
Home>Outdoors & Camping>Landscaping>How To Make A Rock Garden
Landscaping
How To Make A Rock Garden
Published: March 7, 2024

Content Creator for Outdoors & Camping, Sophie turns any yard into a sustainable paradise. Her dedication to DIY outdoor projects and volunteer work in community gardens shares joy and knowledge.
Learn how to create a stunning rock garden with our expert landscaping tips. Transform your outdoor space with our step-by-step guide.
(Many of the links in this article redirect to a specific reviewed product. Your purchase of these products through affiliate links helps to generate commission for Twigandthistle.com, at no extra cost. Learn more)
Introduction
So, you want to add a touch of natural beauty to your yard? Well, creating a rock garden might just be the perfect project for you! A rock garden can bring a sense of tranquility and charm to any outdoor space. Whether you have a sprawling backyard or a cozy balcony, a rock garden can be a stunning addition. In this article, we will guide you through the step-by-step process of creating your very own rock garden. From choosing the right location to selecting the perfect rocks and plants, we've got you covered. Let's roll up our sleeves and get started on this exciting DIY adventure!
Choosing the Right Location
When it comes to creating a rock garden, the first step is to choose the perfect location. Here are some key factors to consider when selecting the right spot for your rock garden:
-
Sunlight: Look for an area in your yard that receives an adequate amount of sunlight. Most rock garden plants thrive in full sun, so choose a spot that gets at least 6 hours of sunlight per day.
-
Drainage: Good drainage is essential for a successful rock garden. Avoid low-lying areas that tend to collect water, as this can lead to root rot and other issues. Instead, opt for a slightly elevated area with well-draining soil.
-
Visibility: Consider the visibility of the location. You'll want to place your rock garden where it can be easily admired, whether it's from your patio, deck, or a favorite outdoor sitting area.
-
Accessibility: Think about accessibility when choosing the location. You'll want to be able to easily access your rock garden for maintenance and enjoyment, so avoid areas that are difficult to reach.
By carefully considering these factors, you can select a location that provides the ideal growing conditions for your rock garden, ensuring its long-term success and beauty.
Selecting the Rocks
Selecting the right rocks is a crucial step in creating a visually appealing and structurally sound rock garden. Here are some tips for choosing the perfect rocks:
-
Variety: Aim for a variety of rock sizes, shapes, and colors to add visual interest to your rock garden. Mix it up with a combination of large boulders, medium-sized rocks, and smaller pebbles. This variety will create a natural and dynamic look.
-
Local Sourcing: Consider sourcing rocks locally. This not only reduces the environmental impact of transportation but also ensures that the rocks will complement the natural landscape of your area. Look for rocks in your own yard, nearby quarries, or landscaping supply stores.
-
Weathered Appearance: Opt for rocks with a weathered appearance. Rocks with rough, textured surfaces and natural patinas will blend seamlessly into the garden, giving it a timeless and organic feel.
-
Suitable Material: Choose rocks that are suitable for your climate and soil type. For example, if you live in an area with acidic soil, avoid using limestone rocks, which can raise the soil pH. Similarly, if you're in a region with freezing temperatures, select rocks that can withstand frost without cracking.
-
Safety Considerations: Prioritize safety when selecting rocks. Avoid using rocks with sharp edges or unstable shapes, especially if children or pets will be frequenting the area. Smooth, rounded rocks are a safer option for high-traffic areas.
By carefully selecting a diverse range of rocks that harmonize with your garden's natural surroundings, you can create a stunning and enduring rock garden that will be the envy of your neighborhood.
Preparing the Soil
Preparing the soil is a crucial step in establishing a thriving rock garden. Here's how to get your soil in prime condition for your new garden:
-
Clear the Area: Before you start preparing the soil, clear the area of any existing vegetation, weeds, and debris. This will give you a clean canvas to work with and prevent competing plants from encroaching on your rock garden.
-
Improve Drainage: Rock garden plants typically prefer well-draining soil. If your soil tends to retain water, consider amending it with organic matter such as compost or peat moss to improve drainage. This will help prevent waterlogged soil, which can be detrimental to many rock garden plants.
-
Adjust pH Levels: Test the pH of your soil and make adjustments as needed. Most rock garden plants thrive in slightly acidic to neutral soil. If your soil is too acidic, you can add lime to raise the pH. Conversely, if it's too alkaline, you can lower the pH with the addition of sulfur.
-
Loosen the Soil: Use a garden fork or tiller to loosen the soil to a depth of about 12 inches. This will improve aeration and root penetration, creating an optimal growing environment for your rock garden plants.
-
Remove Rocks and Debris: While rocks are a key element of a rock garden, you'll want to remove any large rocks and debris from the soil to create a level surface for planting. Set aside the rocks you remove – you may be able to incorporate them into the garden's design later.
-
Add Grit or Sand: Many rock garden plants benefit from the addition of grit or coarse sand to the soil. This helps mimic the sharp drainage and rocky conditions of their natural habitats. Mix in a layer of grit or sand to provide the ideal growing medium for your plants.
By taking the time to properly prepare the soil, you'll create a healthy and supportive foundation for your rock garden, setting the stage for the stunning display of rocks and plants to come.
Choosing the Right Plants
Selecting the right plants is essential for a successful rock garden. Here are some key considerations when choosing the perfect plants for your rock garden:
-
Low-Growing and Compact: Opt for plants that are low-growing and compact. This will help create a natural and harmonious look within the confined spaces between rocks. Look for ground covers, succulents, and alpine plants that stay relatively small and spread slowly.
-
Drought-Tolerant: Choose plants that are drought-tolerant and can thrive in rocky, well-drained soil. Many rock garden plants are adapted to arid conditions and can withstand periods of dryness. Examples of drought-tolerant rock garden plants include sedums, yuccas, lavender, and thyme.
-
Variety of Textures and Colors: Aim for a variety of textures and colors to add visual interest to your rock garden. Mix and match plants with different foliage textures, flower shapes, and colors to create a vibrant and dynamic display. Consider plants with silvery foliage, spiky leaves, and vibrant blooms to add contrast and appeal.
-
Native and Adapted Species: Consider using native plants or species adapted to your local climate. These plants are well-suited to the environmental conditions in your area and are more likely to thrive with minimal maintenance. Native plants also provide important habitat and food sources for local wildlife.
-
Seasonal Interest: Select plants that offer seasonal interest throughout the year. Look for species that bloom at different times, have attractive foliage in multiple seasons, or produce colorful berries or seed heads. This will ensure that your rock garden remains visually appealing and engaging year-round.
-
Rock Garden Classics: Explore classic rock garden plants that have a proven track record of thriving in rocky environments. Examples include saxifrages, alpine asters, creeping phlox, dianthus, and ornamental grasses. These plants are well-suited to the unique growing conditions of a rock garden.
By carefully choosing a diverse selection of plants that complement the rocky landscape and provide visual appeal throughout the seasons, you can create a stunning and sustainable rock garden that will be a source of joy for years to come.
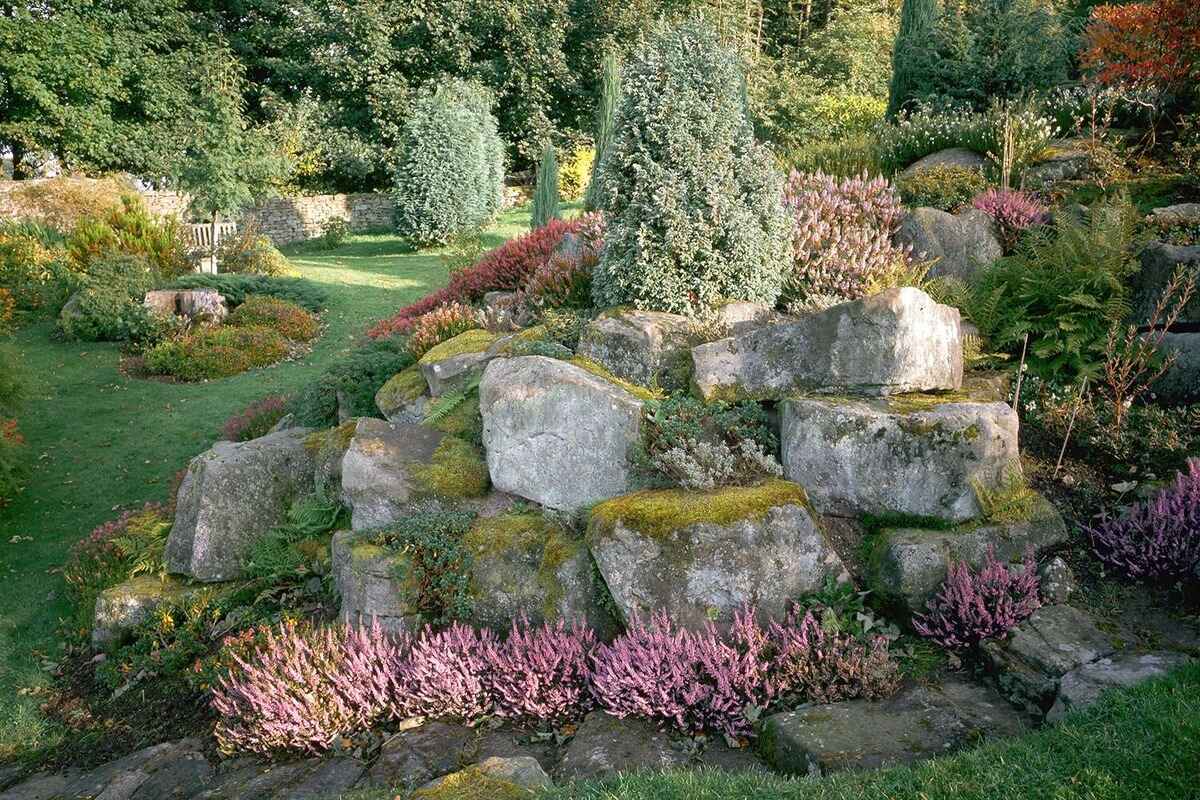
Arranging the Rocks and Plants
Arranging the rocks and plants is where the artistry of creating a rock garden truly comes into play. Here's how to artfully arrange the elements of your rock garden for maximum visual impact and natural appeal:
1. Create Natural Groupings
Start by arranging the larger rocks in natural-looking groupings or clusters. This mimics the way rocks appear in nature, creating a sense of authenticity and harmony within the garden.
2. Vary Heights and Depths
Place rocks of different heights and depths to add dimension and visual interest. Taller rocks can be positioned towards the back or center of the garden, while smaller rocks can be nestled among plants or along the garden's edges.
3. Consider Scale and Proportion
Pay attention to the scale and proportion of the rocks in relation to the overall size of the garden. Avoid overcrowding the space with too many large rocks or overwhelming it with an abundance of small rocks. Aim for a balanced and natural look.
4. Integrate Planting Pockets
Nestle pockets of soil between the rocks to create planting areas for your chosen plants. Tuck the plants into these pockets, ensuring they have enough space to grow and spread. This technique helps blend the rocks and plants seamlessly, giving the garden a cohesive and integrated appearance.
5. Embrace Irregularity
Embrace the irregularity of nature by avoiding perfectly symmetrical arrangements. Instead, opt for asymmetrical placements of rocks and plants to create a more organic and naturalistic feel.
6. Consider Sightlines and Focal Points
Think about the garden's visual flow and create focal points by strategically placing standout rocks or eye-catching plants. Consider how the garden will be viewed from different angles and ensure that its beauty can be appreciated from various vantage points.
7. Blend with Surroundings
Blend the rock garden seamlessly with its surroundings by incorporating rocks and plants that complement the existing landscape. This creates a cohesive transition between the rock garden and the surrounding environment, whether it's a lawn, pathway, or other garden features.
By thoughtfully arranging the rocks and plants with an eye for natural aesthetics and balance, you can create a captivating and harmonious rock garden that looks like it was plucked straight from the rugged beauty of the wilderness.
Maintaining Your Rock Garden
Maintaining your rock garden is essential to ensure its long-term beauty and vitality. While rock gardens are generally low-maintenance, they do require some care to keep them looking their best. Here are some key maintenance tasks to keep your rock garden in top condition:
-
Weeding: Regularly inspect your rock garden for any weeds that may sprout up between the rocks and plants. Remove weeds by hand to prevent them from competing with your desired plants for nutrients and space.
-
Pruning and Deadheading: Some rock garden plants may benefit from occasional pruning to maintain their shape and encourage healthy growth. Deadheading, or the removal of spent flowers, can promote continuous blooming and prevent the plants from expending energy on seed production.
-
Watering: While rock garden plants are often drought-tolerant, they may still require supplemental watering during dry spells, especially in the early stages of establishment. Water deeply but infrequently to encourage deep root growth and drought resistance.
-
Fertilizing: Depending on the nutrient needs of your plants and the quality of your soil, you may need to fertilize your rock garden occasionally. Use a balanced, slow-release fertilizer to provide essential nutrients without promoting excessive growth.
-
Inspecting for Pests and Diseases: Keep an eye out for any signs of pest infestations or disease on your rock garden plants. Early detection and intervention can help prevent the spread of pests and diseases, preserving the health of your garden.
-
Replenishing Mulch: If you've used mulch in your rock garden to help retain moisture and suppress weeds, periodically replenish the mulch layer to maintain its effectiveness.
-
Rock Re-Arrangement: Over time, the arrangement of rocks in your garden may shift due to natural factors or settling. Periodically assess the placement of rocks and make adjustments as needed to maintain the desired aesthetic and stability.
-
Seasonal Maintenance: Consider the seasonal needs of your rock garden. In the fall, tidy up any debris, prepare plants for winter, and consider protective measures for vulnerable species. In the spring, remove any winter protection, prune as needed, and assess the condition of your plants after the winter months.
By staying on top of these maintenance tasks, you can ensure that your rock garden remains a stunning focal point in your landscape, providing a tranquil and captivating outdoor space for you to enjoy.