
Home>Outdoors & Camping>Hardscaping>How To Build A Deck On The Ground
Hardscaping
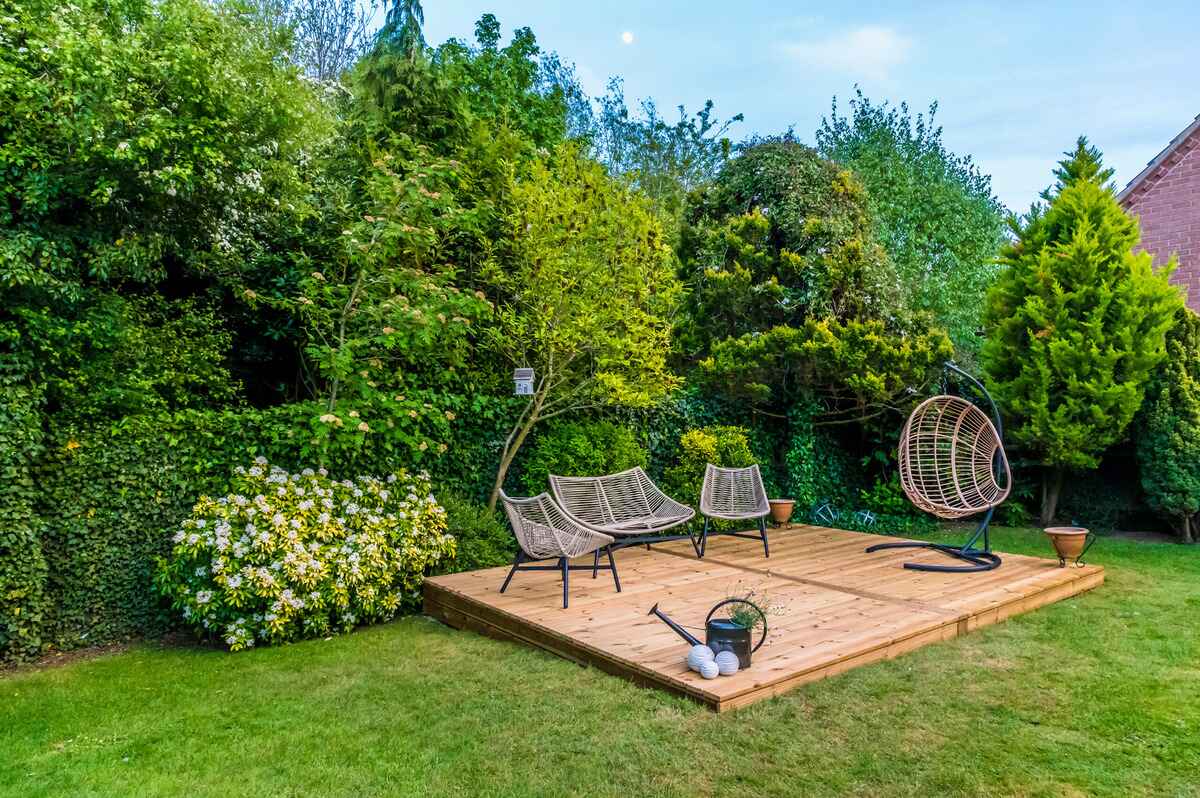
How To Build A Deck On The Ground
Published: February 20, 2024

Content Creator for Outdoors & Camping, Sophie turns any yard into a sustainable paradise. Her dedication to DIY outdoor projects and volunteer work in community gardens shares joy and knowledge.
Learn how to create a stunning hardscaping feature with our step-by-step guide on building a deck on the ground. Perfect for enhancing your outdoor space.
(Many of the links in this article redirect to a specific reviewed product. Your purchase of these products through affiliate links helps to generate commission for Twigandthistle.com, at no extra cost. Learn more)
Introduction
Building a deck on the ground can transform your outdoor space into a functional and inviting area for relaxation, entertainment, and enjoyment of nature. Whether you envision a cozy spot for morning coffee or a spacious platform for hosting gatherings, constructing a ground-level deck offers a myriad of benefits. From enhancing the aesthetic appeal of your property to providing a versatile outdoor living space, a well-crafted deck can significantly elevate the overall ambiance of your home.
In this comprehensive guide, we will walk you through the step-by-step process of building a deck on the ground. From initial planning and preparation to the final touches, you will gain valuable insights and practical tips to embark on this rewarding hardscaping project. By following these detailed instructions and leveraging the right tools and materials, you can create a stunning ground-level deck that complements your lifestyle and adds value to your property.
Whether you are a seasoned DIY enthusiast or a homeowner eager to explore the world of hardscaping, this guide is designed to equip you with the knowledge and confidence needed to tackle this project with precision and creativity. As we delve into each stage of the deck-building process, you will discover the art of transforming a vision into a tangible outdoor oasis. So, roll up your sleeves, unleash your creativity, and let's embark on this exciting journey of bringing your dream deck to life.
Step 1: Planning and Preparation
Before embarking on the construction of a ground-level deck, meticulous planning and thorough preparation are essential to ensure a successful and satisfying outcome. This initial phase sets the foundation for the entire project, encompassing crucial decisions and assessments that will shape the design, functionality, and longevity of the deck.
Design Considerations
The first step in planning a ground-level deck involves envisioning the desired layout, size, and features. Consider the intended purpose of the deck, whether it's for hosting outdoor gatherings, creating a tranquil retreat, or expanding your living space. Take into account the natural surroundings and architectural elements of your home to harmonize the deck with its environment.
Permits and Regulations
Check local building codes and regulations to determine if permits are required for constructing a ground-level deck. Understanding these guidelines is crucial to ensure compliance with safety standards and legal requirements. Additionally, consulting with local authorities or a professional contractor can provide valuable insights into zoning restrictions and property line setbacks.
Site Assessment
Conduct a thorough assessment of the chosen location for the deck. Evaluate the ground's slope, drainage patterns, and soil composition to identify any potential challenges or necessary adjustments. It's essential to ensure proper water runoff and address any issues related to uneven terrain or soil stability.
Material Selection
Choose suitable materials for the deck based on durability, maintenance requirements, and aesthetic preferences. Options range from traditional wood to composite decking, each offering distinct advantages in terms of longevity, appearance, and upkeep. Consider factors such as weather resistance, resistance to decay and insect damage, and the overall visual appeal when selecting the decking material.
Layout and Dimensions
Create a detailed layout plan that outlines the precise dimensions and configuration of the deck. This plan should account for access points, seating areas, and any additional features such as built-in planters or integrated lighting. Taking accurate measurements and visualizing the layout will guide the subsequent stages of the construction process.
Budgeting and Timeline
Establish a realistic budget for the project, factoring in material costs, labor, and any unforeseen expenses. Setting a clear budgetary framework will help prioritize design elements and streamline the procurement of materials. Additionally, create a timeline that outlines the project's milestones and allows for efficient coordination of tasks.
By meticulously addressing these planning and preparation considerations, you can lay a solid groundwork for the construction of a ground-level deck that aligns with your vision and functional requirements. This preparatory phase sets the stage for a smooth and rewarding journey toward creating a captivating outdoor space that seamlessly integrates with your home and lifestyle.
Step 2: Gathering Materials and Tools
Gathering the necessary materials and tools is a pivotal phase in the construction of a ground-level deck. This stage demands meticulous attention to detail and a comprehensive understanding of the components essential for bringing your deck vision to fruition. By procuring high-quality materials and the right tools, you set the stage for a smooth and efficient construction process, ensuring that every element aligns with your design specifications and functional requirements.
Materials
Decking Material:
Select the decking material based on your preferences, budget, and maintenance considerations. Traditional wood options such as pressure-treated lumber offer a classic aesthetic and can be stained or painted to complement your outdoor decor. Alternatively, composite decking presents a low-maintenance, durable alternative that resists fading, staining, and mold.
Framing Material:
Choose the framing material, typically pressure-treated lumber, that provides structural support for the deck. Opt for treated wood that offers resistance to decay and insect damage, ensuring the longevity and stability of the deck's framework.
Fasteners and Hardware:
Acquire corrosion-resistant screws, nails, and joist hangers designed for outdoor use. These fasteners play a critical role in securing the structural components of the deck, ensuring stability and longevity.
Concrete Footings or Piers:
If your deck design necessitates support posts, gather the necessary concrete mix and form tubes for creating sturdy footings or piers. Ensure compliance with local building codes and regulations regarding the depth and diameter of the footings for optimal stability.
Additional Materials:
Depending on your design and layout, gather additional materials such as gravel for drainage, landscape fabric to prevent weed growth, and flashing to protect the ledger board from water damage.
Tools
Power Tools:
Equip yourself with essential power tools including a circular saw, drill/driver, and impact driver for cutting lumber, drilling pilot holes, and driving screws efficiently.
Hand Tools:
Gather a comprehensive set of hand tools such as a hammer, tape measure, level, framing square, and adjustable wrench for precise measurements, leveling, and assembly of the deck components.
Safety Gear:
Prioritize safety by obtaining personal protective equipment including safety glasses, hearing protection, and work gloves to safeguard against potential hazards during the construction process.
Miscellaneous Tools:
Include a chalk line, string line, and post level for accurately marking layout lines, ensuring straight alignments, and leveling support posts.
By meticulously assembling the required materials and tools, you lay a solid foundation for the subsequent stages of deck construction. This proactive approach streamlines the building process, empowering you to execute each step with precision and efficiency, ultimately bringing your ground-level deck project closer to realization.
Step 3: Marking and Leveling the Ground
Marking and leveling the ground serves as a critical precursor to the construction of a ground-level deck, laying the groundwork for a stable and visually appealing structure. This phase involves meticulous attention to detail and a methodical approach to ensure that the deck's foundation is precisely aligned with the intended layout and seamlessly integrates with the surrounding landscape.
Clearing and Preparation
Begin by clearing the designated area of any vegetation, debris, or obstructions that may impede the construction process. This entails removing grass, weeds, rocks, and any other impediments to create a clean and level surface for the deck. Additionally, assess the soil composition and address any uneven terrain or drainage issues that could impact the deck's stability.
Marking the Layout
Using wooden stakes, string lines, and a tape measure, mark the perimeter of the deck's footprint according to the predetermined dimensions and layout plan. Ensure that the corners are square by employing the 3-4-5 triangle method, which involves measuring 3 feet along one string line, 4 feet along the adjacent line, and confirming that the diagonal distance between the two points is 5 feet. This technique guarantees a perfectly square layout, essential for the structural integrity of the deck.
Leveling the Ground
Utilize a transit level or a laser level to assess the existing ground elevation and identify any areas that require leveling. Gradually remove soil from high spots and distribute it to fill in low areas, aiming to achieve a uniform and level surface across the entire deck footprint. Regularly verify the ground's elevation using the level to ensure consistent grading and eliminate any potential discrepancies.
Installing Ground Stakes
Once the ground is leveled, install ground stakes at strategic intervals along the perimeter of the deck layout. These stakes serve as reference points for establishing the final deck height and provide guidance during the subsequent stages of construction. Ensure that the stakes are firmly anchored and accurately positioned to maintain the integrity of the layout.
Verifying Alignment and Grade
Double-check the alignment and grade of the marked layout, confirming that it aligns with the initial design specifications and complies with the intended slope for proper water runoff. This meticulous verification process is crucial for ensuring that the deck's foundation is precisely positioned and graded, setting the stage for the subsequent framing and decking installation.
By meticulously executing the marking and leveling process, you establish a solid foundation for the construction of a ground-level deck, setting the stage for the seamless integration of the deck with its environment and ensuring the structural integrity of the entire project. This preparatory phase lays the groundwork for the subsequent stages of deck construction, bringing you one step closer to realizing your vision of a captivating outdoor living space.
Step 4: Building the Frame
With the ground meticulously prepared and the layout marked and leveled, the next pivotal phase in constructing a ground-level deck involves building the frame. The frame serves as the structural backbone of the deck, providing stability, support, and a framework for the decking material. This phase demands precision, attention to detail, and a methodical approach to ensure that the frame aligns with the designated layout and sets the stage for a durable and visually appealing deck structure.
Setting the Ledger Board
Commence the frame construction by affixing a ledger board to the exterior wall of the house, securing it with lag screws and ensuring it is level and firmly anchored. The ledger board serves as a crucial attachment point for the deck frame and provides essential support for the deck's outer joists.
Installing Rim Joists
Position and secure the rim joists along the outer edges of the deck layout, connecting them to the ledger board and ensuring they are precisely aligned with the marked layout. Utilize joist hangers to secure the rim joists to the ledger board, maintaining consistent spacing and ensuring structural integrity.
Placing Interior Joists
Proceed to install the interior joists within the frame, spacing them according to the predetermined layout and ensuring uniform alignment. Employ joist hangers to secure the interior joists to the ledger board and rim joists, maintaining a level orientation and precise positioning.
Adding Support Posts
If the deck design necessitates support posts, position and secure them within the frame at designated intervals, ensuring they are plumb and securely anchored to the ground. Utilize post anchors or concrete footings to provide stable support for the posts, contributing to the overall stability and load-bearing capacity of the deck.
Verifying Structural Integrity
Thoroughly inspect the frame to ensure that all components are securely fastened, level, and aligned according to the layout plan. Utilize a level and framing square to verify the accuracy of the frame, making any necessary adjustments to guarantee structural integrity and precise alignment.
By meticulously executing the frame construction process, you establish a robust foundation for the subsequent stages of deck assembly, bringing your vision of a captivating ground-level deck one step closer to realization. The completion of this phase sets the stage for the seamless integration of the decking material, culminating in the transformation of your outdoor space into a functional and visually stunning extension of your home.
Step 5: Installing the Decking
With the frame meticulously constructed and the groundwork laid for a stable and visually appealing deck, the installation of the decking material marks a pivotal phase in bringing your ground-level deck to life. This stage demands precision, attention to detail, and a methodical approach to ensure that the decking aligns seamlessly with the frame, creating a durable and visually captivating outdoor living space.
Preparing the Decking Material
Begin by preparing the decking material, whether traditional wood or composite boards, by acclimating them to the outdoor environment. This process allows the material to adjust to the ambient moisture levels, minimizing the risk of warping or buckling after installation. Additionally, inspect each board for any defects, ensuring that only high-quality, flawless pieces are utilized for the deck surface.
Layout and Orientation
Carefully plan the layout and orientation of the decking boards, considering factors such as the desired pattern, visual appeal, and efficient utilization of materials. Whether opting for a traditional parallel orientation or an intricate herringbone pattern, visualize the layout to optimize the aesthetic impact and complement the overall design of the deck.
Securing the Decking
Commence the installation by securing the first row of decking boards along the outer edge of the deck, ensuring they are aligned with the frame and evenly spaced. Utilize corrosion-resistant screws or hidden fastening systems to secure the boards, maintaining consistent spacing and ensuring a uniform overhang along the deck perimeter.
Creating Consistent Gaps
Employ specialized spacers or tools to create consistent gaps between the decking boards, facilitating proper water drainage and allowing for natural expansion and contraction of the material. This meticulous gap-setting process contributes to the longevity and structural integrity of the deck, preventing moisture-related issues and promoting airflow beneath the boards.
Progressing Across the Deck
Continue installing the decking boards row by row, maintaining uniform spacing and alignment as you progress across the deck surface. Utilize a circular saw to trim the boards as needed, ensuring precise fits and seamless transitions at the edges and around obstacles such as posts or protrusions.
Finishing Touches
Upon completing the decking installation, inspect the entire deck surface to verify the alignment, spacing, and overall visual appeal of the boards. Sand any rough edges or surfaces, and apply a protective finish or sealant to enhance the durability and weather resistance of the decking material, prolonging its lifespan and maintaining its aesthetic allure.
By meticulously executing the installation of the decking material, you bring your vision of a captivating ground-level deck one step closer to realization. This transformative phase sets the stage for the integration of functional and aesthetic elements, culminating in the creation of an inviting outdoor space that seamlessly extends the comfort and allure of your home.
Step 6: Adding Finishing Touches
With the frame meticulously constructed and the decking material seamlessly integrated, the final phase of building a ground-level deck involves adding the finishing touches to elevate the functionality, aesthetics, and overall allure of the outdoor space. This transformative stage encompasses a range of enhancements and details that contribute to the cohesiveness and visual impact of the deck, culminating in the creation of an inviting and harmonious extension of your home.
Railing and Balustrades
If your deck design necessitates safety features such as railing and balustrades, meticulously install these elements to provide essential protection and define the perimeter of the deck. Choose materials and designs that complement the overall aesthetic and seamlessly integrate with the deck's architecture, ensuring a cohesive and visually appealing appearance.
Lighting and Ambiance
Enhance the ambiance and functionality of the deck by incorporating strategic lighting elements. From integrated deck lights to stylish lanterns or string lights, thoughtful illumination adds a captivating allure to the outdoor space while extending its functionality into the evening hours. Consider energy-efficient and weather-resistant lighting options to create a welcoming and enchanting atmosphere.
Seating and Furnishings
Integrate comfortable seating and furnishings that align with your lifestyle and design preferences. Whether opting for versatile outdoor furniture, cozy lounge chairs, or built-in benches, the addition of seating elements transforms the deck into a versatile and inviting area for relaxation, entertainment, and social gatherings.
Greenery and Landscaping
Incorporate greenery and landscaping elements to infuse natural beauty and tranquility into the deck environment. From potted plants and vibrant flowers to ornamental shrubs or vertical gardens, the strategic placement of greenery adds a refreshing touch and seamlessly integrates the deck with its natural surroundings.
Personalized Accents
Add personalized accents such as decorative elements, outdoor rugs, or artistic features that reflect your individual style and preferences. Thoughtful accents contribute to the unique character of the deck, creating a personalized retreat that resonates with your personality and enhances the overall ambiance of the outdoor space.
Maintenance and Care
Establish a maintenance and care routine to preserve the beauty and longevity of the deck. Regular cleaning, inspections, and proactive maintenance measures ensure that the deck remains in optimal condition, safeguarding its structural integrity and visual appeal for years to come.
By meticulously attending to these finishing touches, you elevate the ground-level deck into a captivating and functional outdoor living space that seamlessly extends the comfort and allure of your home. Each detail contributes to the overall cohesiveness and visual impact of the deck, culminating in the creation of an inviting oasis that enriches your lifestyle and fosters memorable moments in the embrace of nature.
Conclusion
In conclusion, the construction of a ground-level deck represents a transformative journey that culminates in the creation of a captivating outdoor living space. From meticulous planning and preparation to the integration of finishing touches, every phase of the deck-building process contributes to the realization of a functional, visually appealing, and harmonious extension of your home.
The journey begins with envisioning the design, considering the site's characteristics, and selecting the appropriate materials. This initial phase sets the stage for a well-informed and purposeful approach to deck construction, ensuring that the final outcome aligns with your vision and complements the natural surroundings.
As the project progresses, the meticulous execution of each step, from marking and leveling the ground to building the frame and installing the decking, lays the groundwork for a stable, durable, and visually captivating deck. Attention to detail, precision in measurements, and adherence to best practices contribute to the structural integrity and aesthetic allure of the outdoor space.
The addition of finishing touches, such as railing and balustrades, strategic lighting, comfortable furnishings, and personalized accents, elevates the deck into a versatile and inviting area for relaxation, entertainment, and social gatherings. These thoughtful enhancements infuse the outdoor space with character, functionality, and a welcoming ambiance, fostering memorable experiences and enriching your lifestyle.
Ultimately, the completion of a ground-level deck represents the fulfillment of a vision—a vision of extending the comfort and allure of your home into the embrace of nature. It is a testament to creativity, craftsmanship, and the seamless integration of functional and aesthetic elements, resulting in an outdoor oasis that reflects your individual style and enhances the overall ambiance of your property.
As you embark on the journey of building a ground-level deck, may this guide serve as a source of inspiration, knowledge, and practical insights. Whether you are a seasoned DIY enthusiast or a homeowner venturing into hardscaping for the first time, may the creation of your deck be a rewarding and fulfilling experience, culminating in the realization of a captivating outdoor space that enriches your lifestyle and fosters cherished moments for years to come.