
Home>Create & Decorate>DIY & Crafts>How To Build A Curved Deck
DIY & Crafts
How To Build A Curved Deck
Published: February 23, 2024

Content Creator specializing in woodworking and interior transformations. Caegan's guides motivate readers to undertake their own projects, while his custom furniture adds a personal touch.
Learn how to build a stunning curved deck with our step-by-step DIY guide. Perfect for DIY & Crafts enthusiasts looking to elevate their outdoor space.
(Many of the links in this article redirect to a specific reviewed product. Your purchase of these products through affiliate links helps to generate commission for Twigandthistle.com, at no extra cost. Learn more)
Introduction
Building a curved deck can add a touch of elegance and uniqueness to your outdoor space. Whether you envision a cozy nook for relaxation or a stunning entertainment area, a curved deck can transform your backyard into a captivating retreat. The graceful lines and flowing contours of a curved deck create a visually striking focal point that sets it apart from traditional straight-edged designs.
In this comprehensive guide, you will learn the step-by-step process of constructing a curved deck, from meticulous planning and material selection to the intricate art of crafting the curved frame. With the right tools, materials, and a dash of creativity, you can bring your vision to life and create a stunning curved deck that seamlessly blends with the natural landscape of your property.
As you embark on this journey, keep in mind that building a curved deck requires patience, precision, and a willingness to embrace the artistry of woodworking. Each step in the process is an opportunity to infuse your personality and style into the design, resulting in a one-of-a-kind outdoor space that reflects your individuality.
So, roll up your sleeves, unleash your creativity, and get ready to embark on a rewarding adventure in deck construction. Whether you're a seasoned DIY enthusiast or a novice eager to explore the world of carpentry, this guide will equip you with the knowledge and confidence to tackle the challenge of building a stunning curved deck. Let's dive into the exciting world of curved deck construction and unleash the potential of your outdoor living area.
Step 1: Planning and Designing Your Curved Deck
Before diving into the physical construction of your curved deck, meticulous planning and thoughtful design are essential to ensure a successful and visually appealing outcome. The planning phase sets the stage for the entire project, allowing you to envision the layout, shape, and functionality of your curved deck.
Visualizing Your Vision
Begin by visualizing the purpose and aesthetic of your curved deck. Consider how you intend to use the space – whether it's for intimate gatherings, outdoor dining, or simply a tranquil retreat for relaxation. Visualizing the intended use of the deck will guide the design process and help determine the size, shape, and features that will best suit your needs.
Sketching the Design
Grab a pencil and paper, or utilize a digital design tool, to sketch out the initial design of your curved deck. Pay attention to the natural contours of your outdoor space and explore various curved configurations that harmonize with the landscape. Experiment with different radius curves and layout options to find a design that resonates with your vision.
Considering Practical Elements
Incorporate practical elements into your design, such as seating areas, built-in planters, or integrated lighting. These features not only enhance the functionality of the deck but also contribute to its overall charm and usability. Additionally, consider the traffic flow and accessibility to and from the deck, ensuring a seamless connection to the surrounding environment.
Seeking Inspiration
Gather inspiration from architectural magazines, online resources, and outdoor living showcases to spark your creativity. Explore different decking materials, railing styles, and finishing details that align with your design preferences. Drawing inspiration from diverse sources can enrich your design concept and inspire innovative ideas for your curved deck.
Seeking Professional Input
If you're uncertain about certain design aspects or technical considerations, consulting with a professional deck builder or architect can provide valuable insights. Their expertise can help refine your design, address structural considerations, and ensure that your vision aligns with practical construction principles.
Finalizing the Design
Once you've explored various design options and gathered inspiration, finalize the design that best encapsulates your vision for the curved deck. Take the time to review and refine the details, ensuring that the design reflects your personal style and seamlessly integrates with the natural surroundings.
By dedicating ample time to the planning and design phase, you lay a solid foundation for the construction process, setting the stage for a captivating and functional curved deck that harmonizes with your outdoor space.
Step 2: Gathering Materials and Tools
Gathering the necessary materials and tools is a crucial step in preparing for the construction of a curved deck. The selection of high-quality materials and the use of appropriate tools are essential for ensuring the structural integrity and visual appeal of the finished deck. Here's a detailed overview of the materials and tools you'll need to bring your curved deck to life:
Materials
-
Decking Materials: Choose high-quality decking materials that are well-suited for curved applications. Opt for durable, weather-resistant wood species such as cedar, redwood, or tropical hardwoods. Alternatively, composite decking offers low-maintenance durability and can be shaped to accommodate curved designs.
-
Support Structure: Select pressure-treated lumber for the support structure, including joists, beams, and posts. Ensure that the lumber is suitable for ground contact and outdoor use to withstand the elements over time.
-
Curved Decking Boards: If you opt for a curved design, consider using specially designed curved decking boards. These boards are flexible and can be shaped to conform to the curves of the deck, creating a seamless and visually striking surface.
-
Fasteners: Choose corrosion-resistant screws or hidden fastening systems designed for the specific type of decking material you've selected. Quality fasteners are essential for securing the decking boards and ensuring long-term stability.
-
Concrete Footings: If your deck requires footings, gather the necessary concrete mix and formwork materials to create a solid foundation for the support posts.
-
Railing Components: If your design includes railings, gather the appropriate railing components, including posts, balusters, and railing sections, in accordance with your design specifications.
-
Finishing Touches: Consider additional finishing touches such as outdoor lighting, decorative post caps, and trim elements to enhance the aesthetic appeal of the curved deck.
Tools
-
Circular Saw: A high-quality circular saw equipped with a fine-toothed blade is essential for cutting decking boards, framing lumber, and other materials to precise dimensions.
-
Jigsaw or Bandsaw: A jigsaw or bandsaw is indispensable for cutting curved decking boards to the desired shape, allowing for smooth and accurate cuts along the curved edges.
-
Power Drill: A power drill with appropriate drill bits is necessary for pre-drilling holes and driving screws into the decking material and framing components.
-
Level and Measuring Tools: Ensure you have a reliable level, tape measure, and framing square to maintain accuracy and alignment during the construction process.
-
Clamps and Fastening Tools: Utilize clamps to secure curved decking boards in place during installation, and have a suitable fastening tool for the chosen fastener type.
-
Safety Gear: Prioritize safety by wearing protective gear, including safety glasses, hearing protection, and work gloves, to safeguard yourself during the construction process.
By gathering the right materials and tools, you set the stage for a smooth and efficient construction process, ensuring that you have everything you need to bring your vision of a stunning curved deck to fruition.
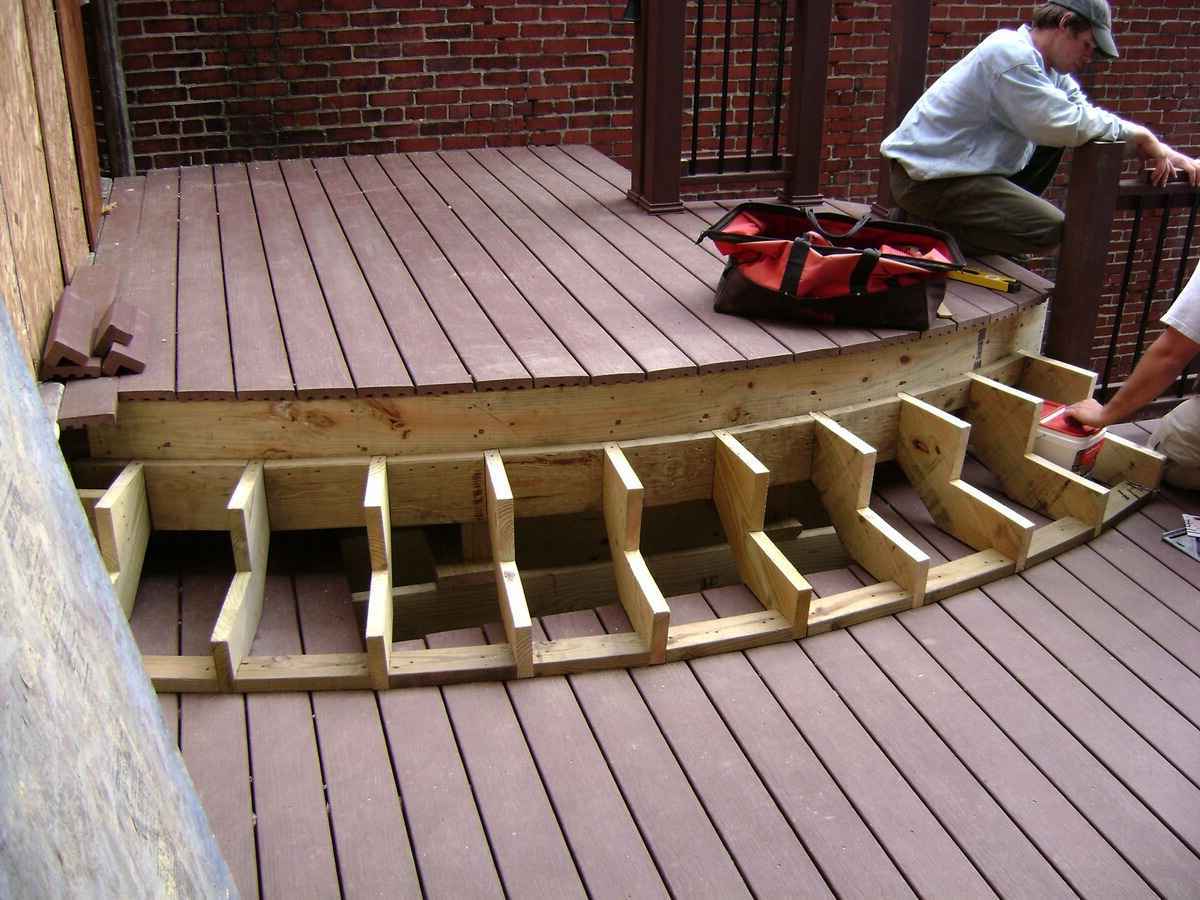
Step 3: Creating the Curved Frame
Crafting the curved frame is a pivotal stage in the construction of a curved deck, as it forms the structural backbone that supports the decking surface and defines the graceful contours of the design. The process of creating the curved frame requires precision, patience, and a keen eye for detail to ensure that the resulting structure aligns with the envisioned design. Here's a comprehensive overview of the steps involved in crafting the curved frame for your stunning deck:
1. Establishing the Curved Layout
Begin by marking the layout of the curved deck on the ground using stakes, string, and a flexible hose or rope to outline the desired curvature. Carefully adjust the layout until you achieve the desired shape and dimensions, ensuring that the curve harmonizes with the surrounding landscape and architectural features.
2. Crafting the Support Structure
Utilize pressure-treated lumber to construct the support structure, including joists and beams, following the curvature of the layout. Cut the lumber to the appropriate lengths and use a jigsaw or bandsaw to create the necessary curves in the framing members, ensuring a precise fit that conforms to the defined curvature.
3. Implementing Blocking and Bracing
Incorporate blocking and bracing within the support structure to enhance stability and load-bearing capacity. Install additional blocking between the joists to provide lateral support and prevent twisting, ensuring that the frame remains structurally sound and resilient against external forces.
4. Securing the Curved Frame
Secure the curved frame in place using galvanized or stainless-steel fasteners, ensuring that the framing members are securely attached to the support posts and ledger board. Pay meticulous attention to the alignment and spacing of the framing components, maintaining consistent curvature and structural integrity throughout the frame.
5. Verifying Alignment and Leveling
Verify the alignment and leveling of the curved frame using a reliable level and measuring tools, ensuring that the frame maintains uniform elevation and curvature. Make necessary adjustments to achieve precise alignment, as a well-leveled frame forms the foundation for a visually appealing and structurally sound curved deck.
6. Incorporating Edge Detailing
Consider incorporating edge detailing within the curved frame, such as fascia boards or trim elements, to refine the visual aesthetics and create a polished transition between the framing structure and the decking surface. Thoughtful edge detailing adds a touch of sophistication to the curved deck, enhancing its overall appeal.
By meticulously crafting the curved frame, you lay the groundwork for the installation of the decking boards, bringing your vision of a captivating curved deck one step closer to reality. The artistry and precision invested in creating the curved frame culminate in a foundational structure that sets the stage for the seamless integration of the decking surface, transforming your outdoor space into a captivating retreat.
Step 4: Installing the Decking Boards
With the meticulously crafted curved frame in place, the installation of the decking boards marks a significant stride towards bringing your vision of a stunning curved deck to fruition. The process of installing the decking boards requires precision, attention to detail, and a keen eye for harmonizing the natural flow of the curves. Here's a comprehensive overview of the steps involved in the precise installation of the decking boards:
1. Selecting the Decking Material
Choose high-quality decking material that aligns with your design preferences and complements the overall aesthetic of the curved deck. Whether you opt for natural wood, composite decking, or other innovative materials, ensure that the selected decking material is well-suited for curved applications and offers durability and visual appeal.
2. Preparing the Curved Surface
Before installing the decking boards, ensure that the curved surface of the frame is clean, free of debris, and meticulously prepared to receive the decking material. Smooth out any rough spots or irregularities on the frame to create a uniform and accommodating surface for the installation.
3. Placing the First Decking Board
Commence the installation process by placing the first decking board along the curved edge of the frame, ensuring a precise fit and alignment. Secure the board in place using appropriate fasteners, taking care to maintain consistent spacing and alignment as you progress along the curve.
4. Shaping and Securing Curved Decking Boards
If you're utilizing specially designed curved decking boards, carefully shape and secure each board to conform to the curvature of the deck. Utilize a jigsaw or bandsaw to make precise cuts and adjustments, ensuring that the boards seamlessly follow the graceful contours of the frame.
5. Ensuring Proper Fastening
Utilize corrosion-resistant screws or hidden fastening systems to secure the decking boards to the frame, ensuring a secure and stable attachment. Pay meticulous attention to the fastening process, maintaining uniform spacing and ensuring that the boards are firmly anchored to the frame.
6. Maintaining Consistent Curvature
As you progress with the installation, maintain a consistent curvature and alignment of the decking boards, ensuring a smooth and visually appealing transition along the curved surface. Regularly assess the alignment and spacing of the boards to achieve a seamless and harmonious flow of the curved design.
7. Finishing Touches
Upon completing the installation of the decking boards, consider incorporating finishing touches such as trim elements, fascia boards, or decorative accents to refine the edges and enhance the overall aesthetics of the curved deck. Thoughtful finishing details add a touch of sophistication and completeness to the deck's visual appeal.
By meticulously following these steps, you will achieve a visually striking and structurally sound installation of the decking boards, bringing your curved deck one step closer to becoming a captivating outdoor sanctuary. The precision and artistry invested in the installation process culminate in a seamless and visually stunning curved deck that harmonizes with the natural landscape, creating a captivating retreat for relaxation and entertainment.
Step 5: Adding Finishing Touches
As the construction of the curved deck nears completion, the addition of finishing touches elevates the visual appeal and functionality of the outdoor space. This pivotal step allows you to infuse personality and style into the design, creating a captivating retreat that reflects your individuality and enhances the overall ambiance of your outdoor living area.
1. Railing and Balustrades
Incorporate stylish and secure railing systems that complement the design of the curved deck. Whether you opt for sleek metal railings, classic wood balustrades, or transparent glass panels, the choice of railing materials and designs can significantly impact the overall aesthetic and safety of the deck.
2. Lighting Elements
Integrate outdoor lighting fixtures to illuminate the curved deck and create a welcoming atmosphere during evening gatherings. From subtle recessed lighting along the curved edges to decorative string lights that accentuate the contours, strategic placement of lighting elements enhances the deck's allure and extends its functionality into the night.
3. Seating and Furnishings
Select comfortable and stylish outdoor furnishings that harmonize with the curved deck's design. From cozy seating arrangements to elegant dining sets, the choice of furnishings contributes to the deck's functionality and invites relaxation and socialization in a visually appealing setting.
4. Greenery and Planters
Introduce greenery and planters to infuse natural beauty into the deck space. Consider incorporating built-in planters along the curved edges or strategically placing potted plants to create a lush and inviting environment that seamlessly integrates with the surrounding landscape.
5. Decorative Accents
Add decorative accents such as outdoor rugs, throw pillows, and decorative accessories to infuse color, texture, and personality into the deck design. Thoughtfully selected accents contribute to the deck's visual charm and create a welcoming ambiance that beckons relaxation and enjoyment.
6. Maintenance Considerations
Implement maintenance considerations such as protective coatings for wood surfaces, regular cleaning routines, and seasonal upkeep to preserve the deck's beauty and longevity. By incorporating maintenance practices into the finishing touches, you ensure that your curved deck remains a captivating and enduring feature of your outdoor space.
By meticulously attending to these finishing touches, you transform your curved deck into a captivating outdoor sanctuary that harmonizes with the natural landscape and invites moments of relaxation, social gatherings, and cherished memories. The thoughtful integration of railing systems, lighting elements, furnishings, greenery, decorative accents, and maintenance considerations culminates in a visually stunning and functional curved deck that enriches your outdoor living experience.
Conclusion
In conclusion, the journey of building a curved deck is a testament to the fusion of craftsmanship, creativity, and vision. From the initial stages of planning and design to the meticulous crafting of the curved frame, the installation of decking boards, and the addition of finishing touches, every step in the process is an opportunity to infuse personality and artistry into the outdoor space.
As the final pieces come together, the curved deck emerges as a captivating retreat that seamlessly integrates with the natural landscape, inviting moments of relaxation, social gatherings, and cherished memories. The graceful lines and flowing contours of the curved design create a visually striking focal point that sets the deck apart as a unique and inviting outdoor sanctuary.
The completion of a curved deck represents not only the culmination of a construction project but also the realization of a vision – a vision of an outdoor space that reflects individuality, style, and a deep appreciation for the art of woodworking. The deck becomes a canvas for self-expression, where each curve, each detail, and each finishing touch contributes to the creation of a captivating and functional outdoor oasis.
As the sun sets and the gentle glow of outdoor lighting illuminates the deck, it transforms into a welcoming haven, beckoning inhabitants and guests alike to immerse themselves in its charm. The seamless integration of railing systems, the strategic placement of furnishings, the infusion of greenery, and the thoughtful addition of decorative accents collectively elevate the deck into a space that transcends mere construction – it becomes an extension of lifestyle and personal expression.
Moreover, the enduring beauty and functionality of the curved deck are sustained through diligent maintenance practices, ensuring that it remains a captivating feature of the outdoor living area for years to come. By embracing the artistry of woodworking and the principles of outdoor design, the curved deck becomes a testament to the harmonious coexistence of nature and human ingenuity.
In essence, the construction of a curved deck is a transformative journey that transcends the realm of carpentry – it is an exploration of creativity, a celebration of individuality, and a testament to the enduring allure of outdoor living. With each step carefully executed, the curved deck stands as a testament to the seamless integration of art and functionality, enriching the outdoor living experience and inspiring admiration for the beauty of craftsmanship.