
Home>Create & Decorate>DIY & Crafts>How To Build A Floating Deck
DIY & Crafts
How To Build A Floating Deck
Published: February 23, 2024

Senior Editor in Create & Decorate, Kathryn combines traditional craftsmanship with contemporary trends. Her background in textile design and commitment to sustainable crafts inspire both content and community.
Learn how to build a stunning floating deck with our step-by-step DIY guide. Perfect for your outdoor space. Get started with our expert tips!
(Many of the links in this article redirect to a specific reviewed product. Your purchase of these products through affiliate links helps to generate commission for Twigandthistle.com, at no extra cost. Learn more)
Introduction
Building a floating deck can be an exciting and rewarding DIY project that adds both aesthetic appeal and functional space to your outdoor area. Whether you envision a cozy spot for lounging or a platform for hosting gatherings, a well-constructed floating deck can transform your backyard into a welcoming oasis.
In this comprehensive guide, we will walk you through the step-by-step process of building your own floating deck. From gathering the necessary materials and tools to adding the finishing touches, you'll gain the knowledge and confidence to tackle this project with ease.
By following these instructions, you'll have the opportunity to unleash your creativity and personalize your deck to suit your unique style and needs. So, roll up your sleeves, gather your tools, and let's embark on this fulfilling journey of creating a stunning floating deck that will elevate your outdoor living space.
Step 1: Gather Materials and Tools
Before diving into the construction of your floating deck, it's crucial to gather all the necessary materials and tools. This step sets the foundation for a smooth and efficient building process, ensuring that you have everything at your disposal to bring your vision to life.
Materials
- Decking Materials: Depending on your preference, you can choose from a variety of decking materials such as composite boards, pressure-treated lumber, or tropical hardwoods. Each option offers distinct benefits in terms of durability, maintenance, and aesthetics.
- Concrete Blocks or Deck Piers: These will serve as the base support for your floating deck, providing stability and elevation above the ground.
- Joist Hangers and Nails: Essential for securing the frame of the deck, joist hangers and nails play a critical role in ensuring structural integrity.
- Gravel or Sand: These materials are used for leveling the ground and creating a stable foundation for the deck.
- Waterproofing Sealant: To protect the wood from moisture and extend its lifespan, a high-quality waterproofing sealant is indispensable.
- Hardware and Fasteners: Bolts, screws, and other fasteners will be required to assemble the frame and secure the decking boards.
Tools
- Measuring Tape and Level: Accurate measurements and leveling are fundamental to the success of your project, making these tools indispensable.
- Circular Saw or Miter Saw: These power tools are essential for cutting the decking materials and framing components to the desired dimensions.
- Drill and Bits: A reliable drill, along with a set of drill bits, will be used for fastening, pre-drilling holes, and various other tasks throughout the construction process.
- Shovel and Wheelbarrow: For preparing the ground and transporting materials, a sturdy shovel and wheelbarrow are invaluable.
- Safety Gear: Prioritize safety by equipping yourself with protective gear including gloves, safety glasses, and ear protection.
By ensuring that you have all the required materials and tools on hand, you'll be well-prepared to embark on the next steps of building your floating deck. This careful preparation sets the stage for a successful and enjoyable construction experience, allowing you to focus on bringing your outdoor oasis to fruition.
Step 2: Choose the Location and Size of Your Deck
Selecting the ideal location for your floating deck is a pivotal decision that significantly influences its functionality and visual impact. Before delving into the construction process, take the time to carefully assess your outdoor space and consider the following factors to determine the optimal location and size for your deck.
Assess Your Outdoor Space
Begin by surveying your yard to identify potential areas for the deck. Consider the natural features of the landscape, such as existing trees, slopes, and any architectural elements of your home. Take note of the sunlight patterns throughout the day, as well as any prevailing winds, to ensure that the chosen location aligns with your preferences for sun exposure and shelter.
Consider Functionality
Think about how you intend to use the deck. Will it primarily serve as a dining area, a relaxation spot, or a multifunctional space for various activities? This consideration will guide the size and layout of the deck, allowing you to allocate sufficient space for seating, outdoor furniture, and any additional features you envision incorporating.
Evaluate Accessibility
Evaluate the accessibility of the chosen location from your home. A well-placed deck seamlessly connects indoor and outdoor living spaces, enhancing the flow and usability of both areas. Additionally, consider pathways and potential connections to other outdoor amenities, such as a garden or a pool, to create a cohesive and integrated outdoor environment.
Size Matters
When determining the size of your deck, strike a balance between accommodating your desired activities and ensuring that the scale harmonizes with the overall proportions of your yard. Avoid overpowering the space with an excessively large deck or constraining it with a diminutive platform. Visualize how the deck will integrate with the surrounding landscape and how it will complement the aesthetics of your home.
Seek Inspiration
Draw inspiration from various sources, such as home improvement magazines, online platforms, and neighboring properties, to gather ideas for the design and layout of your deck. Pay attention to how different deck sizes and configurations enhance outdoor living spaces, and envision how these concepts can be tailored to suit your specific preferences and requirements.
By carefully considering these aspects, you can confidently select the optimal location and size for your floating deck, setting the stage for a seamless transition to the next steps of the construction process. This thoughtful approach ensures that your deck not only meets your practical needs but also harmonizes with the natural beauty of your outdoor environment.
Step 3: Prepare the Ground
Preparing the ground is a crucial phase in the construction of a floating deck, as it sets the foundation for a stable and long-lasting structure. This step involves clearing the designated area, leveling the ground, and creating a solid base to support the deck. By meticulously preparing the ground, you can ensure that your deck will withstand the test of time and provide a safe and enjoyable outdoor space for years to come.
Clear the Area
Begin by clearing the selected site of any vegetation, debris, or obstacles that may impede the construction process. Use a shovel or a sod cutter to remove grass, weeds, and roots, ensuring that the ground is free from organic matter. This step creates a clean canvas for the subsequent groundwork and prevents potential issues such as uneven settling or decay beneath the deck.
Level the Ground
Once the area is cleared, focus on leveling the ground to establish a uniform surface for the deck foundation. Use a combination of a shovel, rake, and a sturdy leveling tool to smooth out any uneven terrain and create a flat, even plane. Pay close attention to achieving precise leveling, as this will directly impact the stability and structural integrity of the deck.
Create a Stable Base
To provide a stable base for the deck, consider using gravel or sand to fill any low-lying areas and create a solid foundation. This step helps to distribute the weight of the deck evenly and minimizes the risk of sinking or shifting over time. Additionally, compact the fill material thoroughly to enhance its load-bearing capacity and prevent settling.
Install Support Blocks or Piers
Depending on the design of your floating deck, you may need to install concrete blocks or deck piers to elevate and support the frame above the ground. Position the support blocks at regular intervals, ensuring that they are level and securely anchored. This foundational support system forms the backbone of the deck's structure, providing stability and safeguarding against ground moisture.
By meticulously preparing the ground, you establish a robust and reliable groundwork for the subsequent stages of building your floating deck. This meticulous approach lays the groundwork for a successful and enduring outdoor retreat, ensuring that your deck will stand the test of time and provide a welcoming space for relaxation and entertainment.
Step 4: Build the Frame
With the ground meticulously prepared, it's time to embark on the pivotal phase of constructing the frame for your floating deck. The frame serves as the structural skeleton, providing support for the decking materials and ensuring the overall stability and integrity of the deck. By following these detailed steps, you'll lay the groundwork for a sturdy and well-crafted frame that forms the backbone of your outdoor oasis.
Measure and Mark
Begin by measuring and marking the layout of the deck frame on the prepared ground. Use a measuring tape, level, and marking tools to outline the perimeter of the deck, ensuring precise dimensions and square angles. Pay careful attention to the placement of support blocks or piers, aligning them according to your predetermined design and layout.
Install Joists
Once the layout is marked, proceed to install the joists, which form the primary framework of the deck. Position the joists perpendicular to the support blocks or piers, ensuring consistent spacing between each joist to accommodate the decking materials. Secure the joists in place using joist hangers and nails, ensuring that they are level and properly aligned to support the weight of the deck.
Reinforce the Frame
To enhance the structural integrity of the frame, consider reinforcing the perimeter and corners with additional framing elements. This reinforcement provides added stability and ensures that the frame can withstand the load and usage demands placed upon it. Pay attention to securely fastening the framing components, creating a robust and durable framework for the deck.
Consider Diagonal Bracing
Incorporating diagonal bracing within the frame can further fortify its stability and resistance to lateral forces. Diagonal braces, positioned at strategic points within the frame, help mitigate sway and movement, especially in larger deck structures. By strategically placing diagonal bracing, you can enhance the overall rigidity and longevity of the deck frame, contributing to its structural soundness.
Verify Leveling and Alignment
Throughout the frame construction process, consistently verify the leveling and alignment of the joists and framing components. Utilize a level and measuring tools to ensure that the frame is uniformly leveled and squared, minimizing the risk of uneven settling or structural issues. This meticulous attention to detail during the construction phase is essential for laying a solid foundation for the decking materials.
By meticulously executing these steps, you'll establish a robust and well-constructed frame for your floating deck, setting the stage for the seamless integration of the decking materials. This phase of the construction process forms the backbone of your outdoor retreat, ensuring that your deck is not only visually appealing but also structurally sound and enduring.
Step 5: Install the Decking
With the solid foundation of the frame in place, the installation of the decking marks a significant stride towards bringing your floating deck to life. This phase not only contributes to the visual allure of the deck but also plays a pivotal role in ensuring its durability and functionality. By meticulously executing the following steps, you'll seamlessly integrate the decking materials, culminating in a captivating outdoor space that beckons for relaxation and enjoyment.
Select the Decking Materials
Begin by selecting the decking materials that best align with your aesthetic preferences, maintenance considerations, and budget. Whether you opt for the natural warmth of wood, the low-maintenance appeal of composite boards, or the exotic allure of tropical hardwoods, choose materials that resonate with your vision for the deck. Consider factors such as durability, resistance to the elements, and the overall ambiance you wish to create in your outdoor sanctuary.
Plan the Layout
Before commencing the installation, carefully plan the layout of the decking boards to optimize their visual appeal and structural integrity. Consider the orientation of the boards, the pattern in which they will be laid, and any design elements such as borders or focal points. Take precise measurements and make any necessary adjustments to accommodate features such as posts, stairs, or built-in seating, ensuring a cohesive and harmonious arrangement.
Secure the Decking Boards
Commence the installation by securing the first row of decking boards to the frame, ensuring that they are aligned, level, and securely fastened. Utilize appropriate fasteners, such as screws or hidden clips, to affix the boards to the joists, allowing for expansion and contraction while maintaining a seamless and uniform appearance. Pay meticulous attention to spacing between the boards, promoting adequate drainage and ventilation to safeguard against moisture-related issues.
Employ Proper Fastening Techniques
Employ proper fastening techniques to ensure the stability and longevity of the decking. Pre-drill holes for screws near the ends of the boards to prevent splitting, and utilize stainless steel or corrosion-resistant fasteners to mitigate the risk of rust and deterioration. Consistently verify the alignment and spacing of the boards as you progress, maintaining a keen eye for detail to achieve a flawless and professional finish.
Incorporate Finishing Touches
As you near the completion of the decking installation, consider incorporating finishing touches to elevate the visual appeal and functionality of the deck. This may involve trimming the edges of the boards, concealing fasteners, or integrating design elements such as inlays or contrasting patterns. Additionally, apply a high-quality waterproofing sealant to protect the decking from the elements and prolong its lifespan, ensuring enduring beauty and resilience.
By meticulously executing these steps, you'll seamlessly integrate the decking materials, culminating in a captivating outdoor space that beckons for relaxation and enjoyment. This phase not only contributes to the visual allure of the deck but also plays a pivotal role in ensuring its durability and functionality.
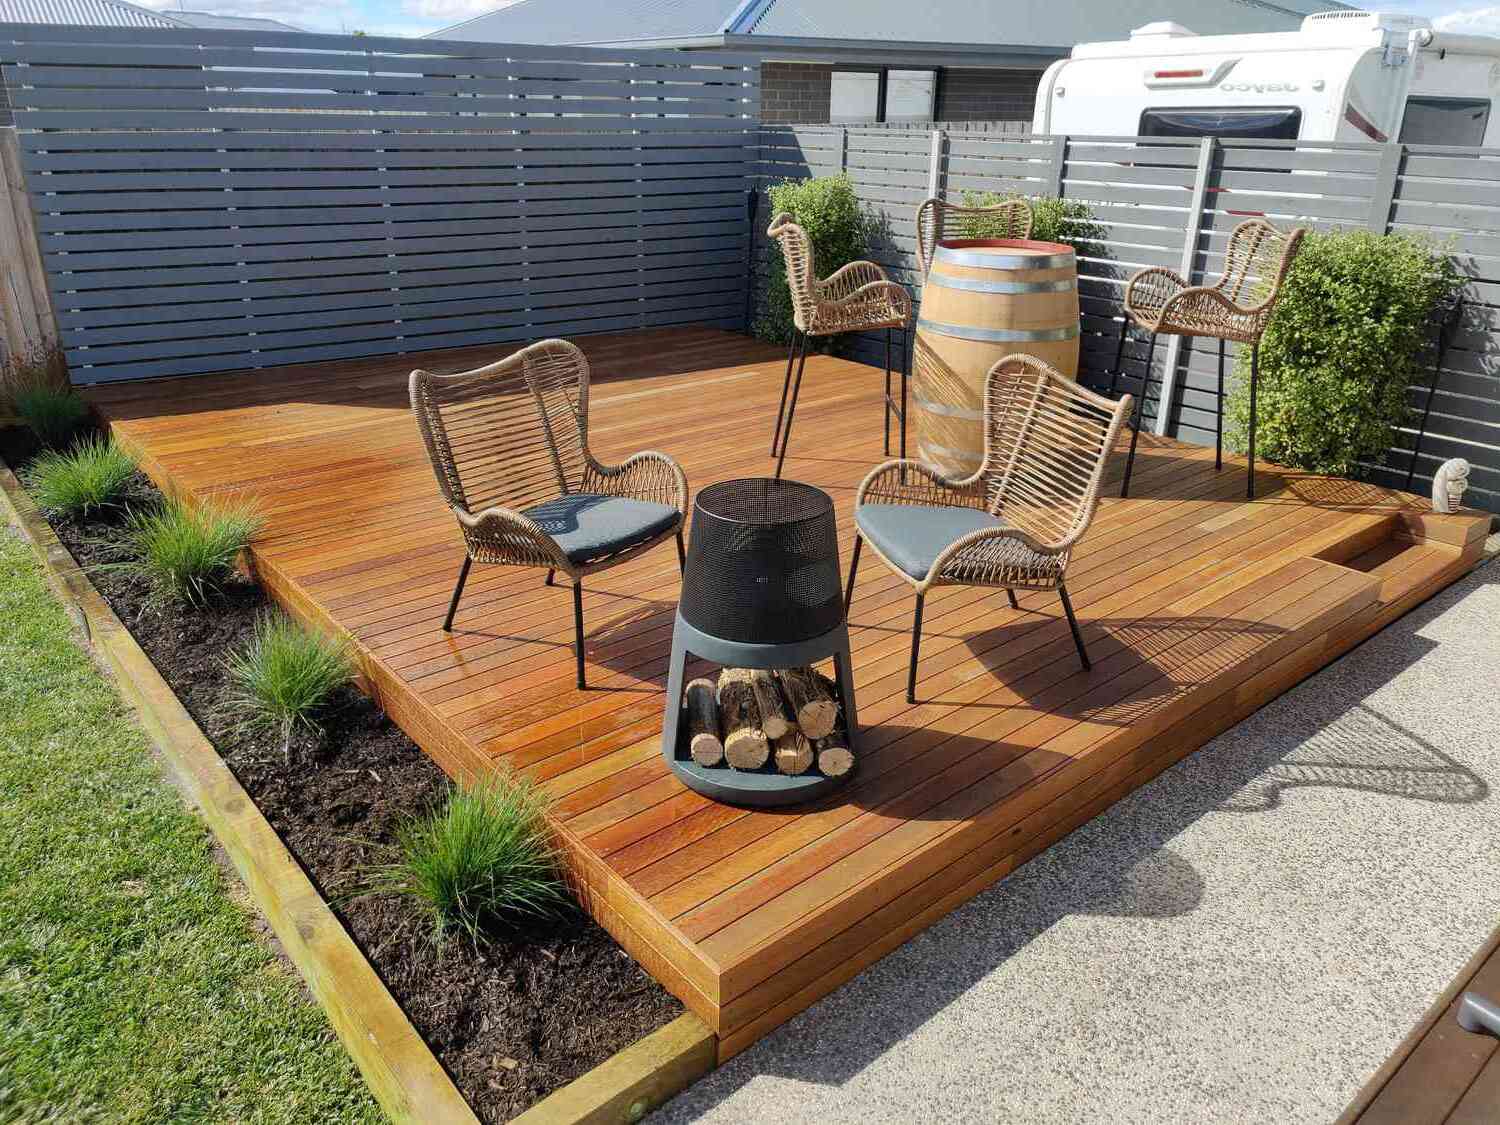
Step 6: Add Finishing Touches
As you near the completion of your floating deck, the addition of finishing touches serves as the crowning moment, elevating the visual appeal and functionality of your outdoor sanctuary. This phase allows you to infuse personalized details and practical elements that enhance the overall ambiance and usability of the deck, transforming it into a welcoming and inviting space for relaxation and entertainment.
Enhance Aesthetics
Consider incorporating aesthetic elements that reflect your personal style and complement the surrounding environment. This may involve adding decorative railings, balusters, or lattice panels to define the perimeter of the deck and create a sense of enclosure. Additionally, explore the option of integrating built-in planters, trellises, or pergolas to infuse natural beauty and create a seamless transition between the deck and the landscape. By thoughtfully integrating these visual enhancements, you can elevate the allure of your outdoor retreat and create a captivating focal point within your yard.
Integrate Lighting Solutions
Extend the functionality of your deck into the evening hours by integrating lighting solutions that enhance safety and ambiance. Explore a variety of lighting options, such as low-voltage LED deck lights, solar-powered path lights, or string lights, to illuminate pathways, accentuate architectural features, and create a warm and inviting atmosphere. Strategic placement of lighting fixtures not only enhances the visual appeal of the deck but also contributes to a cozy and enchanting ambiance, making it an inviting space for evening gatherings and relaxation.
Furnish and Decorate
Complete the transformation of your deck by furnishing it with comfortable and stylish outdoor furniture, creating inviting spaces for lounging, dining, and socializing. Select durable and weather-resistant furniture pieces that align with your preferred outdoor activities, whether it's cozy seating for intimate conversations, a dining set for al fresco meals, or versatile furnishings that cater to various uses. Complement the furniture with outdoor rugs, throw pillows, and decorative accents that infuse personality and comfort, creating an inviting and cohesive outdoor living space.
Incorporate Functional Elements
Incorporate practical elements that enhance the functionality and convenience of your deck. This may involve integrating storage benches or cabinets to stow away outdoor essentials, installing a built-in bar or grilling station for effortless outdoor entertaining, or adding shade solutions such as umbrellas, awnings, or retractable canopies to provide respite from the sun. By thoughtfully integrating these functional elements, you can optimize the usability of your deck and create a versatile outdoor haven that caters to your lifestyle and preferences.
Apply a Protective Finish
To safeguard the beauty and longevity of your deck, apply a protective finish to the decking materials. Depending on the type of decking you've chosen, this may involve staining, painting, or applying a specialized sealant to shield the wood from the elements and minimize the effects of weathering and wear. Prioritize products that offer UV protection, water resistance, and mold and mildew resistance, ensuring that your deck maintains its luster and durability for years to come.
By meticulously adding these finishing touches, you'll elevate your floating deck into a captivating and functional outdoor retreat that reflects your unique style and enhances your outdoor living experience. Each carefully considered detail contributes to the overall allure and usability of the deck, creating a space that beckons for relaxation, entertainment, and cherished moments spent in the embrace of nature.
Conclusion
In conclusion, the journey of building a floating deck is not merely a construction project; it's a transformative endeavor that enriches your outdoor living experience. As you've navigated through the comprehensive steps of this DIY undertaking, you've embarked on a creative and fulfilling process that culminates in the realization of a captivating outdoor sanctuary.
From the initial stages of gathering materials and meticulously preparing the ground to the meticulous construction of the frame and the seamless integration of the decking materials, each step has been a testament to your dedication and craftsmanship. Your attention to detail and thoughtful decision-making have laid the foundation for a floating deck that not only exudes visual allure but also embodies structural integrity and enduring quality.
As you add the finishing touches, infusing personalized details, and practical elements, your deck evolves into a welcoming haven that reflects your unique style and caters to your lifestyle. The incorporation of aesthetic enhancements, lighting solutions, stylish furnishings, and functional elements transforms your deck into a versatile and inviting space that beckons for relaxation, entertainment, and cherished moments spent in the embrace of nature.
The completion of your floating deck marks the beginning of a new chapter in your outdoor living journey. It's a space where you can savor tranquil mornings with a cup of coffee, host lively gatherings with friends and family, or simply unwind amidst the beauty of the outdoors. It's a canvas for creating lasting memories and embracing the simple joys of life.
As you step back and admire the fruits of your labor, take pride in the craftsmanship and dedication that have shaped this remarkable addition to your home. Your floating deck stands as a testament to your creativity, perseverance, and the joy of bringing your vision to fruition.
So, as you prepare to bask in the warmth of the sun on your newly built deck, or gather under the soft glow of evening lights, may it serve as a reminder of the transformative power of DIY endeavors and the boundless potential for creating spaces that enrich our lives.
Congratulations on the completion of your floating deck, and may it be a source of joy, relaxation, and cherished moments for years to come.