
Home>Create & Decorate>DIY & Crafts>How To Build Bathroom Vanity
DIY & Crafts
How To Build Bathroom Vanity
Published: February 23, 2024

Senior Editor in Create & Decorate, Kathryn combines traditional craftsmanship with contemporary trends. Her background in textile design and commitment to sustainable crafts inspire both content and community.
Learn how to build a beautiful bathroom vanity with our DIY & Crafts guide. Create a custom piece that fits your style and space perfectly.
(Many of the links in this article redirect to a specific reviewed product. Your purchase of these products through affiliate links helps to generate commission for Twigandthistle.com, at no extra cost. Learn more)
Introduction
Building a bathroom vanity can be a rewarding and practical DIY project that adds both functionality and style to your bathroom space. Whether you're looking to customize the size, design, or materials to fit your specific needs, creating your own bathroom vanity allows for a personalized touch that store-bought options may not offer. With the right tools, materials, and a bit of creativity, you can craft a beautiful and functional vanity that complements your bathroom décor while maximizing storage and utility.
In this comprehensive guide, we will walk you through the step-by-step process of building a custom bathroom vanity. From gathering the necessary materials and tools to measuring and planning, constructing the frame, adding shelves and drawers, installing the countertop and sink, and finally, finishing and painting, each stage is crucial in creating a durable and aesthetically pleasing vanity that meets your unique requirements.
By following this guide, you'll have the opportunity to unleash your creativity and woodworking skills while achieving a sense of accomplishment as you witness your vision come to life. Whether you're a seasoned DIY enthusiast or a novice looking to embark on your first major woodworking project, building a bathroom vanity can be an exciting and fulfilling endeavor. So, roll up your sleeves, gather your tools, and let's dive into the rewarding journey of crafting a custom bathroom vanity that reflects your personal style and enhances the functionality of your space.
Step 1: Gather Materials and Tools
Before diving into the construction of your custom bathroom vanity, it's essential to gather all the necessary materials and tools to ensure a smooth and efficient building process. Here's a comprehensive list of items you'll need to get started:
Materials:
- Wood: Select high-quality wood for the vanity frame, such as oak, maple, or birch, based on your preferred aesthetic and durability.
- Plywood: Choose plywood for the vanity panels and shelves, ensuring it's sturdy and able to withstand the weight of bathroom essentials.
- Countertop: Decide on a suitable countertop material, such as marble, granite, or quartz, based on your style preferences and budget.
- Drawer Slides and Hinges: Invest in durable drawer slides and hinges to ensure smooth functionality and longevity.
- Sink: Select a stylish and functional sink that fits the dimensions of your vanity and complements your overall design.
Tools:
- Measuring Tape: Accurate measurements are crucial for a precise and well-fitted vanity, so a reliable measuring tape is essential.
- Circular Saw or Table Saw: A saw will be needed to cut the wood and plywood to the required dimensions for the frame and panels.
- Drill and Bits: A drill is necessary for creating holes for screws, hinges, and drawer slides.
- Screwdriver: Ensure you have both flathead and Phillips head screwdrivers for assembling various components.
- Wood Glue: High-quality wood glue will be essential for securing joints and ensuring the structural integrity of the vanity.
- Clamps: Clamps are useful for holding pieces together while the glue dries, ensuring a strong bond.
- Sandpaper and Wood Finish: Smooth any rough edges with sandpaper and have your preferred wood finish ready for the final touches.
By gathering these materials and tools, you'll be well-prepared to commence the construction of your custom bathroom vanity. With everything in place, you can proceed to the next step with confidence, knowing that you have everything you need to bring your vision to life.
Step 2: Measure and Plan
Accurate measurements and meticulous planning are fundamental to the success of your custom bathroom vanity project. Before cutting any wood or assembling components, take the time to measure the available space in your bathroom where the vanity will be installed. Use a measuring tape to record the width, height, and depth, considering any obstructions such as plumbing fixtures and electrical outlets. These measurements will serve as the foundation for designing a vanity that fits seamlessly into your bathroom while allowing for proper functionality.
Once you have the precise measurements, it's time to translate them into a detailed plan. Create a rough sketch or use design software to visualize the layout of your vanity. Consider the placement of the sink, the number and size of drawers and shelves, and any additional features you wish to incorporate. This planning phase allows you to experiment with different configurations and ensure that the final design aligns with your aesthetic preferences and practical needs.
In addition to the physical dimensions, factor in the style and overall theme of your bathroom. Whether you prefer a modern, minimalist look or a more traditional and ornate design, your vanity should harmonize with the existing decor. Take inspiration from interior design magazines, online resources, or even your favorite home improvement shows to gather ideas that resonate with your vision.
As you plan, consider the functionality of the vanity. Will it primarily serve as a storage solution, or do you require ample countertop space for daily grooming routines? Understanding how you intend to use the vanity will guide the design process and ensure that it meets your specific requirements.
Furthermore, think about the materials you'll use for the vanity. The type of wood, finish, and countertop material should complement the overall design of your bathroom while aligning with your budget and maintenance preferences.
By meticulously measuring and planning every aspect of your custom bathroom vanity, you lay the groundwork for a successful and satisfying construction process. This attention to detail and thoughtful consideration of all elements involved will set the stage for bringing your vision to life in the most precise and visually appealing manner.
Step 3: Build the Frame
With precise measurements and a well-thought-out plan in hand, it's time to embark on constructing the frame of your custom bathroom vanity. The frame serves as the foundational structure that supports the panels, drawers, and countertop, making it essential to ensure its stability and durability.
Begin by selecting the wood for the frame, considering both its aesthetic appeal and strength. Oak, maple, and birch are popular choices known for their resilience and attractive grain patterns. Using a circular saw or table saw, cut the wood into pieces according to your measurements, accounting for the width, height, and depth of the vanity. Remember to double-check the dimensions before making any cuts to avoid errors.
Once the pieces are cut, assemble the frame using wood glue and screws for added reinforcement. Ensure that the corners are square and the joints are secure, as this will contribute to the overall stability of the vanity. Clamps can be used to hold the pieces in place while the glue sets, facilitating a strong bond between the components.
As you construct the frame, consider incorporating additional support in areas where the countertop and sink will be installed. This reinforcement will provide the necessary strength to bear the weight of these components and ensure the longevity of your vanity.
After the frame is assembled, take the time to sand any rough edges and surfaces, creating a smooth and polished appearance. This step not only enhances the visual appeal of the vanity but also minimizes the risk of splinters and rough spots.
With the frame completed, you have laid the groundwork for the next stages of building your custom bathroom vanity. The sturdy and precisely constructed frame sets the stage for adding shelves, drawers, and the countertop, bringing you one step closer to realizing your vision of a functional and stylish vanity that seamlessly integrates into your bathroom space.
Step 4: Add Shelves and Drawers
With the sturdy frame of your custom bathroom vanity in place, the next crucial step is to add shelves and drawers, enhancing the functionality and storage capacity of the vanity. This stage allows you to customize the interior layout of the vanity, catering to your specific organizational needs while maximizing the utility of the space.
Begin by measuring and cutting the plywood to create the shelves and drawer components. Precision is key to ensure that these elements fit seamlessly within the vanity and provide ample storage for your bathroom essentials. Utilize a circular saw or table saw to achieve clean and accurate cuts, taking into account the dimensions determined during the planning phase.
Once the shelves and drawer pieces are cut, carefully install them within the vanity frame, ensuring a snug and secure fit. Consider the spacing and arrangement of the shelves, keeping in mind the items you intend to store. Adjustable shelves offer versatility, allowing you to accommodate items of varying heights and sizes.
When it comes to the drawers, invest in high-quality drawer slides to facilitate smooth opening and closing. Mount the drawer slides according to the manufacturer's instructions, ensuring that they are level and aligned for optimal functionality. As you install the drawers, pay attention to their alignment and clearance, guaranteeing that they operate seamlessly within the vanity.
Incorporate dividers within the drawers to further organize your bathroom essentials, such as toiletries, towels, and grooming supplies. This thoughtful addition enhances the efficiency of the vanity, preventing clutter and simplifying the retrieval of items when needed.
As you add shelves and drawers, consider the aesthetic appeal of the interior space. Applying a coordinating finish to the plywood surfaces can elevate the visual appeal of the vanity's interior, creating a cohesive and polished look.
By meticulously adding shelves and drawers to your custom bathroom vanity, you transform it into a highly functional and organized storage solution that caters to your specific needs. This stage marks a significant stride toward completing your custom vanity, bringing you closer to enjoying a well-appointed and personalized bathroom space.
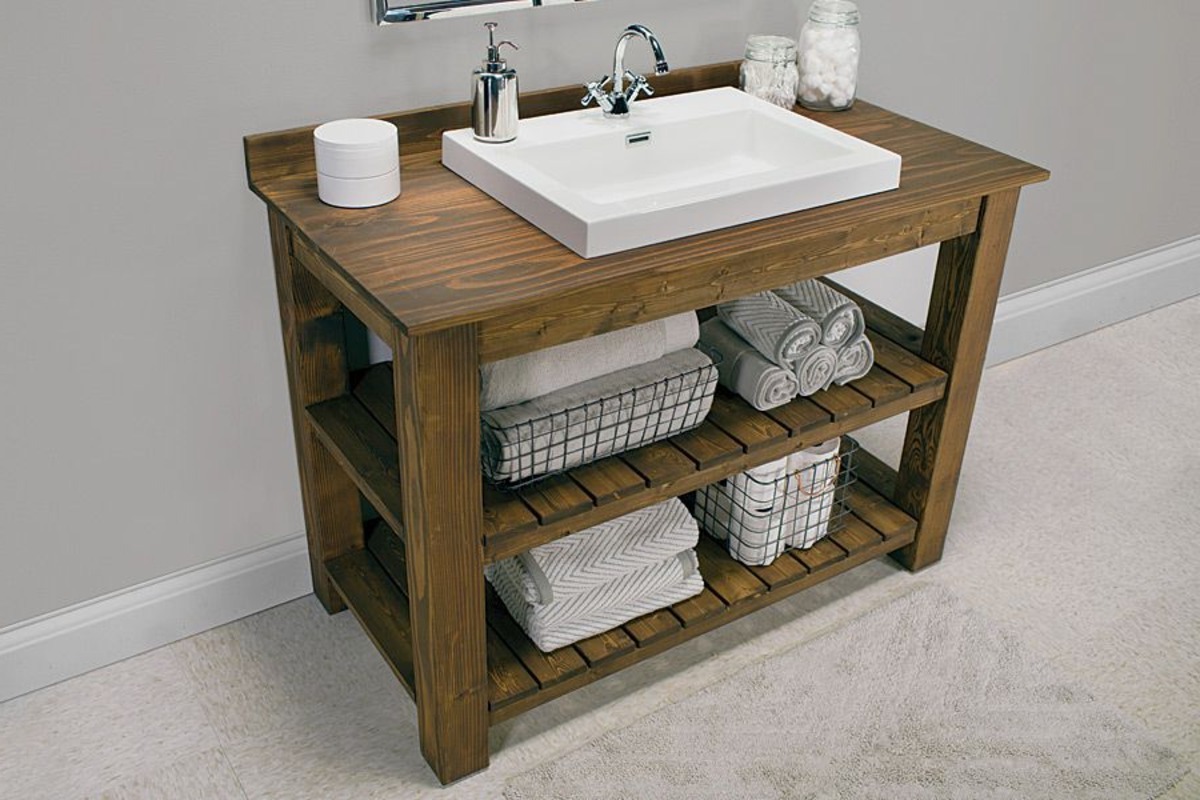
Step 5: Install the Countertop and Sink
The installation of the countertop and sink is a pivotal stage in bringing your custom bathroom vanity to fruition. This step not only adds functionality to the vanity but also contributes to its aesthetic appeal, serving as a focal point within the bathroom space.
Begin by selecting a suitable countertop material that aligns with your style preferences and practical requirements. Whether you opt for the timeless elegance of marble, the durability of granite, or the versatility of quartz, ensure that the dimensions of the countertop correspond to the vanity frame. Carefully place the countertop onto the vanity, ensuring a precise fit and even overhang on all sides.
Next, it's time to install the sink, a vital component that harmonizes with the countertop and facilitates daily grooming routines. Whether you choose an undermount, vessel, or integrated sink, follow the manufacturer's guidelines for proper installation. Ensure that the sink is securely positioned, and the plumbing fixtures align seamlessly with the existing water supply and drainage systems.
Once the sink is in place, connect the plumbing components, including the faucet and drain, ensuring a watertight and functional setup. Pay close attention to any sealing requirements to prevent leaks and ensure the longevity of the vanity and surrounding areas.
After the countertop and sink are installed, take a moment to admire the transformation of your custom bathroom vanity. The marriage of the countertop and sink not only enhances the practicality of the vanity but also elevates the visual allure of the entire bathroom space, creating a cohesive and inviting ambiance.
By meticulously installing the countertop and sink, you bring your custom bathroom vanity one step closer to completion, infusing your bathroom with both functionality and style. This stage marks a significant stride toward enjoying a personalized and well-appointed bathroom space that reflects your unique taste and craftsmanship.
Step 6: Finish and Paint
The final stage of building a custom bathroom vanity involves adding the finishing touches that elevate its visual appeal and ensure long-term durability. By meticulously attending to the finishing and painting process, you can impart a personalized and polished look to your creation, seamlessly integrating it into your bathroom space.
Begin by thoroughly sanding the entire vanity to achieve a smooth and even surface. This step is crucial for preparing the wood for the application of the finish and paint, ensuring that the textures are uniform and free from any imperfections. Use fine-grit sandpaper to gently smooth the wood, paying special attention to the edges and corners to achieve a seamless finish.
Once the sanding is complete, carefully wipe away any dust and debris, preparing the surface for the application of the finish. Select a high-quality wood finish that complements the chosen wood species and aligns with your desired aesthetic. Whether you prefer a natural, stained, or painted finish, ensure that it enhances the beauty of the wood while providing protection against moisture and daily wear.
Apply the chosen finish evenly across the entire vanity, following the manufacturer's instructions for optimal results. Multiple coats may be necessary to achieve the desired depth and luster, allowing each layer to dry thoroughly before applying the next. This meticulous approach ensures a durable and visually appealing finish that accentuates the natural characteristics of the wood.
After the finish has been applied and allowed to cure, consider adding a protective topcoat to safeguard the vanity against moisture and potential damage. A clear polyurethane or lacquer topcoat provides an additional layer of defense, enhancing the longevity of the vanity while preserving its aesthetic allure.
Once the finishing process is complete, it's time to infuse your custom bathroom vanity with a splash of color that complements your bathroom decor. Select a high-quality paint that aligns with your style preferences and the overall theme of your bathroom. Whether you opt for a classic white, a bold accent color, or a custom hue, the painting process allows you to impart a personalized touch to your vanity, transforming it into a standout feature within the space.
By meticulously attending to the finishing and painting of your custom bathroom vanity, you infuse it with a sense of craftsmanship and individuality, ensuring that it harmonizes seamlessly with your bathroom decor. This final stage marks the culmination of your woodworking journey, resulting in a personalized and functional vanity that reflects your unique style and attention to detail.
Conclusion
In conclusion, the journey of building a custom bathroom vanity is a testament to the fusion of craftsmanship, creativity, and practicality. From the initial stages of gathering materials and meticulously measuring to the final touches of finishing and painting, every step in the process contributes to the creation of a personalized and functional piece of furniture that enhances the overall ambiance of the bathroom space.
The satisfaction derived from crafting a custom bathroom vanity extends beyond the tangible results. It embodies the fulfillment of envisioning a design, overcoming challenges, and witnessing a vision materialize into a tangible and functional fixture. The process fosters a deep sense of accomplishment and pride, as each meticulously executed step contributes to the realization of a unique and tailored piece that reflects individual style and preferences.
Moreover, the custom nature of the vanity allows for a seamless integration with the existing bathroom decor, serving as a focal point that harmonizes with the overall aesthetic. The attention to detail in the planning, construction, and finishing stages ensures that the vanity not only meets practical needs but also elevates the visual appeal of the entire space, creating a cohesive and inviting environment.
Building a custom bathroom vanity transcends the realm of woodworking; it embodies the spirit of personalization and self-expression. It offers the opportunity to tailor every aspect of the vanity to align with specific requirements, from storage needs to stylistic preferences, resulting in a piece that is truly one-of-a-kind.
As the final brushstroke of paint is applied and the last coat of finish is allowed to cure, the custom bathroom vanity stands as a testament to the dedication, creativity, and craftsmanship invested in its creation. It represents a functional and aesthetically pleasing addition to the bathroom, embodying the unique vision and skill of its creator.
In essence, the journey of building a custom bathroom vanity transcends the mere act of construction; it embodies the spirit of creativity, personalization, and the fulfillment of bringing a vision to life. It stands as a testament to the transformative power of DIY craftsmanship and the ability to shape living spaces with individuality and ingenuity.