
Home>Create & Decorate>DIY & Crafts>How To Build A Floating Deck On A Slope
DIY & Crafts
How To Build A Floating Deck On A Slope
Published: February 27, 2024

Senior Editor in Create & Decorate, Kathryn combines traditional craftsmanship with contemporary trends. Her background in textile design and commitment to sustainable crafts inspire both content and community.
Learn how to build a DIY floating deck on a slope with our step-by-step guide. Perfect for your next outdoor project. Get started today!
(Many of the links in this article redirect to a specific reviewed product. Your purchase of these products through affiliate links helps to generate commission for Twigandthistle.com, at no extra cost. Learn more)
Introduction
Building a floating deck on a slope can be a rewarding and practical DIY project that adds functional and aesthetic value to your outdoor space. Whether you envision a cozy retreat for relaxation or a versatile area for entertaining guests, a well-constructed floating deck can transform a challenging terrain into a stunning and functional outdoor oasis.
In this comprehensive guide, we will walk you through the step-by-step process of creating a sturdy and visually appealing floating deck on a sloped surface. From meticulous planning and preparation to the final touches that elevate the deck's charm, you will gain valuable insights and practical tips to embark on this exciting endeavor.
By the end of this guide, you will be equipped with the knowledge and confidence to tackle the unique challenges posed by a sloped landscape and create a captivating floating deck that seamlessly integrates with its natural surroundings. So, roll up your sleeves, gather your tools, and let's embark on this enriching journey of crafting a stunning floating deck on a slope.
Step 1: Planning and Preparation
Before diving into the physical construction of your floating deck, meticulous planning and thorough preparation are essential to ensure a smooth and successful project. Here's a detailed breakdown of the crucial steps involved in the planning and preparation phase:
-
Assess the Slope: Begin by carefully evaluating the slope of the terrain where you intend to build the floating deck. Take precise measurements and note any significant irregularities in the landscape. Understanding the slope's degree and variations will guide your design and construction decisions.
-
Check Local Regulations: Research and familiarize yourself with the local building codes, zoning regulations, and permit requirements related to deck construction. Compliance with these regulations is vital to avoid potential legal issues and ensure the structural integrity and safety of your floating deck.
-
Design Considerations: Determine the size, shape, and layout of your floating deck based on the available space and your specific requirements. Consider factors such as intended use, seating or entertainment areas, and integration with existing landscape features. Sketch out rough designs or use digital tools to visualize different layout options.
-
Material Selection: Explore various decking materials such as composite, pressure-treated lumber, or tropical hardwoods, considering factors like durability, maintenance requirements, and aesthetic appeal. Additionally, select suitable foundation materials, fasteners, and finishing products based on the local climate and environmental conditions.
-
Budgeting and Cost Estimation: Create a detailed budget that accounts for all necessary materials, tools, and potential labor costs. Research the current market prices of decking materials and obtain multiple quotes from suppliers to ensure an accurate cost estimation for the project.
-
Gather Tools and Equipment: Take inventory of the tools and equipment required for the construction process, including but not limited to a level, tape measure, circular saw, drill, and safety gear. Ensure that all tools are in good working condition and that you have access to any specialized equipment needed for the project.
-
Site Preparation: Clear the designated area of any vegetation, rocks, or debris that may impede the construction process. Level the ground as much as possible, and consider using retaining walls or landscaping techniques to address significant slope variations.
By meticulously addressing these planning and preparation steps, you will lay a solid foundation for the subsequent stages of building your floating deck on a slope. This thoughtful approach will contribute to the overall success and durability of your outdoor deck project.
Step 2: Marking the Area and Clearing the Ground
Once you have completed the initial planning and preparation phase, the next crucial step in building a floating deck on a slope is marking the designated area and clearing the ground. This phase sets the stage for the physical construction process and requires attention to detail and precision.
Marking the Area
Begin by using wooden stakes and string to outline the perimeter of the deck. Take into account the planned dimensions and layout, ensuring that the marked area aligns with your design considerations. Use a level to confirm that the marked lines are horizontally and vertically straight, as this will serve as a guide for the subsequent construction stages.
Clearing the Ground
Before commencing any excavation or groundwork, it is essential to clear the designated area of any obstructions. Remove rocks, roots, and debris from the site to create a clean and level surface for the foundation. If the slope presents significant irregularities, consider using a shovel or a small excavator to address any protruding elements and achieve a relatively uniform ground level.
Addressing Vegetation
If the marked area is covered with grass or vegetation, you may need to clear the organic layer to expose the bare ground. Depending on the extent of vegetation, this can be accomplished using a sod cutter for larger areas or a shovel for smaller sections. Properly disposing of the removed vegetation will help prevent regrowth and ensure a stable foundation for the deck.
Soil Compaction
After clearing the ground, it is advisable to compact the soil to enhance stability and load-bearing capacity. Utilize a plate compactor or a hand tamper to firmly compact the exposed soil, particularly in areas where the ground may have been disturbed during the clearing process. This step is crucial for minimizing ground settlement and ensuring the long-term structural integrity of the floating deck.
By meticulously marking the area and clearing the ground, you are laying the groundwork for the subsequent construction phases. This meticulous approach sets the stage for a smooth and efficient building process, ultimately contributing to the durability and stability of your floating deck on a slope.
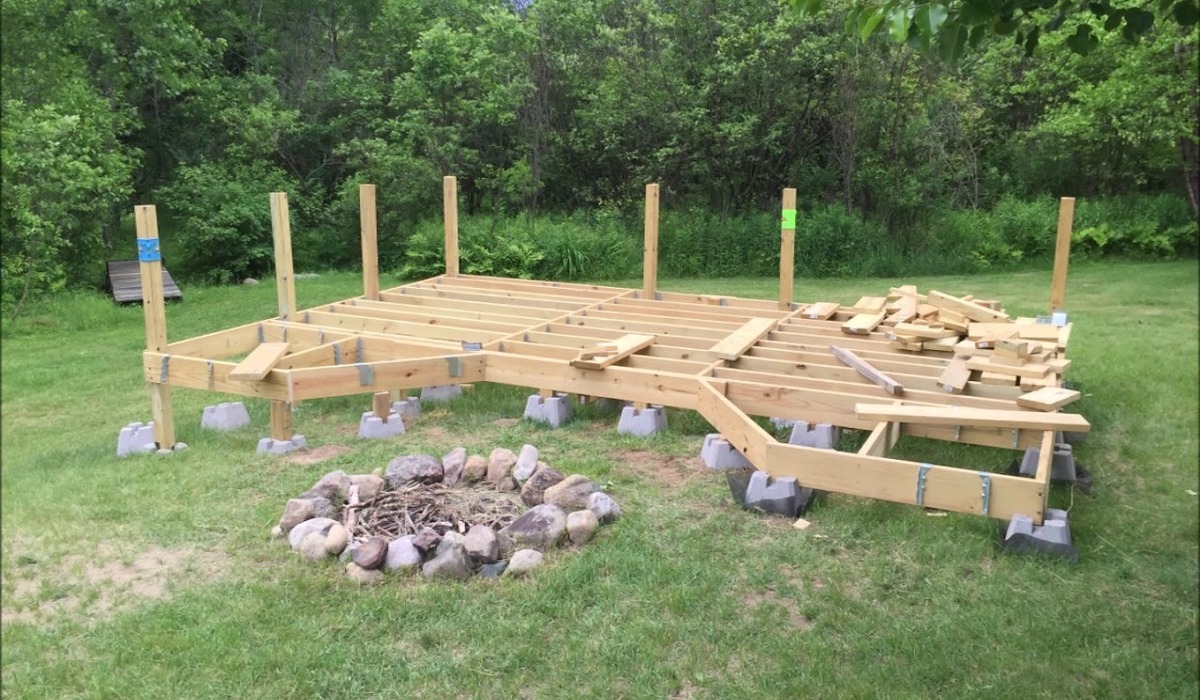
Step 3: Building the Foundation
The foundation serves as the backbone of your floating deck, providing essential support and stability, especially when constructing on a sloped terrain. A well-constructed foundation is crucial for ensuring the longevity and structural integrity of the deck. Here's a detailed breakdown of the key steps involved in building a solid foundation for your floating deck on a slope:
Establishing Support Piers
Begin by determining the locations where support piers will be installed to bear the weight of the deck. Given the slope, it's essential to ensure that the piers are strategically positioned to accommodate the varying elevations. Use a post hole digger or an auger to create holes for the support piers, taking into account the depth required to reach stable soil or bedrock.
Installing Support Posts
Once the holes are prepared, insert support posts into each hole, ensuring that they are plumb and securely positioned. The height of the support posts should be adjusted to accommodate the slope, allowing for a level framework for the deck. Consider using adjustable post anchors to facilitate precise leveling and alignment, especially in areas with significant slope variations.
Securing Beams and Joists
With the support posts in place, attach beams horizontally to the posts to form the primary framework of the deck. The beams should be securely fastened using appropriate hardware, such as galvanized brackets or joist hangers, to ensure a robust connection. Subsequently, install joists perpendicular to the beams, spacing them according to the design specifications and local building codes.
Adding Cross-Bracing (If Necessary)
In cases where the slope and the overall deck size warrant additional structural reinforcement, consider incorporating cross-bracing between support posts and beams. Cross-bracing enhances the lateral stability of the deck, mitigating potential sway and ensuring uniform weight distribution, particularly on sloped surfaces.
Verifying Levelness and Stability
Throughout the foundation construction process, regularly verify the levelness and stability of the framework using a spirit level and by physically assessing the structural integrity. Adjust the support posts, beams, and joists as needed to achieve a uniformly level and stable foundation, accounting for the slope variations and potential ground irregularities.
By meticulously executing these foundation-building steps, you establish a robust and reliable base for your floating deck, effectively addressing the challenges posed by the sloped terrain. A well-constructed foundation forms the groundwork for the subsequent phases of deck construction, setting the stage for a visually appealing and structurally sound outdoor living space.
Step 4: Constructing the Frame
Constructing the frame of a floating deck on a slope is a pivotal phase that demands precision and attention to detail. The frame serves as the structural skeleton, providing the framework for the deck's surface and ensuring its stability and longevity. Here's a comprehensive overview of the key steps involved in constructing the frame for your floating deck on a slope:
Attaching Ledger Board (If Applicable)
If your design incorporates a ledger board to anchor the deck to an existing structure, such as a house, begin by securely attaching the ledger board to the exterior wall. Use lag screws or through-bolts to fasten the ledger board, ensuring it is level and properly flashed to prevent water infiltration. The ledger board serves as a crucial anchor point for the deck's frame, especially when building on a slope.
Installing Rim Joists and Outer Framing
With the ledger board in place (if applicable), proceed to install the rim joists, which form the outer perimeter of the deck. Ensure that the rim joists are precisely positioned and securely attached to the support posts or ledger board, providing structural integrity and defining the deck's boundaries. Additionally, install any required outer framing elements, such as beams or additional support joists, to reinforce the frame's overall stability.
Incorporating Angled Bracing (If Necessary)
On a sloped terrain, the inclusion of angled bracing within the frame becomes essential to counteract the lateral forces and maintain the structural integrity of the deck. Install angled bracing between the support posts and the rim joists, ensuring that they are securely fastened and angled to effectively resist the gravitational forces exerted on the sloped surface. Properly positioned angled bracing enhances the overall stability of the frame, especially on steeper slopes.
Verifying Alignment and Squareness
Throughout the frame construction process, meticulously verify the alignment and squareness of the frame using measuring tools and diagonal measurements. Confirm that the frame is precisely aligned with the designated layout and that all corners form perfect right angles. Adjust the positioning of the support posts, rim joists, and bracing elements as needed to achieve a uniformly aligned and square frame, essential for the subsequent decking installation.
Treating and Protecting the Frame
Before proceeding to the decking phase, consider treating the frame with a suitable wood preservative or waterproofing sealant to enhance its resistance to moisture, decay, and insect damage. Properly treating the frame contributes to its long-term durability and ensures that it can withstand the outdoor elements, especially when built on a sloped surface where water runoff and exposure to the ground are significant factors.
By meticulously executing these frame construction steps, you establish a robust and precisely engineered framework for your floating deck on a slope. The frame's structural integrity and alignment lay the groundwork for the subsequent decking installation, setting the stage for a visually appealing and long-lasting outdoor living space.
Step 5: Installing the Decking
With the foundation and frame meticulously constructed, the installation of the decking marks a significant stride towards bringing your vision of a stunning floating deck on a slope to fruition. This phase demands careful consideration of material selection, precise installation techniques, and a keen eye for detail to ensure a visually appealing and structurally sound deck surface. Here's a comprehensive overview of the key steps involved in installing the decking for your floating deck on a slope:
Material Selection
Begin by selecting the decking material that best aligns with your aesthetic preferences, maintenance requirements, and budget. Whether you opt for natural wood, composite decking, or other innovative materials, ensure that the chosen material is well-suited to withstand the outdoor elements and complements the overall design of your deck. Consider factors such as slip resistance, color options, and resistance to moisture and UV exposure when making your selection.
Planning the Layout
Carefully plan the layout of the decking boards, taking into account the slope of the terrain and any design considerations. Depending on the degree of slope, you may need to determine the optimal orientation of the boards to ensure a visually appealing and structurally sound installation. Consider whether the boards should follow the slope or be installed perpendicular to it, and plan for any necessary adjustments to accommodate the terrain variations.
Securing the Decking Boards
Commence the installation by securing the first row of decking boards, ensuring that they are aligned and securely fastened to the frame. Utilize appropriate fastening methods, such as screws or hidden fastening systems, to achieve a clean and polished appearance while ensuring the boards are firmly anchored to the frame. Pay close attention to spacing and alignment, making necessary adjustments to accommodate the slope and achieve a uniform and visually pleasing layout.
Addressing Slope Variations
As you progress with the decking installation, be prepared to address slope variations by employing techniques such as shimming or tapering the support structure. These adjustments are crucial for maintaining a level deck surface and mitigating potential water pooling or unevenness. Carefully assess the slope variations and implement precise adjustments to ensure a seamless and structurally sound decking installation.
Finishing Touches
Upon completing the decking installation, consider adding finishing touches such as trim boards, fascia, or railing systems to enhance the deck's visual appeal and safety. These elements not only contribute to the overall aesthetics but also serve practical functions, such as concealing exposed edges and providing secure boundaries for the deck. Pay attention to detail and ensure that the finishing touches harmonize with the decking material and complement the surrounding landscape.
By meticulously executing these decking installation steps, you bring your floating deck on a slope one step closer to realization. The careful selection of materials, precise installation techniques, and attention to slope variations contribute to the creation of a visually stunning and structurally robust outdoor living space that seamlessly integrates with the natural terrain.
Step 6: Adding Finishing Touches
As you near the completion of your floating deck on a slope, the addition of finishing touches plays a pivotal role in elevating the overall aesthetics, functionality, and safety of the outdoor living space. This phase encompasses a range of meticulous details and enhancements that contribute to the visual appeal and cohesiveness of the deck, ensuring that it seamlessly integrates with its natural surroundings.
Installing Railing Systems
One essential finishing touch involves the installation of railing systems, particularly if your deck is elevated or if local building codes mandate their inclusion. Railing systems not only enhance the safety of the deck but also contribute to its visual appeal. Whether opting for traditional wooden railings, sleek metal designs, or contemporary cable rail systems, the choice of railing should harmonize with the overall design aesthetic while providing a secure and visually unobtrusive boundary for the deck.
Incorporating Lighting Features
To extend the functionality and ambiance of your floating deck, consider incorporating lighting features that illuminate the space during evening hours. From subtle recessed deck lights to decorative string lights and solar-powered lanterns, the strategic placement of lighting fixtures can create a warm and inviting atmosphere while enhancing safety and visibility. Additionally, integrating lighting along stairways and pathways contributes to the deck's practicality and visual allure.
Adding Seating and Storage Solutions
Integrating built-in seating elements or storage solutions within the deck's design can optimize space utilization and convenience. Whether incorporating integrated benches along the deck perimeter, stylish storage benches, or multifunctional deck boxes, these additions offer practical seating options and provide discreet storage for outdoor essentials, such as cushions, gardening tools, or recreational equipment.
Applying Protective Finishes
Applying protective finishes to the decking surface and structural elements is crucial for safeguarding the deck against environmental elements and wear. Depending on the chosen decking material, consider applying a high-quality sealant, stain, or protective coating to enhance durability, resist moisture penetration, and shield the wood from UV exposure. Additionally, treating any exposed wood surfaces with a suitable preservative contributes to the long-term maintenance and resilience of the deck.
Landscaping Integration
To seamlessly blend the deck with its natural surroundings, consider integrating landscaping elements around the perimeter of the deck. Incorporating potted plants, decorative shrubs, or flower beds adjacent to the deck creates a harmonious transition between the built environment and the natural landscape, enhancing the overall visual appeal and creating a cohesive outdoor retreat.
By meticulously attending to these finishing touches, you transform your floating deck on a slope into a captivating and functional outdoor sanctuary. Each detail contributes to the deck's overall charm, safety, and integration with the surrounding environment, culminating in a space that invites relaxation, entertainment, and appreciation of the outdoor setting.
Conclusion
In conclusion, the journey of building a floating deck on a slope is a testament to the fusion of creativity, craftsmanship, and practicality. From the initial planning and meticulous preparation to the final embellishments that elevate its charm, every phase of this endeavor contributes to the creation of a captivating outdoor living space that harmonizes with the natural terrain.
The process begins with a thorough assessment of the slope, allowing for a deep understanding of the landscape's nuances and variations. This insight guides the design and construction decisions, ensuring that the deck seamlessly integrates with the natural topography. By meticulously addressing local regulations, design considerations, material selection, and budgeting, the foundation is laid for a well-informed and purposeful project.
As the construction unfolds, the careful marking of the area and clearing of the ground set the stage for the physical manifestation of the envisioned deck. Building a robust foundation that accommodates the slope's challenges becomes a pivotal step, requiring precision in establishing support piers, installing support posts, and securing beams and joists. The frame construction, including the attachment of ledger boards, installation of rim joists, and incorporation of angled bracing, forms the structural backbone that withstands the demands of the sloped terrain.
The installation of decking boards, with meticulous attention to material selection, layout planning, and addressing slope variations, breathes life into the deck, transforming it into a functional and visually appealing outdoor retreat. The addition of finishing touches, such as railing systems, lighting features, seating, storage solutions, and protective finishes, elevates the deck's allure while seamlessly integrating it with the surrounding landscape.
Ultimately, the completion of a floating deck on a slope represents the culmination of dedication, craftsmanship, and a deep appreciation for outdoor living. It stands as a testament to the seamless coexistence of human ingenuity and natural beauty, offering a space where moments of relaxation, gatherings with loved ones, and appreciation of the outdoors converge. As the deck becomes a canvas for cherished memories and tranquil moments, its presence enriches the outdoor experience, embodying the spirit of creativity and practicality intertwined with the allure of nature.