
Home>Outdoors & Camping>Hardscaping>How To Build A Fence On A Slope
Hardscaping
How To Build A Fence On A Slope
Published: March 6, 2024

Content Creator for Outdoors & Camping, Sophie turns any yard into a sustainable paradise. Her dedication to DIY outdoor projects and volunteer work in community gardens shares joy and knowledge.
Learn how to tackle the challenge of building a fence on a slope with our expert hardscaping tips and techniques. Ensure a sturdy and visually appealing result for your outdoor space.
(Many of the links in this article redirect to a specific reviewed product. Your purchase of these products through affiliate links helps to generate commission for Twigandthistle.com, at no extra cost. Learn more)
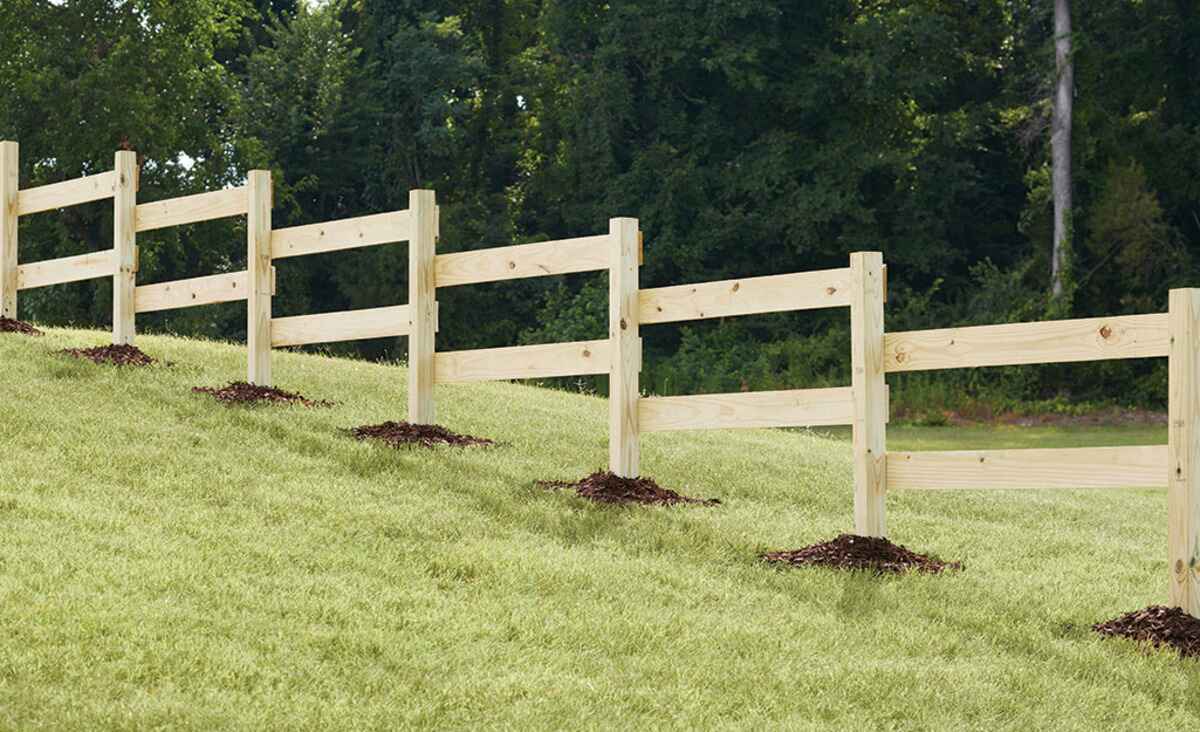
Understanding the Slope
When building a fence on a slope, it's crucial to understand the degree of incline you're working with. The slope of the land will determine the type of fence you can build and the methods you'll need to use. It's important to measure the slope accurately using a level or a transit to determine the rise and run of the slope. This will help you calculate the degree of the slope and plan for the adjustments needed in the fence installation process. Understanding the slope will ensure that your fence is not only visually appealing but also structurally sound.
Choosing the Right Materials
When building a fence on a slope, it's essential to select the right materials that can accommodate the uneven terrain. Here are some materials to consider:
1. Fence Panels
Opt for fence panels that are flexible and can be adjusted to the slope. Look for panels with pickets that can be individually adjusted to follow the contour of the land.
2. Rails
Choose rails that are sturdy and can be easily manipulated to fit the slope. Flexible materials such as vinyl or aluminum rails are ideal for sloped landscapes.
3. Posts
Select longer posts to accommodate the varying heights caused by the slope. Taller posts will ensure that the fence remains stable and secure, even on uneven ground.
4. Fasteners
Use appropriate fasteners such as screws or nails that are suitable for the material of your fence. For example, if you're using wooden panels, opt for galvanized screws to prevent rust and corrosion.
5. Gravel and Concrete
Consider using gravel and concrete for the fence posts to provide stability and support. The gravel allows for drainage, while the concrete ensures that the posts remain firmly in place, even on a slope.
By choosing the right materials, you can ensure that your fence not only complements the landscape but also withstands the challenges posed by the slope.
Planning the Layout
-
Survey the Area: Begin by surveying the area where the fence will be installed. Mark the boundaries and take note of any obstacles or features that may affect the layout, such as trees, rocks, or changes in terrain.
-
Determine the Fence Line: Use stakes and string to outline the fence line, following the natural slope of the land. This will give you a visual guide for the layout and help you visualize how the fence will follow the contours of the slope.
-
Measure the Sections: Divide the fence line into manageable sections, taking into account the degree of the slope in each area. Measure the length of each section and calculate the rise and run to determine the slope ratio.
-
Adjust for the Slope: For each section, determine the method of adjusting the fence to the slope. This may involve stepping the fence, racking the panels, or a combination of both, depending on the severity of the slope.
-
Mark the Post Locations: Using the measurements and slope ratio, mark the locations for the fence posts. Ensure that the posts are evenly spaced and aligned to accommodate the adjusted fence panels and rails.
-
Double-Check the Layout: Before proceeding with installation, double-check the layout to ensure that the fence will follow the natural slope of the land while maintaining a consistent height and alignment. Making adjustments at this stage will save time and effort during the installation process.
By carefully planning the layout of the fence, you can ensure that it not only conforms to the slope of the land but also enhances the overall aesthetic of your property.
Installing the Posts
-
Marking the Post Locations: Begin by marking the locations for the fence posts based on the layout plan. Use a tape measure and stakes to ensure that the posts are evenly spaced and aligned to accommodate the adjusted fence panels and rails.
-
Digging the Holes: When installing fence posts on a slope, it's crucial to dig the holes at the appropriate depth and angle to account for the incline. The depth of the holes should be consistent to ensure stability, while the angle should match the slope of the land. Use a post hole digger or an auger to excavate the holes, making adjustments for the slope as needed.
-
Setting the Posts: Once the holes are dug, place a few inches of gravel at the bottom of each hole to facilitate drainage. Then, set the posts in the holes, ensuring that they are plumb and aligned with the slope. Temporary bracing may be necessary to hold the posts in position while the concrete sets.
-
Pouring Concrete: To secure the posts, pour concrete into the holes around the posts. Use a shovel to compact the concrete and eliminate air pockets. The concrete should be sloped to allow for water drainage away from the posts. Check the posts for plumb and adjust as necessary before the concrete sets.
-
Securing the Posts: Allow the concrete to cure according to the manufacturer's instructions. Once the concrete has set, the posts should be firmly anchored in place, providing a stable foundation for the fence. Double-check the alignment and stability of the posts before proceeding to the next step.
By following these steps, you can ensure that the fence posts are installed securely and are able to withstand the challenges posed by the slope.
Attaching the Rails and Panels
-
Start with the Bottom: Begin by attaching the bottom rail to the first set of posts. Ensure that the rail is level and follows the slope of the land. Use a level to confirm that the rail is straight, and make adjustments as needed to accommodate the slope.
-
Secure the Panels: Once the bottom rail is in place, attach the fence panels to the posts. If the panels are designed to be adjustable, manipulate them to follow the contour of the land. Secure the panels to the rails using appropriate fasteners, ensuring that they are evenly spaced and aligned.
-
Install Intermediate Rails: If your fence design includes intermediate rails, install them at regular intervals between the bottom and top rails. Adjust the rails to match the slope of the land and secure them to the posts. These intermediate rails provide additional support for the panels and help maintain the overall stability of the fence.
-
Attach the Top Rail: After the panels are secured, attach the top rail to the posts. Like the bottom rail, ensure that the top rail is level and follows the slope of the land. Use a level to confirm the alignment and make any necessary adjustments.
-
Check for Consistency: Throughout the process of attaching the rails and panels, regularly check for consistency in the alignment and levelness of the fence. Making small adjustments as you progress will ensure that the finished fence maintains a uniform appearance and structural integrity.
-
Secure the Fasteners: Once all the rails and panels are in place, go back and secure all the fasteners to ensure that the fence components are firmly attached. Use a screwdriver or drill to tighten any loose screws or fasteners, and double-check the stability of the entire fence structure.
-
Add Finishing Touches: To complete the installation, add any finishing touches such as post caps or decorative elements to enhance the appearance of the fence. These details not only add visual appeal but also provide additional protection for the posts and rails.
By following these steps, you can effectively attach the rails and panels to create a fence that not only conforms to the slope of the land but also provides security and aesthetic value to your property.
Finishing Touches and Maintenance
Once the fence is installed on a slope, it's essential to add the finishing touches that will enhance its appearance and longevity. Here are the steps for adding finishing touches and maintaining the fence:
-
Trimming and Leveling: After the fence is installed, trim any excess material and ensure that the top of the fence is level. This will give the fence a polished look and contribute to its overall stability.
-
Applying Sealant or Stain: Depending on the material of the fence, consider applying a sealant or stain to protect it from the elements. This is especially important for wooden fences, as it helps prevent rot, decay, and discoloration.
-
Adding Decorative Elements: Consider adding decorative elements such as post caps, finials, or lattice panels to enhance the visual appeal of the fence. These details can add a touch of elegance and personalization to the overall design.
-
Inspecting for Damage: Regularly inspect the fence for any signs of damage, such as loose fasteners, cracked panels, or leaning posts. Addressing these issues promptly will prevent further damage and prolong the life of the fence.
-
Cleaning and Maintenance: Periodically clean the fence to remove dirt, debris, and mildew. Use a gentle detergent and a soft brush to scrub the surface, and rinse thoroughly with water. Additionally, trim any vegetation that may be encroaching on the fence to prevent damage.
-
Repairing and Reinforcing: If any damage is detected during inspections, make the necessary repairs promptly. This may involve replacing damaged panels, reinforcing loose rails, or tightening fasteners to maintain the structural integrity of the fence.
-
Reapplying Sealant or Stain: Over time, the sealant or stain on the fence may wear off. It's important to reapply these protective coatings as needed to ensure that the fence remains resilient against the elements.
By following these steps for finishing touches and maintenance, you can ensure that your fence not only looks great but also remains durable and functional for years to come. Regular upkeep and attention to detail will contribute to the long-term success of your fence, even on a slope.