
Home>Outdoors & Camping>Hardscaping>How To Build A Boulder Retaining Wall
Hardscaping
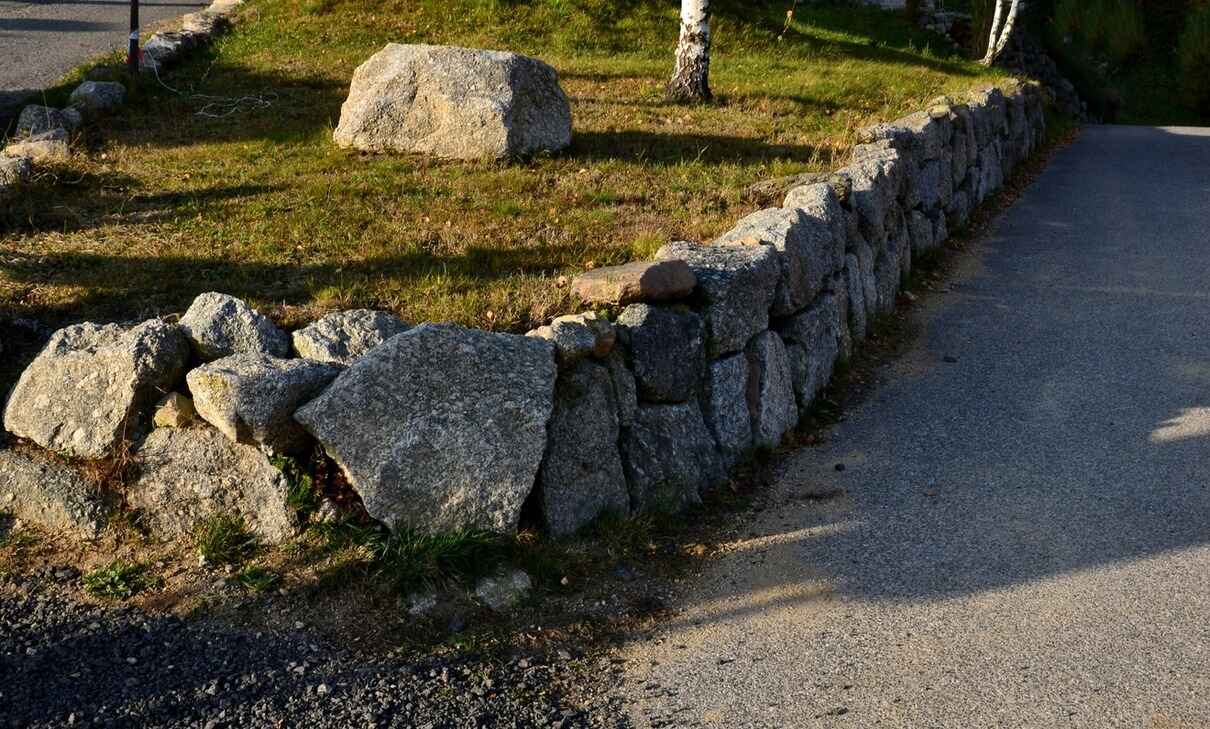
How To Build A Boulder Retaining Wall
Published: March 6, 2024

Content Creator for Outdoors & Camping, Sophie turns any yard into a sustainable paradise. Her dedication to DIY outdoor projects and volunteer work in community gardens shares joy and knowledge.
Learn how to build a boulder retaining wall with our comprehensive hardscaping guide. Get expert tips and step-by-step instructions for a stunning landscape.
(Many of the links in this article redirect to a specific reviewed product. Your purchase of these products through affiliate links helps to generate commission for Twigandthistle.com, at no extra cost. Learn more)
Introduction
So, you're thinking about building a boulder retaining wall? Well, you've come to the right place! A boulder retaining wall can add both functionality and aesthetic appeal to your outdoor space. Whether you're looking to prevent soil erosion, create a terraced garden, or simply enhance the natural beauty of your landscape, a boulder retaining wall can be a fantastic addition to your property. In this guide, we'll walk you through the step-by-step process of building your own boulder retaining wall, from planning and preparation to the finishing touches. Let's get started!
Planning and Preparation
Before you start stacking boulders, it's crucial to lay a solid foundation through careful planning and preparation. Here's what you need to do:
-
Assess the Site: Begin by surveying the area where you intend to build the retaining wall. Take note of the slope, soil type, and drainage patterns. This assessment will help you determine the appropriate height and placement of the wall.
-
Check Local Regulations: Before embarking on your project, it's essential to check with your local authorities regarding any permits or regulations that may apply to building a retaining wall. Some areas have specific guidelines for structures like these, so it's best to be informed from the start.
-
Gather Materials and Tools: Once you have a clear understanding of the project requirements, gather all the necessary materials and tools. This may include boulders of various sizes, gravel, landscape fabric, a shovel, a level, a hand tamper, and safety equipment.
-
Create a Design Plan: Sketch out a rough design plan for your retaining wall. Consider the overall look you want to achieve and how the wall will integrate with the surrounding landscape. This plan will serve as a roadmap during the construction process.
-
Establish a Budget: Determine your budget for the project, factoring in the cost of materials, equipment rental, and any professional assistance you may need. Having a clear budget in mind will help you make informed decisions as you progress.
By taking the time to plan and prepare thoroughly, you'll set the stage for a successful boulder retaining wall project. This initial phase is crucial for ensuring that the construction process goes smoothly and that the end result meets your expectations.
Choosing the Right Boulder Size and Type
When it comes to building a boulder retaining wall, selecting the right boulder size and type is a critical decision that will impact both the structural integrity and visual appeal of the finished wall. Here's what you need to consider:
-
Size Matters: The size of the boulders you choose will depend on the scale of your project and the specific requirements of your site. Larger boulders are typically used for taller walls or areas with significant soil pressure, while smaller boulders are suitable for shorter walls or decorative purposes.
-
Consider the Aesthetic: In addition to their functional role, boulders also contribute to the overall aesthetic of the retaining wall. Consider the natural surroundings and the desired look of the wall. For a more rugged and natural appearance, irregularly shaped boulders with varying sizes can be used. On the other hand, if you prefer a more uniform and structured look, you may opt for boulders of similar size and shape.
-
Evaluate the Type of Stone: The type of stone you choose for your boulder retaining wall can also make a significant difference. Different types of stone offer varying levels of durability, texture, and color. Common options include granite, limestone, sandstone, and basalt. Each type of stone has its own unique characteristics, so it's important to select one that aligns with your preferences and the environmental conditions of your location.
-
Assess Accessibility and Handling: Before making your final decision, consider the practical aspects of handling and transporting the boulders. Large, heavy boulders may require special equipment or additional labor for placement, especially if your site has limited access for machinery. Smaller boulders, on the other hand, may be more manageable for a DIY project with minimal equipment.
-
Seek Professional Advice: If you're unsure about which boulder size and type would best suit your project, don't hesitate to seek advice from a landscaping professional or a stone supplier. They can provide valuable insights based on their experience and expertise, helping you make an informed decision that aligns with your specific needs and vision for the retaining wall.
By carefully considering these factors, you can ensure that the boulders you choose are not only structurally sound but also harmonize with the natural surroundings and enhance the overall appeal of your boulder retaining wall.
Site Preparation and Excavation
Before the boulder retaining wall construction can begin, thorough site preparation and excavation are essential to create a stable foundation and ensure proper drainage. Here's a detailed look at the steps involved in this crucial phase:
-
Mark the Layout: Use stakes and string to outline the exact location and dimensions of the retaining wall. This will serve as a guide for excavation and ensure that the wall is positioned correctly.
-
Excavate the Trench: Using a shovel or a small excavator, dig a trench along the marked layout. The depth of the trench should accommodate the first course of boulders and provide space for the necessary base materials. The width of the trench will depend on the size and design of the wall.
-
Level the Trench: Once the trench is excavated, use a level to ensure that the bottom is flat and even. This step is crucial for establishing a stable base for the retaining wall.
-
Add Base Materials: Fill the bottom of the trench with a layer of compactible base material, such as crushed rock or gravel. This material will provide a solid foundation for the first course of boulders and facilitate proper drainage behind the wall.
-
Compact the Base: Use a hand tamper or a mechanical compactor to compact the base material. This step is essential for creating a stable and level surface that can support the weight of the boulders and withstand soil pressure.
-
Install Drainage: If necessary, incorporate drainage pipes or perforated drain tile behind the first course of boulders to manage water buildup and prevent hydrostatic pressure. Proper drainage is critical for the long-term stability of the retaining wall.
-
Backfill and Compact: Once the base is prepared and drainage is in place, backfill any remaining space behind the first course of boulders with additional base material. Compact the backfill to ensure that it is firmly packed and provides adequate support for the wall.
By meticulously executing the site preparation and excavation process, you'll establish a solid foundation for your boulder retaining wall, setting the stage for the subsequent stages of construction. This phase is fundamental to the overall stability, longevity, and performance of the retaining wall.
Building the Base Course
The base course of a boulder retaining wall serves as the initial layer of boulders that forms the foundation of the entire structure. Building this base course correctly is crucial for ensuring the stability and longevity of the wall. Here's a detailed look at the steps involved in constructing the base course:
-
Selecting the Right Boulders: Begin by carefully selecting boulders of appropriate size, shape, and weight for the base course. These boulders should be the largest and most substantial ones in your collection, as they will bear the primary weight of the wall and provide a solid base for the layers above.
-
Placement and Orientation: Position the boulders in the trench, ensuring that they are snugly nestled against each other with minimal gaps between them. The flat, stable side of each boulder should face outward, while the irregular, rough side should be oriented toward the backfill. This arrangement creates a sturdy and visually appealing base for the retaining wall.
-
Leveling and Alignment: As you place each boulder, use a level to ensure that it is both horizontally level and vertically aligned with the adjacent boulders. This meticulous attention to leveling and alignment is essential for maintaining the structural integrity of the base course and the entire wall.
-
Backfilling and Compacting: Once the base course boulders are in place, carefully backfill the space behind them with additional base material, such as crushed rock or gravel. Compact the backfill material using a hand tamper or compactor to create a firm, stable foundation that supports the base course and provides adequate drainage.
-
Check for Stability: After completing the base course, thoroughly inspect the alignment, stability, and levelness of the boulders. Make any necessary adjustments to ensure that the base course is solid and well-constructed. This proactive approach will prevent potential issues as you progress to the upper courses of the retaining wall.
By meticulously following these steps, you'll establish a robust and reliable base course for your boulder retaining wall, laying the groundwork for the subsequent stages of construction. The base course forms the backbone of the entire structure, and its proper construction is essential for the overall strength and stability of the retaining wall.
Placing and Stacking the Boulders
With the base course firmly in place, the next phase of building a boulder retaining wall involves the meticulous process of placing and stacking the boulders to create the upper courses. This stage requires careful attention to detail and a strategic approach to ensure the structural integrity and visual appeal of the wall. Here's a detailed look at the steps involved in placing and stacking the boulders:
-
Selecting Appropriate Boulders: Just as with the base course, it's crucial to carefully select boulders of suitable size, shape, and weight for the upper courses. The boulders should complement the base course and each other, creating a cohesive and stable structure.
-
Laying the First Layer: Begin by placing the first layer of boulders on top of the base course. Position the boulders so that they slightly overlap the joints of the base course, creating a staggered and interlocking pattern. This arrangement enhances the stability and strength of the wall.
-
Maintaining Levelness and Alignment: As you stack the boulders, use a level to ensure that each one is horizontally level and vertically aligned with the adjacent boulders. This meticulous attention to levelness and alignment is essential for the overall stability and appearance of the retaining wall.
-
Creating a Gradual Slope: Depending on the design and purpose of the retaining wall, you may need to create a gradual slope as you stack the boulders. This slope helps distribute the pressure exerted by the retained soil and enhances the wall's ability to withstand external forces.
-
Filling Gaps and Voids: As you stack the boulders, pay close attention to any gaps or voids between them. Fill these spaces with smaller rocks or gravel to ensure that the wall is solid and free of potential weak points.
-
Checking for Uniformity: Periodically step back and assess the overall uniformity and appearance of the stacked boulders. Aim for a balanced distribution of sizes, shapes, and colors to create a visually appealing and harmonious retaining wall.
-
Securing the Boulders: Depending on the height and design of the wall, you may need to use specialized equipment or techniques to secure the boulders in place. This may involve the use of geogrid reinforcement, pins, or mortar to enhance the stability of the wall.
By meticulously following these steps, you'll effectively place and stack the boulders to create the upper courses of your boulder retaining wall. This phase requires patience, precision, and a keen eye for detail to ensure that the wall not only functions as intended but also enhances the overall beauty of your outdoor space.
Backfilling and Compacting
Once the base course of boulders is securely in place, the next critical step in building a boulder retaining wall is the backfilling and compacting process. This phase is essential for providing structural support, promoting proper drainage, and enhancing the overall stability of the wall. Here's a detailed look at the backfilling and compacting process:
-
Backfilling Behind the Boulders: Begin by backfilling the space behind the base course and the stacked boulders with additional base material, such as crushed rock or gravel. This backfill material serves multiple purposes, including providing support to the wall, facilitating drainage, and preventing soil erosion behind the wall.
-
Layering and Compacting: As you add the backfill material, layer it in increments, compacting each layer thoroughly before adding the next. This incremental approach ensures that the backfill is densely packed and provides uniform support to the retaining wall. A hand tamper or a mechanical compactor can be used to achieve proper compaction.
-
Filling Voids and Gaps: Pay close attention to any voids or gaps between the boulders and within the backfill material. These spaces should be filled and compacted to eliminate potential weak points in the wall. Properly filling these voids contributes to the overall stability and integrity of the structure.
-
Drainage Considerations: If the retaining wall is designed to manage water runoff or if it's located in an area prone to moisture buildup, consider incorporating drainage features within the backfill. This may include perforated drain pipes or gravel-filled trenches that direct water away from the wall and prevent hydrostatic pressure.
-
Slope and Grade Maintenance: As you backfill and compact, pay attention to maintaining the desired slope and grade behind the retaining wall. A gradual slope away from the wall helps promote proper drainage and reduces the risk of soil pressure buildup, contributing to the long-term stability of the structure.
-
Regular Inspection and Adjustment: Throughout the backfilling and compacting process, periodically inspect the wall for any signs of shifting, settling, or unevenness. Make any necessary adjustments to the backfill material and the boulders to ensure that the wall remains structurally sound and visually appealing.
By meticulously executing the backfilling and compacting process, you'll create a solid and reliable support system for your boulder retaining wall. This phase is crucial for enhancing the wall's ability to withstand external forces, manage water drainage effectively, and maintain its integrity over time.
Finishing Touches and Maintenance
Once the boulder retaining wall is constructed, attention to finishing touches and ongoing maintenance is essential to ensure its long-term performance and visual appeal. Here's a detailed look at the final steps and maintenance practices for your boulder retaining wall:
-
Surface Treatment: Depending on the type of boulders used and the desired aesthetic, you may choose to apply a surface treatment to the exposed face of the wall. This could involve pressure washing to reveal the natural colors and textures of the boulders, or the application of a sealant to enhance durability and weather resistance.
-
Landscaping Integration: To seamlessly integrate the retaining wall into your landscape, consider adding vegetation, such as climbing plants or shrubs, around the wall. This softens the appearance of the structure and creates a more natural transition between the wall and the surrounding environment.
-
Weed Control: Regularly inspect the areas around the retaining wall for any signs of weed growth. Implement weed control measures to prevent invasive plants from taking root within the wall's structure, which can compromise its integrity over time.
-
Drainage Maintenance: Keep an eye on the drainage features incorporated into the wall and its surroundings. Clear any debris or obstructions from drainage pipes or trenches to ensure that water can flow freely away from the wall, preventing potential water-related issues.
-
Structural Inspection: Periodically inspect the retaining wall for signs of settlement, shifting, or damage. Look for any loose or displaced boulders, cracks, or bulging sections. Address any structural concerns promptly to prevent further deterioration.
-
Erosion Control: If the retaining wall is exposed to significant water runoff or erosion, consider implementing erosion control measures, such as adding mulch, gravel, or erosion-control fabric to the areas surrounding the wall. This helps minimize soil erosion and preserves the stability of the wall.
-
Regular Cleaning: Maintain the visual appeal of the retaining wall by regularly cleaning the boulders and the surrounding area. This may involve removing debris, dirt, or organic matter that accumulates on the surface of the wall, preserving its natural beauty.
-
Professional Inspection: Consider scheduling periodic inspections by a landscaping professional or structural engineer to assess the condition of the retaining wall. Their expertise can help identify any potential issues and provide recommendations for maintenance or repairs.
By attending to these finishing touches and implementing a proactive maintenance routine, you can ensure that your boulder retaining wall remains structurally sound, visually appealing, and an enduring feature of your outdoor space for years to come.
Conclusion
In conclusion, building a boulder retaining wall is a rewarding and impactful project that can transform the functionality and aesthetics of your outdoor space. By following the step-by-step process outlined in this guide, you can create a durable, visually appealing structure that effectively manages soil erosion, creates terraced landscapes, and enhances the natural beauty of your property. From meticulous planning and preparation to the careful selection and placement of boulders, each phase of the construction process plays a crucial role in the overall success of the retaining wall. Additionally, ongoing maintenance and attention to detail ensure that the wall remains a resilient and attractive feature for years to come. Whether you're a seasoned DIY enthusiast or embarking on your first outdoor construction project, building a boulder retaining wall is a fulfilling endeavor that yields both practical and aesthetic benefits for your outdoor environment.