
Home>Create & Decorate>DIY & Crafts>How To Build Timber Steps On A Slope
DIY & Crafts
How To Build Timber Steps On A Slope
Published: April 4, 2024

Senior Editor in Create & Decorate, Kathryn combines traditional craftsmanship with contemporary trends. Her background in textile design and commitment to sustainable crafts inspire both content and community.
Learn how to build timber steps on a slope with our easy DIY & Crafts guide. Create a beautiful and functional outdoor feature today!
(Many of the links in this article redirect to a specific reviewed product. Your purchase of these products through affiliate links helps to generate commission for Twigandthistle.com, at no extra cost. Learn more)
Introduction
So, you've got a sloped area in your yard that needs some timber steps to make it more accessible and visually appealing. Building timber steps on a slope can be a challenging but rewarding DIY project. Not only will it enhance the functionality of your outdoor space, but it can also add a touch of natural beauty to your landscape. In this guide, we'll walk you through the step-by-step process of building timber steps on a slope, from assessing the slope and planning to putting the finishing touches on your newly constructed steps. Let's dive in and get those steps built!
Assessing the Slope and Planning
Before diving into the construction of timber steps, it's crucial to assess the slope of the area and come up with a solid plan. Here's how to go about it:
-
Measure the Slope: Use a long piece of lumber and a level to determine the degree of the slope. This will help you understand the extent of the incline and plan the number and size of steps needed.
-
Consider the Terrain: Take note of any obstacles such as rocks, tree roots, or uneven ground that may affect the placement of the steps. It's essential to work with the natural features of the slope rather than against them.
-
Plan the Layout: Sketch out a rough design for the steps, considering the rise and run of each step. This will help you visualize the final look and make adjustments before you start building.
-
Check Local Regulations: Depending on your location, there may be regulations or permits required for building structures on sloped terrain. Check with your local authorities to ensure compliance with any building codes or zoning restrictions.
By thoroughly assessing the slope and carefully planning the layout of the timber steps, you'll set the stage for a successful construction process.
Gathering Materials and Tools
To bring your timber steps to life, you'll need a variety of materials and tools. Here's a comprehensive list to ensure you have everything at your disposal before you start the construction process:
Materials
- Timber: Choose durable, weather-resistant timber for the steps. Pressure-treated lumber or rot-resistant wood species like cedar or redwood are excellent choices.
- Gravel and Sand: These materials will be used for creating a stable base for the steps.
- Rebar: Used to reinforce the foundation of the steps and prevent shifting over time.
- Gravel or Paver Base: Provides drainage and stability for the steps.
- Landscape Fabric: Helps prevent weed growth and maintains the integrity of the base.
- Wood Sealer or Stain: Protects the timber from moisture and prolongs its lifespan.
Tools
- Measuring Tape and Level: Essential for accurate measurements and ensuring the steps are level.
- Shovel and Rake: For clearing the site and leveling the ground.
- Circular Saw or Miter Saw: Used for cutting the timber to the desired lengths and angles.
- Drill and Screws: Necessary for securing the timber pieces together.
- Hammer and Nails: Alternative fastening options for timber construction.
- Wheelbarrow: For transporting materials such as gravel and sand to the construction site.
- Safety Gear: Including gloves, safety glasses, and ear protection to ensure your safety during the construction process.
By gathering all the necessary materials and tools in advance, you'll streamline the construction process and minimize interruptions once you begin building your timber steps.
Clearing and Preparing the Site
Before you can start building your timber steps, it's essential to clear and prepare the site to ensure a solid foundation and smooth construction process. Here's a detailed breakdown of the steps involved in this crucial phase:
-
Remove Vegetation: Begin by clearing the area of any vegetation, including grass, weeds, and small plants. Use a shovel or a sod cutter to strip away the top layer of vegetation, exposing the bare ground.
-
Level the Ground: Use a rake and a shovel to level the ground where the steps will be constructed. It's important to create a flat, even surface to prevent any unevenness in the steps' foundation.
-
Excavate the Tread Area: Dig out the tread area for each step, ensuring a consistent depth and width for all steps. This will provide a clear space for the steps to be installed and allow for proper drainage.
-
Add Gravel and Sand: Once the tread areas are excavated, add a layer of gravel followed by a layer of sand to create a stable base for the steps. Use a tamper to compact the gravel and sand, ensuring a firm foundation.
-
Lay Landscape Fabric: To prevent weed growth and maintain the integrity of the base, lay down landscape fabric over the gravel and sand layers. This will help keep the area under the steps free from unwanted vegetation.
-
Compact the Base: After laying the landscape fabric, use a tamper to compact the entire base, including the gravel, sand, and fabric. This will further stabilize the foundation and provide a solid surface for the timber steps.
By meticulously clearing and preparing the site, you'll establish a sturdy and level foundation for your timber steps, setting the stage for the next phase of the construction process.
Setting the Foundation for the Steps
Now that the site is cleared and prepared, it's time to focus on setting a solid foundation for the timber steps. This phase is crucial for ensuring the stability and longevity of the steps. Here's a step-by-step guide to setting the foundation:
-
Positioning the First Step: Begin by placing the first timber step in the desired location. Use a level to ensure it is positioned evenly and securely on the prepared base.
-
Reinforcing with Rebar: To prevent shifting and settling, drive rebar through pre-drilled holes in the timber step and into the prepared base. This will anchor the step firmly to the ground.
-
Checking for Level: Once the first step is in place, check for levelness both side-to-side and front-to-back. Make any necessary adjustments to ensure it is perfectly level before proceeding.
-
Adding Subsequent Steps: For each additional step, repeat the process of positioning, reinforcing with rebar, and checking for level. It's essential to maintain consistency in the rise and run of each step for a uniform and safe staircase.
-
Backfilling and Compacting: After all the steps are in place, backfill the area behind and between the steps with gravel. Use a tamper to compact the backfilled material, providing additional support and stability.
-
Securing the Risers: If your design includes risers between the steps, secure them in place using screws or nails. This will enhance the structural integrity of the steps and create a polished look.
By meticulously following these steps, you'll establish a robust foundation for your timber steps, ensuring they can withstand the test of time and foot traffic. With the foundation set, you're ready to move on to the exciting phase of cutting and installing the timber steps themselves.
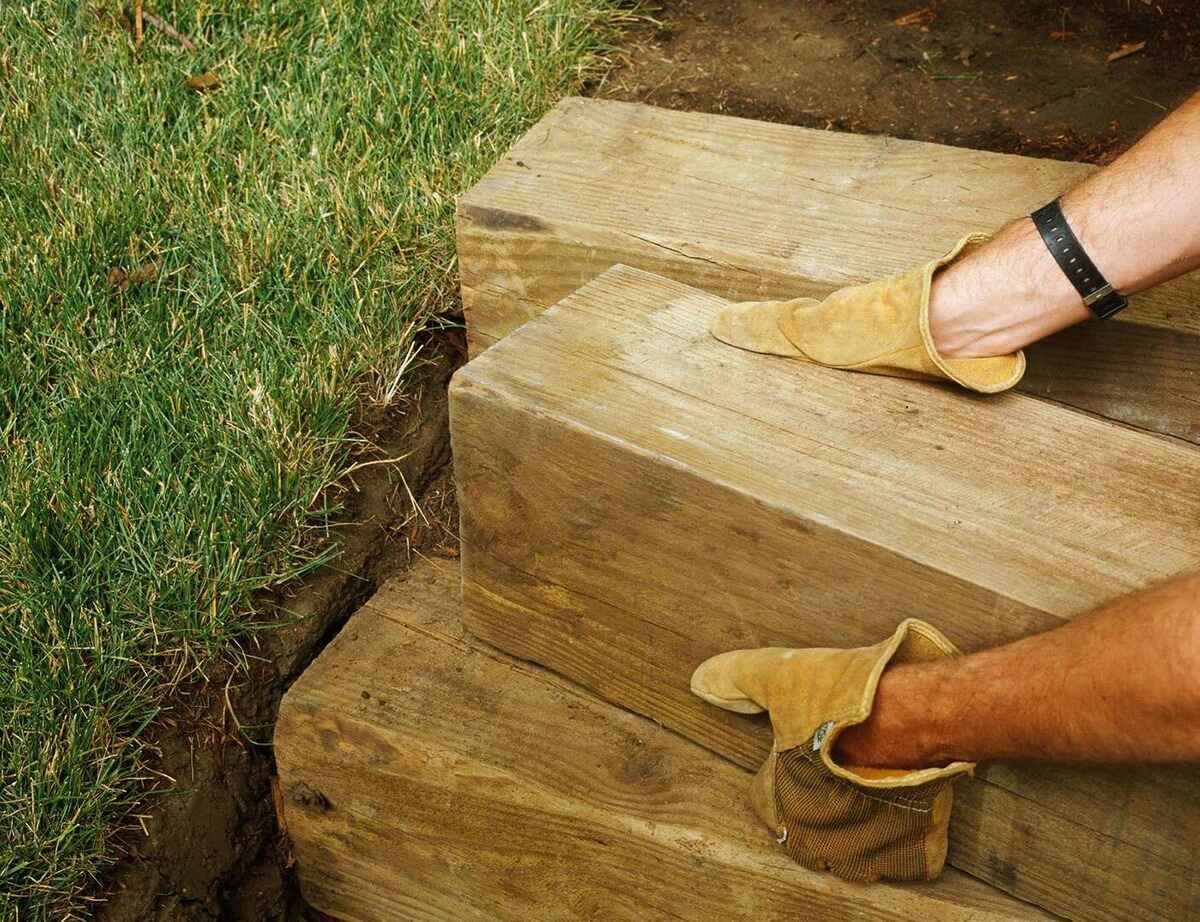
Cutting and Installing the Timber Steps
With the foundation in place, it's time to focus on the crucial task of cutting and installing the timber steps themselves. This phase requires precision and attention to detail to ensure that the steps are not only structurally sound but also visually appealing. Here's a detailed breakdown of the process:
-
Measuring and Cutting the Timber: Begin by measuring and marking the timber according to the predetermined dimensions for each step. Use a circular saw or miter saw to make precise cuts, ensuring that the steps are uniform in size and shape.
-
Applying Wood Sealant or Stain: Before installing the steps, it's advisable to apply a wood sealant or stain to the cut timber. This will protect the wood from moisture, UV exposure, and other environmental factors, prolonging its lifespan and maintaining its appearance.
-
Placing the Timber Steps: Carefully position each cut timber piece on the prepared foundation, starting with the bottom step and working your way up. Use a level to ensure that each step is perfectly horizontal and aligned with the overall design.
-
Securing the Steps: Once the steps are in position, secure them to the foundation and to each other using screws or nails. It's essential to fasten the steps securely to prevent any shifting or instability over time.
-
Adding Traction and Grip: To enhance safety, consider adding non-slip strips or applying a textured finish to the surface of each step. This will provide traction and grip, especially in wet or slippery conditions.
-
Installing Handrails (Optional): Depending on the height and design of the steps, you may choose to install handrails for added safety and support. Ensure that the handrails are securely anchored to the steps and meet any relevant building codes or regulations.
By meticulously following these steps, you'll successfully cut and install the timber steps, creating a functional and visually appealing staircase on your sloped terrain. With the steps in place, you're one step closer to completing your timber step construction project.
Finishing Touches and Maintenance Tips
After the construction of your timber steps, it's time to add the finishing touches that will not only enhance the aesthetic appeal but also ensure the longevity of your newly built staircase. Additionally, incorporating maintenance tips will help preserve the beauty and functionality of the steps for years to come. Here's a comprehensive guide to the final steps and maintenance practices:
Applying a Protective Finish
To protect the timber steps from the elements and wear, consider applying a protective finish such as a clear wood sealer or exterior-grade wood stain. This will create a barrier against moisture, UV rays, and general wear and tear, extending the lifespan of the timber and maintaining its natural beauty.
Landscaping and Lighting
Enhance the overall look of your timber steps by incorporating landscaping elements around the staircase. Planting flowers, shrubs, or ground cover alongside the steps can soften the transition between the steps and the surrounding landscape. Additionally, consider adding low-voltage outdoor lighting to illuminate the steps, improving visibility and safety, especially during the evening hours.
Regular Inspection and Maintenance
Make it a habit to regularly inspect the timber steps for any signs of damage, wear, or instability. Look for loose fasteners, cracks, or any areas that may require attention. Promptly addressing any issues will prevent minor problems from escalating and ensure the continued safety and functionality of the steps.
Cleaning and Debris Removal
Keep the timber steps clean by regularly removing debris such as leaves, dirt, and other organic matter. Use a broom or leaf blower to clear the steps and the surrounding area. Periodically washing the steps with a mild detergent and water can help remove built-up grime and maintain their appearance.
Seasonal Maintenance
During the changing seasons, pay special attention to the impact of weather on the timber steps. In colder climates, be mindful of ice accumulation and consider using ice melt products sparingly to prevent damage to the wood. In warmer climates, monitor the effects of prolonged sun exposure and consider reapplying a protective finish as needed.
Repairing and Refinishing
If you notice any signs of damage or wear, such as splintering, warping, or discoloration, take the necessary steps to repair and refinish the timber steps. Sanding out imperfections, applying a fresh coat of sealant or stain, and replacing any damaged components will help restore the steps to their original condition.
By incorporating these finishing touches and following a proactive maintenance routine, you'll ensure that your timber steps remain a functional and visually appealing feature of your landscape for years to come. With proper care and attention, your newly constructed timber steps will continue to serve their purpose and enhance the overall beauty of your outdoor space.