
Home>Create & Decorate>DIY & Crafts>How To Build Concrete Steps On A Slope
DIY & Crafts
How To Build Concrete Steps On A Slope
Published: May 21, 2024

Content Creator specializing in woodworking and interior transformations. Caegan's guides motivate readers to undertake their own projects, while his custom furniture adds a personal touch.
Learn how to build concrete steps on a slope with our easy DIY guide. Perfect for your next outdoor project. Get started today!
(Many of the links in this article redirect to a specific reviewed product. Your purchase of these products through affiliate links helps to generate commission for Twigandthistle.com, at no extra cost. Learn more)
Introduction
So, you've got a sloped area in your yard and you're thinking about adding some concrete steps to make it more accessible and visually appealing. Building concrete steps on a slope can be a challenging but rewarding DIY project. Whether you're looking to create a pathway from your driveway to your front door or you want to add some steps to a garden or patio area, this guide will walk you through the process step by step. Let's dive in and get started on this exciting project!
Planning and Preparation
Before you start building your concrete steps on a slope, it's crucial to take the time to plan and prepare properly. Here's what you need to do:
-
Measure and Assess the Slope: Begin by measuring the slope's angle and length. This will help you determine the number of steps you'll need and the dimensions of each step. Assess the soil and drainage in the area to ensure that it's suitable for supporting concrete steps.
-
Check Local Building Codes: Contact your local building authority to check if there are any specific regulations or permits required for constructing concrete steps on a slope. Compliance with building codes is essential for safety and legal reasons.
-
Gather Materials and Tools: Make a list of all the materials and tools you'll need for the project, including concrete mix, rebar, wooden forms, gravel, and hand tools such as a shovel, level, and trowel. Ensure that you have everything on hand before you begin.
-
Create a Detailed Plan: Sketch out a detailed plan for your concrete steps, including the dimensions, layout, and placement. This will serve as a guide throughout the construction process and help you visualize the end result.
-
Safety Precautions: Consider the safety aspects of the project. Ensure that you have the necessary safety gear, such as gloves, safety glasses, and sturdy footwear. Additionally, plan for proper lighting and clear pathways to the construction site.
By thoroughly planning and preparing for the construction of your concrete steps on a slope, you'll set yourself up for a smoother and more successful DIY project.
Excavating the Slope
Excavating the slope is a crucial step in the process of building concrete steps. Here's a detailed guide on how to tackle this part of the project:
-
Mark the Area: Begin by marking the area where the steps will be located. Use stakes and string to outline the boundaries of the steps, ensuring that the measurements and layout align with your initial plan.
-
Start Digging: Using a shovel, start digging into the slope to create a level surface for the steps. Begin at the bottom of the slope and work your way up, removing any rocks, roots, or debris as you go. It's essential to create a stable and level base for the steps to ensure their longevity and safety.
-
Create Tread and Riser Forms: As you excavate, create forms for the treads (the flat part of the step) and risers (the vertical part between each step). These forms will help you visualize the layout of the steps and ensure that they are consistent in size and shape.
-
Check for Level: Use a level to check the flatness and levelness of each step as you excavate. Adjust the depth and angle of the excavation as needed to maintain a consistent slope and ensure that each step is level from front to back and side to side.
-
Add Drainage: Consider incorporating drainage features into the excavation to prevent water from accumulating on the steps. This can be achieved by adding a layer of gravel or creating a slight slope away from the steps to direct water flow.
-
Inspect and Compact: Once the excavation is complete, inspect the area for any remaining debris or uneven surfaces. Use a hand tamper or plate compactor to compact the soil and create a firm foundation for the steps.
By following these steps, you'll be well on your way to creating a solid and well-prepared base for your concrete steps on a slope. Excavating the slope with care and precision is essential for the overall success and durability of the project.
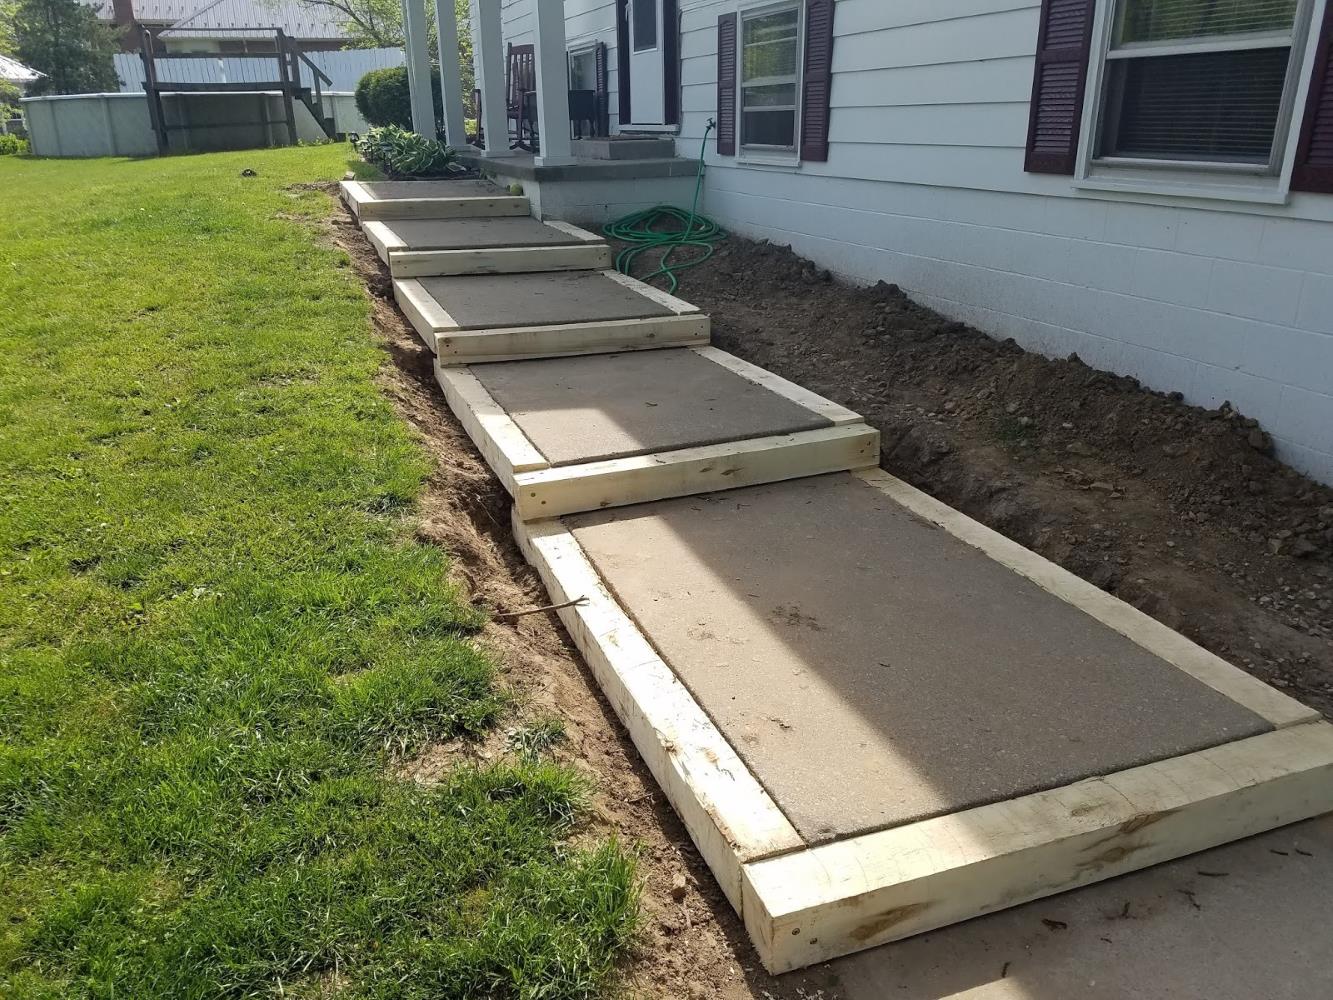
Building the Base
Building a sturdy and reliable base is essential for the structural integrity of your concrete steps on a slope. Here's a detailed guide on how to build the base for your project:
-
Install Wooden Forms: Begin by installing wooden forms along the excavated area to define the shape and structure of each step. These forms will serve as molds for the concrete and help create uniformity in the size and shape of the steps.
-
Reinforce with Rebar: To enhance the strength and durability of the steps, place rebar within the forms. This reinforcement will provide added support and prevent cracking or shifting over time. Ensure that the rebar is positioned evenly and securely within the forms.
-
Add Gravel Base: Once the forms and rebar are in place, add a layer of gravel to the bottom of each step. The gravel will improve drainage, provide a stable foundation, and help prevent moisture-related issues in the future.
-
Check for Level and Alignment: Use a level to ensure that the forms are positioned evenly and that each step is level from front to back and side to side. Make any necessary adjustments to the forms to achieve the desired alignment and slope.
-
Secure Forms and Rebar: Once the forms and rebar are in the correct position, secure them in place using stakes or braces. This will prevent any shifting or movement during the concrete pouring and finishing process.
-
Prepare for Concrete Pouring: Before pouring the concrete, double-check the alignment, levelness, and overall readiness of the base. Take the time to review your plan and ensure that everything is in place for a successful concrete pour.
By following these steps, you'll establish a solid and well-prepared base for your concrete steps on a slope. Building a strong foundation is crucial for the longevity and stability of the steps, so take the time to complete this phase of the project with care and precision.
Pouring and Finishing the Concrete
Once the base is prepared, it's time to move on to the exciting phase of pouring and finishing the concrete for your steps. Here's a detailed guide on how to tackle this critical stage of the project:
-
Mix the Concrete: Begin by mixing the concrete according to the manufacturer's instructions. Use a sturdy wheelbarrow or mixing tub to combine the concrete mix with water until it reaches the desired consistency. Ensure that the concrete is thoroughly mixed to achieve uniformity in strength and texture.
-
Pour the Concrete: Carefully pour the mixed concrete into the prepared forms, starting from the bottom step and working your way up. Use a shovel or trowel to distribute the concrete evenly within each form, filling it to the top and ensuring that there are no air pockets or voids.
-
Level and Smooth: Once the forms are filled with concrete, use a screed board or straight edge to level the surface of each step. Move the screed board in a back-and-forth sawing motion across the forms to remove excess concrete and create a smooth, flat surface. Pay close attention to maintaining the desired slope and alignment of each step.
-
Add Texture and Finish: Depending on your preference, you can add texture to the concrete surface using a broom or trowel to create a non-slip finish. Additionally, consider using a edging tool to create a clean and defined edge along the front of each step. These finishing touches will enhance the appearance and functionality of the steps.
-
Cure the Concrete: After the concrete is poured and finished, it's crucial to allow it to cure properly. Cover the steps with plastic sheeting or a curing compound to retain moisture and promote gradual curing. Follow the manufacturer's recommendations for the curing period to ensure that the concrete achieves its full strength and durability.
-
Remove Forms and Clean Up: Once the concrete has cured, carefully remove the wooden forms and any excess concrete from the sides of the steps. Use a wire brush or concrete edging tool to clean up the edges and remove any rough spots. Dispose of any leftover materials and debris from the construction site.
By following these steps, you'll successfully pour and finish the concrete for your steps, creating a durable and visually appealing surface. Paying attention to the details during this phase of the project will contribute to the overall quality and longevity of your concrete steps on a slope.
Adding Railings and Finishing Touches
Once the concrete steps are in place, adding railings and finishing touches is essential for both safety and aesthetics. Here's a detailed guide on how to complete this final phase of the project:
-
Select the Right Railings: Choose railings that complement the design of your concrete steps and provide the necessary support. Options include metal, wood, or composite railings, each offering different styles and levels of durability.
-
Measure and Install Posts: Begin by measuring the distance between each step and determining the placement of the railing posts. Install the posts securely into the concrete using anchor bolts or post brackets, ensuring that they are plumb and aligned with the steps.
-
Attach the Handrails: Once the posts are in place, attach the handrails to create a secure and stable railing system. Ensure that the handrails are at the appropriate height and angle for comfortable use, especially if the steps are used frequently.
-
Add Decorative Elements: Consider adding decorative elements to enhance the visual appeal of the railings and steps. This could include post caps, balusters, or lighting fixtures to create a welcoming and stylish entrance to your home.
-
Apply a Protective Finish: If you used wood elements for the railings, apply a protective finish to safeguard them from the elements and prolong their lifespan. Choose a finish that is suitable for exterior use and provides protection against moisture, UV exposure, and wear.
-
Inspect and Test: Once the railings are installed, thoroughly inspect the entire structure to ensure that it is secure and meets safety standards. Test the railings for stability and make any necessary adjustments to ensure that they provide reliable support.
By following these steps, you'll complete the construction of your concrete steps on a slope with the addition of sturdy railings and attractive finishing touches. This final phase will not only enhance the functionality and safety of the steps but also contribute to the overall visual appeal of your outdoor space.
Conclusion
In conclusion, building concrete steps on a slope is a challenging yet rewarding DIY project that can enhance the accessibility and visual appeal of your outdoor space. By carefully planning and preparing, excavating the slope, building a solid base, pouring and finishing the concrete, and adding railings and finishing touches, you can create a durable and attractive set of steps that will stand the test of time. Whether you're creating a pathway to your front door, connecting different levels of your garden, or adding steps to a patio area, the steps outlined in this guide will help you tackle the project with confidence and achieve impressive results. Remember to prioritize safety, attention to detail, and adherence to local building codes throughout the construction process. With the right tools, materials, and know-how, you can successfully build concrete steps on a slope and enjoy the functional and aesthetic benefits for years to come.