
Home>Create & Decorate>DIY & Crafts>DIY Closet System: Organize Your Space With This Step-by-Step Guide
DIY & Crafts
DIY Closet System: Organize Your Space With This Step-by-Step Guide
Published: February 23, 2024

Content Creator specializing in woodworking and interior transformations. Caegan's guides motivate readers to undertake their own projects, while his custom furniture adds a personal touch.
Transform your space with our step-by-step DIY closet system guide. Organize your belongings efficiently with these DIY & Crafts tips.
(Many of the links in this article redirect to a specific reviewed product. Your purchase of these products through affiliate links helps to generate commission for Twigandthistle.com, at no extra cost. Learn more)
Introduction
Creating a well-organized and functional closet system can transform the way you approach your daily routine. Whether you're a DIY enthusiast or a novice looking to embark on a new project, building a custom closet system can be a rewarding and practical endeavor. By following this step-by-step guide, you'll gain valuable insights into optimizing your closet space and learn how to tailor a system that suits your specific needs.
A well-organized closet not only enhances the aesthetic appeal of your living space but also simplifies your daily routine. Imagine effortlessly finding your favorite outfit, neatly arranging your shoes, and efficiently accessing your accessories. With a custom DIY closet system, you can achieve all this and more.
This comprehensive guide will walk you through the process of assessing your closet space, planning the layout, selecting the right materials, and building a sturdy framework. You'll also learn how to install shelves and rods, add accessories such as drawers and baskets, and finally, organize your belongings in a way that maximizes space and functionality.
Whether you're revamping a small reach-in closet or tackling a larger walk-in space, this guide is designed to cater to various closet sizes and layouts. By the end of this journey, you'll not only have a beautifully organized closet but also a sense of accomplishment and pride in your DIY skills.
So, roll up your sleeves, gather your tools, and get ready to embark on a fulfilling DIY project that will elevate the functionality and aesthetic appeal of your living space. Let's dive into the first step: assessing your closet space.
Step 1: Assess Your Closet Space
Before diving into the DIY closet system project, it's crucial to assess your existing closet space thoroughly. This step sets the foundation for creating a customized system that maximizes storage and organization. Here's how to approach the assessment process:
-
Inventory Your Belongings: Begin by taking stock of all the items you plan to store in the closet. This includes clothing, shoes, accessories, and any other belongings that currently occupy the space. Sorting through your belongings allows you to evaluate the types of storage solutions needed and determine the amount of space required for different categories of items.
-
Evaluate Your Storage Needs: Consider the specific storage requirements for different types of items. For example, hanging space is essential for dresses, shirts, and coats, while shelves are ideal for folded clothing, shoes, and accessories. Assessing your storage needs helps in determining the quantity and types of storage components required for the closet system.
-
Analyze the Layout: Take note of the existing layout and configuration of your closet. Assess the available wall space, ceiling height, and any alcoves or nooks that can be utilized for storage. Understanding the layout will guide the design and placement of shelves, rods, and other organizational elements within the closet.
-
Identify Pain Points: Reflect on any existing challenges or inefficiencies in your current closet setup. This could include inadequate hanging space, limited shelving, or underutilized areas. Identifying these pain points will inform the design of the new closet system, allowing you to address and overcome these limitations effectively.
-
Consider Future Needs: Anticipate any potential changes in your wardrobe or storage requirements. Whether it's accommodating seasonal clothing, expanding your shoe collection, or creating space for accessories, considering future needs ensures that the closet system remains functional and adaptable in the long run.
By thoroughly assessing your closet space and storage needs, you'll gain valuable insights that lay the groundwork for designing a tailored DIY closet system. This proactive approach sets the stage for a successful and personalized organizational solution that caters to your specific lifestyle and belongings.
Step 2: Measure and Plan
Accurate measurements and meticulous planning are the cornerstones of a successful DIY closet system. Before diving into the construction phase, it's essential to take precise measurements of your closet space and develop a comprehensive plan that outlines the layout and design of the new system.
Measure Your Closet Space
Begin by measuring the dimensions of your closet, including the width, height, and depth. Use a reliable tape measure to record these measurements, ensuring precision down to the nearest fraction of an inch. Take note of any architectural features such as baseboards, moldings, or irregular wall angles that may impact the design and installation of the closet system.
Consider Vertical Space
Assess the vertical space within the closet to determine the maximum height available for hanging rods, shelves, and other storage components. Utilizing the vertical space efficiently can significantly increase the storage capacity of the closet system, allowing for ample room to organize clothing, accessories, and other items.
Plan the Layout
With the measurements in hand, sketch a rough layout of the closet space, incorporating the dimensions and any architectural nuances. Consider the placement of hanging rods, shelves, drawers, and other organizational elements based on your storage needs and the inventory of belongings. Visualizing the layout on paper provides a clear roadmap for the construction phase and helps in identifying potential design challenges.
Customize to Your Needs
Tailor the plan to align with your specific storage requirements and organizational preferences. If you have a substantial collection of shoes, allocate sufficient space for shoe racks or cubbies. For folded clothing, plan for ample shelf space, and consider incorporating adjustable components to accommodate varying heights of items. Customizing the plan ensures that the closet system caters to your unique lifestyle and belongings.
Anticipate Future Adjustments
While planning the layout, keep future adaptability in mind. Consider incorporating adjustable shelves and rods that can be repositioned as your storage needs evolve. This forward-thinking approach ensures that the closet system remains functional and versatile, capable of accommodating changes in your wardrobe and belongings over time.
By meticulously measuring your closet space and developing a detailed plan, you set the stage for a seamless and efficient construction process. The precision and foresight invested in this phase lay the groundwork for a customized DIY closet system that optimizes storage, organization, and accessibility.
Step 3: Choose Your Materials
Selecting the right materials is a pivotal aspect of creating a durable and visually appealing DIY closet system. The chosen materials not only contribute to the structural integrity of the system but also play a significant role in defining its aesthetic appeal. When embarking on the material selection process, it's essential to consider factors such as durability, versatility, and visual cohesiveness with the existing decor. Here's a comprehensive guide to choosing the materials for your DIY closet system:
Consider the Framework
For the framework of the closet system, sturdy and reliable materials are essential to ensure long-term stability. Opt for high-quality wood such as plywood or medium-density fiberboard (MDF) for constructing the framework. These materials offer excellent structural support and can withstand the weight of clothing, accessories, and other items stored within the closet.
Choose Shelving Materials
When it comes to shelving, consider materials that strike a balance between strength and visual appeal. Solid wood shelves provide a timeless and elegant look while offering robust support for folded clothing, shoes, and accessories. Alternatively, ventilated wire shelving is a practical choice for promoting airflow and visibility, ideal for storing linens, handbags, and other items.
Select Rod and Hardware Materials
The materials for hanging rods and hardware should prioritize durability and corrosion resistance. Opt for metal rods, such as stainless steel or chrome-plated steel, to ensure reliable support for hanging garments. Additionally, choose high-quality hardware such as brackets, fasteners, and drawer pulls that complement the chosen materials and contribute to the overall cohesiveness of the closet system.
Explore Decorative Finishes
Incorporating decorative finishes can elevate the visual appeal of the closet system. Consider adding decorative trim, molding, or edge banding to the exposed edges of shelves and framework components. This not only adds a refined touch to the design but also provides a cohesive and polished look to the entire system.
Factor in Customization Options
Keep in mind the potential for customization when selecting materials. Choose materials that offer flexibility for customization, such as paintable surfaces or stainable wood, allowing you to personalize the aesthetic to align with your interior decor and personal style preferences.
By carefully considering these aspects and selecting materials that align with your functional and aesthetic goals, you can lay the foundation for a well-crafted and visually appealing DIY closet system. The chosen materials will not only contribute to the structural integrity and longevity of the system but also enhance the overall ambiance of the space, creating a harmonious and organized environment.
Step 4: Build the Framework
The framework serves as the backbone of your DIY closet system, providing structural support and laying the groundwork for the installation of shelves, rods, and other organizational components. Building a sturdy and well-constructed framework is essential to ensure the longevity and functionality of the closet system. Here's a detailed overview of the process involved in constructing the framework:
Selecting the Framework Material
Choose high-quality wood such as plywood or medium-density fiberboard (MDF) for constructing the framework. These materials offer excellent stability and durability, providing a reliable foundation for the entire closet system. Ensure that the selected material is free from warping or defects, as this will impact the overall integrity of the framework.
Cutting and Preparing the Components
Using precise measurements from the planning phase, carefully cut the wood panels to create the vertical supports, horizontal rails, and any additional framework components required. Take care to achieve clean and accurate cuts, as this will facilitate seamless assembly and ensure a professional finish.
Assembling the Framework
Begin by assembling the vertical supports, connecting them with the horizontal rails to form the basic structure of the framework. Utilize wood screws or dowels to secure the joints, ensuring a tight and stable connection. Pay attention to the alignment and squareness of the framework components to maintain structural integrity.
Securing the Framework in Place
Once the framework is assembled, secure it in place within the closet space using appropriate fasteners. Ensure that the framework is level and securely anchored to the walls, providing a stable base for the subsequent installation of shelves, rods, and other organizational elements.
Reinforcing the Corners and Junctions
To enhance the strength and stability of the framework, consider reinforcing the corners and junctions with additional bracing or corner brackets. This extra reinforcement minimizes the risk of sagging or shifting over time, particularly when the closet system is subjected to the weight of stored items.
Evaluating Structural Integrity
After the framework is assembled and secured, conduct a thorough evaluation of its structural integrity. Check for any signs of instability, such as wobbling or misalignment. Address any issues promptly to ensure that the framework provides a solid and reliable foundation for the entire closet system.
By meticulously following these steps and paying attention to detail during the construction of the framework, you can establish a robust and stable base for your DIY closet system. The framework sets the stage for the subsequent installation of shelves, rods, and accessories, culminating in a well-organized and functional closet space that enhances the overall efficiency and aesthetic appeal of your home.
Step 5: Install Shelves and Rods
With the framework in place, the next crucial step in creating a customized DIY closet system is the installation of shelves and rods. This phase brings the organizational structure to life, providing designated spaces for clothing, accessories, and other items. Here's a detailed overview of the process involved in installing shelves and rods to optimize your closet space:
Positioning the Shelves
Begin by determining the placement of the shelves within the closet. Based on your storage needs and the inventory of belongings, allocate space for folded clothing, shoes, and accessories. Utilize the vertical dimension of the closet efficiently, considering varying heights of items to maximize storage capacity. Position the shelves at consistent intervals, ensuring a balanced and visually appealing layout.
Securing the Shelves
Once the positions are marked, proceed to secure the shelves onto the framework. Use appropriate shelf brackets or supports to anchor the shelves firmly in place. Ensure that the shelves are level and securely fastened, capable of accommodating the weight of the stored items without sagging or instability. Pay attention to the alignment and spacing of the shelves to create a cohesive and functional storage arrangement.
Installing Hanging Rods
For the hanging rods, identify the optimal heights for different types of clothing, such as dresses, shirts, and pants. Install the rods at suitable heights, allowing ample clearance for hanging garments without causing them to touch the floor. Utilize sturdy rod brackets or supports to secure the rods within the closet, ensuring that they can withstand the weight of the hanging clothing without bending or warping.
Customizing the Configuration
Consider incorporating adjustable shelves and rods to accommodate varying storage needs and future changes in your wardrobe. This customization option allows for flexibility in organizing different types of items, ensuring that the closet system remains adaptable over time. By customizing the configuration to align with your specific storage requirements, you can create a personalized and efficient organizational solution.
Evaluating Accessibility and Functionality
As the shelves and rods are installed, evaluate the accessibility and functionality of the closet system. Ensure that the arrangement allows for easy retrieval of items and promotes efficient organization. Consider the visibility of stored items and make adjustments as needed to optimize accessibility and usability within the closet space.
By meticulously following these steps and focusing on precision and functionality, you can successfully install shelves and rods to create a well-organized and efficient DIY closet system. This phase marks a significant milestone in transforming your closet space, setting the stage for the final step: adding accessories to further enhance the functionality and aesthetic appeal of the customized system.
Step 6: Add Accessories
The addition of accessories serves as the finishing touch that elevates the functionality and aesthetic appeal of your DIY closet system. By incorporating accessories such as drawers, baskets, dividers, and hooks, you can further optimize the organization and storage capacity of the closet space. Here's a detailed exploration of the process involved in adding accessories to enhance the overall functionality and visual cohesiveness of the customized system.
Integrate Drawers and Dividers
Integrating drawers into the closet system provides designated spaces for storing smaller items such as jewelry, accessories, and undergarments. Opt for durable and smoothly gliding drawer slides to ensure effortless access to the contents. Additionally, consider incorporating dividers within the drawers to compartmentalize and organize items effectively, preventing clutter and promoting a tidy storage solution.
Utilize Baskets and Bins
Baskets and bins offer versatile storage solutions for items such as scarves, belts, and seasonal accessories. Incorporate woven or fabric-lined baskets onto the shelves to create visually appealing storage compartments. These baskets not only add a decorative element to the closet but also provide convenient storage for items that benefit from easy accessibility and visibility.
Introduce Hooks and Hanging Organizers
Hooks and hanging organizers are valuable additions for maximizing vertical space within the closet. Install sturdy hooks for hanging handbags, belts, or scarves, effectively utilizing the often underutilized wall space. Additionally, consider hanging organizers such as fabric shoe racks or accessory organizers to create dedicated spaces for specific items, promoting a clutter-free and organized closet environment.
Incorporate Decorative Accents
Incorporating decorative accents such as decorative knobs, handles, or labels adds a personalized and refined touch to the closet system. Choose decorative hardware that complements the overall aesthetic of the space, enhancing the visual cohesiveness of the system. These small yet impactful details contribute to a polished and customized look, elevating the overall ambiance of the closet.
Evaluate Accessibility and Functionality
As accessories are integrated into the closet system, evaluate the accessibility and functionality of the storage solutions. Ensure that the placement of accessories promotes ease of use and efficient organization. Consider the visibility and reachability of items stored within the accessories, making adjustments as needed to optimize the overall functionality of the closet space.
By thoughtfully incorporating these accessories, you can transform your DIY closet system into a well-organized and visually appealing space that caters to your specific storage needs. The addition of accessories not only enhances the functionality of the system but also adds a personalized and decorative element, creating a harmonious and efficient storage solution within your home.
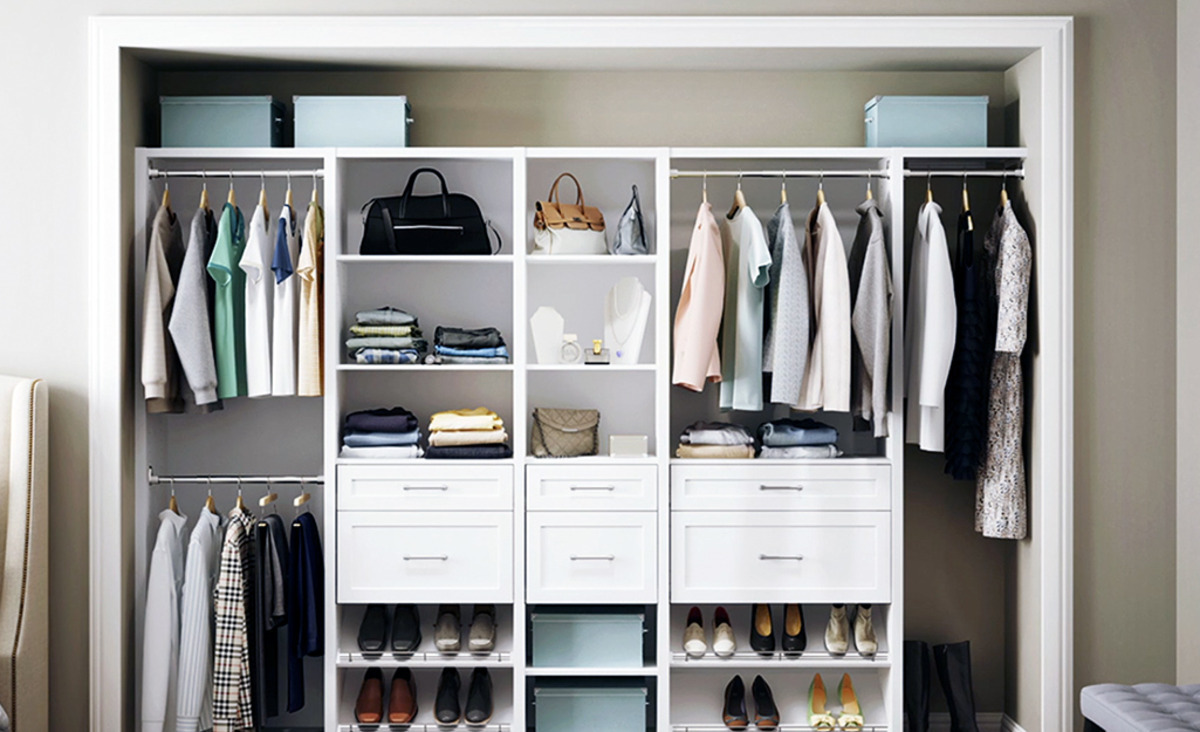
Step 7: Organize and Enjoy Your New Closet System
With the completion of the construction and installation phases, it's time to bring your newly crafted DIY closet system to life through thoughtful organization and the enjoyment of its enhanced functionality. This pivotal step involves the meticulous arrangement of your belongings within the system, ensuring that each item finds its designated place while maximizing the efficiency and visual appeal of the space.
Begin by categorizing your clothing, accessories, and other items, grouping them based on usage frequency, seasonality, or specific organizational preferences. Utilize the designated shelves, drawers, and hanging spaces to create a cohesive and intuitive storage arrangement that aligns with your daily routine and lifestyle.
Consider implementing organizational strategies such as color coordination, grouping similar items together, and utilizing storage containers to maintain a clutter-free environment. By organizing your belongings with purpose and attention to detail, you can streamline your daily routine and effortlessly locate items when needed.
As you organize your new closet system, take the opportunity to declutter and assess the necessity of each item. Embrace the concept of minimalism by curating a collection of clothing and accessories that truly resonate with your personal style and lifestyle, fostering a sense of simplicity and mindfulness within your wardrobe.
Once the organizational process is complete, take a moment to step back and admire the transformation of your closet space. Revel in the satisfaction of a well-organized and visually appealing environment that reflects your unique preferences and organizational prowess. Embrace the newfound functionality and efficiency of your DIY closet system, savoring the seamless access to your belongings and the enhanced aesthetic appeal of the space.
By embracing the process of organizing and enjoying your new closet system, you not only elevate the functionality of your living space but also cultivate a sense of pride and accomplishment in your DIY endeavor. Embrace the daily convenience and visual harmony that your customized closet system brings, setting the stage for a more organized and enjoyable lifestyle within your home.