
Home>Create & Decorate>DIY & Crafts>DIY Gaga Ball Pit: Step-by-Step Guide To Building Your Own
DIY & Crafts
DIY Gaga Ball Pit: Step-by-Step Guide To Building Your Own
Published: March 7, 2024

Content Creator specializing in woodworking and interior transformations. Caegan's guides motivate readers to undertake their own projects, while his custom furniture adds a personal touch.
Learn how to build your own DIY Gaga Ball Pit with our step-by-step guide. Perfect for DIY & Crafts enthusiasts looking for a fun and engaging project. Start building today!
(Many of the links in this article redirect to a specific reviewed product. Your purchase of these products through affiliate links helps to generate commission for Twigandthistle.com, at no extra cost. Learn more)
Introduction
Are you looking for a fun and exciting outdoor activity that will keep the kids entertained for hours? Look no further than a DIY Gaga Ball Pit! Building your own Gaga Ball Pit is a fantastic way to encourage physical activity and social interaction among children. In this step-by-step guide, we will walk you through the process of creating your very own Gaga Ball Pit right in your backyard. So, roll up your sleeves, gather your materials, and get ready to embark on a thrilling DIY project that will bring joy and laughter to your little ones.
Materials Needed
To get started on your DIY Gaga Ball Pit project, you will need the following materials:
- Pressure-treated lumber: This will be used to construct the frame of the Gaga Ball Pit. Make sure to choose high-quality, durable lumber that can withstand outdoor elements.
- Netting: You will need a large piece of durable netting to enclose the Gaga Ball Pit and keep the balls from rolling out.
- Gaga Ball Pit Balls: The number of balls you need will depend on the size of your pit, but it's always better to have more than you think you'll need.
- Galvanized screws: These will be used to secure the lumber together, ensuring a sturdy and safe frame.
- Measuring tape and level: Essential tools for ensuring that your Gaga Ball Pit is built to the correct dimensions and is level.
- Drill and saw: You'll need these tools to cut the lumber to size and assemble the frame.
- Safety goggles and gloves: Always prioritize safety when working with tools and materials.
- Paint and brushes (optional): If you want to add a pop of color to your Gaga Ball Pit, consider using outdoor paint to decorate the frame.
Gather these materials before you begin, and you'll be well-prepared to tackle each step of the construction process.
Step 1: Choosing the Right Location
The first step in building your DIY Gaga Ball Pit is to carefully select the perfect location for it in your backyard. Here are some essential considerations to keep in mind:
-
Space: Ensure that the chosen area has enough space to accommodate the Gaga Ball Pit comfortably. The ideal size for a Gaga Ball Pit is around 20 feet in diameter, so make sure the location can accommodate this size without feeling cramped.
-
Flat Ground: Look for a spot with level ground to set up the Gaga Ball Pit. This will make the construction process easier and ensure that the pit is safe and stable for use.
-
Safety: Keep safety in mind when choosing the location. Avoid areas with obstacles such as rocks, tree roots, or uneven terrain that could pose a tripping hazard.
-
Accessibility: Consider the accessibility of the location. It should be easily reachable from your home and other areas of your backyard, allowing for convenient supervision of the children playing in the pit.
-
Sun Exposure: Take note of the sun exposure in the chosen location. While some sunlight is beneficial, excessive exposure can make the pit uncomfortably hot. Aim for a balance of sun and shade throughout the day.
By carefully considering these factors, you can select the perfect location for your DIY Gaga Ball Pit, ensuring that it provides a safe, enjoyable, and convenient play area for the kids.
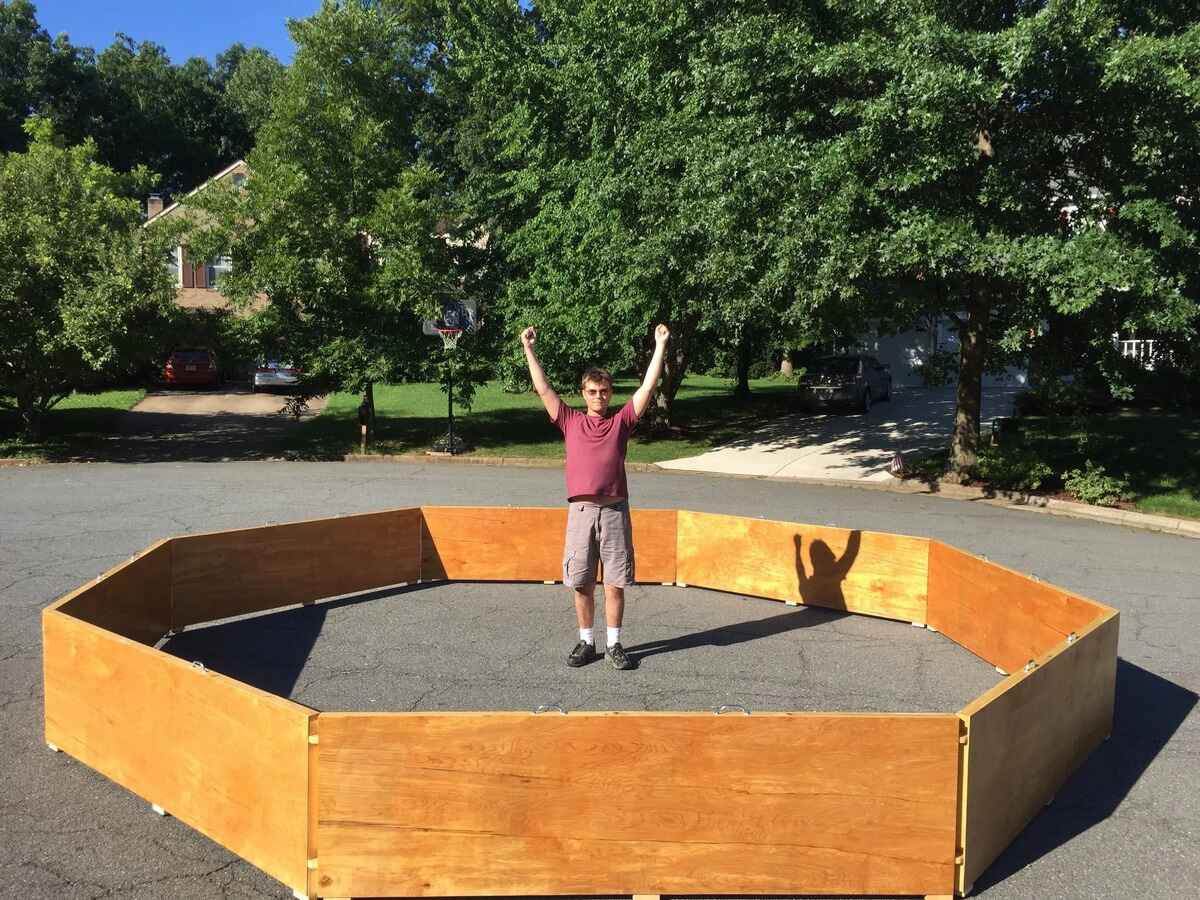
Step 2: Building the Frame
Now that you've chosen the ideal location, it's time to dive into the construction process by building the frame for your Gaga Ball Pit. Follow these steps to create a sturdy and reliable frame that will form the foundation of your pit:
-
Cutting the Lumber: Begin by measuring and cutting the pressure-treated lumber to the required lengths. You'll need pieces for the base, uprights, and top rail of the frame. Use a saw to ensure precise cuts, and remember to prioritize safety by wearing protective gear.
-
Assembling the Base: Lay out the cut lumber to form the base of the frame. Use galvanized screws to securely attach the pieces together, ensuring that the base is stable and level. A level can be handy for checking the evenness of the base.
-
Adding the Uprights: Once the base is assembled, it's time to attach the upright pieces of lumber to form the walls of the frame. Position the uprights evenly around the perimeter of the base, ensuring that they are securely fastened and perpendicular to the ground.
-
Installing the Top Rail: Complete the frame by adding the top rail, which will connect the uprights and provide additional stability. Secure the top rail to the uprights using galvanized screws, creating a solid and durable structure.
-
Optional: Painting the Frame: If you want to add a personal touch to your Gaga Ball Pit, consider painting the frame with outdoor paint. This step is entirely optional but can add a vibrant and playful aesthetic to the pit.
By following these steps, you'll successfully build a robust frame for your Gaga Ball Pit, setting the stage for the next phases of construction. Ensure that the frame is securely anchored to the ground and free from any sharp edges or protruding screws to guarantee a safe and enjoyable playing environment for the kids.
Step 3: Installing the Netting
With the frame of your Gaga Ball Pit securely in place, the next crucial step is to install the netting that will enclose the pit and prevent the balls from escaping. Follow these detailed instructions to ensure a proper and effective installation of the netting:
-
Measuring the Netting: Begin by measuring the dimensions of the Gaga Ball Pit frame to determine the size of netting needed. Ensure that the netting is large enough to fully enclose the pit while allowing ample space for movement inside.
-
Cutting the Netting: Once you have the measurements, carefully cut the netting to the appropriate size using sharp scissors or a utility knife. Double-check the dimensions before cutting to avoid any errors.
-
Attaching the Netting to the Frame: Position the cut netting around the perimeter of the frame, ensuring that it is taut and free from any sagging or loose areas. Use durable zip ties or heavy-duty staples to secure the netting to the frame at regular intervals, ensuring a snug and secure fit.
-
Securing the Bottom Edge: Pay special attention to securing the bottom edge of the netting to the base of the frame. This will prevent balls from rolling underneath the netting and help maintain a contained playing area.
-
Checking for Stability: Once the netting is attached, carefully inspect the installation to ensure that it is securely fastened and free from any gaps or openings. Tug gently on the netting to test its stability and make any necessary adjustments to achieve a tight and secure enclosure.
-
Trimming Excess Netting: If there is any excess netting protruding from the frame, carefully trim it away using scissors or a utility knife. Be sure to leave a small margin of netting to maintain a secure attachment to the frame.
By following these steps, you will effectively install the netting for your Gaga Ball Pit, creating a safe and contained playing area for the children to enjoy. The netting serves as a crucial element in ensuring that the balls remain within the pit, allowing for uninterrupted and energetic gameplay.
Step 4: Adding the Ball Pit Balls
Now that the frame and netting of your Gaga Ball Pit are in place, it's time to add the essential element that will bring the pit to life – the ball pit balls! Follow these steps to ensure a fun and engaging ball pit experience for the kids:
-
Selecting the Balls: Choose high-quality, durable ball pit balls that are designed for safe play. Opt for brightly colored balls to create an inviting and visually appealing play environment.
-
Calculating the Quantity: Determine the number of balls needed based on the size of your Gaga Ball Pit. As a general guideline, aim for a ball density that allows for easy movement and play without overcrowding the pit.
-
Filling the Pit: Carefully pour the ball pit balls into the enclosed area, ensuring an even distribution throughout the pit. Encourage the kids to join in on the fun by helping with the ball placement.
-
Testing the Depth: Once the pit is filled with balls, assess the depth to ensure that it provides a comfortable and safe playing experience. The balls should be deep enough to allow for diving, jumping, and playful interaction without posing any risk of injury.
-
Maintaining the Balls: Regularly inspect and clean the ball pit balls to ensure hygiene and safety. Consider using a mild soap and water solution to gently wash the balls, followed by thorough rinsing and drying.
By following these steps, you'll successfully add the ball pit balls to your Gaga Ball Pit, creating an exciting and dynamic play area that will captivate the kids and provide endless hours of entertainment. The colorful balls, combined with the enclosed space and energetic gameplay, will make the Gaga Ball Pit a favorite destination for fun and laughter in your backyard.
Step 5: Safety Precautions
Ensuring the safety of the children playing in the Gaga Ball Pit is paramount. Implementing the following safety precautions will help create a secure and enjoyable environment for all participants:
-
Supervision: Always supervise children while they are playing in the Gaga Ball Pit. An adult should be present to oversee the activities and intervene if necessary. This proactive approach can prevent accidents and promote responsible play.
-
Establishing Rules: Set clear and age-appropriate rules for using the Gaga Ball Pit. Emphasize the importance of respectful and considerate behavior, as well as the avoidance of roughhousing or aggressive play. Encouraging good sportsmanship and cooperation among the children will contribute to a positive and safe play experience.
-
Safety Signage: Consider posting safety guidelines and rules near the Gaga Ball Pit. Simple visual reminders, such as "No Running" or "Take Turns," can help reinforce good behavior and promote awareness of safety considerations.
-
Regular Inspections: Routinely inspect the Gaga Ball Pit for any signs of wear, damage, or deterioration. Check the frame, netting, and ball pit balls for any issues that may compromise safety. Promptly address any concerns to maintain a secure play environment.
-
Proper Use of Equipment: Educate children on the correct way to use the Gaga Ball Pit. Emphasize the importance of entering and exiting the pit carefully, as well as the safe handling of the ball pit balls. Encourage respectful and considerate play to minimize the risk of accidents.
-
First Aid Kit: Keep a well-stocked first aid kit nearby in case of minor injuries. Having essential supplies readily available can expedite the treatment of minor cuts, scrapes, or bruises, ensuring that the children can quickly return to their play activities.
By prioritizing safety and implementing these precautions, you can create a secure and enjoyable environment within the Gaga Ball Pit. These measures will promote responsible play, minimize the risk of accidents, and provide peace of mind for both the children and supervising adults.
Conclusion
Congratulations on successfully completing your DIY Gaga Ball Pit! By following this step-by-step guide, you've created an exciting and engaging play area that will bring joy and laughter to children for years to come. The combination of a sturdy frame, secure netting, vibrant ball pit balls, and essential safety precautions ensures that the Gaga Ball Pit provides a safe and enjoyable environment for active play.
As you watch the kids dive, dodge, and laugh within the confines of the Gaga Ball Pit, take pride in knowing that you've crafted a space that encourages physical activity, social interaction, and imaginative play. Whether it's a weekend gathering, a birthday celebration, or a simple afternoon of fun, the Gaga Ball Pit will undoubtedly become a beloved centerpiece of outdoor entertainment.
Remember to periodically inspect and maintain the Gaga Ball Pit to ensure its continued safety and functionality. With proper care and attention, your DIY creation will remain a source of endless amusement and cherished memories for the young adventurers who step into its lively confines.
So, gather the kids, invite the neighborhood, and let the games begin in your very own DIY Gaga Ball Pit!