
Home>Create & Decorate>DIY & Crafts>DIY: How To Build A Wood Deck With A Built-In Fire Pit
DIY & Crafts
DIY: How To Build A Wood Deck With A Built-In Fire Pit
Published: February 24, 2024

Content Creator specializing in woodworking and interior transformations. Caegan's guides motivate readers to undertake their own projects, while his custom furniture adds a personal touch.
Learn how to build a stunning wood deck with a built-in fire pit with our step-by-step DIY guide. Perfect for DIY & Crafts enthusiasts!
(Many of the links in this article redirect to a specific reviewed product. Your purchase of these products through affiliate links helps to generate commission for Twigandthistle.com, at no extra cost. Learn more)
Introduction
Are you dreaming of a cozy outdoor space where you can gather with friends and family, enjoying the warmth of a crackling fire on a cool evening? Building a wood deck with a built-in fire pit can turn that dream into a reality. This DIY project not only adds a charming and functional element to your backyard but also provides an opportunity for creative expression and hands-on craftsmanship.
Creating a wood deck with a built-in fire pit is a rewarding endeavor that allows you to personalize your outdoor living area according to your preferences and needs. Whether you envision a spacious entertainment hub or a tranquil retreat, this project offers the flexibility to tailor the design to suit your lifestyle.
By following this comprehensive guide, you'll learn the step-by-step process of planning, constructing, and finishing a wood deck with a built-in fire pit. From selecting the ideal location for your deck to choosing the right materials and tools, each stage of the project presents an opportunity to exercise your creativity and problem-solving skills.
As you embark on this DIY journey, keep in mind that safety is paramount. Throughout the construction process, we'll highlight essential safety considerations to ensure that your wood deck with a built-in fire pit not only exudes charm but also prioritizes the well-being of you and your loved ones.
So, roll up your sleeves, gather your tools, and get ready to transform your outdoor space into a welcoming haven where cherished memories are made. Let's dive into the exciting world of DIY wood deck construction and fire pit installation, where your vision and craftsmanship converge to create a captivating outdoor retreat.
Step 1: Planning and Designing Your Deck
Before diving into the construction of your wood deck with a built-in fire pit, meticulous planning and thoughtful design are essential. This initial phase sets the foundation for a successful and satisfying DIY project. Here's a detailed breakdown of the crucial steps involved in planning and designing your deck:
-
Assess Your Space: Begin by surveying your outdoor area to determine the ideal location for your wood deck and fire pit. Consider factors such as sunlight exposure, proximity to the house, and any existing landscaping features. This assessment will help you visualize how the deck will integrate with the surrounding environment.
-
Define Your Deck's Purpose: Envision how you intend to use the deck. Will it primarily serve as an entertainment space for hosting gatherings, or do you prefer a tranquil retreat for relaxation? Understanding the intended purpose will guide the design and layout of your deck.
-
Set a Budget: Establish a realistic budget for the project, factoring in material costs, tools, and any professional assistance you may require. Having a clear budget in mind will influence your material choices and design decisions.
-
Create a Design Plan: Sketch out a rough design plan for your wood deck, considering its size, shape, and any additional features such as seating areas or built-in planters. This plan will serve as a visual reference and can be refined as you progress through the planning phase.
-
Check Local Building Codes: Research and familiarize yourself with the building codes and regulations in your area pertaining to deck construction and fire pit installation. Compliance with these codes is crucial for the safety and legality of your project.
-
Select Materials: Choose the type of wood and decking materials that align with your aesthetic preferences, maintenance requirements, and budget. Additionally, consider fire-resistant materials for the fire pit construction to ensure safety.
-
Consider Safety Measures: Integrate safety features into your deck design, such as sturdy railings, proper ventilation for the fire pit, and non-combustible materials in close proximity to the fire pit.
By meticulously planning and designing your wood deck with a built-in fire pit, you lay the groundwork for a successful and enjoyable construction process. This preparatory phase allows you to envision the end result and make informed decisions that align with your vision and practical considerations.
Step 2: Gathering Materials and Tools
The successful execution of any DIY project hinges on the availability of the right materials and tools. When it comes to building a wood deck with a built-in fire pit, the selection of high-quality materials and appropriate tools is paramount to achieving a durable and visually appealing end result. Here's a comprehensive guide to gathering the essential materials and tools for this project:
Materials:
- Decking Materials: Select pressure-treated lumber or composite decking boards based on your design preferences and budget. Ensure that the chosen materials are suitable for outdoor use and can withstand varying weather conditions.
- Support Posts and Beams: Acquire sturdy support posts and beams to form the structural framework of the deck. These components provide the necessary stability and load-bearing capacity.
- Fasteners and Hardware: Gather corrosion-resistant screws, nails, and joist hangers to securely fasten the deck components. Additionally, consider stainless steel or galvanized hardware to prevent rust and corrosion.
- Concrete and Gravel: If your deck design includes a built-in fire pit, procure concrete and gravel for creating a stable and fire-resistant base for the pit.
- Fire Pit Materials: Depending on the chosen design, gather fire-resistant bricks, retaining wall blocks, or metal fire pit inserts to construct the fire pit. Ensure that the selected materials are suitable for containing and withstanding high temperatures.
- Fire Pit Gravel and Sand: Acquire gravel and sand to fill the bottom of the fire pit, providing a safe and heat-resistant foundation for the fire.
Tools:
- Power Tools: Ensure you have a circular saw, power drill, and impact driver for cutting and fastening the decking materials and structural components.
- Measuring and Marking Tools: Gather a tape measure, carpenter's square, and chalk line to accurately measure and mark the deck layout and cut lines.
- Level and Plumb Line: A spirit level and plumb line are essential for ensuring the evenness and vertical alignment of the deck components during construction.
- Shovel and Wheelbarrow: If site preparation is required, have a shovel and wheelbarrow on hand for excavating and moving soil, gravel, and concrete.
- Masonry Tools: If building a fire pit, gather a trowel, masonry hammer, and level for laying and leveling fire-resistant bricks or blocks.
By meticulously gathering the necessary materials and tools, you set the stage for a smooth and efficient construction process. With careful preparation, you can embark on the next steps of the project with confidence, knowing that you have everything required to bring your wood deck with a built-in fire pit to fruition.
Step 3: Preparing the Site
Before the construction of your wood deck and the installation of the built-in fire pit can commence, thorough site preparation is essential to ensure a stable and safe foundation for the project. This crucial step involves a series of tasks aimed at clearing, leveling, and securing the designated area where the deck and fire pit will be situated.
Clearing the Area
The first task in preparing the site is to clear the designated area of any obstructions, debris, or vegetation. Remove rocks, branches, and any other objects that may impede the construction process. If necessary, trim overhanging branches and bushes to create a clear and open space for the deck and fire pit.
Marking the Layout
Using stakes and string, mark the layout of the deck and fire pit on the ground. This visual guide will help you visualize the dimensions and placement of the structures, ensuring that they align with your design plan and comply with any local building codes or regulations.
Excavation and Leveling
If the site is not already level, excavation may be necessary to create a flat and even surface for the deck. Use a shovel and a level to remove any uneven patches of soil and ensure that the ground is adequately graded. Additionally, consider using a compactor to compact the soil, providing a stable base for the deck's foundation.
Installing Ground Cover
To prevent weed growth and promote drainage, consider laying landscaping fabric or a weed barrier over the prepared site. This layer serves as a protective barrier between the soil and the deck structure, minimizing maintenance requirements and preserving the integrity of the project over time.
Establishing Footings for the Deck
If your deck design requires footings for support, mark and dig holes at designated intervals to accommodate the footings. The depth and diameter of the holes should adhere to local building codes and the specific requirements of your deck design. Once the holes are dug, insert and secure the footings according to the manufacturer's instructions.
By meticulously preparing the site for your wood deck and built-in fire pit, you set the stage for a seamless and successful construction process. This preparatory phase ensures that the foundation of your outdoor retreat is solid, level, and ready to support the structural elements of the project. With the site preparation complete, you are now poised to move forward with the exciting stages of building your wood deck and constructing the captivating built-in fire pit.
Step 4: Building the Deck Frame
With the site meticulously prepared, it's time to transition to the pivotal phase of constructing the deck frame. This foundational framework forms the structural skeleton of the deck, providing stability, support, and a level surface for the decking boards. Here's a detailed breakdown of the essential steps involved in building the deck frame:
1. Setting the Ledger Board
Begin by attaching a ledger board to the exterior wall of your house, ensuring it is level and securely anchored. The ledger board serves as the primary attachment point for the deck frame and provides crucial support for the deck's outer joists.
2. Installing Support Posts
Position and install support posts at designated intervals along the perimeter of the deck layout. These posts will support the outer beams and provide additional structural reinforcement for the deck frame. Use a level to ensure the posts are plumb and accurately aligned.
3. Attaching Outer Beams
Secure the outer beams to the support posts, ensuring they are level and properly aligned. These beams form the outer edge of the deck frame and play a vital role in distributing the weight of the deck and supporting the joists.
4. Adding Inner Joists
Once the outer beams are in place, install the inner joists perpendicular to the outer beams, creating a sturdy framework for the decking boards. Ensure the joists are spaced according to your design plan and local building codes, providing ample support for the decking material.
5. Incorporating Cross Bracing
Integrate cross bracing between the support posts to enhance the stability and rigidity of the deck frame. Cross bracing helps mitigate lateral movement and reinforces the structural integrity of the entire deck framework.
6. Verifying Level and Square
Throughout the construction process, consistently verify the levelness and squareness of the deck frame using a spirit level and measuring tape. Ensuring that the frame is level and square is essential for the proper installation of the decking boards and the long-term structural integrity of the deck.
By meticulously executing each step of the deck frame construction, you establish a solid and reliable foundation for the subsequent phases of the project. The completion of this phase marks a significant milestone, bringing your vision of a wood deck with a built-in fire pit one step closer to reality. With the deck frame in place, you are now prepared to advance to the next stage of installing the decking boards, further shaping your outdoor oasis.
Step 5: Installing the Decking Boards
With the sturdy framework of the deck in place, the focus now shifts to the transformative phase of installing the decking boards. This step not only enhances the visual appeal of the deck but also contributes to its structural integrity and functionality. Here's a comprehensive guide to the meticulous process of installing the decking boards:
1. Selecting the Decking Material
Begin by selecting the appropriate decking material that aligns with your aesthetic preferences, maintenance requirements, and budget. Whether you opt for traditional pressure-treated lumber or low-maintenance composite decking, ensure that the chosen material is well-suited for outdoor use and can withstand the elements.
2. Planning the Layout
Carefully plan the layout of the decking boards, considering factors such as the orientation of the boards, any pattern or design features, and the alignment with the deck's structural elements. This planning phase allows you to visualize the final look of the deck and make informed decisions regarding board placement.
3. Starting at the House
Commence the installation by placing the first row of decking boards against the exterior wall of the house, ensuring a uniform overhang and a straight, parallel alignment. Use appropriate fasteners, such as corrosion-resistant screws or nails, to securely attach the boards to the deck frame, maintaining consistent spacing between each board.
4. Creating Expansion Gaps
Incorporate expansion gaps between the decking boards to accommodate natural expansion and contraction due to temperature and moisture variations. These gaps prevent warping and buckling of the boards over time, contributing to the longevity of the deck's surface.
5. Cutting and Fitting
As you progress with the installation, you may need to cut and fit the decking boards to accommodate the deck's shape, any obstructions, or design features. Utilize a circular saw or appropriate cutting tools to achieve precise cuts, ensuring a seamless and tailored fit for each board.
6. Securing the Boards
Continuously verify the alignment, levelness, and secure attachment of the decking boards as you proceed with the installation. Consistently check for any protruding fasteners and make any necessary adjustments to maintain a smooth and safe deck surface.
7. Finishing Touches
Upon completing the installation of the decking boards, consider applying a protective finish or sealant to enhance the durability and weather resistance of the deck surface. This finishing touch not only safeguards the wood but also accentuates its natural beauty.
By meticulously executing each step of the decking board installation, you elevate the visual appeal and functionality of your wood deck with a built-in fire pit. The completion of this phase brings you closer to realizing your outdoor retreat, where cherished moments and relaxation await amidst the warmth of the fire pit. With the decking boards in place, the stage is set for the captivating culmination of constructing the built-in fire pit, further enriching your outdoor haven.
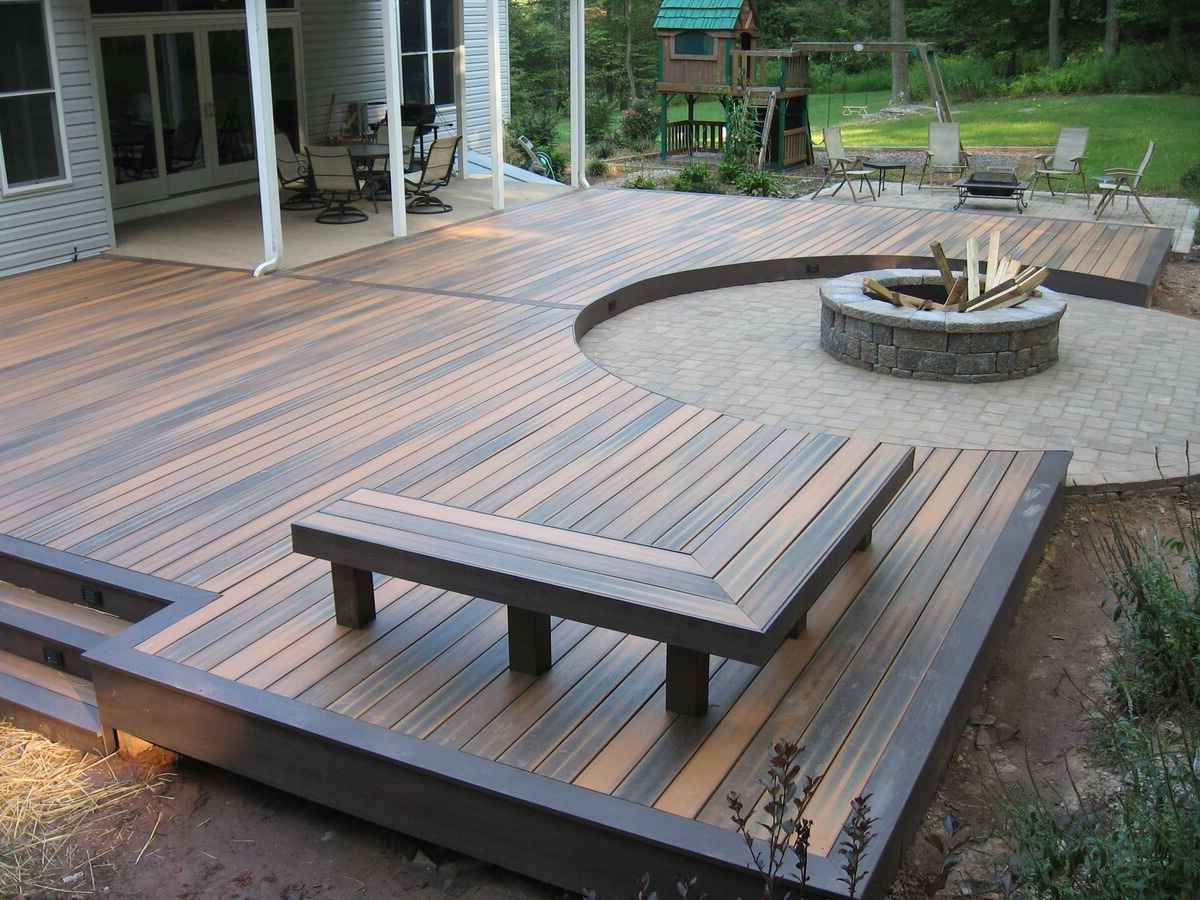
Step 6: Constructing the Built-In Fire Pit
The construction of a built-in fire pit infuses your wood deck with warmth, ambiance, and a focal point for gatherings. This captivating feature not only adds a cozy element to your outdoor space but also serves as a gathering spot for memorable conversations and shared experiences. Here's a detailed guide to the meticulous process of constructing the built-in fire pit:
1. Selecting the Fire Pit Design
Begin by selecting a fire pit design that complements the overall aesthetic of your wood deck. Whether you opt for a circular, square, or custom-shaped fire pit, ensure that the chosen design harmonizes with the deck's layout and provides ample space for seating and circulation.
2. Preparing the Fire Pit Location
Identify the ideal location for the fire pit within the deck area, considering factors such as proximity to seating areas, wind patterns, and safety regulations. Clear the designated space of any debris and ensure that it is level and stable, providing a suitable foundation for the fire pit construction.
3. Building the Fire Pit Structure
If using fire-resistant bricks or retaining wall blocks, begin by laying the first course in a circular or square formation, adhering to the chosen design. Use a level to ensure the bricks are evenly aligned and create a stable base for subsequent courses. Alternatively, if utilizing a metal fire pit insert, follow the manufacturer's instructions for proper installation within the designated area.
4. Layering Fire-Resistant Materials
As the fire pit structure takes shape, fill the bottom with a layer of gravel and sand to create a heat-resistant foundation. This layer provides insulation and stability for the fire pit, ensuring safe and efficient combustion of the firewood or gas flame.
5. Finishing Touches
Once the fire pit structure is complete, consider adding a decorative coping or top layer to enhance its visual appeal and provide a comfortable edge for seating. Additionally, if incorporating a gas fire pit, ensure that the gas lines are properly installed and connected according to safety standards and local regulations.
By meticulously constructing the built-in fire pit, you infuse your wood deck with a captivating focal point that beckons gatherings and creates a welcoming ambiance. The completion of this phase marks the harmonious integration of warmth and charm into your outdoor retreat, where the crackling flames of the fire pit invite cherished moments and shared laughter. With the fire pit in place, your wood deck embodies a captivating blend of functionality and allure, ready to host memorable gatherings and tranquil evenings under the stars.
Step 7: Finishing Touches and Safety Considerations
As the construction of your wood deck with a built-in fire pit nears completion, attention to finishing touches and safety considerations is paramount. These final steps not only add aesthetic appeal to your outdoor oasis but also ensure the safety and longevity of the entire project.
Enhancing Aesthetics
Consider adding thoughtful embellishments to elevate the visual allure of your wood deck and fire pit. Incorporating outdoor lighting, such as string lights or low-voltage deck lighting, can extend the functionality of the space into the evening hours while creating a captivating ambiance. Additionally, integrating comfortable and stylish outdoor furniture, such as seating and tables, transforms the deck into a welcoming and functional area for relaxation and entertainment. Furthermore, adding potted plants, decorative accents, and personalized touches infuses the space with character and charm, reflecting your unique style and creating an inviting atmosphere for gatherings.
Safety Considerations
Prioritizing safety measures is crucial to ensure that your wood deck with a built-in fire pit provides a secure and enjoyable environment for all who gather there. Here are essential safety considerations to incorporate into your project:
-
Fire Pit Safety: If using a wood-burning fire pit, always have a fire extinguisher, water source, or sand nearby to quickly extinguish any unexpected flare-ups. Additionally, establish clear guidelines for fire pit usage and ensure that all users are aware of safety protocols and precautions.
-
Deck Maintenance: Regularly inspect and maintain the deck structure, including the decking boards, support posts, and railings, to identify and address any signs of wear, rot, or damage. Proper maintenance preserves the structural integrity of the deck and promotes long-term safety.
-
Fire Prevention: Implement fire prevention measures, such as clearing debris and flammable materials from the deck area, to minimize the risk of accidental fires. Educate all users about fire safety practices and the responsible use of the fire pit.
-
Child Safety: If children frequent the deck area, install childproof safety gates or barriers to prevent unsupervised access to the fire pit. Educate children about the potential dangers of the fire pit and establish clear rules for safe interaction with the feature.
By attending to these finishing touches and safety considerations, you not only enhance the beauty and functionality of your wood deck with a built-in fire pit but also prioritize the well-being of those who will enjoy this captivating outdoor retreat. With these elements in place, your outdoor space becomes a haven where cherished memories are made, and safety is upheld as a fundamental priority.
Conclusion
In conclusion, the journey of building a wood deck with a built-in fire pit is a testament to the fusion of creativity, craftsmanship, and practicality. From the initial stages of planning and designing to the final touches and safety considerations, this DIY project embodies the art of transforming an outdoor space into a captivating retreat. As the construction culminates, the wood deck with its integrated fire pit stands as a testament to the vision, dedication, and ingenuity invested in its creation.
The process of planning and designing the deck sets the stage for a personalized outdoor oasis, where every detail is meticulously considered to align with the envisioned purpose and aesthetic preferences. The careful selection of materials and tools, coupled with thorough site preparation, lays the groundwork for a sturdy and enduring foundation, ensuring that the deck and fire pit are poised to withstand the test of time and the elements.
The construction of the deck frame and the installation of the decking boards mark pivotal milestones, where the vision of a welcoming and functional outdoor space begins to materialize. Each step reflects the harmonious blend of structural integrity and visual appeal, culminating in a platform that beckons relaxation, entertainment, and shared moments of joy.
The addition of the built-in fire pit infuses the deck with warmth and ambiance, creating a focal point that invites gatherings and contemplative evenings under the stars. This captivating feature not only elevates the aesthetic allure of the outdoor space but also fosters an inviting atmosphere where cherished memories are kindled amidst the crackling flames.
As the finishing touches and safety considerations are meticulously attended to, the wood deck with its built-in fire pit emerges as a haven where safety, comfort, and aesthetic charm converge. The thoughtful embellishments and safety measures not only enhance the functionality and allure of the space but also prioritize the well-being of all who gather there, ensuring that every moment spent in this outdoor retreat is imbued with peace of mind and delight.
In essence, the completion of a wood deck with a built-in fire pit transcends the realm of DIY construction; it embodies the creation of a sanctuary where the beauty of nature, the warmth of fire, and the joy of shared experiences intertwine. It stands as a testament to the transformative power of craftsmanship and the enduring allure of outdoor living, inviting all who encounter it to embrace the art of relaxation, connection, and cherished moments in the embrace of nature's splendor.