
Home>Create & Decorate>DIY & Crafts>DIY Propane Fire Pit: Step-by-Step Guide To Building Your Own Outdoor Fire Feature
DIY & Crafts
DIY Propane Fire Pit: Step-by-Step Guide To Building Your Own Outdoor Fire Feature
Published: February 24, 2024

Content Creator specializing in woodworking and interior transformations. Caegan's guides motivate readers to undertake their own projects, while his custom furniture adds a personal touch.
Learn how to build your own DIY propane fire pit with our step-by-step guide. Create a stunning outdoor fire feature with our easy-to-follow instructions and enjoy cozy evenings in your backyard. Perfect for DIY & Crafts enthusiasts!
(Many of the links in this article redirect to a specific reviewed product. Your purchase of these products through affiliate links helps to generate commission for Twigandthistle.com, at no extra cost. Learn more)
Introduction
Are you dreaming of cozy evenings spent around a warm and inviting fire pit in your backyard? Building your own DIY propane fire pit can turn this dream into a reality. Whether you're a seasoned DIY enthusiast or a novice looking for a rewarding project, creating a propane fire pit can add a touch of elegance and functionality to your outdoor space.
A DIY propane fire pit offers numerous advantages over traditional wood-burning fire pits. It eliminates the need to constantly tend to a fire, clean up ash, or deal with the smoke and sparks that often accompany wood fires. Additionally, propane fire pits provide precise control over the flame's intensity, allowing you to adjust the heat to your liking with the simple turn of a knob.
By embarking on this DIY project, you'll have the opportunity to unleash your creativity and customize your fire pit to suit your personal style and outdoor décor. Whether you prefer a sleek and modern design or a rustic, natural look, you can tailor every aspect of the fire pit to reflect your unique taste.
Building a DIY propane fire pit is not only a fulfilling endeavor but also a practical one. It can serve as a focal point for outdoor gatherings, providing warmth and ambiance for socializing with family and friends. Furthermore, a well-designed fire pit can enhance the value of your property and create a welcoming atmosphere for outdoor entertaining and relaxation.
In this comprehensive guide, we will walk you through the step-by-step process of building your own propane fire pit, from gathering the necessary materials and tools to testing the finished product. By following these instructions, you can embark on a rewarding DIY journey and ultimately bask in the warm glow of your custom-made fire pit.
So, roll up your sleeves, unleash your creativity, and let's dive into the exciting world of crafting your very own DIY propane fire pit!
Step 1: Gather Materials and Tools
Before diving into the construction of your DIY propane fire pit, it's essential to gather all the necessary materials and tools. By ensuring that you have everything at your disposal, you can streamline the building process and minimize interruptions. Here's a comprehensive list of items you'll need to kick-start your project:
Materials:
- Fire Pit Kit: Opt for a propane fire pit kit that includes a burner, control valve, and ignition system. Ensure that the kit is suitable for outdoor use and complies with safety standards.
- Fire Pit Enclosure: Select a sturdy and heat-resistant enclosure to house the burner and provide a base for your fire pit. This can be a metal fire pit bowl, a concrete fire pit structure, or any other non-combustible material.
- Lava Rocks or Fire Glass: These decorative elements not only enhance the visual appeal of your fire pit but also help disperse the flame and retain heat.
- Propane Tank: Choose a standard 20-pound propane tank, readily available at hardware or home improvement stores. Ensure that the tank is equipped with a compatible regulator and hose for outdoor use.
- Flexible Gas Line: Acquire a flexible gas line to connect the propane tank to the fire pit burner. Verify that the gas line is designed for outdoor applications and is of sufficient length to reach your desired location.
- Pipe Thread Sealant: This sealant will help create a secure and leak-free connection between the gas line and the burner assembly.
Tools:
- Adjustable Wrench: A versatile tool that will come in handy for tightening and loosening various fittings during the installation process.
- Tape Measure: Essential for accurately determining dimensions and ensuring proper alignment of components.
- Level: Use a level to ensure that the fire pit enclosure and burner assembly are positioned evenly and securely.
- Safety Gloves and Goggles: Prioritize safety by wearing protective gloves and goggles when handling materials and tools.
- Drill with Masonry Bit (if applicable): If your fire pit enclosure is made of a hard material such as concrete or stone, a drill with a masonry bit will be necessary for creating openings for the gas line and burner assembly.
By gathering these materials and tools, you'll set the stage for a smooth and efficient construction process. With everything in place, you can proceed to the next step of choosing the perfect location for your DIY propane fire pit.
Step 2: Choose a Location for Your Fire Pit
Selecting the ideal location for your DIY propane fire pit is a crucial decision that can significantly impact its functionality and visual appeal. Before settling on a spot, consider the following factors to ensure that your fire pit becomes a seamless and integral part of your outdoor living space.
Consider Safety and Regulations
First and foremost, prioritize safety when choosing a location for your fire pit. Ensure that it complies with local regulations and safety guidelines regarding fire pit placement. Check with your municipality or homeowners' association to determine any specific regulations or permits required for installing a propane fire pit. Additionally, maintain a safe distance from structures, overhanging branches, and combustible materials to prevent potential hazards.
Evaluate Wind Patterns
Assess the prevailing wind patterns in your outdoor area to determine the optimal placement for your fire pit. Positioning the fire pit in a location shielded from strong winds will enhance the comfort of your outdoor gatherings and prevent the flames from being excessively affected by gusts. Consider natural windbreaks such as fences, walls, or dense vegetation to create a sheltered environment around the fire pit.
Enhance Ambiance and Accessibility
Strategically placing your fire pit can contribute to the overall ambiance of your outdoor space. Consider locating the fire pit in an area that encourages social interaction and relaxation. Whether it's a focal point for entertaining guests or a cozy retreat for quiet evenings, the fire pit should be easily accessible and integrated into the natural flow of your outdoor living area.
Evaluate Ground Stability and Drainage
Ensure that the chosen location provides a stable and level surface for the fire pit. Avoid areas prone to pooling water or uneven terrain, as these conditions can affect the stability and functionality of the fire pit. Additionally, assess the drainage of the area to prevent water accumulation around the fire pit, especially if you live in a region with frequent rainfall.
Visual Integration with Surroundings
Consider how the fire pit will visually integrate with its surroundings. Take into account the existing landscape, outdoor furniture, and architectural features to create a cohesive and aesthetically pleasing outdoor environment. The fire pit should complement the overall design of your outdoor space and serve as a captivating focal point that enhances the beauty of your backyard.
By carefully considering these factors, you can strategically choose the perfect location for your DIY propane fire pit, ensuring that it becomes a cherished and functional addition to your outdoor living space.
Step 3: Prepare the Base
Preparing a solid and stable base is a critical step in the construction of your DIY propane fire pit. The base serves as the foundation for the fire pit structure, ensuring its durability and structural integrity. By following these detailed instructions, you can create a reliable base that will support your fire pit and contribute to its long-term functionality.
Clear the Area
Begin by clearing the chosen location for the fire pit, removing any debris, vegetation, or obstacles that may impede the construction process. Ensure that the ground is level and free of any protruding rocks or roots that could affect the stability of the base.
Mark the Perimeter
Using a tape measure and marking spray paint, outline the perimeter of the fire pit base according to your desired dimensions. Whether you opt for a circular, square, or custom-shaped fire pit, clearly marking the perimeter will provide a visual guide for excavating the base area.
Excavate the Base
With the perimeter marked, proceed to excavate the base area to a depth of approximately 4 to 6 inches. Use a shovel to remove the topsoil and create a uniform excavation that corresponds to the outlined perimeter. This step is crucial for establishing a level surface and accommodating the base materials.
Add Base Materials
Once the base area is excavated, introduce a layer of gravel or paver base to the bottom of the pit. This material will facilitate drainage, prevent shifting, and provide a stable foundation for the subsequent layers. Spread the gravel evenly across the excavated area, ensuring uniform coverage.
Compact the Base
Using a hand tamper or plate compactor, compact the base materials to create a firm and level surface. This step is essential for enhancing the stability and load-bearing capacity of the base, minimizing the risk of settling or shifting over time.
Verify Levelness
Utilize a carpenter's level to verify that the compacted base is level and even. Make any necessary adjustments to ensure uniformity and precision, as the accuracy of the base will directly influence the alignment and stability of the fire pit structure.
By meticulously preparing the base according to these steps, you can establish a solid foundation for your DIY propane fire pit, setting the stage for the subsequent stages of assembly and installation. With the base in place, you are one step closer to realizing your vision of a captivating and functional outdoor fire feature.
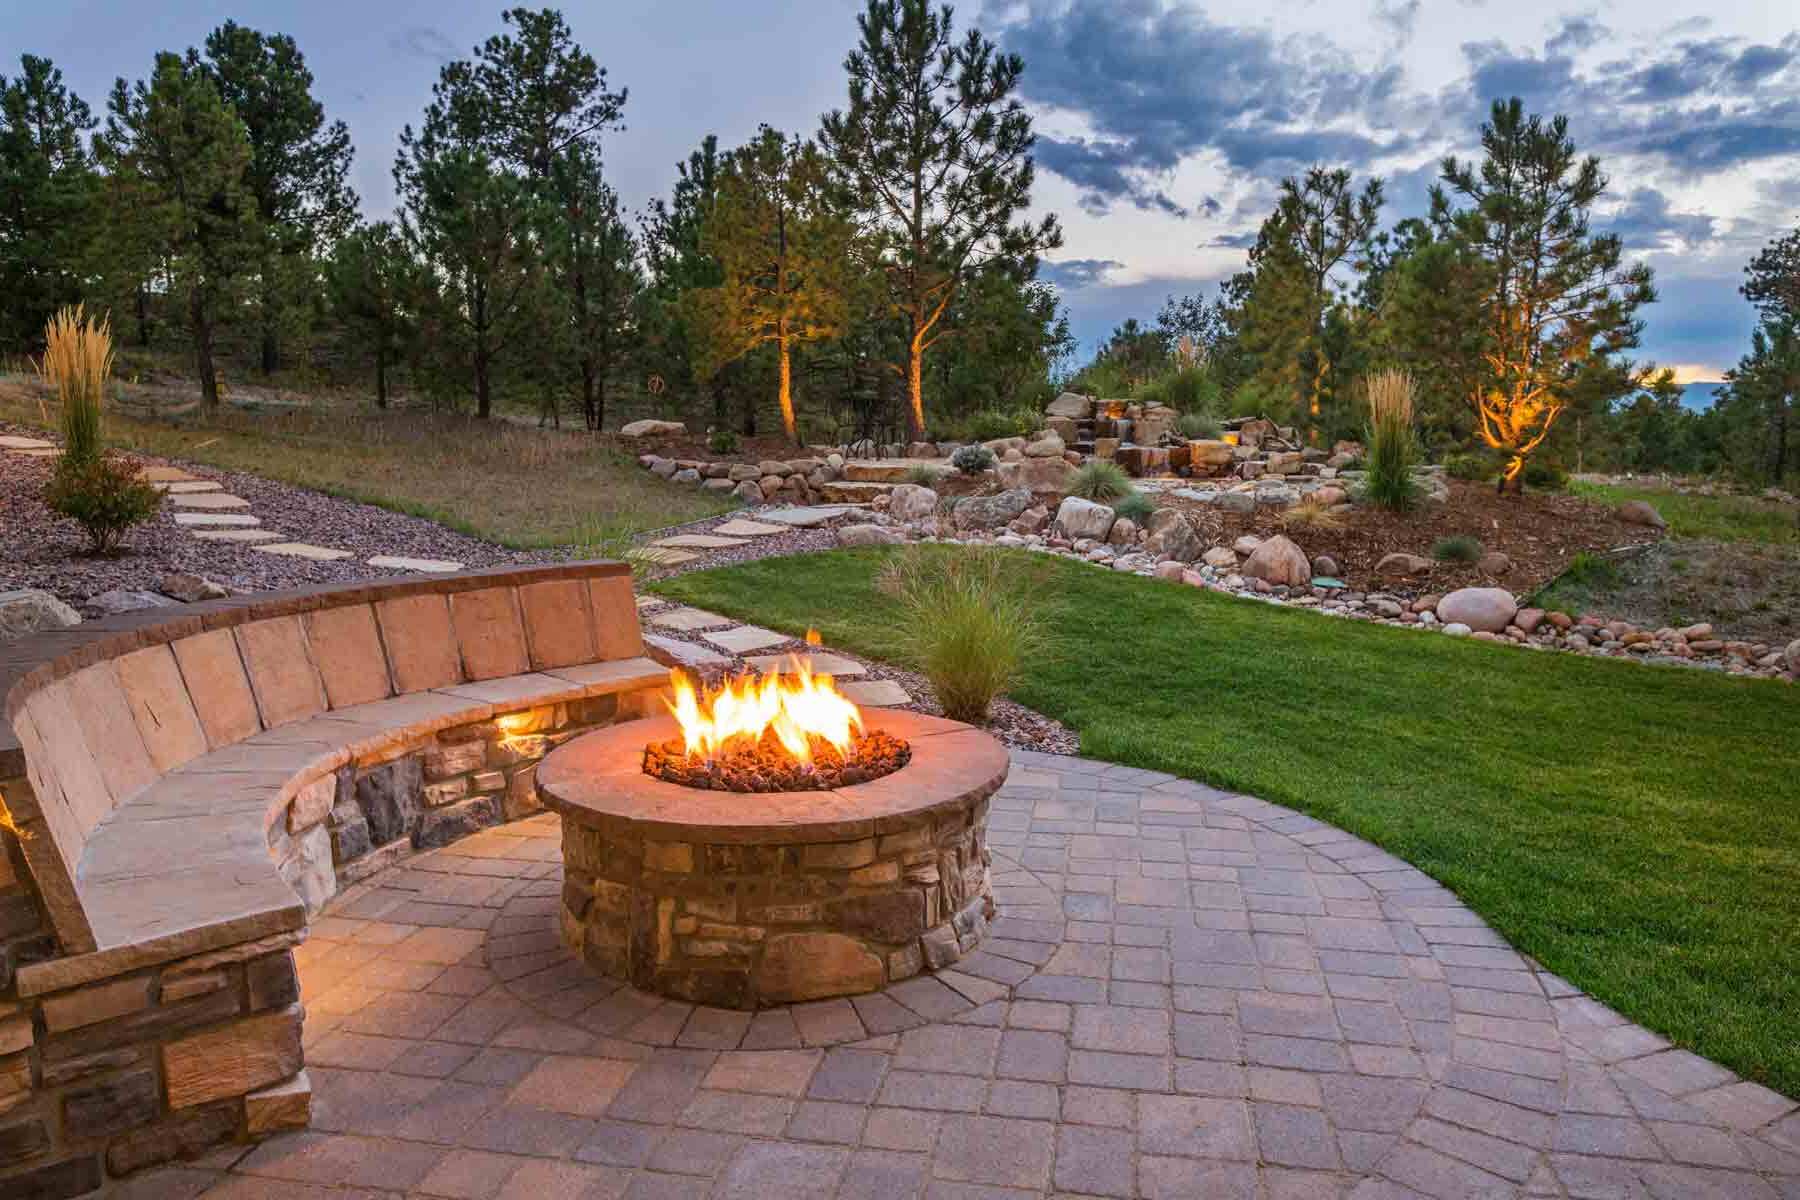
Step 4: Assemble the Fire Pit Structure
With the base prepared, it's time to embark on assembling the fire pit structure, a pivotal phase that will bring your DIY propane fire pit to life. This process involves integrating the fire pit enclosure, burner assembly, and decorative elements to create a cohesive and visually appealing outdoor feature. Follow these detailed steps to seamlessly assemble the components and elevate your fire pit to its full potential.
Position the Fire Pit Enclosure
Carefully place the fire pit enclosure, whether it's a metal fire pit bowl or a custom-built structure, onto the prepared base. Ensure that the enclosure is centered and aligned according to your desired orientation, taking into account factors such as wind direction, seating arrangements, and visual prominence within your outdoor space.
Install the Burner Assembly
Position the propane burner assembly within the fire pit enclosure, following the manufacturer's guidelines and specifications. Secure the burner in place, ensuring that it is level and centrally located to facilitate even distribution of the flame. If the burner assembly requires fastening or anchoring, utilize the provided hardware to affix it securely to the base of the enclosure.
Arrange Decorative Elements
Enhance the aesthetic appeal of your fire pit by arranging lava rocks, fire glass, or other decorative media around the burner assembly. These elements not only contribute to the visual allure of the fire pit but also aid in dispersing the flame and retaining heat. Exercise creativity in arranging the decorative elements to achieve a captivating and personalized look that complements your outdoor décor.
Connect the Gas Line
Carefully connect the flexible gas line from the propane tank to the designated inlet on the burner assembly. Apply pipe thread sealant to the threaded connections to ensure a secure and leak-free joint. Verify that the connections are tightened according to the manufacturer's specifications, prioritizing safety and precision in the installation process.
Test for Proper Functionality
Before finalizing the assembly, conduct a thorough inspection of the fire pit components and connections. Once the assembly is verified, turn on the propane supply and ignite the burner to test its functionality. Observe the flame pattern, adjust the flame height if necessary, and ensure that the ignition system operates smoothly. This step allows you to address any potential issues and fine-tune the fire pit for optimal performance.
By meticulously following these steps, you can successfully assemble the fire pit structure, culminating in the realization of your DIY propane fire pit. With the components seamlessly integrated and the burner emitting a warm and inviting flame, your outdoor space will be transformed into a welcoming haven for relaxation and social gatherings. The completion of this phase marks a significant milestone in your journey toward enjoying the warmth and ambiance of your custom-built fire pit.
Step 5: Install the Propane Burner
Installing the propane burner is a pivotal step in the construction of your DIY propane fire pit, as it directly influences the functionality and performance of the fire feature. By meticulously following the installation process, you can ensure that the burner is securely integrated and poised to deliver a consistent and mesmerizing flame.
Positioning the Burner Assembly
Begin by positioning the propane burner assembly within the fire pit enclosure, adhering to the manufacturer's guidelines and specifications. Carefully place the burner in the designated location, ensuring that it is centered and level to facilitate an even distribution of the flame. Proper alignment of the burner assembly is essential for optimizing the heat output and visual appeal of the fire pit.
Securing the Burner in Place
Once the burner assembly is positioned, proceed to secure it within the fire pit enclosure. Depending on the design of the burner and the enclosure, utilize the provided hardware or mounting features to anchor the burner securely to the base of the fire pit. This step is crucial for maintaining the stability of the burner and preventing displacement during operation.
Connecting the Gas Line
With the burner assembly in place, carefully connect the flexible gas line from the propane tank to the designated inlet on the burner. Prioritize safety and precision during this process, ensuring that the connections are tightened according to the manufacturer's specifications. Additionally, apply pipe thread sealant to the threaded connections to create a secure and leak-free joint, minimizing the risk of gas leakage.
Verifying the Connections
After connecting the gas line, conduct a thorough inspection of the connections to confirm their integrity. Verify that all fittings are properly secured and that there are no signs of gas leakage. Prior to proceeding to the testing phase, it is imperative to ensure that the connections are meticulously assembled and free from any potential hazards.
Testing the Burner Functionality
Before finalizing the installation, it is essential to test the functionality of the propane burner. Turn on the propane supply and ignite the burner to assess its performance. Observe the flame pattern, adjust the flame height if necessary, and ensure that the ignition system operates smoothly. This testing phase allows you to address any potential issues and fine-tune the burner for optimal functionality.
By meticulously following these steps, you can successfully install the propane burner, paving the way for the completion of your DIY propane fire pit. With the burner securely integrated and emitting a captivating flame, your outdoor space will be transformed into a welcoming haven for relaxation and social gatherings.
Step 6: Connect the Propane Tank
Connecting the propane tank is a crucial phase in the construction of your DIY propane fire pit, as it establishes the fuel source that will power the captivating flame. By meticulously following the connection process, you can ensure a safe and reliable supply of propane to your fire pit, enabling seamless operation and long-lasting enjoyment.
Positioning the Propane Tank
Begin by selecting an appropriate location for the propane tank within your outdoor space. Opt for a well-ventilated area that is easily accessible for maintenance and replacement. Ensure that the tank is positioned on a stable and level surface, minimizing the risk of tipping or instability. Prioritize safety by maintaining a safe distance from heat sources, ignition points, and high-traffic areas.
Attaching the Regulator and Hose
Carefully attach the regulator to the valve outlet on the propane tank, ensuring a secure and snug fit. The regulator plays a critical role in regulating the flow of propane to the fire pit burner, maintaining a consistent and controlled flame. Once the regulator is affixed, connect the flexible gas line from the fire pit to the regulator, following the manufacturer's specifications and guidelines. Verify that the connections are tightened according to the recommended torque to prevent gas leakage and ensure a reliable supply of fuel.
Conducting a Leak Test
After connecting the propane tank to the fire pit, it is essential to conduct a thorough leak test to verify the integrity of the connections. Apply a solution of soapy water to the joints and fittings, then carefully observe for any signs of bubbling or gas release. If bubbles appear, it indicates a potential gas leak, and the connections should be promptly addressed and tightened to eliminate the leakage. This meticulous testing process is imperative for ensuring the safety and functionality of the propane supply system.
Securing the Propane Tank
Once the connections are verified and the leak test is successfully conducted, secure the propane tank in its designated location. Utilize straps, brackets, or other approved securing mechanisms to prevent the tank from tipping or shifting. Prioritize stability and adherence to safety regulations to mitigate the risk of accidents or hazards associated with the propane tank.
Final Verification and Adjustment
Before finalizing the connection of the propane tank, conduct a final verification of all fittings, connections, and securing mechanisms. Ensure that the tank is positioned securely and that the gas supply system is free from any potential issues. Make any necessary adjustments to optimize the functionality and safety of the propane supply, culminating in a reliable and efficient fuel source for your DIY propane fire pit.
By meticulously following these steps, you can successfully connect the propane tank, establishing a dependable fuel supply for your DIY propane fire pit. With the tank securely integrated and the flame ignited, your outdoor space will be transformed into a welcoming haven for relaxation and social gatherings, powered by the warmth and allure of your custom-built fire feature.
Step 7: Test the Fire Pit
Testing the fire pit is a pivotal phase that ensures the functionality, safety, and performance of your DIY propane fire pit. By meticulously conducting a series of tests and verifications, you can ascertain that the fire pit operates as intended, providing a mesmerizing flame and a welcoming ambiance for your outdoor space.
Ignition System Test
Initiate the testing process by activating the fire pit's ignition system. Whether it utilizes a manual ignition or an electronic ignition system, verify that the ignition mechanism functions smoothly and consistently. Observe the ignition process, ensuring that the flame ignites promptly and without hesitation. This test allows you to confirm the reliability of the ignition system, a critical component that facilitates the effortless operation of the fire pit.
Flame Height Adjustment
Once the flame is ignited, assess the adjustability of the flame height using the control valve. Gradually adjust the flame height to different levels, observing the responsiveness and precision of the control mechanism. Verify that the flame height can be easily regulated, allowing you to customize the intensity of the flame according to your preferences. This test enables you to fine-tune the flame to achieve the desired warmth and visual allure, enhancing the versatility of your fire pit.
Flame Pattern Observation
Observe the flame pattern and distribution within the fire pit enclosure. Assess the uniformity and consistency of the flame, ensuring that it spreads evenly across the burner assembly. Verify that the decorative elements, such as lava rocks or fire glass, effectively disperse the flame and contribute to an aesthetically pleasing display. This observation allows you to confirm that the flame pattern aligns with your expectations, creating a captivating visual focal point for your outdoor space.
Heat Output Assessment
Conduct a practical assessment of the heat output generated by the fire pit. Position yourself at various distances from the fire pit, gauging the warmth and comfort provided by the radiant heat. Evaluate the reach and dispersion of the heat, considering factors such as wind conditions and outdoor temperatures. This assessment enables you to ascertain the practical functionality of the fire pit in delivering warmth and creating a cozy environment for outdoor gatherings.
Safety and Leak Inspection
Prioritize safety by conducting a comprehensive inspection of the fire pit and its components. Verify that all connections, including the gas line, regulator, and burner assembly, are free from leaks and potential hazards. Additionally, ensure that the fire pit enclosure and surrounding area remain free from combustible materials and obstructions. This inspection is crucial for maintaining a safe and secure environment for operating the fire pit.
By meticulously conducting these tests and verifications, you can ensure that your DIY propane fire pit operates reliably and safely, providing a captivating and functional outdoor feature for your enjoyment. The successful completion of the testing phase marks a significant milestone in the construction of your fire pit, setting the stage for its seamless integration into your outdoor living space.
Step 8: Enjoy Your DIY Propane Fire Pit!
Congratulations! You have successfully completed the construction of your DIY propane fire pit, and now it's time to revel in the warmth, ambiance, and allure it brings to your outdoor space. As you prepare to bask in the captivating glow of your custom-built fire feature, consider the following aspects to maximize your enjoyment and create lasting memories around your new centerpiece.
Social Gatherings and Relaxation
Your DIY propane fire pit serves as a focal point for social gatherings, providing a cozy and inviting atmosphere for entertaining family and friends. Whether it's hosting outdoor dinner parties, roasting marshmallows with loved ones, or simply unwinding with a good book, the fire pit creates an ideal setting for memorable moments and meaningful connections. Gather around the fire pit, share stories, and relish the warmth and comfort it offers, fostering a sense of togetherness and camaraderie.
Customization and Personalization
Embrace the opportunity to customize the ambiance of your outdoor space by adjusting the flame height and experimenting with different decorative elements. Tailor the appearance and warmth of the fire pit to suit various occasions and moods, creating a versatile and dynamic outdoor feature. Whether you prefer a roaring blaze for festive celebrations or a gentle flicker for intimate conversations, your DIY propane fire pit empowers you to curate the perfect setting for every occasion.
Year-Round Enjoyment
Embrace the versatility of your propane fire pit by extending its use throughout the year. As the seasons change, the fire pit remains a steadfast source of warmth and comfort, allowing you to enjoy your outdoor space even during cooler evenings. Embrace the enchanting glow of the fire pit during crisp autumn nights, frosty winter gatherings, and refreshing spring evenings, creating a year-round haven for relaxation and enjoyment.
Maintenance and Safety
Prioritize the regular maintenance and upkeep of your fire pit to ensure its longevity and safety. Periodically inspect the components, clean the burner assembly, and verify the integrity of the gas supply system. Adhere to safety guidelines and regulations, and educate yourself and others on proper fire pit etiquette to minimize risks and maximize enjoyment. By maintaining your fire pit diligently, you can continue to relish its warmth and allure for years to come.
Cherished Memories
Above all, savor the moments and memories created around your DIY propane fire pit. Whether it's the crackling of the flames, the laughter of loved ones, or the tranquil moments of solitude, your fire pit becomes a cherished backdrop for countless experiences and emotions. Embrace the enchanting ambiance it provides and cherish the memories made in its comforting glow, solidifying its place as a beloved feature of your outdoor living space.
As you embark on this journey of enjoying your DIY propane fire pit, may it become a source of warmth, joy, and connection, enriching your outdoor lifestyle and creating enduring moments that will be treasured for years to come.