
Home>Create & Decorate>DIY & Crafts>DIY Outdoor Shower: Building Your Own Oasis
DIY & Crafts
DIY Outdoor Shower: Building Your Own Oasis
Published: February 25, 2024

Senior Editor in Create & Decorate, Kathryn combines traditional craftsmanship with contemporary trends. Her background in textile design and commitment to sustainable crafts inspire both content and community.
Create your own DIY outdoor shower oasis with our step-by-step guide. Get inspired with our DIY & Crafts tips and ideas. Transform your outdoor space today!
(Many of the links in this article redirect to a specific reviewed product. Your purchase of these products through affiliate links helps to generate commission for Twigandthistle.com, at no extra cost. Learn more)
Introduction
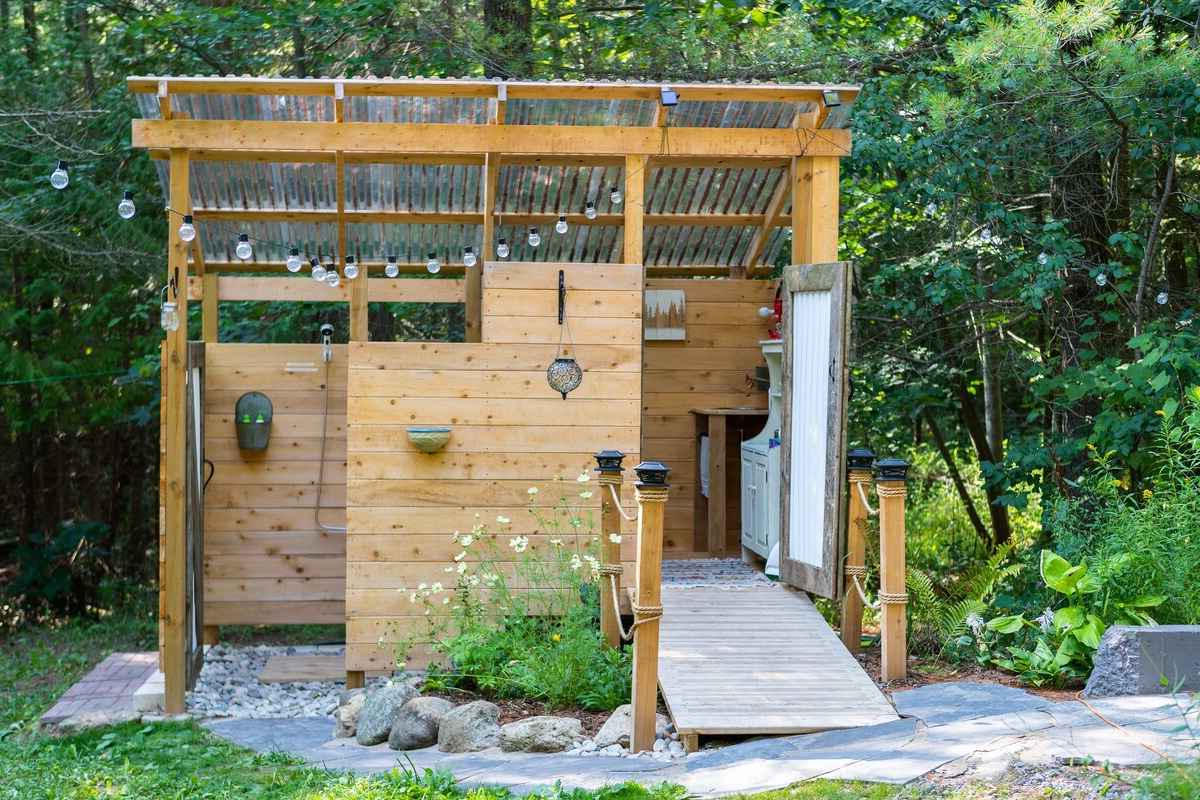
Imagine stepping out into your backyard on a warm summer day, feeling the sun on your skin, and hearing the gentle rustle of leaves in the breeze. Now, picture yourself rinsing off under a refreshing stream of water in your very own outdoor shower. The idea of having a DIY outdoor shower may seem like a dream, but with the right guidance and a touch of creativity, you can turn this vision into a reality.
An outdoor shower is not only a practical addition to your home, but it also brings a sense of luxury and relaxation to your outdoor space. Whether you want to rinse off after a swim, wash away the day's stress, or simply connect with nature, an outdoor shower provides a unique and rejuvenating experience.
Building your own outdoor shower allows you to customize every aspect to suit your preferences, from the design and materials to the placement and functionality. It's an opportunity to unleash your creativity and craftsmanship, resulting in a personalized oasis right in your backyard.
In this comprehensive guide, we will walk you through the step-by-step process of creating your DIY outdoor shower. From selecting the perfect location to gathering materials, constructing the frame, installing plumbing, and adding the finishing touches, we've got you covered. By the end of this journey, you'll not only have a functional outdoor shower but also a newfound sense of pride in your DIY accomplishment.
So, roll up your sleeves, gather your tools, and get ready to embark on an exciting adventure of building your own outdoor oasis. Whether you're a seasoned DIY enthusiast or a newcomer to the world of home projects, this guide will equip you with the knowledge and inspiration to bring your outdoor shower dreams to life. Let's dive in and transform your outdoor space into a refreshing haven that you'll enjoy for years to come.
Choosing the Right Location
Selecting the ideal location for your DIY outdoor shower is a crucial first step in the construction process. The chosen spot should offer a harmonious blend of convenience, privacy, and aesthetic appeal. Here are some key factors to consider when determining the perfect location for your outdoor shower:
-
Privacy: Look for an area that provides a sense of seclusion. Whether it's nestled within a corner of your backyard, shielded by lush foliage, or enclosed by a privacy screen, ensuring privacy is essential for a relaxing shower experience.
-
Accessibility: The location should be easily accessible from your home and outdoor living spaces. Consider proximity to your pool, patio, or garden, as well as the convenience of accessing water and drainage lines.
-
Sunlight and Shade: Take into account the sun's path throughout the day. While some may prefer a sun-drenched shower, others might opt for a shaded retreat. Consider the position of the sun during the times you're most likely to use the shower.
-
Drainage: Ensure that the chosen location allows for proper drainage to prevent water from pooling around the shower area. A slightly sloped or permeable surface can help facilitate efficient water runoff.
-
Aesthetic Integration: Integrate the shower into your outdoor landscape to create a cohesive and visually appealing environment. Consider how the design and placement of the shower will complement the overall aesthetic of your outdoor space.
-
Utility Connections: If you plan to connect the shower to existing water and drainage lines, proximity to these connections is essential. Assess the feasibility of extending plumbing to the chosen location.
-
Wind Direction: Consider prevailing wind patterns to avoid potential discomfort from strong gusts while showering. Positioning the shower to minimize exposure to strong winds can enhance the overall comfort of the experience.
By carefully evaluating these factors, you can pinpoint the optimal location for your outdoor shower. Once you've identified the perfect spot, you'll be one step closer to creating a tranquil and functional oasis in your outdoor living space.
Gathering Materials and Tools
Before diving into the construction of your DIY outdoor shower, it's essential to gather all the necessary materials and tools. Having everything on hand will streamline the building process and ensure a smooth and efficient workflow. Here's a comprehensive list of materials and tools you'll need to bring your outdoor shower project to life:
Materials:
-
Lumber: Select pressure-treated or weather-resistant lumber for the frame and structural components. Opt for cedar or teak for a natural, rot-resistant option that adds a touch of elegance to your outdoor shower.
-
Hardware: Purchase corrosion-resistant screws, nails, and brackets to assemble the frame securely. Stainless steel or galvanized hardware is ideal for outdoor applications, as it withstands moisture and prevents rusting.
-
Shower Fixtures: Choose a durable and stylish showerhead, mixing valve, and any additional fixtures such as a handheld sprayer or shelf. Look for fixtures specifically designed for outdoor use to ensure longevity in various weather conditions.
-
Plumbing Materials: Acquire PVC or copper pipes, fittings, and waterproof sealant for the plumbing system. Consider using flexible, UV-resistant hoses for connecting the shower to water sources, providing versatility and ease of installation.
-
Drainage Components: Gather a drain assembly, waterproof membrane, and gravel for creating a reliable and efficient drainage system. A sloped base and waterproofing materials are essential for directing water away from the shower area.
-
Finishing Materials: Depending on your design preferences, procure exterior-grade paint or stain, as well as sealant for protecting the wood from moisture and UV exposure. Consider adding decorative elements such as pebble flooring or mosaic tiles for a personalized touch.
-
Privacy Features: If desired, obtain materials for constructing privacy screens, curtains, or natural barriers to enhance the seclusion and comfort of your outdoor shower space.
Tools:
-
Power Saw: Whether it's a circular saw, miter saw, or reciprocating saw, having a reliable cutting tool is essential for shaping lumber and creating precise cuts for the frame and components.
-
Drill and Bits: A cordless drill with a set of drill bits and screwdriver attachments will be indispensable for assembling the frame, attaching hardware, and installing fixtures.
-
Level and Square: Ensure accuracy and alignment during construction by using a level and carpenter's square to maintain straight, plumb, and square angles throughout the assembly process.
-
Pipe Cutter and Torch (for copper pipes): If working with copper plumbing, a pipe cutter and torch will be necessary for cutting and soldering pipes to create a watertight plumbing system.
-
Shovel and Trowel: For projects involving drainage installation, a shovel and trowel will aid in excavating the area, spreading gravel, and creating a stable base for the shower.
-
Paintbrushes and Rollers: If you plan to finish the wood with paint or stain, having a selection of brushes and rollers will facilitate the application of protective coatings.
By ensuring that you have all the required materials and tools at your disposal, you'll be well-prepared to embark on the construction of your DIY outdoor shower. With careful planning and attention to detail, you can set the stage for a successful and rewarding building experience.
Building the Shower Frame
The construction of the shower frame forms the structural backbone of your outdoor shower, providing stability and support for the enclosure and plumbing components. Building a sturdy and well-designed frame is essential for ensuring the longevity and functionality of your outdoor shower. Here's a detailed overview of the steps involved in creating the shower frame:
Design Considerations
Before diving into the construction process, it's important to finalize the design and dimensions of your shower frame. Consider the overall size of the shower enclosure, the desired height of the walls, and any additional features such as built-in shelving or seating. Take into account the available space in your chosen location and ensure that the frame's dimensions align with your vision for the outdoor shower.
Selecting Lumber and Hardware
Choose high-quality, weather-resistant lumber for constructing the frame, such as pressure-treated pine, cedar, or teak. Opting for rot-resistant wood ensures that the frame can withstand exposure to moisture and outdoor elements. Additionally, select corrosion-resistant screws, nails, and brackets to assemble the frame securely. Stainless steel or galvanized hardware is ideal for outdoor applications, as it provides durability and prevents rusting.
Cutting and Assembling the Frame
Using precise measurements based on your design plan, cut the lumber to create the individual components of the frame, including the vertical posts, horizontal beams, and any additional structural elements. Utilize a power saw, such as a circular saw or miter saw, to achieve accurate and clean cuts. Once the lumber is cut to size, assemble the frame components according to your design, ensuring that the corners are square and the connections are secure. A cordless drill with screwdriver attachments will be invaluable for attaching the lumber and hardware.
Reinforcement and Bracing
To enhance the stability and strength of the frame, consider incorporating diagonal bracing or additional support beams as needed. Reinforcing the frame with strategically placed braces or cross-members can prevent wobbling and ensure that the structure can withstand the elements and regular use. Pay careful attention to the alignment and placement of reinforcement elements to maintain the structural integrity of the frame.
Preparing for Plumbing and Fixtures
As you construct the frame, plan for the integration of plumbing lines and fixtures. Leave openings or access points within the frame to accommodate the installation of pipes, fittings, and shower fixtures. By considering the placement of plumbing components during the frame construction phase, you can streamline the subsequent steps of installing the shower's plumbing system.
By meticulously following these steps and paying attention to detail, you can construct a robust and well-crafted shower frame that serves as the foundation for your DIY outdoor shower. With the frame in place, you'll be ready to proceed to the next stages of installing plumbing, adding finishing touches, and ultimately enjoying the rejuvenating experience of your personalized outdoor oasis.
Installing Plumbing and Drainage
Installing the plumbing and drainage system is a pivotal phase in the construction of your DIY outdoor shower. This stage involves connecting water supply lines, integrating drainage components, and ensuring that the shower functions seamlessly. By carefully executing the plumbing and drainage installation, you can create a reliable and efficient system that delivers a refreshing and enjoyable shower experience.
Water Supply Connection
Begin by determining the most practical and accessible source for the water supply. Whether it involves tapping into an existing outdoor faucet, extending a dedicated water line, or utilizing a hose connection, ensure that the water source is conveniently located and capable of delivering the necessary water pressure. If you opt for a hot water feature, consider the feasibility of connecting to a water heater or implementing a solar heating system to provide warm water for your outdoor shower.
Plumbing Fixture Installation
Select a high-quality outdoor-rated showerhead, mixing valve, and any additional fixtures such as a handheld sprayer or foot wash. Position the fixtures within the shower enclosure, ensuring that they are securely attached to the frame and aligned at comfortable heights. When installing the fixtures, use waterproof sealant and appropriate fittings to create watertight connections, preventing leaks and ensuring the longevity of the plumbing system.
Drainage System Integration
Establishing an effective drainage system is essential for preventing water accumulation and maintaining the cleanliness of the shower area. Begin by installing a reliable drain assembly at the lowest point of the shower floor, allowing water to flow efficiently. Incorporate a waterproof membrane beneath the shower base to protect the underlying structure from moisture and facilitate proper drainage. Additionally, layering gravel or a similar permeable material beneath the shower base can aid in water runoff and prevent standing water.
Waterproofing and Sealing
To safeguard the surrounding areas from water damage, apply waterproof sealant to the joints, connections, and seams of the plumbing and drainage components. Utilize waterproofing materials to create a barrier that prevents water from seeping into the surrounding surfaces, ensuring the structural integrity of the shower enclosure and the adjacent outdoor space.
Testing and Adjustment
Once the plumbing and drainage components are in place, conduct thorough testing to ensure that the system functions as intended. Turn on the water supply and inspect for any leaks, irregular drainage, or water pooling. Make any necessary adjustments to the fixtures, drainage components, and plumbing connections to achieve optimal performance and functionality.
By meticulously executing the installation of the plumbing and drainage system, you can establish a reliable and efficient infrastructure for your DIY outdoor shower. With the plumbing and drainage components seamlessly integrated, you're one step closer to enjoying the rejuvenating experience of your personalized outdoor oasis.
Adding Finishing Touches
With the structural and functional elements of your DIY outdoor shower in place, it's time to infuse character and style by adding the finishing touches. This phase allows you to personalize the shower space, enhance its visual appeal, and elevate the overall experience for both practical and aesthetic purposes.
Sealing and Waterproofing
Apply a protective sealant or weather-resistant finish to the exterior surfaces of the shower frame and any exposed wood components. This not only enhances the natural beauty of the wood but also provides crucial protection against moisture, UV exposure, and the elements. Choose a sealant that is specifically formulated for outdoor use to ensure long-lasting durability and resistance to weathering.
Decorative Elements
Consider incorporating decorative elements to infuse personality and charm into your outdoor shower. Whether it's adding a mosaic tile accent, installing a pebble or stone flooring, or integrating artistic touches such as a hand-painted mural, these details can transform the shower space into a visually captivating and inviting oasis. Select materials and designs that resonate with your outdoor aesthetic and contribute to a harmonious integration with the surrounding environment.
Privacy Features
If privacy is a priority, explore options for enhancing the seclusion of the shower area. Install bamboo screens, louvered panels, or outdoor curtains to create a private and intimate space for showering. Natural elements such as climbing vines or strategically positioned foliage can also serve as organic privacy barriers, adding a touch of greenery while ensuring a sense of seclusion.
Functional Accessories
Incorporate functional accessories that enhance the convenience and utility of the outdoor shower. Consider adding hooks or shelves for hanging towels, robes, and bathing essentials. A built-in bench or seating area provides a comfortable spot for relaxation before or after showering. Additionally, integrating a foot wash station or a designated area for rinsing off sandy feet can contribute to the practicality and versatility of the outdoor shower space.
Lighting and Ambiance
Illuminate the shower area with outdoor lighting fixtures to extend its functionality into the evening hours. Whether it's soft, ambient lighting for a tranquil atmosphere or brighter task lighting for added visibility, thoughtful lighting design can enhance the safety and allure of the outdoor shower. Solar-powered lights offer an energy-efficient and eco-friendly option for illuminating the space while minimizing the need for additional wiring.
Greenery and Landscaping
Integrate landscaping elements around the shower area to create a seamless connection with nature. Planting fragrant flowers, lush foliage, or aromatic herbs nearby can enhance the sensory experience and infuse the space with natural beauty. Consider incorporating a small garden bed or container plants to introduce greenery and color, further enriching the ambiance of the outdoor shower oasis.
By attending to these finishing touches, you can elevate your DIY outdoor shower from a functional structure to a captivating and inviting retreat. Each detail contributes to the overall ambiance, comfort, and visual appeal of the space, culminating in a personalized oasis that reflects your unique style and enhances your outdoor living experience.
Enjoying Your DIY Outdoor Shower
As you stand beneath the open sky, feeling the warmth of the sun on your skin and the gentle caress of a refreshing breeze, you realize that your DIY outdoor shower has become more than just a functional addition to your outdoor space. It has evolved into a sanctuary of relaxation, a place where you can escape the hustle and bustle of daily life and immerse yourself in a rejuvenating experience unlike any other.
With the construction and embellishment of your outdoor shower complete, it's time to savor the fruits of your labor and fully embrace the gratifying benefits it offers. Here's how you can make the most of your DIY outdoor shower and revel in the unique pleasures it brings:
Daily Refreshment
Embrace the ritual of starting or ending your day with a revitalizing shower in the great outdoors. Whether it's a brisk morning rinse to invigorate your senses or a tranquil evening shower to unwind and wash away the day's stresses, your outdoor shower provides a refreshing escape that connects you with nature and rejuvenates your body and mind.
Connection with Nature
Immerse yourself in the natural surroundings as you shower amidst the elements. Feel the earth beneath your feet, listen to the symphony of birdsong and rustling leaves, and breathe in the fresh, invigorating air. Your outdoor shower offers a unique opportunity to engage all your senses and foster a deeper connection with the natural world.
Wellness and Relaxation
Transform your outdoor shower into a personal spa experience by incorporating elements of wellness and relaxation. Consider adding aromatic plants or essential oil diffusers to infuse the air with soothing scents. Create a serene ambiance with soft lighting and calming music, allowing yourself to unwind and indulge in moments of tranquility.
Social Gatherings and Entertaining
Elevate your outdoor entertaining experience by offering guests the option to freshen up with an al fresco shower. Whether hosting a poolside gathering, a backyard barbecue, or a leisurely afternoon with friends, your outdoor shower adds a touch of luxury and convenience, enhancing the overall enjoyment of outdoor gatherings.
Seasonal Delights
Embrace the changing seasons and revel in the unique experiences your outdoor shower offers throughout the year. From invigorating summer showers under the warmth of the sun to serene autumn rinses amidst the falling leaves, and even the enchanting experience of a winter shower under a blanket of snow, each season brings its own distinct charm to your outdoor oasis.
Sustainable Living
Celebrate the eco-friendly aspects of your outdoor shower, knowing that you're conserving water and reducing indoor water usage. Embrace sustainable living by utilizing biodegradable soaps and shampoos, and consider incorporating rainwater harvesting systems to further minimize your environmental impact.
Personal Retreat
Above all, cherish your outdoor shower as a personal retreat—a sanctuary where you can escape, unwind, and embrace moments of solitude. Whether it's a brief respite during a busy day or an extended indulgence in self-care, your outdoor shower offers a private haven that reflects your individuality and provides a space for self-renewal.
As you bask in the pleasures of your DIY outdoor shower, take pride in the craftsmanship and creativity that have brought this oasis to life. Embrace the myriad ways in which your outdoor shower enriches your lifestyle, fosters well-being, and creates lasting memories. With each shower, you'll find yourself immersed in a symphony of sensations, embracing the beauty of the outdoors, and savoring the simple yet profound joy of your personalized outdoor sanctuary.