
Home>Create & Decorate>DIY & Crafts>Pallet Deck: A DIY Guide To Creating A Stunning Outdoor Space
DIY & Crafts
Pallet Deck: A DIY Guide To Creating A Stunning Outdoor Space
Published: February 25, 2024

Content Creator specializing in woodworking and interior transformations. Caegan's guides motivate readers to undertake their own projects, while his custom furniture adds a personal touch.
Transform your outdoor space with a stunning DIY pallet deck. Discover step-by-step instructions and creative ideas for your next DIY & Crafts project.
(Many of the links in this article redirect to a specific reviewed product. Your purchase of these products through affiliate links helps to generate commission for Twigandthistle.com, at no extra cost. Learn more)
Introduction
Creating a stunning outdoor space doesn't have to be a daunting task. With a touch of creativity and some do-it-yourself spirit, you can transform your backyard into a captivating oasis. One of the most innovative and cost-effective ways to achieve this is by building a pallet deck. This versatile and eco-friendly project not only adds charm to your outdoor area but also provides a functional platform for relaxation, entertainment, and gatherings.
In this comprehensive guide, we will walk you through the step-by-step process of building your own pallet deck. From planning and preparation to the finishing touches, you'll gain valuable insights and practical tips to embark on this exciting DIY journey. Whether you're a seasoned DIY enthusiast or a novice looking to explore the world of woodworking, this guide is designed to empower you with the knowledge and inspiration needed to bring your vision to life.
By repurposing wooden pallets, you'll not only contribute to sustainable living but also unleash your creativity in a meaningful way. Each step of this project offers an opportunity to personalize your outdoor space, making it a true reflection of your style and preferences. From choosing the perfect pallets to adding decorative elements, the pallet deck project allows for endless customization, ensuring that your outdoor sanctuary is a unique extension of your home.
So, roll up your sleeves, gather your tools, and let's embark on this exciting journey to transform your outdoor space. With a bit of determination and a sprinkle of imagination, you'll soon be basking in the satisfaction of creating a stunning pallet deck that enhances the beauty and functionality of your outdoor living area. Let's dive into the first step: planning and preparation.
Step 1: Planning and Preparation
Before diving into the construction of your pallet deck, it's crucial to lay a solid foundation through meticulous planning and thorough preparation. This initial step sets the stage for a successful and rewarding DIY project. Here's a detailed breakdown of the essential aspects to consider during the planning and preparation phase:
-
Assess Your Outdoor Space: Begin by evaluating the area where you intend to build the pallet deck. Take measurements and note any existing features such as trees, shrubs, or structures that may impact the layout. Understanding the dimensions and characteristics of the space will guide your deck design and ensure a seamless integration with the surroundings.
-
Define Your Vision: Envision how you want your outdoor space to function and feel. Are you aiming for a cozy lounging area, a vibrant entertainment space, or a tranquil retreat? Clarifying your vision will inform the design elements and layout of the pallet deck, allowing you to tailor it to your specific needs and preferences.
-
Set a Budget: Determine the financial resources you're willing to allocate for the project. Consider the costs of materials, tools, and any additional features you plan to incorporate. Setting a budget from the outset will help you make informed decisions and avoid unexpected expenses as the project progresses.
-
Research and Gather Inspiration: Explore various pallet deck designs and outdoor decor ideas to gather inspiration. Platforms like Pinterest, home improvement websites, and DIY blogs can provide a wealth of creative concepts and practical tips. By immersing yourself in diverse design possibilities, you can refine your vision and identify elements that resonate with your style.
-
Check Local Regulations: Depending on your location, there may be zoning regulations, building codes, or permit requirements related to constructing a deck. Research the local guidelines to ensure compliance with any relevant regulations. This proactive approach will prevent potential setbacks and ensure that your pallet deck is built in accordance with legal standards.
-
Create a Detailed Plan: Sketch a rough layout of the pallet deck, considering factors such as access points, seating areas, and potential enhancements like planters or lighting. This visual representation will serve as a roadmap during the construction phase, helping you stay organized and focused on realizing your vision.
By dedicating time to thorough planning and preparation, you'll lay a strong groundwork for the successful execution of your pallet deck project. This proactive approach sets the stage for a smooth transition to the next phase: sourcing and selecting pallets.
Step 2: Sourcing and Selecting Pallets
Sourcing and selecting the right pallets is a critical phase in the construction of your pallet deck. The quality and condition of the pallets will significantly impact the durability and aesthetic appeal of the final structure. Here's a detailed guide to help you navigate the process of acquiring and choosing the ideal pallets for your project.
1. Identify Reliable Sources:
Begin by identifying reputable sources for obtaining pallets. Local businesses, warehouses, distribution centers, and recycling facilities are common places where pallets are readily available. Reach out to these establishments and inquire about the availability of used pallets. Additionally, online marketplaces and community forums can be valuable resources for finding individuals or businesses looking to offload surplus pallets.
2. Assess Pallet Quality:
When sourcing pallets, prioritize quality and structural integrity. Inspect each pallet for signs of damage, such as cracks, splits, or rot. Ensure that the pallets are free from chemical spills or contaminants, especially if they were previously used for transporting hazardous materials. Opt for pallets constructed from sturdy wood, such as oak or hardwood, as they offer superior strength and longevity.
3. Consider Size and Uniformity:
Select pallets that are uniform in size and shape to facilitate a seamless construction process. Consistent dimensions will simplify the alignment and arrangement of the pallets, resulting in a more polished and professional-looking deck. Additionally, prioritize pallets with intact and evenly spaced deck boards, as these will contribute to the structural stability and visual appeal of the deck.
4. Prioritize Heat-Treated Pallets:
To ensure the safety and integrity of your pallet deck, prioritize heat-treated pallets that bear the "HT" stamp, indicating compliance with international phytosanitary standards. Heat-treated pallets are free from chemical treatments and are less susceptible to pests and decay, making them an ideal choice for outdoor projects.
5. Obtain Permission and Transport:
Before acquiring pallets, seek permission from the respective sources and obtain any necessary approvals for collecting or purchasing the pallets. Once you've secured the pallets, arrange for their transportation to your project site. Depending on the quantity and size of the pallets, you may need a suitable vehicle or assistance to transport them safely.
By meticulously sourcing and selecting pallets that meet the specified criteria, you'll lay a solid foundation for the construction of a durable and visually appealing pallet deck. With the pallets in hand, you're ready to proceed to the next phase: cleaning and preparing the pallets for assembly.
Step 3: Cleaning and Preparing Pallets
Cleaning and preparing the pallets is a crucial step that sets the stage for the successful assembly and longevity of your pallet deck. By meticulously addressing any dirt, debris, or imperfections, you'll ensure that the pallets are primed for a seamless integration into your outdoor space. Here's a detailed guide to help you navigate the process of cleaning and preparing the pallets for your DIY project.
1. Inspection and Sorting:
Begin by inspecting each pallet to identify any visible contaminants, such as dirt, grease, or residues. Sort the pallets based on their condition, separating those that require minor cleaning from those needing more extensive preparation. This initial assessment will streamline the cleaning process and allow you to allocate resources efficiently.
2. Thorough Cleaning:
Utilize a stiff-bristled brush, a pressure washer, or a combination of both to remove dirt, grime, and any embedded debris from the pallet surfaces. Pay special attention to the spaces between the deck boards and the underside of the pallets, as these areas are prone to accumulating dirt and moisture. Thorough cleaning not only enhances the visual appeal of the pallets but also mitigates the risk of mold or decay over time.
3. Sanding and Smoothing:
After cleaning, consider sanding the pallet surfaces to eliminate rough patches, splinters, and protruding nails or staples. Use medium-grit sandpaper to smooth the wood, focusing on areas that will come into direct contact with furniture or bare skin. This step not only improves the tactile comfort of the pallet deck but also minimizes the risk of snagging or splinter injuries.
4. Optional Surface Treatment:
Depending on your aesthetic preferences and the desired finish of the pallet deck, you may opt to apply a wood sealant, stain, or paint to the cleaned and sanded pallets. These surface treatments not only enhance the visual appeal of the wood but also provide added protection against weathering, UV exposure, and moisture absorption. Select products specifically formulated for outdoor use to ensure long-lasting results.
5. Drying and Acclimatization:
Allow the cleaned and treated pallets to dry thoroughly in a well-ventilated area before proceeding with the deck assembly. This drying period is essential to ensure that the wood reaches an optimal moisture content, preventing warping or dimensional changes after installation. Additionally, acclimatizing the pallets to the outdoor environment minimizes the risk of post-installation issues related to wood expansion or contraction.
By meticulously cleaning and preparing the pallets according to these guidelines, you'll lay a solid foundation for the construction of a durable, visually appealing, and functional pallet deck. With the pallets now primed for assembly, you're ready to embark on the next phase: building the deck base.
Step 4: Building the Deck Base
The construction of the deck base marks a pivotal phase in the realization of your pallet deck project. By meticulously assembling a sturdy and level foundation, you'll set the stage for a structurally sound and visually appealing outdoor space. Here's a comprehensive guide to walk you through the essential steps of building the deck base:
1. Site Preparation:
Begin by clearing and leveling the ground where the pallet deck will be installed. Remove any debris, rocks, or vegetation that may impede the placement of the pallets. Use a shovel, rake, or a compacting tool to ensure that the ground is even and free from any irregularities. This preparatory step is crucial for establishing a stable and uniform surface for the deck base.
2. Placement and Alignment:
Lay out the cleaned and prepared pallets in the desired configuration, ensuring that they are positioned evenly and align with the designated layout. Take precise measurements to maintain consistent spacing between the pallets and verify that the overall arrangement corresponds to your initial plan. This meticulous approach will contribute to a cohesive and visually pleasing deck layout.
3. Structural Support:
To reinforce the stability of the deck base, consider installing support beams or joists beneath the pallets. These structural elements provide additional strength and distribute the weight of the deck more evenly, reducing the risk of sagging or uneven settling over time. Secure the support beams at regular intervals to create a robust framework for the pallets.
4. Fastening and Securing:
Once the pallets are aligned and supported, fasten them to the underlying structure using appropriate hardware such as screws, nails, or brackets. Ensure that the pallets are securely anchored to the support beams, minimizing any potential movement or shifting. This step is essential for consolidating the individual pallets into a unified and stable deck base.
5. Leveling and Adjustment:
Verify that the deck base is level and adjust the positioning of the pallets as needed to achieve a uniform surface. Utilize a spirit level to confirm the horizontal alignment of the pallets, making incremental adjustments to compensate for any discrepancies. A level deck base not only enhances the aesthetic appeal but also ensures the proper function of the outdoor space.
By meticulously following these steps, you'll successfully build a robust and well-structured deck base, laying the groundwork for the subsequent phases of the pallet deck project. With the deck base in place, you're now poised to advance to the next critical phase: securing the pallets to create a cohesive and resilient deck surface.
Step 5: Securing the Pallets
Securing the pallets is a critical step that ensures the stability, safety, and longevity of your pallet deck. By implementing robust fastening techniques and strategic anchoring, you'll create a cohesive and resilient deck surface that can withstand the elements and daily use. Here's a detailed guide to walk you through the essential aspects of securing the pallets for your DIY project.
1. Anchoring Points:
Identify key anchoring points along the perimeter and within the interior of the deck base. These points serve as strategic locations for securing the pallets to the underlying support structure. Consider the placement of anchor points in relation to the overall layout of the deck, ensuring that they are strategically distributed to provide comprehensive support.
2. Fastening Methods:
Select appropriate fastening methods based on the composition and dimensions of the pallets. Depending on the design and structural requirements, options such as screws, nails, or specialized deck fasteners may be utilized. Prioritize corrosion-resistant fasteners, especially for outdoor applications, to mitigate the impact of weather exposure and ensure long-term durability.
3. Uniform Attachment:
Consistently attach the pallets to the underlying support structure, maintaining uniformity in the fastening process. Ensure that each pallet is securely anchored to the support beams or joists, minimizing any potential movement or shifting. This uniform attachment not only enhances the structural integrity of the deck but also contributes to a visually cohesive and professional finish.
4. Consider Diagonal Bracing:
Incorporate diagonal bracing or cross-bracing where necessary to reinforce the stability of the pallet deck. Diagonal braces provide additional lateral support, minimizing sway and enhancing the overall rigidity of the structure. Evaluate the specific load-bearing requirements of your deck and strategically install diagonal bracing to optimize its resilience.
5. Verify Stability:
After securing the pallets, conduct a thorough assessment of the deck's stability and structural integrity. Test the resistance to movement and apply pressure at various points to ensure that the pallets are firmly anchored and devoid of any noticeable flexing or instability. This verification process is essential for identifying and addressing any potential issues before proceeding to the final phase of the project.
By meticulously securing the pallets according to these guidelines, you'll fortify the foundation of your pallet deck, ensuring a robust and enduring outdoor space. With the pallets securely fastened, you're now poised to advance to the final phase: adding the finishing touches to elevate the aesthetic and functional appeal of your pallet deck.
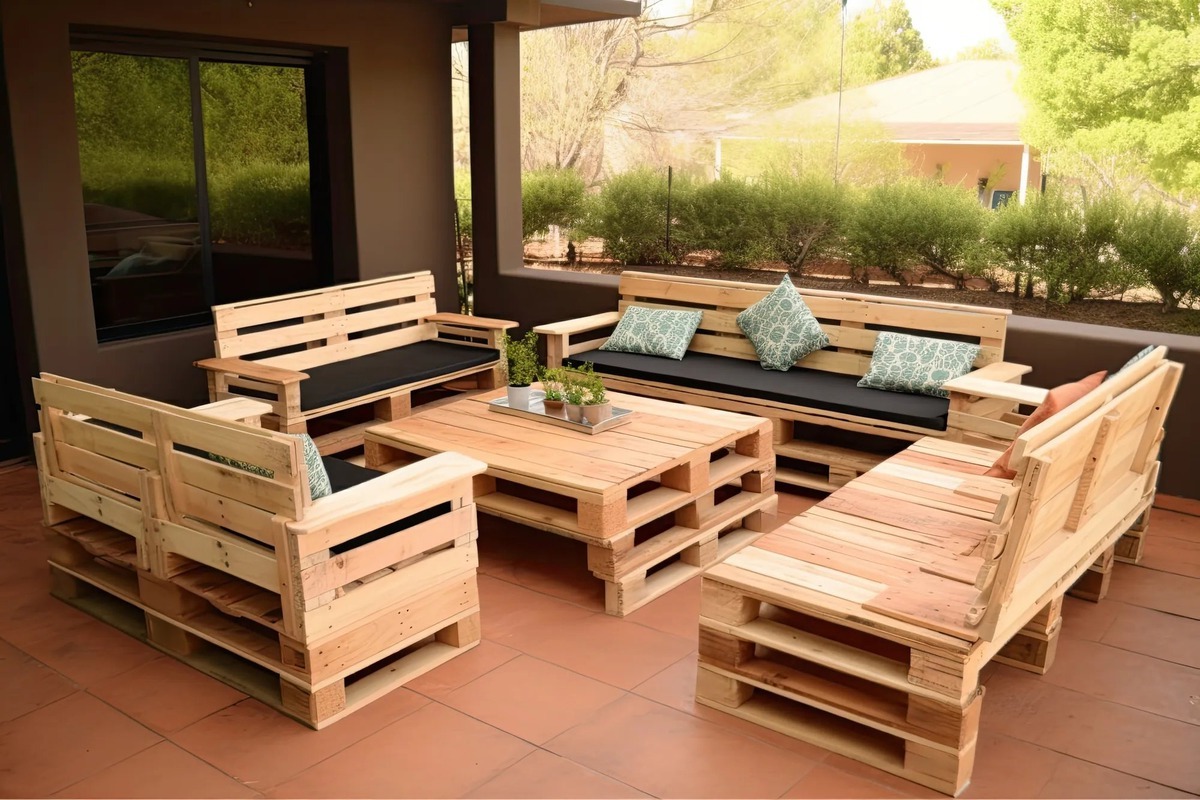
Step 6: Finishing Touches
With the pallets securely in place, it's time to infuse your personal touch and elevate the visual appeal and functionality of your pallet deck through the application of finishing touches. This phase allows you to transform the basic structure into a captivating outdoor space that reflects your style and enhances the overall ambiance of your home. Here's a detailed exploration of the essential elements to consider when adding the finishing touches to your pallet deck:
-
Decorative Elements: Introduce decorative elements such as potted plants, outdoor rugs, and cushions to infuse color, texture, and visual interest into the deck space. These accents not only add a touch of personality but also create a warm and inviting atmosphere for relaxation and entertainment.
-
Seating and Furniture: Select suitable outdoor furniture, such as lounge chairs, benches, or a dining set, to furnish the deck according to its intended use. Opt for weather-resistant and durable pieces that harmonize with the overall design, providing comfort and functionality for outdoor activities.
-
Shade and Shelter: Consider incorporating shade solutions such as umbrellas, pergolas, or retractable awnings to provide relief from the sun and create comfortable outdoor lounging areas. These additions enhance the versatility of the deck, allowing for enjoyment in various weather conditions.
-
Lighting: Illuminate the deck with strategic lighting options, including string lights, lanterns, or solar-powered fixtures. Thoughtfully placed lighting not only extends the functionality of the space into the evening but also contributes to a cozy and enchanting ambiance.
-
Safety Features: Prioritize safety by installing handrails, balustrades, or non-slip coatings on stairs and elevated areas of the deck. These measures enhance the security of the space, especially if the deck is used for gatherings or family activities.
-
Stain or Sealant Application: Apply a protective stain or sealant to the pallets to safeguard the wood from weathering, UV exposure, and moisture. This step not only preserves the natural beauty of the wood but also extends the lifespan of the deck, ensuring long-term enjoyment.
-
Personalized Accents: Infuse your personal style by incorporating custom accents such as outdoor artwork, decorative screens, or hanging planters. These unique touches add character and individuality to the deck, making it a true extension of your home.
By thoughtfully integrating these finishing touches, you'll elevate your pallet deck into a captivating and functional outdoor retreat. Each element contributes to the overall appeal and usability of the space, creating an inviting environment for relaxation, entertainment, and cherished moments with family and friends. With the completion of the finishing touches, your pallet deck stands as a testament to your creativity and craftsmanship, ready to enrich your outdoor living experience for years to come.
Conclusion
As you reach the culmination of your pallet deck project, it's essential to reflect on the journey you've undertaken and the remarkable transformation that has unfolded. From the initial stages of planning and preparation to the meticulous sourcing, cleaning, and assembly of the pallets, each step has been a testament to your dedication, creativity, and craftsmanship. The result is not merely a deck but a personalized outdoor sanctuary that embodies your vision and ingenuity.
By repurposing wooden pallets, you've not only contributed to sustainable living but also unlocked the potential for boundless creativity. The pallet deck stands as a testament to the beauty of upcycling, where discarded materials have been reimagined and repurposed into a functional and visually captivating structure. This embodiment of sustainability and creativity serves as an inspiration for embracing eco-friendly practices and unleashing one's inventive spirit in the realm of DIY projects.
Beyond its environmental and creative significance, the pallet deck represents a space of endless possibilities. It's a stage for cherished gatherings, tranquil moments of solitude, and the creation of lasting memories. The finishing touches, from decorative accents to comfortable seating, have transformed the deck into an extension of your home, offering a seamless transition between indoor comfort and outdoor allure.
As you bask in the satisfaction of completing this project, take a moment to envision the countless experiences that await within this enchanting outdoor space. Whether it's savoring a morning cup of coffee amidst the serenity of nature, hosting lively gatherings under the stars, or simply finding solace in the embrace of a good book, the pallet deck stands ready to enrich your life in myriad ways.
Moreover, the journey of building a pallet deck has not only honed your DIY skills but has also fostered a deeper connection with your outdoor environment. It has instilled a sense of pride in creating a space that harmonizes with nature and complements the beauty of the surrounding landscape. This newfound appreciation for outdoor living is a gift that will continue to inspire and rejuvenate, season after season.
In conclusion, the completion of your pallet deck marks not just the end of a project, but the beginning of a new chapter in your outdoor living experience. It's a testament to your resourcefulness, creativity, and commitment to enhancing your home and lifestyle. As you embark on this next phase of enjoyment and relaxation, may your pallet deck be a constant source of joy, inspiration, and connection with the natural world.