
Home>Create & Decorate>DIY & Crafts>DIY Guide: Installing Deck Balusters For A Stunning Outdoor Space
DIY & Crafts
DIY Guide: Installing Deck Balusters For A Stunning Outdoor Space
Published: February 24, 2024

Content Creator specializing in woodworking and interior transformations. Caegan's guides motivate readers to undertake their own projects, while his custom furniture adds a personal touch.
Learn how to enhance your outdoor space with our DIY guide for installing deck balusters. Create a stunning and functional area with our step-by-step instructions. Perfect for DIY & Crafts enthusiasts.
(Many of the links in this article redirect to a specific reviewed product. Your purchase of these products through affiliate links helps to generate commission for Twigandthistle.com, at no extra cost. Learn more)
Introduction
Transforming your outdoor space into a captivating and inviting area often involves a blend of creativity, craftsmanship, and practicality. One of the key elements in achieving this transformation is the installation of deck balusters. These vertical supports not only enhance the safety of your deck but also contribute to its aesthetic appeal, creating a stunning outdoor environment for relaxation and entertainment.
In this comprehensive DIY guide, we will walk you through the step-by-step process of installing deck balusters, empowering you to take on this project with confidence and precision. Whether you're a seasoned DIY enthusiast or a novice looking to elevate your outdoor space, this guide will equip you with the knowledge and skills needed to complete the installation successfully.
By following these instructions and leveraging your creativity, you'll be able to infuse your personal touch into the design, resulting in a deck that reflects your unique style and enhances the overall ambiance of your outdoor living area. So, roll up your sleeves, gather your tools, and let's embark on this fulfilling journey of enhancing your outdoor space with the installation of deck balusters.
Step 1: Gather Materials and Tools
Before diving into the installation process, it's crucial to gather all the necessary materials and tools to ensure a smooth and efficient workflow. Here's a comprehensive list of items you'll need:
Materials:
- Deck balusters: Choose a style and material that complements your deck's design and meets local building codes.
- Bottom rail: This horizontal component provides support for the balusters and adds structural integrity to the railing system.
- Top rail: The top rail not only enhances the visual appeal of the railing but also serves as a functional handhold.
- Baluster connectors or fasteners: These are essential for securely attaching the balusters to the bottom and top rails.
- Wood screws or nails: Select corrosion-resistant fasteners suitable for outdoor use.
- Wood sealant or paint: Protect the wood components from moisture and UV exposure while adding a decorative finish.
Tools:
- Measuring tape: Accurate measurements are crucial for ensuring proper baluster spacing and alignment.
- Pencil or chalk: Marking the baluster placement on the rails and posts.
- Saw: Depending on the material of the balusters and rails, you may need a handsaw or a power saw for cutting.
- Drill and bits: For pre-drilling holes and installing screws or fasteners.
- Level: Ensures that the railing components are installed straight and plumb.
- Work gloves and safety goggles: Protect your hands and eyes during the installation process.
- Paintbrushes or applicators: For applying wood sealant or paint to the railing components.
By gathering these materials and tools, you'll be well-prepared to proceed with confidence to the next steps of the installation process. This careful preparation sets the stage for a successful and rewarding DIY project, allowing you to create a visually stunning and secure deck railing that enhances your outdoor living space.
Step 2: Measure and Mark Baluster Placement
Accurate measurement and precise marking are fundamental to the successful installation of deck balusters. This step sets the foundation for a visually appealing and structurally sound railing system. Here's a detailed walkthrough of the process:
-
Determine Baluster Spacing: Begin by consulting local building codes or guidelines to ensure compliance with regulations regarding baluster spacing. Typically, the spacing should be narrow enough to prevent small children from slipping through while maintaining an aesthetically pleasing appearance. A common guideline is to space the balusters no more than 4 inches apart.
-
Measure Bottom Rail: Using a measuring tape, mark the placement of the balusters on the bottom rail. Start by measuring the length of the bottom rail and dividing it by the desired spacing between balusters. This calculation will determine the precise locations for marking where the balusters will be installed.
-
Mark Baluster Positions: With the measurements in hand, use a pencil or chalk to mark the positions for each baluster along the bottom rail. Ensure that the marks are evenly spaced and aligned to maintain a consistent and visually appealing look.
-
Check for Alignment: Before proceeding, use a level to confirm that the marks for the baluster positions are aligned horizontally. This step is crucial for ensuring a professional and polished end result.
-
Repeat for Top Rail: Once the bottom rail is marked, repeat the measuring and marking process for the top rail. Align the marks on the top rail with those on the bottom rail to ensure uniformity in baluster placement.
-
Consider Design Elements: If you're aiming for a specific design pattern, such as alternating baluster styles or creating a custom pattern, take the time to plan and mark the layout accordingly. This attention to detail can elevate the visual appeal of your deck railing.
By meticulously measuring and marking the baluster placement, you lay the groundwork for a precise and visually pleasing railing system. This careful attention to detail ensures that the subsequent steps in the installation process proceed smoothly, resulting in a stunning and secure deck railing that enhances your outdoor space.
Step 3: Install Bottom Rail
With the baluster placement meticulously marked on the bottom rail, it's time to proceed with the installation of this crucial component. The bottom rail serves as the foundational support for the balusters, contributing to the overall stability and structural integrity of the railing system. Follow these detailed steps to ensure a seamless installation process:
-
Position the Bottom Rail: Begin by positioning the bottom rail along the designated area of the deck, ensuring that it aligns with the previously marked baluster positions. Use a level to confirm that the rail is horizontally aligned and adjust its placement as needed to achieve a straight and level orientation.
-
Secure the Bottom Rail: Once the bottom rail is properly positioned, secure it to the deck posts using appropriate fasteners, such as screws or nails. Depending on the material of the deck posts and bottom rail, you may need to pre-drill holes to prevent splitting and ensure a secure attachment.
-
Check for Stability: After securing the bottom rail, perform a stability check to ensure that it is firmly anchored to the deck structure. Apply pressure to different sections of the rail to confirm that it can support the weight and pressure exerted during regular use.
-
Verify Alignment: Use a level to double-check the alignment of the bottom rail, ensuring that it remains straight and level throughout its length. Any adjustments required at this stage will contribute to the overall visual appeal and structural soundness of the railing system.
-
Consider Decorative Elements: If desired, this is an opportune time to incorporate decorative elements into the bottom rail, such as routed edges or ornamental accents. These embellishments can add a touch of elegance to the railing while complementing the overall design of the deck.
By meticulously following these steps, you'll successfully install the bottom rail, laying a solid foundation for the subsequent attachment of the balusters. The secure and level positioning of the bottom rail is essential for ensuring the stability and visual appeal of the entire railing system, setting the stage for the next phase of the installation process.
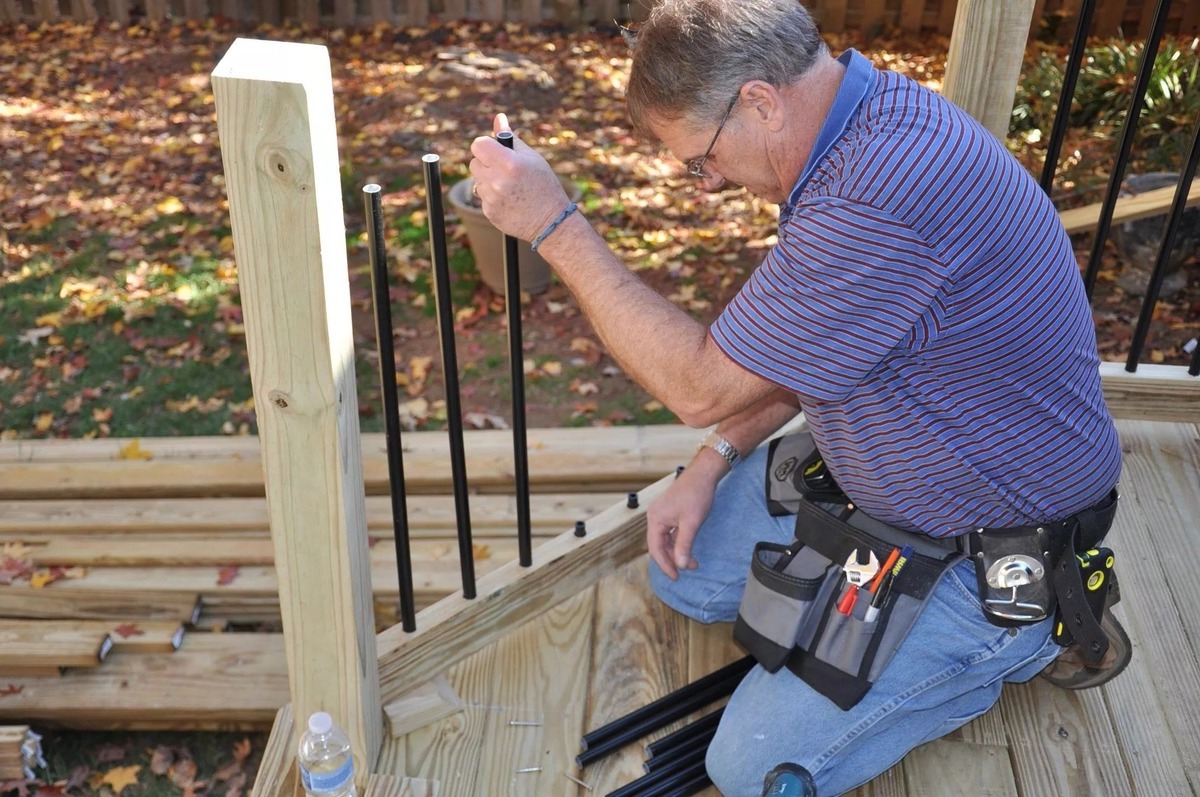
Step 4: Attach Balusters to Bottom Rail
With the bottom rail securely in place, the next critical step in the installation process is attaching the balusters to the bottom rail. This phase not only contributes to the structural integrity of the railing system but also significantly influences the visual appeal of the deck. Follow these detailed steps to ensure a seamless and professional attachment of the balusters:
-
Prepare the Balusters: Before attaching the balusters, ensure that they are cut to the appropriate length based on the measurements and markings made during the planning phase. If necessary, use a saw to trim the balusters to the required size, taking care to achieve clean and precise cuts.
-
Position the Balusters: Place the first baluster at one end of the bottom rail, aligning it with the marked position. Ensure that the baluster is positioned vertically and rests securely on the deck surface. Use a level to confirm that the baluster is plumb, making any adjustments as needed.
-
Secure the Balusters: Once the first baluster is properly positioned, use baluster connectors or fasteners to attach it to the bottom rail securely. Depending on the chosen fastening method, pre-drill pilot holes to prevent splitting and then insert the connectors or fasteners to firmly anchor the baluster to the rail.
-
Maintain Consistent Spacing: As you proceed to attach additional balusters along the bottom rail, maintain consistent spacing between each baluster to achieve a uniform and visually appealing result. Refer to the markings made during the measurement phase to ensure that the spacing adheres to the predetermined layout.
-
Check Alignment and Stability: Periodically use a level to verify that the attached balusters are aligned vertically and maintain a straight orientation along the bottom rail. Additionally, perform a stability check by applying gentle pressure to each baluster to confirm its secure attachment and structural integrity.
-
Repeat the Process: Continue attaching the remaining balusters to the bottom rail, following the same meticulous approach to positioning, securing, and aligning each component. Consistent attention to detail throughout this process is essential for achieving a professional and polished end result.
By methodically attaching the balusters to the bottom rail, you establish the framework for a visually stunning and secure deck railing. The careful alignment, secure attachment, and consistent spacing of the balusters contribute to the overall aesthetic appeal and structural soundness of the railing system, setting the stage for the final steps in the installation process.
Step 5: Install Top Rail
With the balusters securely attached to the bottom rail, the installation process progresses to the pivotal step of installing the top rail. The top rail not only serves as a functional handhold but also adds a finishing touch to the deck railing, enhancing its visual appeal and structural integrity. Follow these detailed steps to ensure a seamless and professional installation of the top rail:
-
Position the Top Rail: Begin by placing the top rail over the installed balusters, ensuring that it aligns with the corresponding markings on the balusters and bottom rail. Use a level to confirm that the top rail is horizontally aligned and adjust its position as needed to achieve a straight and level orientation.
-
Secure the Top Rail: Once the top rail is properly positioned, secure it to the balusters using appropriate fasteners, such as screws or connectors. Depending on the material of the top rail and balusters, you may need to pre-drill holes to prevent splitting and ensure a secure attachment. Ensure that the top rail is firmly anchored to the balusters, providing stability and support.
-
Check for Alignment: Use a level to double-check the alignment of the top rail, ensuring that it remains straight and level throughout its length. Any adjustments required at this stage will contribute to the overall visual appeal and structural soundness of the railing system, creating a polished and professional finish.
-
Verify Stability: After securing the top rail, perform a stability check to ensure that it is firmly anchored and capable of supporting the weight and pressure exerted during regular use. Apply gentle pressure to different sections of the rail to confirm its stability and structural integrity.
-
Consider Decorative Elements: If desired, this is an opportune time to incorporate decorative elements into the top rail, such as routed edges, ornamental caps, or post caps. These embellishments can add a touch of elegance to the railing while complementing the overall design of the deck, elevating its visual appeal.
By meticulously following these steps, you'll successfully install the top rail, completing the framework for a visually stunning and secure deck railing. The secure and level positioning of the top rail, combined with attention to alignment and stability, is essential for ensuring the overall visual appeal and structural soundness of the entire railing system, culminating in a polished and professional finish.
Step 6: Finishing Touches and Maintenance Tips
With the primary installation steps completed, it's time to add the finishing touches to your newly installed deck balusters and gain valuable insights into maintaining their pristine condition for years to come.
Adding Decorative Flourishes
To elevate the visual appeal of your deck railing, consider incorporating decorative elements such as ornamental caps, post caps, or routed edges. These embellishments not only add a touch of elegance to the railing but also serve as protective accents, shielding the railing components from moisture and environmental elements. By carefully selecting and integrating these decorative flourishes, you can infuse your deck with a personalized and sophisticated aesthetic that complements your outdoor living space.
Applying Wood Sealant or Paint
Protecting the wood components of your deck railing is essential for ensuring longevity and resilience against the elements. Consider applying a high-quality wood sealant or paint to the balusters, bottom rail, and top rail. This protective coating acts as a barrier, shielding the wood from moisture, UV exposure, and potential decay. Additionally, the application of sealant or paint allows you to customize the appearance of the railing, coordinating it with your overall outdoor design scheme while safeguarding its structural integrity.
Regular Maintenance Practices
To preserve the beauty and structural integrity of your deck railing, incorporate regular maintenance practices into your routine. Periodically inspect the railing for signs of wear, moisture damage, or loose fasteners, addressing any issues promptly to prevent further deterioration. Depending on the climate and environmental conditions in your area, consider reapplying wood sealant or paint every few years to maintain optimal protection and visual appeal. Additionally, keeping the railing clean from dirt, debris, and organic matter contributes to its longevity and ensures a welcoming outdoor environment for relaxation and entertainment.
By attending to these finishing touches and embracing proactive maintenance practices, you'll not only enhance the visual allure of your deck railing but also prolong its lifespan, allowing you to enjoy a captivating and secure outdoor space for years to come.
Conclusion
In conclusion, the installation of deck balusters represents a transformative endeavor that goes beyond mere functionality, elevating your outdoor space into a captivating and inviting environment. By following the comprehensive DIY guide outlined here, you have gained the knowledge and skills necessary to embark on this fulfilling journey with confidence and precision.
Through meticulous planning, precise measurement, and careful execution, you have successfully laid the foundation for a visually stunning and secure deck railing. The strategic placement of balusters, coupled with the installation of bottom and top rails, has culminated in a polished and professional finish that enhances the overall ambiance of your outdoor living area.
As you admire the newly installed deck balusters, take pride in the personalized touch you've infused into the design, reflecting your unique style and creativity. The decorative flourishes and protective coatings applied during the finishing touches not only add elegance to the railing but also safeguard its longevity, ensuring that your outdoor space remains a source of relaxation and enjoyment for years to come.
It's important to recognize that the journey doesn't end with installation. Embracing regular maintenance practices, such as inspecting the railing for wear and reapplying protective coatings as needed, will preserve its beauty and structural integrity, allowing you to savor the captivating outdoor environment you've created.
Ultimately, the installation of deck balusters transcends the realm of DIY projects; it embodies the art of crafting a space that beckons you to unwind, entertain, and connect with nature. As you bask in the allure of your enhanced outdoor space, may it serve as a testament to your craftsmanship and creativity, enriching your lifestyle and creating lasting memories for years to come.