
Home>Create & Decorate>DIY & Crafts>DIY Deck Privacy Wall: Create Your Own Outdoor Oasis
DIY & Crafts
DIY Deck Privacy Wall: Create Your Own Outdoor Oasis
Published: February 28, 2024

Content Creator specializing in woodworking and interior transformations. Caegan's guides motivate readers to undertake their own projects, while his custom furniture adds a personal touch.
Transform your outdoor space with a DIY deck privacy wall. Discover creative DIY & Crafts ideas to build your own outdoor oasis. Create privacy and style!
(Many of the links in this article redirect to a specific reviewed product. Your purchase of these products through affiliate links helps to generate commission for Twigandthistle.com, at no extra cost. Learn more)
Introduction
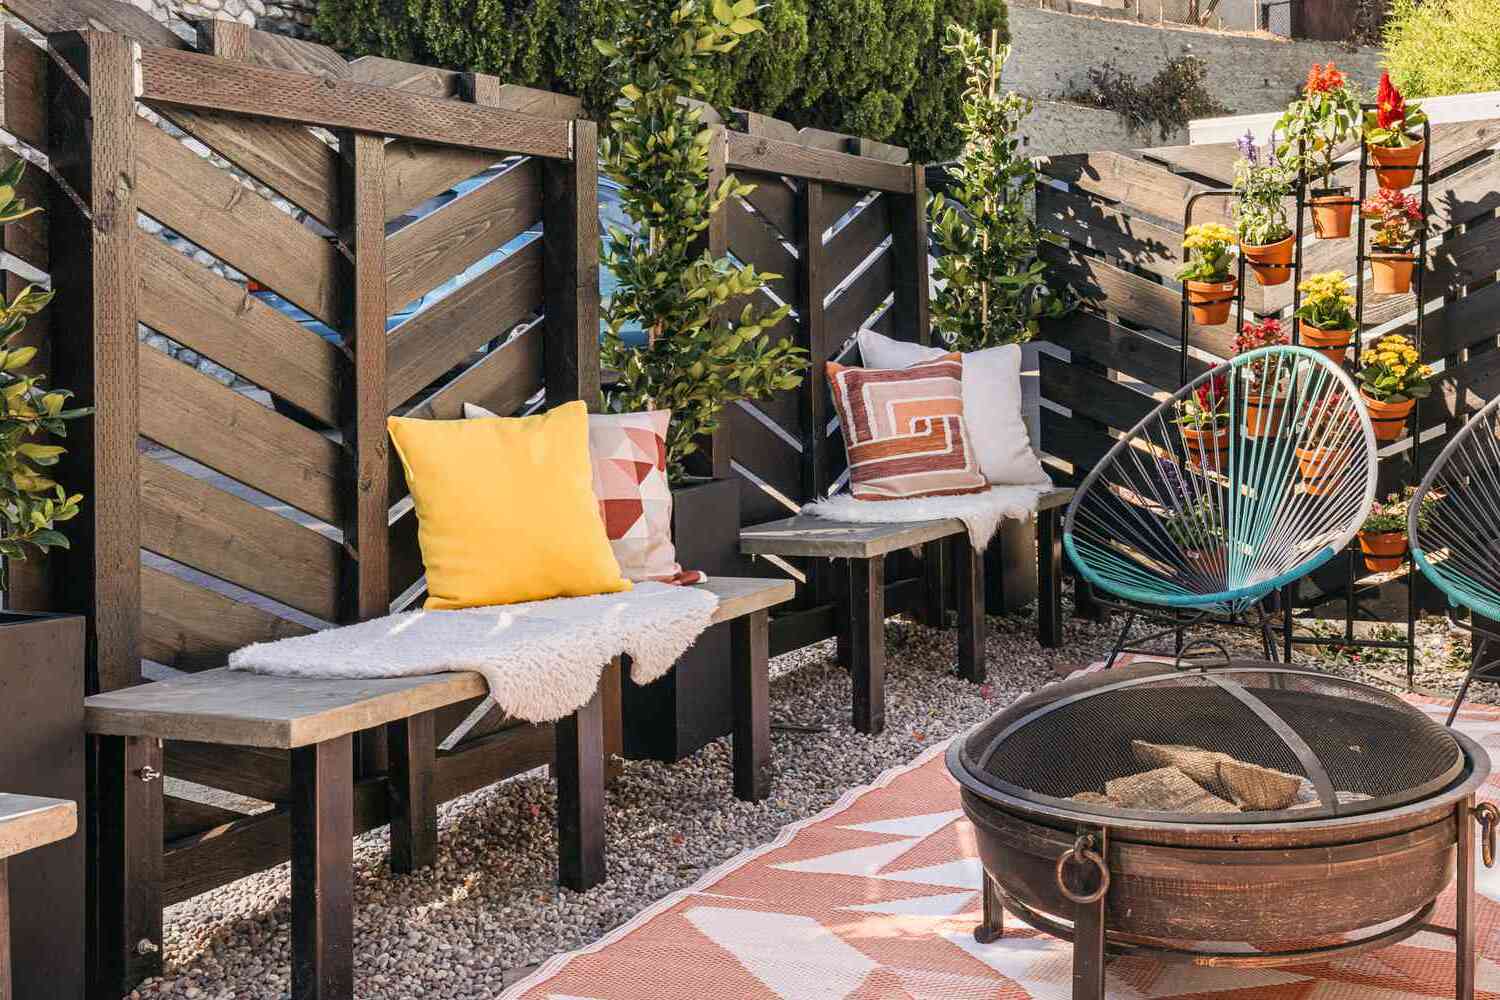
Creating a serene and inviting outdoor space is a cherished aspiration for many homeowners. Whether you seek a cozy retreat for relaxation or a private area for entertaining guests, a DIY deck privacy wall can transform your outdoor oasis into a secluded haven. This project not only enhances the aesthetic appeal of your deck but also provides the practical benefit of added privacy.
By embarking on this DIY endeavor, you have the opportunity to infuse your personal style and creativity into the design. From selecting the materials to customizing the dimensions, every aspect of the privacy wall can be tailored to complement your outdoor living space. Additionally, the satisfaction of crafting a functional and visually appealing structure with your own hands is immensely rewarding.
As you delve into this project, envision the possibilities that a well-designed deck privacy wall can offer. Picture the tranquil ambiance it will create, shielding you from prying eyes and the hustle and bustle of the outside world. Imagine the potential for incorporating decorative elements that reflect your unique taste, such as hanging planters, string lights, or artistic accents. With careful planning and attention to detail, you can elevate your deck into a private retreat that exudes charm and comfort.
In the following sections, we will guide you through the process of constructing a DIY deck privacy wall, from gathering the necessary materials to executing each step with precision. Embrace this opportunity to unleash your creativity and craftsmanship, and soon you will revel in the satisfaction of having transformed your outdoor space into a secluded sanctuary. Let's embark on this journey to create a captivating and functional outdoor oasis that reflects your individuality and enhances your enjoyment of your home.
Materials Needed
To embark on the construction of a DIY deck privacy wall, you will require a selection of materials that are essential for bringing your vision to life. Here's a comprehensive list of the items you'll need to gather before commencing this project:
-
Pressure-Treated Lumber: This sturdy and weather-resistant material will serve as the primary component for constructing the frame and slats of the privacy wall. Ensure that the lumber is suitable for outdoor use to withstand the elements effectively.
-
Deck Screws: Opt for corrosion-resistant deck screws to secure the components of the privacy wall firmly. These screws should be durable enough to withstand outdoor conditions and provide long-lasting stability.
-
Post Caps: These decorative elements not only add a polished look to the top of the privacy wall posts but also offer protection against moisture, ultimately prolonging the lifespan of the structure.
-
Concrete Mix: If you plan to install the privacy wall with posts set in concrete footings, you will need concrete mix to secure the posts firmly in place. Ensure that the concrete mix is suitable for outdoor applications and provides strong, reliable support.
-
Post Anchors: If you prefer to attach the privacy wall directly to your deck, post anchors will be necessary to secure the posts to the deck surface. Choose high-quality post anchors that are designed for outdoor use and can withstand the weight and pressure exerted on the privacy wall.
-
Level: A reliable level is essential for ensuring that the privacy wall is installed perfectly upright and plumb. This tool is crucial for achieving a professional and visually appealing result.
-
Circular Saw: A high-quality circular saw will be indispensable for cutting the lumber to the precise dimensions required for the frame and slats of the privacy wall. Ensure that the saw is equipped with a sharp blade suitable for cutting pressure-treated lumber.
-
Measuring Tape: Accurate measurements are crucial for the success of this project. A durable and easy-to-read measuring tape will enable you to precisely determine the dimensions of the privacy wall components and ensure a seamless construction process.
-
Safety Gear: Prioritize safety by equipping yourself with protective gear, including safety goggles, work gloves, and a dust mask. These items will safeguard you against potential hazards and ensure a secure and comfortable working environment.
By gathering these essential materials, you will be well-prepared to commence the construction of your DIY deck privacy wall. With careful planning and attention to detail, you can transform these basic components into a stunning and functional addition to your outdoor living space.
Step 1: Measure and Plan
Before diving into the construction of your DIY deck privacy wall, it is crucial to commence with meticulous measurements and a comprehensive plan. This initial step lays the foundation for a successful and visually appealing outcome, ensuring that the privacy wall seamlessly integrates with your existing deck and fulfills your specific requirements.
Begin by surveying the area where the privacy wall will be installed. Take precise measurements of the space to determine the dimensions for the frame and slats of the privacy wall. Consider the desired height and width of the structure, keeping in mind the level of privacy you aim to achieve and any architectural or design elements you wish to incorporate.
Next, draft a detailed plan that outlines the layout and design of the privacy wall. Take into account any existing features of your deck, such as railings, posts, or stairs, and strategize how the privacy wall will harmoniously coexist with these elements. Visualize the placement of the privacy wall in relation to the surrounding environment, ensuring that it complements the overall aesthetic of your outdoor space.
As you plan the construction of the privacy wall, consider the orientation of the slats to optimize privacy while allowing sufficient airflow and natural light. Additionally, contemplate any decorative elements or embellishments you intend to incorporate, such as lattice panels, decorative cutouts, or integrated planters. These details will infuse personality and charm into the privacy wall, elevating its visual appeal and contributing to the ambiance of your outdoor oasis.
Furthermore, assess the structural requirements for installing the privacy wall, whether it involves securing posts in concrete footings or attaching them directly to the deck surface. Evaluate the necessary support and anchoring methods to ensure the stability and durability of the privacy wall, especially in areas prone to strong winds or inclement weather.
By meticulously measuring the space and devising a comprehensive plan, you set the stage for a seamless and gratifying construction process. This preparatory phase empowers you to envision the end result and tailor the design to suit your preferences, ultimately culminating in a well-crafted and harmonious addition to your outdoor living space.
Step 2: Build the Frame
With the meticulous measurements and comprehensive plan in place, it's time to embark on the construction of the frame for your DIY deck privacy wall. The frame serves as the structural backbone of the privacy wall, providing stability and support for the slats while defining the overall shape and dimensions of the structure.
Begin by selecting high-quality pressure-treated lumber that is well-suited for outdoor applications. This durable material will ensure that the frame withstands the elements and maintains its integrity over time. Using a reliable circular saw, carefully cut the lumber to the precise dimensions determined during the planning phase. Take care to achieve clean and accurate cuts, as they will contribute to the professional and polished appearance of the frame.
Once the lumber is cut to size, assemble the frame components according to your plan. Position the vertical posts at the designated intervals, ensuring that they are aligned perfectly upright and securely anchored to the ground or deck surface. Utilize a level to confirm that the posts are plumb and adjust them as needed to achieve precise vertical alignment.
Subsequently, attach the horizontal crosspieces to the posts, forming the top, bottom, and intermediate sections of the frame. Secure the components with corrosion-resistant deck screws, ensuring that they are firmly fastened to create a sturdy and reliable frame. Pay close attention to the alignment and spacing of the crosspieces to maintain uniformity and structural integrity throughout the frame.
As you progress with the assembly, periodically assess the squareness and alignment of the frame to guarantee that it conforms to your initial plan. This attention to detail will result in a frame that is not only visually appealing but also structurally sound, laying the groundwork for the successful completion of your deck privacy wall.
By methodically constructing the frame with precision and care, you establish a solid foundation for the subsequent steps of the project. The frame not only defines the structure of the privacy wall but also sets the stage for the integration of the slats and the realization of your envisioned outdoor oasis. With the frame in place, you are poised to advance to the next phase of the construction process, bringing you one step closer to enjoying a private and enchanting outdoor retreat.
Step 3: Attach the Slats
With the sturdy frame of the deck privacy wall in place, the next crucial step is to attach the slats, which will not only enhance the privacy and functionality of the structure but also contribute to its visual appeal. The careful and precise installation of the slats is essential to achieving a polished and professional outcome that aligns with your vision for an inviting outdoor oasis.
Begin by selecting high-quality pressure-treated lumber for the slats, ensuring that the material is well-suited for outdoor use and capable of withstanding the elements. With the lumber at hand, use a reliable circular saw to cut the slats to the predetermined dimensions, taking care to achieve clean and uniform cuts that will contribute to the overall aesthetic of the privacy wall.
Once the slats are cut to size, position them horizontally between the vertical posts of the frame, ensuring even spacing and alignment. Secure the slats to the frame using corrosion-resistant deck screws, ensuring that they are firmly fastened and evenly distributed across the width of the privacy wall. This meticulous approach will not only contribute to the structural integrity of the privacy wall but also result in a visually pleasing and harmonious arrangement of the slats.
As you progress with the attachment of the slats, pay attention to the orientation and spacing to strike a balance between privacy and airflow. Consider the desired level of seclusion and the potential for integrating decorative elements or embellishments within the slatted design. This thoughtful approach will allow you to customize the privacy wall to suit your preferences while ensuring that it seamlessly integrates with the overall aesthetic of your outdoor space.
Throughout the installation process, periodically step back to assess the visual impact and functionality of the slatted arrangement. This vantage point will enable you to make any necessary adjustments to ensure that the slats are aligned, level, and visually appealing. By maintaining a keen eye for detail and precision, you will achieve a cohesive and polished result that elevates the allure of your outdoor oasis.
As the final slats are securely attached, take a moment to admire the transformation taking place. The privacy wall is now not only a functional addition to your deck but also a visually striking element that enhances the ambiance of your outdoor space. With the slats in place, you are one step closer to reveling in the secluded and inviting retreat that you have envisioned, where you can unwind and entertain in privacy and style.
Step 4: Add Finishing Touches
As the construction of the DIY deck privacy wall nears completion, the addition of finishing touches will elevate the visual appeal and functionality of the structure, culminating in a captivating and inviting outdoor oasis. This pivotal step allows you to infuse your personal style and creativity into the privacy wall, transforming it from a functional barrier into a visually striking and harmonious element of your outdoor living space.
One impactful way to enhance the aesthetic appeal of the privacy wall is by incorporating decorative elements that reflect your individual taste and complement the overall design of your deck. Consider integrating lattice panels within the slatted arrangement to introduce an element of visual interest and sophistication. These panels not only contribute to the privacy and seclusion provided by the wall but also create an elegant and decorative motif that enriches the ambiance of the outdoor space.
Furthermore, the addition of integrated planters or shelves within the privacy wall presents an opportunity to infuse greenery and natural beauty into the structure. By strategically placing planters or shelves at intervals along the wall, you can introduce vibrant foliage, cascading vines, or artistic arrangements that infuse the space with color, texture, and vitality. This botanical infusion not only softens the architectural lines of the privacy wall but also establishes a seamless connection with the surrounding natural environment.
Incorporating lighting elements into the privacy wall offers the dual benefit of enhancing both its visual appeal and functionality. Consider installing discreet LED lighting along the top or bottom of the wall to create a warm and inviting ambiance during evening gatherings or quiet moments of relaxation. These subtle yet impactful lighting accents not only contribute to the overall allure of the outdoor space but also extend its functionality into the evening hours, allowing you to enjoy the enchanting atmosphere of your secluded retreat after sunset.
Finally, consider the application of a protective finish to the pressure-treated lumber comprising the privacy wall. A high-quality outdoor wood sealant or stain will not only safeguard the wood against the effects of weathering and UV exposure but also enrich its natural tones and textures, resulting in a polished and enduring finish. This finishing touch not only enhances the longevity of the privacy wall but also elevates its visual appeal, ensuring that it remains a captivating and enduring feature of your outdoor oasis for years to come.
By thoughtfully incorporating these finishing touches, you will transform the DIY deck privacy wall into a captivating and functional centerpiece of your outdoor living space. The integration of decorative elements, greenery, lighting, and protective finishes will not only enhance the visual appeal of the privacy wall but also contribute to the creation of a serene and inviting retreat that reflects your unique style and fosters moments of relaxation and enjoyment. With these finishing touches in place, your outdoor oasis is poised to become a cherished haven where you can unwind, entertain, and savor the beauty of your personalized sanctuary.
Conclusion
In conclusion, the construction of a DIY deck privacy wall presents a gratifying opportunity to transform your outdoor space into a secluded and enchanting oasis that reflects your individual style and enhances your enjoyment of your home. By embarking on this project, you have not only crafted a functional barrier for privacy but also curated a visually striking and harmonious addition to your deck. The meticulous planning, precise measurements, and thoughtful execution have culminated in the creation of a captivating outdoor retreat that invites relaxation and fosters moments of tranquility.
As you reflect on the journey from the initial measurements and planning to the meticulous construction of the frame, attachment of the slats, and addition of finishing touches, take pride in the craftsmanship and creativity that have shaped the privacy wall. The integration of decorative elements, greenery, lighting, and protective finishes has elevated the visual appeal and functionality of the structure, resulting in a seamless and inviting extension of your outdoor living space.
With the privacy wall in place, you are poised to savor the seclusion and tranquility it offers, whether you seek a quiet sanctuary for personal reflection or a private setting for gatherings with loved ones. The carefully designed slatted arrangement not only ensures privacy but also allows for gentle airflow and natural light, creating a balanced and inviting atmosphere. The decorative elements and integrated planters infuse the space with color, texture, and vitality, establishing a seamless connection with the natural environment and enhancing the overall ambiance of your outdoor oasis.
Furthermore, the addition of discreet LED lighting and the application of a protective finish to the pressure-treated lumber contribute to the enduring allure and functionality of the privacy wall. These thoughtful details ensure that your outdoor retreat remains captivating and inviting, day or night, while withstanding the effects of weathering and UV exposure.
As you bask in the tranquil ambiance of your secluded outdoor oasis, take a moment to appreciate the transformation that has taken place. The DIY deck privacy wall stands as a testament to your creativity, craftsmanship, and dedication to enhancing your living space. Embrace the satisfaction of having created a captivating and functional centerpiece that enriches your daily life and provides a haven for relaxation and rejuvenation.
In the end, the construction of a DIY deck privacy wall transcends the mere assembly of materials; it embodies the realization of a vision, the expression of individuality, and the cultivation of a cherished retreat. With each glance at the privacy wall, you are reminded of the transformative power of hands-on creativity and the enduring allure of a personalized outdoor sanctuary.