
Home>Create & Decorate>DIY & Crafts>DIY Deck Canopy: Create Your Own Outdoor Oasis
DIY & Crafts
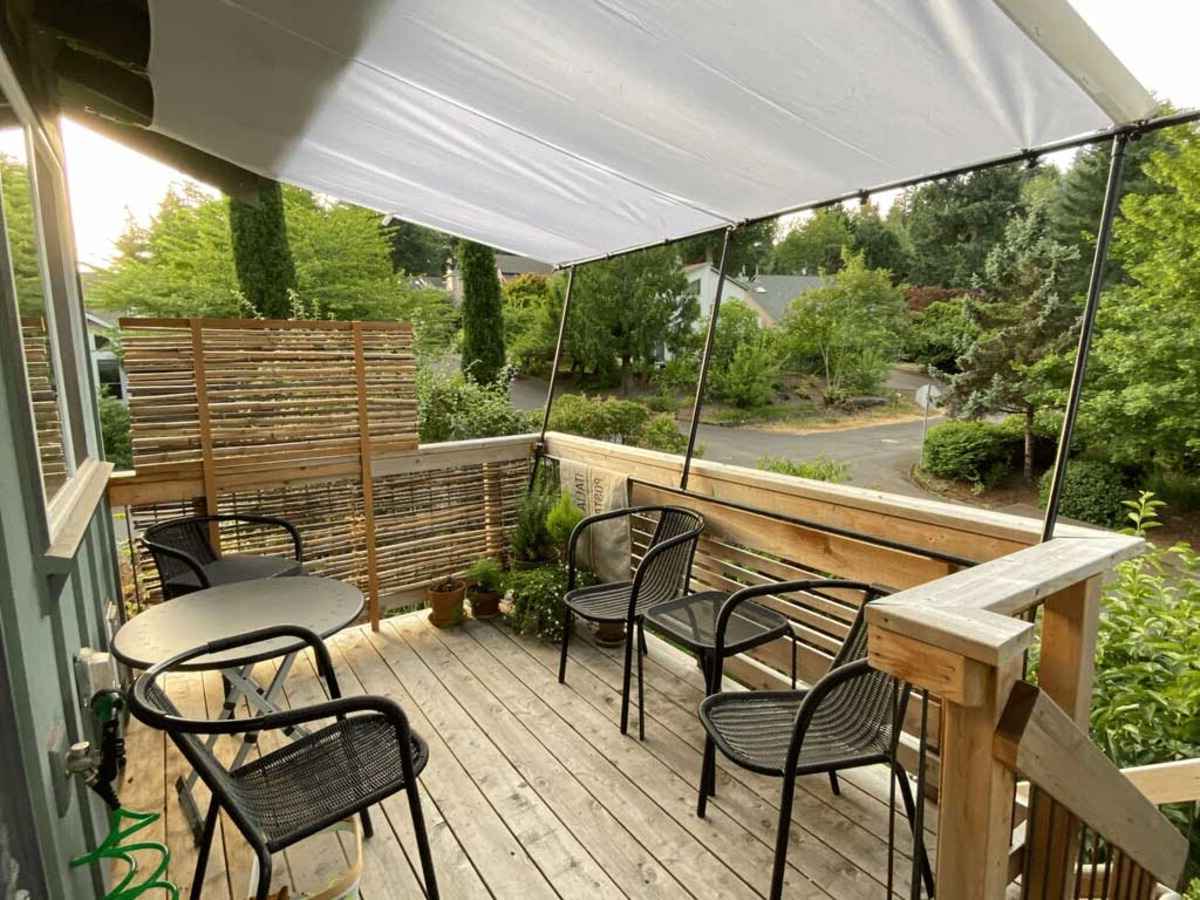
DIY Deck Canopy: Create Your Own Outdoor Oasis
Published: February 24, 2024

Senior Editor in Create & Decorate, Kathryn combines traditional craftsmanship with contemporary trends. Her background in textile design and commitment to sustainable crafts inspire both content and community.
Create your own outdoor oasis with a DIY deck canopy. Transform your space with this DIY & Crafts project and enjoy the ultimate relaxation.
(Many of the links in this article redirect to a specific reviewed product. Your purchase of these products through affiliate links helps to generate commission for Twigandthistle.com, at no extra cost. Learn more)
Introduction
Creating a DIY deck canopy is an excellent way to transform your outdoor space into a relaxing oasis where you can unwind and entertain. Whether you're looking to shield your deck from the sun's intense rays or create a cozy spot for al fresco dining, a custom canopy offers both practical benefits and aesthetic appeal. By embarking on this DIY project, you have the opportunity to personalize your outdoor area while adding value to your home.
A well-designed deck canopy not only provides shade and protection from the elements but also enhances the overall ambiance of your outdoor living space. Imagine lounging on your deck, sipping a refreshing beverage, and enjoying the gentle breeze while being sheltered from the sun's glare. With a carefully crafted canopy, you can create a comfortable and inviting environment for relaxation and social gatherings.
In addition to its functional advantages, a DIY deck canopy allows you to showcase your creativity and craftsmanship. By selecting the materials, colors, and design elements that align with your vision, you can tailor the canopy to suit your personal style and complement the existing decor of your outdoor area. Whether you prefer a minimalist, modern look or a more rustic, natural aesthetic, the possibilities for customization are endless.
Furthermore, taking on a DIY project such as building a deck canopy can be a fulfilling and empowering experience. As you work through each step of the construction process, from planning and measuring to assembling and installing, you'll gain a sense of accomplishment and pride in your handiwork. The satisfaction of creating a functional and visually appealing addition to your home with your own two hands is truly rewarding.
In the following sections, we'll delve into the materials and tools needed for this project, as well as the step-by-step process of building and installing your DIY deck canopy. By following these guidelines and infusing your own creativity, you'll be well on your way to enjoying an outdoor oasis that reflects your unique taste and provides a welcoming retreat for you, your family, and your guests.
Materials and Tools Needed
Before embarking on the construction of your DIY deck canopy, it's essential to gather all the necessary materials and tools. By ensuring that you have everything at your disposal, you can streamline the building process and minimize interruptions. Here's a comprehensive list of the items you'll need to bring your outdoor oasis to life:
Materials:
-
Lumber: Select high-quality, weather-resistant lumber for the frame of your canopy. Pressure-treated wood or cedar are popular choices due to their durability and ability to withstand outdoor conditions.
-
Canopy Fabric: Choose a durable, UV-resistant fabric that will provide adequate shade and protection. Options include outdoor canvas, polyester, or shade sail material, available in various colors to complement your outdoor decor.
-
Hardware: Purchase galvanized or stainless steel screws, bolts, and brackets to assemble the frame securely. Additionally, consider acquiring eye bolts and turnbuckles for attaching the canopy fabric.
-
Concrete Mix or Deck Blocks: Depending on your deck's construction, you may need concrete mix for setting posts or deck blocks for a freestanding canopy.
-
Waterproof Sealant: To prolong the lifespan of the wood, apply a waterproof sealant to protect the frame from moisture and rot.
-
Decorative Elements: If desired, incorporate decorative elements such as trim pieces, finials, or post caps to add a personalized touch to your canopy.
Tools:
-
Measuring Tape: Accurate measurements are crucial for ensuring the proper fit and alignment of the canopy components.
-
Circular Saw or Miter Saw: A saw will be necessary for cutting the lumber to the required dimensions.
-
Drill and Bits: A power drill equipped with drill bits and screwdriver bits will facilitate the assembly of the frame and attachment of hardware.
-
Level: To ensure that the canopy frame is installed evenly and securely, a level is indispensable.
-
Post Hole Digger or Auger: If your canopy will have posts set in the ground, a post hole digger or auger will expedite the digging process.
-
Paintbrush or Roller: For applying the waterproof sealant to the wood components.
-
Ladder: Depending on the height of your deck, a ladder may be necessary for reaching elevated areas during construction.
By procuring these materials and tools, you'll be well-equipped to commence the construction of your DIY deck canopy. With careful planning and attention to detail, you can create a functional and visually appealing outdoor retreat that enhances the enjoyment of your deck space.
Step 1: Measure and Plan
Before diving into the construction of your DIY deck canopy, it's crucial to begin with a meticulous process of measurement and planning. This initial step lays the foundation for a successful and well-executed project, ensuring that your canopy fits seamlessly into your outdoor space while meeting your specific requirements.
Measuring the Deck Area
Start by carefully measuring the dimensions of your deck to determine the ideal location and size for your canopy. Take accurate measurements of the length, width, and height of the area where the canopy will be installed. Consider factors such as the position of existing structures, the direction of sunlight throughout the day, and any potential obstructions that may impact the placement of the canopy.
Assessing Sun and Wind Exposure
Observe the patterns of sunlight and shade on your deck at different times of the day to identify the areas that receive the most intense sunlight. This information will help you determine the optimal placement of the canopy to provide adequate shade and protection. Additionally, assess the prevailing wind direction to anticipate potential wind resistance and ensure the stability of the canopy.
Design Considerations
Based on your measurements and observations, visualize the design and layout of your canopy. Consider whether you prefer a freestanding canopy or one attached to the existing structure of your deck. Determine the height and slope of the canopy to maximize shade coverage and create a visually appealing silhouette. Take into account any architectural or aesthetic elements of your home and deck that can influence the design of the canopy.
Creating a Detailed Plan
With the measurements and design considerations in mind, create a detailed plan that outlines the specific dimensions, materials, and construction methods for your canopy. Sketch a rough diagram or use a digital design tool to visualize the layout and structure of the canopy. This plan will serve as a valuable reference throughout the construction process, guiding you through each stage of building and installation.
Obtaining Necessary Permits
Depending on your local building codes and regulations, you may need to obtain permits for the construction of a deck canopy. Research the requirements in your area and ensure that your planned canopy complies with any relevant regulations. Obtaining the necessary permits in advance will prevent potential setbacks and ensure that your project proceeds smoothly and legally.
By meticulously measuring and planning the layout and design of your DIY deck canopy, you set the stage for a successful and satisfying construction process. This preparatory phase allows you to make informed decisions and create a clear roadmap for bringing your outdoor oasis to fruition. With careful attention to detail and a well-thought-out plan, you'll be ready to move on to the next exciting phase of building the frame for your canopy.
Step 2: Build the Frame
With the meticulous planning and measurements in place, it's time to embark on the construction of the frame for your DIY deck canopy. The frame serves as the structural backbone of the canopy, providing stability and support for the canopy fabric while defining the overall shape and appearance of the structure.
Frame Design and Layout
Begin by referencing your detailed plan and design considerations to determine the dimensions and layout of the frame. Based on the size and shape of your deck area, decide on the configuration of the frame, including the number of support posts, beams, and rafters required to achieve the desired canopy structure. Consider the optimal height and slope of the frame to ensure effective shade coverage and a visually appealing profile.
Selecting and Preparing Lumber
Select high-quality, weather-resistant lumber for constructing the frame, such as pressure-treated wood or cedar known for their durability and ability to withstand outdoor conditions. Carefully measure and cut the lumber to the specified dimensions, ensuring precise angles and lengths for each component of the frame. Use a circular saw or miter saw to achieve clean and accurate cuts, taking care to maintain uniformity across all pieces.
Assembling the Frame Components
Assemble the frame components according to your design plan, starting with the support posts that will anchor the frame to the deck or ground. Use galvanized or stainless steel screws, bolts, and brackets to securely join the posts, beams, and rafters, ensuring a robust and stable frame structure. Employ a level to confirm that the frame is installed evenly and securely, making any necessary adjustments to achieve proper alignment.
Attaching Cross Braces and Reinforcements
To enhance the strength and stability of the frame, consider incorporating cross braces and reinforcements at strategic points. These additional structural elements can mitigate sway and movement, especially in areas prone to strong winds or inclement weather. Utilize appropriate hardware and fasteners to affix the cross braces and reinforcements, reinforcing the integrity of the frame.
Applying Waterproof Sealant
Once the frame is fully assembled, apply a waterproof sealant to the exposed surfaces of the lumber to protect it from moisture, rot, and weathering. Use a paintbrush or roller to evenly coat the wood with the sealant, ensuring comprehensive coverage that safeguards the frame against the elements and prolongs its lifespan.
By meticulously constructing the frame for your DIY deck canopy, you lay the groundwork for a durable and visually striking outdoor feature. With careful attention to detail and precise craftsmanship, you'll soon be ready to proceed to the next phase of attaching the canopy fabric and adding the finishing touches to complete your custom outdoor oasis.
Step 3: Attach the Canopy
With the sturdy frame in place, the next pivotal step in bringing your DIY deck canopy to life is attaching the canopy fabric. This phase not only adds the essential element of shade and protection but also contributes to the aesthetic appeal of the canopy, creating a welcoming and visually captivating outdoor retreat.
Selecting the Canopy Fabric
Carefully choose a high-quality, UV-resistant fabric that is designed for outdoor use. Options include outdoor canvas, polyester, or shade sail material, available in an array of colors to complement your outdoor decor. Consider the desired level of shade, breathability, and durability when selecting the fabric, ensuring that it meets your specific functional and aesthetic requirements.
Measuring and Cutting the Fabric
Accurately measure the dimensions of the canopy frame to determine the required size of the fabric panels. Allow for adequate overhang and tensioning to ensure a snug and secure fit. Use sharp fabric scissors or a rotary cutter to cut the fabric to the precise measurements, taking care to achieve clean and straight edges for a polished appearance.
Attaching the Fabric to the Frame
Securely attach the canopy fabric to the frame using durable hardware such as eye bolts, turnbuckles, or tensioning clips. Begin by affixing the fabric to one side of the frame, gradually stretching and fastening it to the opposing side to achieve even tension and a taut surface. Pay attention to the alignment and positioning of the fabric to ensure a symmetrical and professional finish.
Creating Tension and Stability
Utilize turnbuckles or tensioning mechanisms to create the desired level of tension in the canopy fabric, preventing sagging and ensuring a smooth, taut surface. Adjust the tension evenly across the fabric to maintain uniformity and stability, minimizing the risk of flapping or billowing in windy conditions. This step is crucial for achieving both functional shade coverage and a visually appealing canopy silhouette.
Adding Decorative Elements
If desired, incorporate decorative elements such as trim pieces, finials, or post caps to embellish the edges and corners of the canopy. These decorative accents not only enhance the visual appeal of the canopy but also contribute to a cohesive and polished overall look. Select elements that complement the style of your outdoor space, adding a personalized touch to the finished canopy.
By meticulously attaching the canopy fabric and attending to the details of tensioning and aesthetics, you bring your DIY deck canopy one step closer to completion. The addition of the canopy fabric not only enhances the functionality of the structure but also elevates the ambiance of your outdoor oasis, providing a shaded and inviting space for relaxation and enjoyment.
Step 4: Add Finishing Touches
As you near the completion of your DIY deck canopy project, the addition of finishing touches will elevate the visual appeal and functionality of the structure, culminating in a polished and inviting outdoor oasis. This phase allows you to infuse personalized details and practical elements that enhance the overall aesthetic and usability of the canopy.
Enhancing Aesthetics
Incorporate decorative elements such as ornamental brackets, lattice panels, or carved post caps to embellish the frame of the canopy. These embellishments not only add visual interest but also contribute to a sense of refinement and craftsmanship, elevating the canopy from a functional structure to a captivating focal point of your outdoor space.
Lighting Integration
Consider integrating lighting elements into the canopy design to extend its functionality into the evening hours. String lights, lanterns, or recessed lighting can be strategically incorporated to create a warm and inviting ambiance, allowing you to enjoy the outdoor space well after sunset. Thoughtfully placed lighting enhances safety and adds a magical touch to the canopy's atmosphere.
Seating and Comfort
To maximize the comfort and usability of the canopy, introduce cozy seating options such as weather-resistant cushions, pillows, and throws. By creating a comfortable and inviting seating area beneath the canopy, you establish a dedicated space for relaxation and socializing, further enhancing the allure of your outdoor retreat.
Greenery and Planters
Integrate natural elements by incorporating potted plants, hanging baskets, or trellises within the canopy space. Lush greenery not only adds a refreshing touch of nature but also softens the architectural lines of the canopy, creating a harmonious blend of structure and organic beauty. Select plants that thrive in the available sunlight and climate to ensure a vibrant and inviting canopy environment.
Functional Additions
Incorporate practical elements such as hooks for hanging outdoor essentials, a small side table for beverages and snacks, or a portable speaker for ambient music. These thoughtful additions enhance the usability of the canopy, ensuring that it serves as a versatile and well-equipped outdoor retreat for various activities and occasions.
By attending to these finishing touches, you transform your DIY deck canopy into a captivating and functional outdoor haven that reflects your personal style and enhances the enjoyment of your outdoor living space. Each carefully considered detail contributes to the overall charm and usability of the canopy, creating an inviting environment where you can unwind, entertain, and savor the beauty of the outdoors.
Conclusion
In conclusion, the journey of creating your own DIY deck canopy is not just about constructing a functional shade structure; it's a transformative process that allows you to craft an outdoor oasis tailored to your unique vision and lifestyle. From the initial measurements and planning to the final embellishments, every step of this project offers an opportunity for creativity, personalization, and hands-on craftsmanship.
By meticulously measuring and planning the layout and design of your DIY deck canopy, you set the stage for a successful and satisfying construction process. This preparatory phase allows you to make informed decisions and create a clear roadmap for bringing your outdoor oasis to fruition. With careful attention to detail and a well-thought-out plan, you're ready to move on to the next exciting phase of building the frame for your canopy.
With the sturdy frame in place, the next pivotal step in bringing your DIY deck canopy to life is attaching the canopy fabric. This phase not only adds the essential element of shade and protection but also contributes to the aesthetic appeal of the canopy, creating a welcoming and visually captivating outdoor retreat.
As you near the completion of your DIY deck canopy project, the addition of finishing touches will elevate the visual appeal and functionality of the structure, culminating in a polished and inviting outdoor oasis. This phase allows you to infuse personalized details and practical elements that enhance the overall aesthetic and usability of the canopy.
In the end, the process of creating a DIY deck canopy goes beyond the tangible outcome; it's a journey of self-expression, ingenuity, and the joy of transforming a simple outdoor space into a personalized haven. Whether you envision a serene retreat for solitary relaxation, a cozy setting for intimate gatherings, or a versatile outdoor entertainment area, your DIY deck canopy becomes a reflection of your lifestyle and a testament to your creative spirit.
As you bask in the comfort and beauty of your completed canopy, you'll find that the effort and attention invested in this project have yielded a rewarding and enduring asset for your home. With its practical functionality, visual allure, and the satisfaction of having built it with your own hands, your DIY deck canopy stands as a testament to the power of imagination and the fulfillment of bringing a vision to life.