
Home>Create & Decorate>DIY & Crafts>DIY Deck Railing Installation: Step-by-Step Guide For A Beautiful Outdoor Space
DIY & Crafts
DIY Deck Railing Installation: Step-by-Step Guide For A Beautiful Outdoor Space
Published: February 24, 2024

Content Creator specializing in woodworking and interior transformations. Caegan's guides motivate readers to undertake their own projects, while his custom furniture adds a personal touch.
Learn how to install a stunning DIY deck railing with our step-by-step guide. Elevate your outdoor space with this easy DIY & Crafts project.
(Many of the links in this article redirect to a specific reviewed product. Your purchase of these products through affiliate links helps to generate commission for Twigandthistle.com, at no extra cost. Learn more)
Introduction
Creating a beautiful and functional outdoor space is a rewarding endeavor for any homeowner. One of the key elements in achieving this is the installation of a well-designed deck railing. Not only does a deck railing provide safety and security, but it also adds aesthetic value to your outdoor area. Whether you're embarking on a new deck project or looking to upgrade your existing railing, this step-by-step guide will walk you through the process of DIY deck railing installation.
Installing a deck railing can seem like a daunting task, but with the right tools, materials, and a clear plan, it can be a satisfying and achievable project. By following this comprehensive guide, you'll gain the confidence to tackle this DIY project and create a stunning outdoor space that you can enjoy for years to come.
In the following steps, we will cover everything from gathering the necessary materials and tools to the finishing touches that will elevate the overall look of your deck railing. Whether you're a seasoned DIY enthusiast or a beginner looking to expand your skills, this guide is designed to be accessible and informative for all levels of experience.
So, roll up your sleeves, gather your tools, and let's dive into the world of DIY deck railing installation. With careful planning and attention to detail, you'll soon be basking in the satisfaction of transforming your outdoor space into a stylish and secure haven for relaxation and entertainment.
Step 1: Gather Materials and Tools
Before diving into the installation process, it's crucial to gather all the necessary materials and tools to ensure a smooth and efficient DIY deck railing project. Here's a comprehensive list to get you started:
Materials:
- Deck Railing Kit: Choose a railing kit that complements the style of your deck and meets local building codes. The kit typically includes top and bottom rails, balusters, and necessary hardware.
- Pressure-Treated Posts: These will serve as the sturdy support for your railing. Ensure they are suitable for outdoor use and resistant to rot and decay.
- Balusters: Available in various materials such as wood, metal, or composite, balusters add both safety and visual appeal to your railing.
- Mounting Hardware: This includes screws, brackets, and connectors for securing the railing components to the deck and posts.
- Wood Sealer or Stain: If you're using wooden components, a quality sealer or stain will protect the railing from the elements and enhance its longevity.
- Post Caps: These decorative elements add a polished look to the tops of your posts while protecting them from moisture.
Tools:
- Measuring Tape: Accurate measurements are essential for a precise and professional-looking installation.
- Level: Ensures that your railing is straight and plumb, enhancing both safety and aesthetics.
- Circular Saw or Miter Saw: For cutting rails and balusters to the required lengths.
- Drill with Bits: Needed for pre-drilling holes and driving screws into the deck and railing components.
- Screwdriver or Screw Gun: For securing hardware and fastening components.
- Safety Gear: This includes gloves, safety glasses, and ear protection to keep you safe during the construction process.
By gathering these materials and tools, you'll set the stage for a successful deck railing installation. It's essential to invest in high-quality materials and reliable tools to ensure the longevity and structural integrity of your railing. With everything in hand, you're ready to move on to the next step: measuring and planning for your deck railing project.
Step 2: Measure and Plan
Accurate measurements and meticulous planning are the foundation of a successful deck railing installation. Before picking up any tools, take the time to measure your deck space thoroughly and develop a detailed plan for the railing layout. Here's a comprehensive guide to help you navigate through this crucial step:
Measure Your Deck
Begin by measuring the perimeter of your deck to determine the amount of railing material needed. Use a measuring tape to record the length of each side where the railing will be installed. Take note of any variations in length due to angles or staircases, as these areas may require custom-cut railing components.
Consider Building Codes
Familiarize yourself with local building codes and regulations regarding deck railing height, spacing between balusters, and other safety requirements. Adhering to these codes is essential to ensure the safety and compliance of your deck railing.
Plan the Railing Layout
With the measurements in hand, sketch out a rough layout of your railing design. Consider the placement of posts, the spacing of balusters, and the positioning of the top and bottom rails. Visualizing the layout will help you identify any potential challenges and make necessary adjustments before installation begins.
Account for Gate and Stair Requirements
If your deck includes stairs or requires a gate for access, factor in the specific requirements for these areas when planning your railing layout. Gates and stair railings have distinct installation considerations, so it's important to incorporate these elements into your overall plan.
Optimize Baluster Spacing
Baluster spacing not only contributes to the aesthetic appeal of your railing but also plays a crucial role in safety. Ensure that the gaps between balusters comply with local building codes to prevent the risk of entrapment for children and pets.
Double-Check Measurements
Before finalizing your plan, double-check all measurements and calculations to avoid errors that could lead to material wastage or an ill-fitting railing. Precision at this stage will streamline the installation process and contribute to a professional-looking end result.
By meticulously measuring and planning your deck railing layout, you'll lay the groundwork for a seamless installation process. Taking the time to ensure accuracy and compliance with regulations will set the stage for a visually appealing, safe, and structurally sound deck railing. With the plan in place, you're ready to move on to the next step: installing the posts that will support your railing structure.
Step 3: Install Posts
The installation of sturdy and well-positioned posts is a critical step in creating a secure and visually appealing deck railing. These posts serve as the foundation for the entire railing structure, providing essential support and stability. Here's a detailed walkthrough of the process to ensure a successful installation:
Mark Post Locations
Using the measurements and layout plan from the previous step, mark the precise locations where the posts will be installed. Ensure that the spacing between posts complies with local building codes and provides adequate support for the railing.
Prepare the Deck Surface
Before installing the posts, it's essential to prepare the deck surface by clearing any debris and ensuring a clean, level area for the installation. This will facilitate a secure attachment and alignment of the posts.
Position and Secure the Posts
Carefully position each post at its designated location, ensuring that it is plumb and securely aligned. Depending on the type of deck surface, you may need to use specific mounting hardware such as post anchors or brackets to secure the posts in place.
Check for Alignment and Stability
Once the posts are in position, use a level to verify that they are perfectly plumb and aligned according to the layout plan. Stability is key, so ensure that each post is firmly anchored to the deck surface to prevent any wobbling or shifting.
Trim Posts to Proper Height
If the posts extend above the desired railing height, use a saw to trim them to the appropriate level. This step is crucial for achieving a uniform and polished look for your deck railing.
Reinforce Post Connections
To enhance the structural integrity of the railing, reinforce the connections between the posts and the deck surface using appropriate fasteners or hardware. This additional reinforcement will contribute to the overall stability and durability of the railing system.
By following these detailed steps, you'll establish a solid foundation for your deck railing, setting the stage for the seamless integration of the remaining components. With the posts securely in place, you're ready to progress to the next phase of the installation process, which involves attaching the bottom rail to create the framework for the balusters.
Step 4: Attach Bottom Rail
With the posts securely installed, the next pivotal step in the DIY deck railing installation process is attaching the bottom rail. The bottom rail serves as the foundational element, providing support for the balusters while contributing to the overall structural integrity and visual appeal of the railing. Here's a detailed walkthrough of the process to ensure a seamless and professional attachment of the bottom rail:
-
Select the Appropriate Rail Segment: Depending on the layout of your deck and railing design, measure and cut the bottom rail segment to fit the intended span between the posts. Use a saw to achieve precise and clean cuts, ensuring that the rail segment aligns seamlessly with the post locations.
-
Position the Bottom Rail: Carefully position the cut rail segment at the base of the posts, ensuring that it sits level and aligns with the predetermined layout plan. Use a level to verify that the bottom rail is horizontally straight and parallel to the deck surface.
-
Secure the Rail to the Posts: Utilize appropriate mounting hardware, such as rail brackets or screws, to securely attach the bottom rail to each post. Ensure that the connections are tight and reliable, as the bottom rail forms the foundation for the entire railing structure.
-
Check for Stability and Alignment: Once the bottom rail is attached, perform a thorough inspection to confirm its stability and alignment. A stable and level bottom rail is essential for the secure installation of the balusters and the overall safety of the railing system.
-
Reinforce the Connections: To enhance the strength and durability of the bottom rail, consider reinforcing the connections between the rail segment and the posts. Additional screws or brackets may be employed to fortify the attachment points, contributing to the long-term stability of the railing.
-
Consider Decorative Elements: If desired, incorporate decorative elements such as post caps or trim pieces to enhance the visual appeal of the bottom rail. These finishing touches can elevate the aesthetic impact of the railing while providing added protection to the railing components.
By meticulously following these steps, you'll successfully establish the framework for the baluster installation while ensuring that the bottom rail serves as a secure and visually appealing foundation for your deck railing. With the bottom rail securely in place, you're ready to progress to the next phase of the installation process, which involves the installation of the balusters to enhance both the safety and aesthetic appeal of your deck railing.
Step 5: Install Balusters
The installation of balusters is a pivotal phase in the construction of a sturdy and visually appealing deck railing. Balusters, also known as spindles or pickets, not only contribute to the aesthetic charm of the railing but also play a crucial role in enhancing safety and preventing falls. Here's a detailed guide to ensure a seamless and professional installation of balusters for your DIY deck railing project.
Prepare the Balusters
Before commencing the installation, inspect the balusters to ensure they are free from defects and are of uniform length. If necessary, trim the balusters to the desired height using a saw, ensuring consistency across all the components. Additionally, consider applying a protective finish or paint to the balusters to safeguard them from weather-related deterioration and to complement the overall design of the railing.
Determine Baluster Spacing
Carefully calculate and mark the spacing between each baluster, adhering to local building codes and regulations. The spacing should be uniform and comply with safety standards to prevent the risk of entrapment for children and pets. Utilize a measuring tape and pencil to mark the precise locations where the balusters will be installed, ensuring an even and visually appealing distribution across the railing span.
Secure the Balusters
Position the balusters at the designated locations, aligning them with the bottom rail and ensuring they are plumb and level. Depending on the railing design, balusters can be attached using screws or connectors, securing them firmly to the bottom rail and, if applicable, the top rail. Employ a level to verify the vertical alignment of each baluster, making adjustments as needed to achieve a uniform and professional appearance.
Reinforce Baluster Connections
To enhance the stability and durability of the balusters, consider reinforcing their connections to the bottom rail and, if applicable, the top rail. Utilize additional screws or brackets to fortify the attachment points, ensuring that the balusters are securely anchored and capable of withstanding external forces. This reinforcement contributes to the overall strength and safety of the railing system.
Finishing Touches
Upon securing the balusters, perform a final inspection to confirm their stability and alignment. Consider adding decorative elements such as baluster connectors or caps to provide a polished and cohesive look to the railing. These finishing touches not only enhance the visual appeal of the railing but also offer additional protection to the baluster connections, contributing to the longevity of the railing system.
By meticulously following these steps, you'll successfully integrate the balusters into your deck railing, creating a secure, visually appealing, and code-compliant structure. With the balusters securely in place, you're ready to progress to the final phase of the installation process, which involves attaching the top rail to complete the construction of your DIY deck railing.
Step 6: Attach Top Rail
The attachment of the top rail is a pivotal stage in completing the construction of a sturdy and visually appealing deck railing. The top rail not only provides a finishing touch to the railing structure but also contributes to the overall safety and aesthetics of the outdoor space. Here's a detailed guide to ensure a seamless and professional attachment of the top rail for your DIY deck railing project.
Prepare the Top Rail Segment
Begin by selecting the appropriate top rail segment based on the layout of your deck and the railing design. Measure and cut the top rail to fit the intended span between the posts, ensuring precise and clean cuts for a seamless alignment with the post locations.
Position and Align the Top Rail
Carefully position the cut top rail segment on top of the balusters, ensuring that it aligns with the predetermined layout plan. Use a level to verify that the top rail is horizontally straight and parallel to the bottom rail, enhancing both the visual appeal and safety of the railing.
Secure the Rail to the Balusters
Utilize appropriate mounting hardware, such as rail brackets or screws, to securely attach the top rail to each baluster. Ensure that the connections are tight and reliable, as the top rail serves as the final element in completing the structural integrity of the railing system.
Check for Stability and Alignment
Once the top rail is attached, perform a thorough inspection to confirm its stability and alignment. A stable and level top rail is essential for the overall safety and visual appeal of the railing. Ensure that the top rail sits securely on the balusters, providing a smooth and polished finish to the entire railing structure.
Reinforce the Connections
To enhance the strength and durability of the top rail, consider reinforcing the connections between the rail segment and the balusters. Additional screws or brackets may be employed to fortify the attachment points, contributing to the long-term stability of the railing system.
Consider Decorative Elements
If desired, incorporate decorative elements such as post caps or trim pieces to enhance the visual appeal of the top rail. These finishing touches can elevate the aesthetic impact of the railing while providing added protection to the railing components.
By meticulously following these steps, you'll successfully complete the construction of your deck railing, ensuring that the top rail serves as a secure and visually appealing finishing element. With the top rail securely in place, your DIY deck railing project will culminate in a stunning and functional outdoor space, ready to be enjoyed for years to come.
Step 7: Finishing Touches
With the main structural components of your DIY deck railing securely in place, it's time to add the finishing touches that will elevate the overall look and functionality of your outdoor space. This phase allows you to infuse your personal style and creativity into the railing, transforming it from a functional necessity into a visually captivating and inviting feature of your deck.
Add Decorative Elements
Consider incorporating decorative elements such as post caps, finials, or ornamental inserts to enhance the aesthetic appeal of your railing. These embellishments not only add a touch of elegance but also provide additional protection to the railing components, preventing moisture from seeping into the posts and prolonging their lifespan.
Apply a Protective Finish
If your railing components are made of wood, applying a protective finish such as a weather-resistant sealant or stain is essential to safeguard them from the elements. This step not only enhances the natural beauty of the wood but also shields it from moisture, UV rays, and general wear and tear, ensuring longevity and durability.
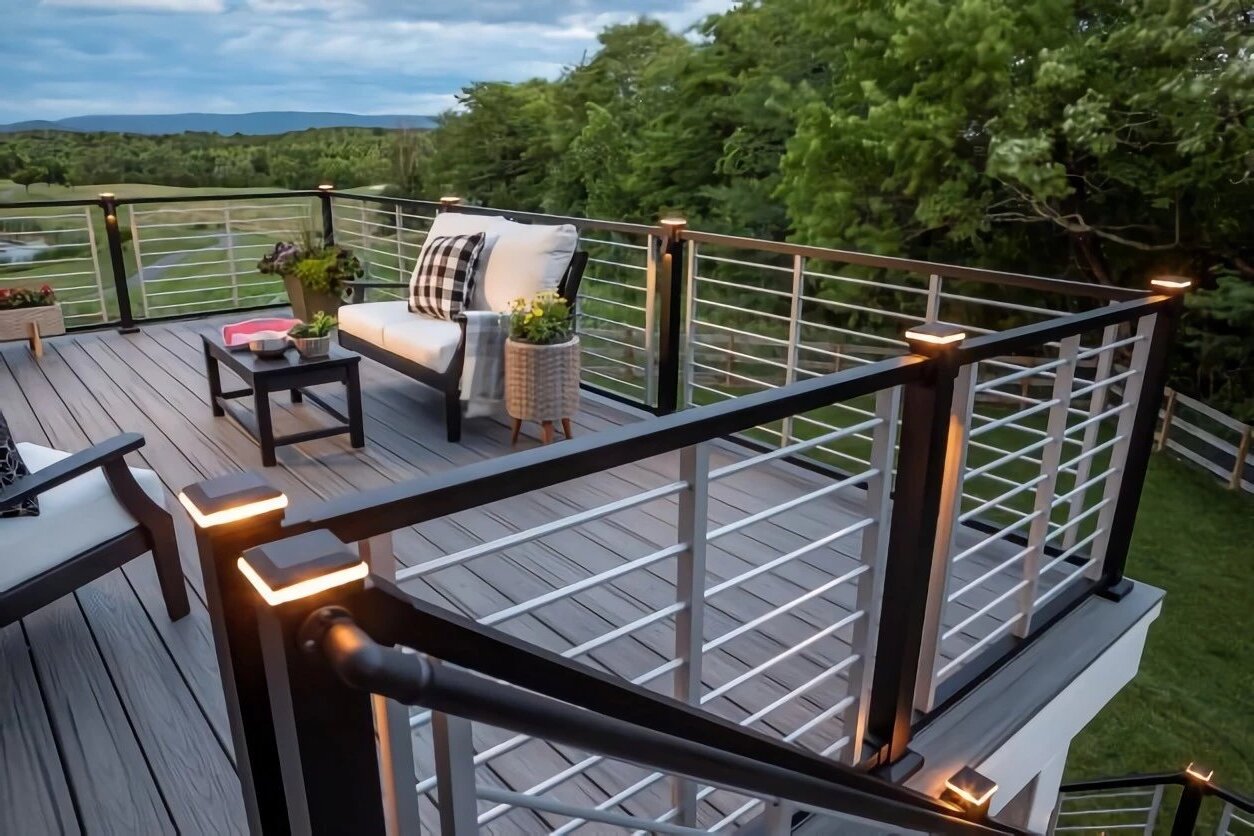
Install Lighting Features
To create a warm and inviting ambiance, consider integrating lighting features into your railing design. LED strip lights, solar-powered post cap lights, or low-voltage deck lighting can add a touch of sophistication while enhancing safety during evening gatherings or outdoor activities.
Incorporate Planters or Hanging Brackets
Integrating planters or hanging brackets along the railing can introduce a vibrant and natural element to your outdoor space. Cascading flowers or lush greenery not only soften the appearance of the railing but also contribute to a welcoming and serene atmosphere.
Personalize with Accessories
Consider personalizing your railing with accessories such as hooks for hanging outdoor decor, custom signage, or outdoor artwork. These thoughtful additions can reflect your unique style and create a personalized outdoor retreat that resonates with your personality and preferences.
By attending to these finishing touches, you'll transform your deck railing into a cohesive and visually captivating feature that complements the overall design of your outdoor space. These details not only enhance the aesthetic appeal of the railing but also contribute to the functionality and ambiance of your deck, creating a welcoming and enjoyable environment for relaxation, entertainment, and outdoor gatherings.
Conclusion
In conclusion, the successful completion of a DIY deck railing installation not only enhances the safety and functionality of your outdoor space but also adds a touch of elegance and charm to your deck. By following the comprehensive step-by-step guide outlined in this article, you've embarked on a journey that transforms raw materials into a stunning and secure railing that will be enjoyed for years to come.
As you reflect on the process, it's evident that meticulous planning, precise measurements, and attention to detail are the cornerstones of a successful deck railing installation. From gathering the necessary materials and tools to integrating the finishing touches, each step contributes to the creation of a visually appealing and structurally sound railing system.
The installation of sturdy posts, the attachment of the bottom and top rails, and the seamless integration of balusters are fundamental aspects that ensure the safety and stability of the railing. Additionally, the incorporation of decorative elements, protective finishes, and personalized accessories adds a unique and inviting character to your outdoor space.
As you stand back and admire the completed deck railing, you can take pride in the fact that you've not only enhanced the aesthetic appeal of your deck but also created a safe and welcoming environment for relaxation, entertainment, and outdoor gatherings. The satisfaction of knowing that you've taken an active role in transforming your outdoor space is truly rewarding.
Furthermore, the skills and knowledge gained from this DIY project can be applied to future endeavors, empowering you to tackle new challenges and expand your repertoire of home improvement projects. Whether you're a seasoned DIY enthusiast or a beginner exploring the world of deck construction, the successful completion of a deck railing installation is a testament to your creativity, resourcefulness, and dedication to creating a beautiful and functional outdoor space.
In essence, the journey of DIY deck railing installation is not just about assembling materials; it's about crafting a space where cherished memories will be made, where laughter will resonate, and where moments of tranquility will be savored. It's about creating an extension of your home that reflects your personality and provides a sanctuary for relaxation and enjoyment.
With your newly installed deck railing, you've not only elevated the visual appeal of your outdoor space but also created a haven where the beauty of nature converges with the comfort of home. As the sun sets on your completed project, it marks the beginning of a new chapter filled with the joy and fulfillment that comes from transforming a vision into a tangible and enduring reality.