
Home>Create & Decorate>DIY & Crafts>DIY Hog Wire Deck Railing: Step-by-Step Guide
DIY & Crafts
DIY Hog Wire Deck Railing: Step-by-Step Guide
Published: February 22, 2024

Content Creator specializing in woodworking and interior transformations. Caegan's guides motivate readers to undertake their own projects, while his custom furniture adds a personal touch.
Learn how to build a stunning hog wire deck railing with our step-by-step DIY guide. Perfect for DIY & Crafts enthusiasts looking to enhance their outdoor space.
(Many of the links in this article redirect to a specific reviewed product. Your purchase of these products through affiliate links helps to generate commission for Twigandthistle.com, at no extra cost. Learn more)
Introduction
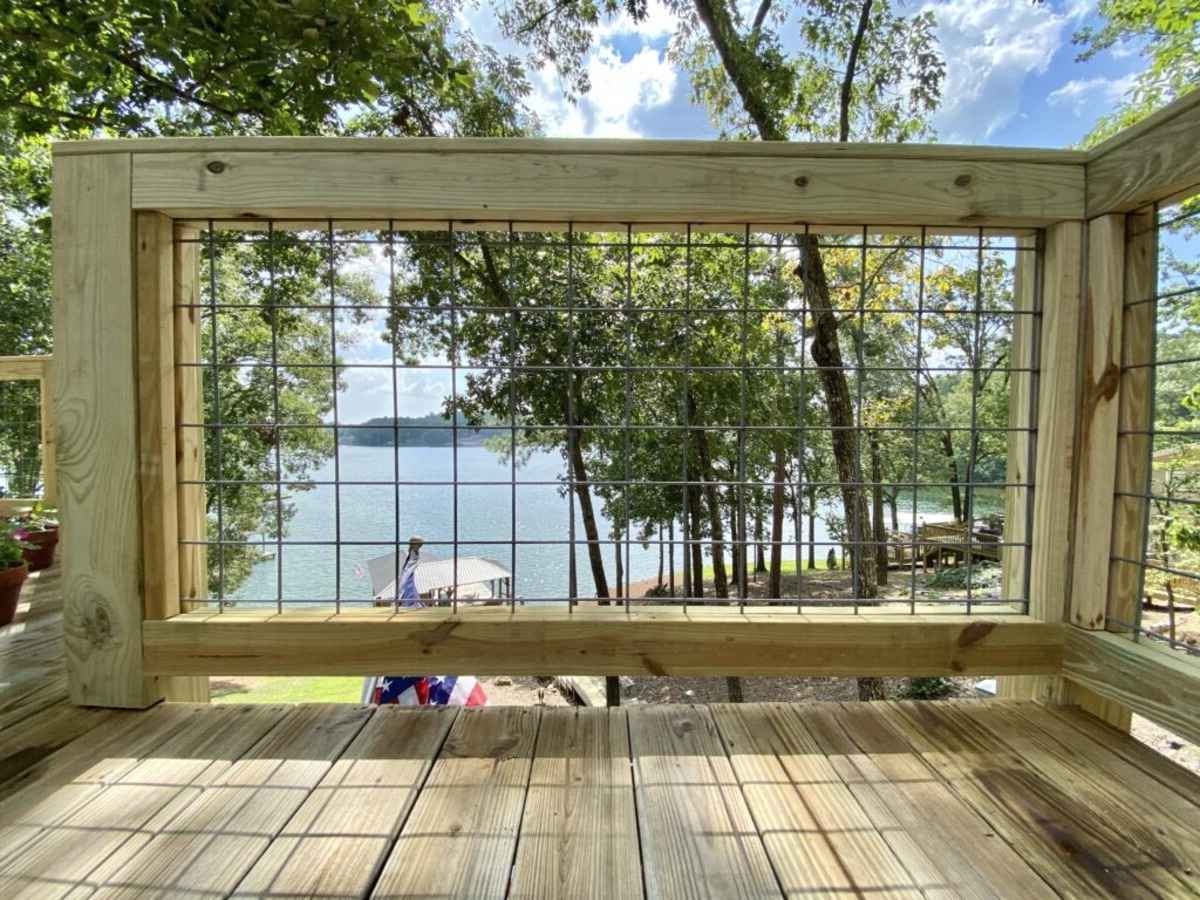
Are you looking to add a touch of rustic charm and modern appeal to your deck? A DIY hog wire deck railing might be just the project for you. This stylish and durable railing option offers both safety and aesthetic value, making it a popular choice for homeowners seeking a unique and eye-catching design.
Hog wire, also known as hog panel, is a sturdy and versatile material commonly used for fencing livestock. However, its industrial look and robust construction have made it a sought-after option for contemporary deck railings. With its grid pattern and sturdy wire construction, hog wire provides an open and unobstructed view while ensuring the safety of those enjoying the deck.
In this comprehensive guide, we will walk you through the step-by-step process of creating your own hog wire deck railing. Whether you're a seasoned DIY enthusiast or a novice looking to take on a new project, this guide will equip you with the knowledge and confidence to tackle this rewarding endeavor.
By following this guide, you'll have the opportunity to unleash your creativity and craftsmanship, resulting in a custom deck railing that perfectly complements your outdoor living space. So, roll up your sleeves, gather your tools, and let's embark on this exciting journey to transform your deck with a stunning hog wire railing.
Materials and Tools Needed
Before diving into the construction of your hog wire deck railing, it's essential to gather all the necessary materials and tools. Having everything at hand will streamline the process and ensure a smooth and efficient build. Here's a comprehensive list of what you'll need:
Materials:
- Hog Wire Panels: The central component of your railing, these panels are available in various sizes and styles. Opt for galvanized or stainless steel panels for durability and weather resistance.
- Wood or Metal Posts: These will serve as the support structure for your railing. Choose pressure-treated wood or metal posts that can withstand outdoor conditions.
- Fasteners: Select appropriate screws or nails for attaching the hog wire panels to the posts securely.
- Post Caps: These add a decorative touch to the top of your posts while protecting them from moisture and extending their lifespan.
- Wood or Metal Rails (Optional): Depending on your design preference, you may choose to include top and bottom rails for added stability and aesthetics.
- Stain or Paint (Optional): If you opt for wooden components, stain or paint can enhance their appearance and provide protection against the elements.
Tools:
- Measuring Tape: Essential for accurately determining the dimensions of your railing and ensuring a precise fit.
- Circular Saw or Angle Grinder: For cutting the hog wire panels to the required size and trimming the posts if necessary.
- Drill and Bits: Needed for creating pilot holes and securing the panels and other components in place.
- Level: To ensure that the posts and railing components are installed perfectly straight and level.
- Wire Cutters: For trimming and adjusting the hog wire panels to fit the designated spaces.
- Safety Gear: Including gloves, safety glasses, and ear protection to safeguard yourself during the construction process.
By gathering these materials and tools, you'll be well-prepared to embark on the construction of your hog wire deck railing. With everything in place, you can proceed confidently through each step of the project, knowing that you have everything you need to bring your vision to life.
Step 1: Measure and Plan
Before diving into the physical construction of your hog wire deck railing, it's crucial to start with a solid plan and accurate measurements. This initial step sets the foundation for a successful and visually appealing railing installation.
Begin by assessing the layout of your deck and identifying the areas where the railing will be installed. Take precise measurements of the designated spaces, accounting for the length and height of each section where the hog wire panels will be placed. It's essential to ensure that your measurements comply with local building codes and safety standards, so be sure to familiarize yourself with any relevant regulations before proceeding.
Once you have the measurements in hand, sketch out a detailed plan for the railing design. Consider the overall aesthetic you wish to achieve and how the hog wire railing will complement the existing style of your deck. Additionally, determine the placement of the posts and any additional railing components, such as top and bottom rails, if included in your design.
During the planning phase, take into account the spacing between the hog wire panels to achieve the desired level of openness and visibility. This spacing will also impact the overall stability and structural integrity of the railing, so careful consideration is paramount.
As you finalize your plan, visualize how the completed railing will enhance the functionality and visual appeal of your deck. Consider factors such as ease of access, maintenance requirements, and the seamless integration of the railing with the surrounding environment.
By meticulously measuring and planning the layout and design of your hog wire deck railing, you'll set the stage for a smooth and efficient construction process. This preparatory phase not only ensures the accuracy and precision of your installation but also allows you to envision the stunning transformation that awaits your outdoor living space. With a well-thought-out plan in place, you're ready to move on to the next step of cutting the hog wire panels and bringing your vision to life.
Step 2: Cut the Hog Wire Panels
With your detailed plan in hand, it's time to bring your vision to life by cutting the hog wire panels to fit the designated spaces on your deck. This step requires precision and careful handling of the panels to ensure a seamless and professional-looking installation.
Begin by measuring the sections of your deck where the hog wire panels will be installed, taking into account the dimensions and spacing outlined in your plan. Use a measuring tape to accurately determine the required length and height for each panel, ensuring a snug and secure fit within the railing framework.
Once you have the measurements in place, mark the cutting lines on the hog wire panels using a marker or chalk. Double-check the measurements to avoid any errors before proceeding with the cutting process. It's crucial to exercise caution during this step to prevent any damage to the panels and ensure clean, straight cuts.
When it comes to cutting the hog wire panels, a circular saw or angle grinder equipped with a metal-cutting blade is the ideal tool for the job. These tools provide the necessary cutting power to cleanly and precisely trim the panels to the desired dimensions. Prioritize safety by wearing appropriate protective gear, including safety glasses and gloves, to shield yourself from any metal shards or debris during the cutting process.
Carefully guide the saw or grinder along the marked cutting lines, maintaining a steady hand and consistent pressure to achieve smooth and accurate cuts. Take your time and exercise patience to ensure that each panel is cut to the exact specifications required for its placement within the railing framework.
As you complete the cutting process, inspect each panel to ensure that the edges are clean and free from any jagged or uneven areas. Smooth out any rough edges using a metal file or sandpaper, if necessary, to achieve a polished and professional finish.
By meticulously cutting the hog wire panels to fit your deck's layout, you'll lay the groundwork for a seamless and visually striking railing installation. This precise and methodical approach sets the stage for the next steps of installing the posts and attaching the panels, bringing you one step closer to enjoying the stunning transformation of your outdoor living space.
Step 3: Install the Posts
The installation of sturdy and secure posts forms the backbone of your hog wire deck railing, providing the essential support and framework for the panels. This step is critical in ensuring the stability and longevity of your railing, making it imperative to approach the installation with precision and attention to detail.
Begin by positioning the first post at the starting point of your railing section, ensuring that it aligns with your predetermined layout and measurements. Use a level to confirm that the post is perfectly plumb and adjust its position as needed. Once the post is in the correct placement, secure it to the deck surface using appropriate fasteners, such as lag screws or anchor bolts, depending on the material of your deck.
For subsequent posts, carefully measure and mark their locations according to your railing plan, maintaining consistent spacing between each post to support the hog wire panels effectively. As you position each post, verify its alignment and vertical orientation with a level before proceeding with the installation.
If you're working with wooden posts, it's advisable to pre-drill pilot holes to prevent splitting and facilitate the insertion of fasteners. For metal posts, ensure that they are anchored securely to the deck surface to withstand the forces exerted on the railing.
As you install each post, periodically check their alignment and verticality to maintain a uniform and professional appearance for your railing. Additionally, consider the integration of post caps to provide a decorative accent while protecting the posts from moisture and extending their lifespan.
Once all the posts are securely installed, take a moment to admire the foundational framework taking shape, laying the groundwork for the striking hog wire railing that will soon adorn your deck. With the posts in place, you're ready to progress to the next step of attaching the hog wire panels, bringing you closer to the completion of your captivating DIY railing project.
Step 4: Attach the Hog Wire Panels
With the sturdy posts firmly in place, it's time to bring the hog wire railing to life by attaching the panels to create a visually captivating and secure barrier for your deck. This step requires precision and attention to detail to ensure that the panels are seamlessly integrated into the framework, resulting in a polished and professional finish.
Begin by positioning the first hog wire panel against the installed posts, ensuring that it aligns with the predetermined layout and measurements from your initial plan. Depending on your design, you may opt to place the panel between the posts or attach it to the exterior side of the posts. Carefully consider the spacing between the panels to achieve the desired level of openness and visibility while maintaining structural integrity.
Using appropriate fasteners, such as screws or nails designed for outdoor use, secure the hog wire panel to the posts, ensuring a snug and stable attachment. Pre-drilling pilot holes may be beneficial, especially when working with wooden posts, to prevent splitting and facilitate the insertion of the fasteners. Exercise caution to avoid overtightening the fasteners, as this may distort the panels or compromise their integrity.
As you progress to the installation of subsequent panels, maintain consistent spacing and alignment to create a uniform and visually appealing railing. Take the time to verify the levelness and straightness of each panel, making any necessary adjustments to ensure a seamless and professional installation.
If your design incorporates top and bottom rails, consider how the hog wire panels will be integrated with these components. Secure the panels to the rails using appropriate fasteners, ensuring that they are evenly spaced and aligned to maintain a cohesive and polished appearance.
Throughout the attachment process, periodically step back to assess the overall visual impact of the railing, ensuring that the panels are securely in place and contribute to the desired aesthetic and functionality of your deck. Attention to detail during this step will result in a stunning hog wire railing that enhances the appeal and safety of your outdoor living space.
As you complete the attachment of the hog wire panels, take a moment to admire the transformation taking place, as the rugged elegance of the panels combines with the structural framework to create a striking and contemporary railing. With the panels securely attached, you're ready to proceed to the next step of securing the panels and adding the finishing touches to complete your DIY hog wire deck railing.
Step 5: Secure the Panels
With the hog wire panels firmly attached to the posts and integrated into the railing framework, the next crucial step is to ensure that they are securely fastened and stabilized to withstand the demands of everyday use. This phase of the installation process focuses on reinforcing the panels and optimizing their structural integrity, contributing to the overall safety and longevity of your hog wire deck railing.
To begin securing the panels, carefully inspect each attachment point to verify the stability and alignment of the fasteners. Ensure that the screws or nails used to affix the panels to the posts are tightened securely, providing a firm and stable connection. Pay close attention to any areas where the panels may exhibit slight movement or flexing, as these sections require additional reinforcement to eliminate any potential weak points.
Consider utilizing additional fasteners at strategic intervals along the length of the panels to bolster their stability and minimize the risk of sagging or shifting over time. By evenly distributing the securing points, you can effectively distribute the load across the panels, enhancing their overall resilience and durability.
Incorporate diagonal bracing or cross supports within the railing framework to further fortify the hog wire panels and mitigate any lateral movement. These supplementary reinforcements serve to uphold the panels under varying pressures and usage, ensuring that they remain steadfast and resistant to external forces.
If your design includes top and bottom rails, evaluate the attachment points where the panels intersect with these components. Confirm that the panels are securely affixed to the rails, promoting a cohesive and unified structure that enhances the overall rigidity and visual appeal of the railing.
Throughout the process of securing the panels, prioritize meticulous attention to detail and precision to achieve a robust and reliable hog wire deck railing. Regularly assess the stability and firmness of the panels, making any necessary adjustments to reinforce their attachment points and eliminate any potential areas of vulnerability.
As you complete the securing phase, take a moment to appreciate the enhanced resilience and structural integrity of your hog wire railing. The thorough reinforcement of the panels ensures that your DIY creation not only exudes visual allure but also stands as a testament to meticulous craftsmanship and unwavering durability.
With the panels securely fastened and fortified, you're poised to move on to the final step of adding the finishing touches, bringing your DIY hog wire deck railing to its full fruition.
Step 6: Finishing Touches
With the hog wire panels securely in place and the structural framework of your railing solidified, the final step involves adding the finishing touches to elevate the visual appeal and cohesiveness of your DIY hog wire deck railing.
One impactful way to enhance the aesthetic allure of your railing is by considering the application of a protective finish to the wood components, if applicable. Stain or paint can infuse the wooden posts and rails with a rich hue, complementing the rugged elegance of the hog wire panels while providing essential protection against the elements. Select a finish that harmonizes with your deck's overall color scheme and style, ensuring a seamless integration that elevates the entire outdoor space.
Incorporating decorative elements such as post caps can further accentuate the polished appearance of your railing while offering practical benefits. These ornamental caps not only serve as a visually appealing embellishment but also shield the tops of the posts from moisture, preventing premature deterioration and extending their lifespan. Choose post caps that align with your design vision, whether it's a classic pyramid style or a sleek, modern finish, to add a refined touch to your railing.
Consider the addition of lighting elements to illuminate and accentuate the beauty of your hog wire railing during evening hours. Solar-powered or low-voltage LED lights can be strategically integrated into the railing design, casting a warm and inviting glow that enhances both safety and ambiance. Whether installed along the top rail or incorporated into the posts, these lighting accents contribute to a captivating and functional outdoor environment.
To further personalize your railing, explore the option of incorporating planters or hanging baskets along the length of the structure. These green accents not only introduce a touch of natural beauty but also seamlessly integrate with the open design of the hog wire panels, creating a harmonious blend of industrial and organic elements. Select plant varieties that thrive in your local climate and complement the overall aesthetic of your outdoor space, infusing your railing with vibrant color and vitality.
As you add the finishing touches to your hog wire deck railing, take the opportunity to step back and admire the remarkable transformation that has taken place. The culmination of meticulous craftsmanship and thoughtful design has yielded a captivating and functional railing that not only enhances the safety and appeal of your deck but also stands as a testament to your creativity and dedication to the art of DIY construction.
With the completion of the finishing touches, your DIY hog wire deck railing now stands as a striking centerpiece of your outdoor living space, inviting admiration and enjoyment for years to come.
Conclusion
In conclusion, the journey of creating your own hog wire deck railing has been a rewarding and transformative experience, culminating in the realization of a stunning and functional addition to your outdoor living space. From the initial planning and precise measurements to the meticulous installation and finishing touches, every step has contributed to the creation of a railing that seamlessly blends rugged charm with contemporary allure.
As you stand back and admire the completed hog wire railing, you witness the convergence of craftsmanship and creativity, resulting in a visually captivating and structurally sound addition to your deck. The open grid pattern of the hog wire panels provides an unobstructed view of the surrounding landscape while ensuring the safety of those enjoying the outdoor space.
The integration of sturdy posts, meticulously cut panels, and secure fastenings has yielded a railing that not only exudes visual appeal but also stands as a testament to durability and resilience. The thoughtful addition of finishing touches, such as protective finishes, decorative post caps, and lighting elements, has elevated the railing to a new level of sophistication and functionality.
Beyond its aesthetic impact, your DIY hog wire deck railing represents a personal achievement, showcasing your ability to envision, plan, and execute a project that enhances the beauty and utility of your home. The pride and satisfaction derived from this endeavor extend far beyond the completed railing, resonating in the knowledge that you have left an indelible mark on your outdoor living space.
As you envision the countless gatherings, tranquil moments, and cherished memories that will unfold against the backdrop of your newly adorned deck, the significance of this project becomes even more profound. Your hog wire railing stands not only as a testament to your DIY prowess but also as a symbol of the care and attention you invest in creating a welcoming and enchanting environment for yourself and your loved ones.
In the end, the completion of your DIY hog wire deck railing marks the beginning of a new chapter in the story of your outdoor sanctuary. It stands as a testament to your ingenuity, perseverance, and commitment to crafting a space that reflects your unique vision and passion for creating beauty and functionality in your home.
With the completion of this project, you have not only transformed your deck but also enriched your life with the fulfillment that comes from bringing a vision to fruition. As you bask in the glow of your newly adorned outdoor haven, may it serve as a constant reminder of the power of creativity, determination, and the enduring rewards of hands-on craftsmanship.