
Home>Create & Decorate>DIY & Crafts>How To Make A Router Table
DIY & Crafts
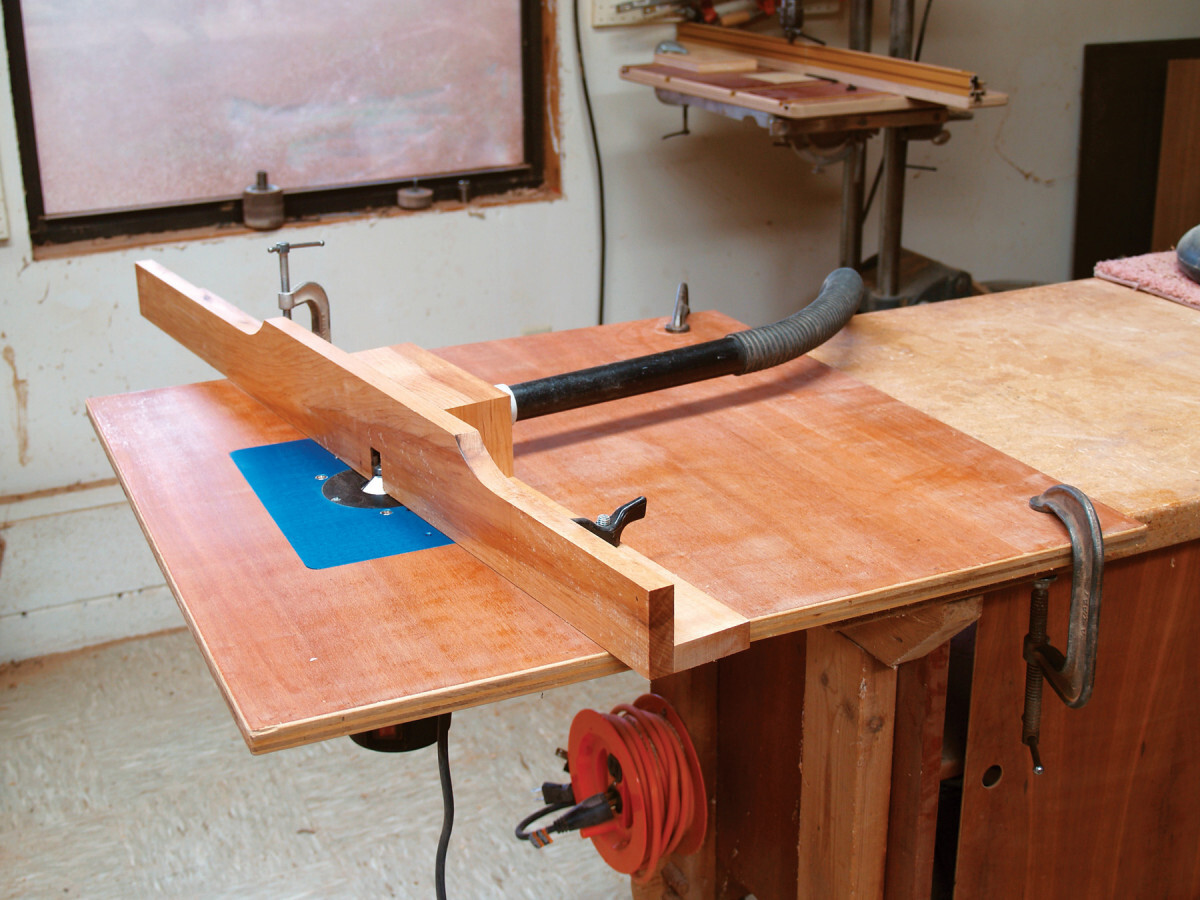
How To Make A Router Table
Published: April 17, 2024

Content Creator specializing in woodworking and interior transformations. Caegan's guides motivate readers to undertake their own projects, while his custom furniture adds a personal touch.
Learn how to make a router table with our easy DIY & Crafts guide. Build your own router table for woodworking projects at home. Step-by-step instructions!
(Many of the links in this article redirect to a specific reviewed product. Your purchase of these products through affiliate links helps to generate commission for Twigandthistle.com, at no extra cost. Learn more)
Introduction
So, you've decided to take your woodworking skills to the next level by building your very own router table. Congratulations! A router table is an essential tool for any woodworking enthusiast, as it allows for precise and controlled shaping of wood. Whether you're a seasoned DIYer or just starting out, creating your own router table can be a rewarding and cost-effective project. In this guide, we'll walk you through the step-by-step process of building a router table that will serve as a valuable addition to your workshop. Let's dive in and get started on this exciting DIY adventure!
Materials and Tools Needed
Materials:
- Plywood: 3/4-inch plywood for the tabletop and fence.
- Lumber: 2×4 lumber for the table base and support.
- Router Plate: A pre-made router plate or acrylic sheet to create your own.
- T-Track: T-track for the miter slot and fence adjustment.
- Screws and Nails: Assorted screws and nails for assembly.
- Router Bit: A suitable router bit for your woodworking projects.
Tools:
- Circular Saw: For cutting the plywood and lumber to size.
- Drill and Bits: For drilling holes and driving screws.
- Router: To test the fit of the router plate and install the router.
- Screwdriver: For tightening screws and attaching hardware.
- Measuring Tape and Square: For accurate measurements and square cuts.
- Safety Gear: Safety glasses, ear protection, and a dust mask for safe woodworking.
Gathering these materials and tools will set you up for a successful router table construction project. Now, let's move on to the exciting part – building the tabletop!
Building the Tabletop
-
Cut the Plywood: Begin by cutting the 3/4-inch plywood to the desired dimensions for the tabletop. A circular saw can be used to make precise cuts, ensuring that the tabletop is the right size for your woodworking projects.
-
Create an Opening for the Router Plate: Measure and mark the location for the router plate on the plywood. Use a jigsaw to carefully cut out the opening, ensuring a snug fit for the router plate. The router plate provides a stable base for the router and allows for easy bit changes.
-
Attach the Router Plate: Once the opening is cut, secure the router plate in place using screws. Ensure that the plate sits flush with the tabletop surface, providing a level and stable platform for the router.
-
Add T-Track for Accessories: Install T-track in the tabletop to accommodate accessories such as featherboards, hold-down clamps, and miter gauges. This allows for versatility in woodworking operations and enhances safety and precision.
-
Smooth the Edges and Surface: Use sandpaper to smooth out any rough edges and surfaces of the tabletop. This not only provides a professional finish but also prevents splinters and ensures a smooth work surface for your woodworking projects.
-
Attach the Tabletop to the Base: Place the tabletop on the base, ensuring it is centered and secure. Use screws to attach the tabletop to the base, creating a sturdy and reliable foundation for the router table.
By following these steps, you can create a durable and functional tabletop for your router table. Now, let's move on to the next crucial component – constructing the fence.
Constructing the Fence
-
Cut the Plywood and Lumber: Begin by cutting the 3/4-inch plywood to the desired dimensions for the fence. Additionally, cut the 2×4 lumber to the appropriate lengths for the fence frame and support.
-
Assemble the Fence Frame: Using the cut pieces of lumber, assemble a rectangular frame for the fence. Ensure that the corners are square and use screws to secure the frame together. This frame will provide stability and support for the fence.
-
Attach the Plywood to the Frame: Once the frame is assembled, attach the plywood to one side of the frame. This will create a solid surface for guiding the wood through the router and provide a smooth and flat fence face.
-
Add T-Track for Adjustability: Install T-track on the face of the fence to allow for adjustable and customizable setups. This will enable the use of featherboards, hold-down clamps, and other accessories to enhance safety and precision during woodworking operations.
-
Install the Fence to the Tabletop: Position the fence on the tabletop, ensuring it is square to the router bit and parallel to the miter slot. Secure the fence in place using bolts and knobs, allowing for easy adjustment and locking in the desired position.
-
Fine-Tune the Fence Alignment: Use a straight edge or ruler to verify that the fence is perfectly parallel to the miter slot and router bit. Make any necessary adjustments to ensure precise and accurate woodworking operations.
By following these steps, you can construct a sturdy and adjustable fence for your router table, providing essential support and guidance for your woodworking projects. Now, let's move on to the next step – installing the router.
Installing the Router
-
Prepare the Router: Before installing the router, ensure that it is unplugged and the router bit is removed. This is crucial for safety and allows for easier handling during installation.
-
Test Fit the Router Plate: Place the router plate in the previously cut opening on the tabletop. Test the fit by setting the router on the plate. Ensure that the plate sits flush with the tabletop and that the router base is level.
-
Adjust Router Height: Adjust the height of the router bit to the desired position for your woodworking project. This can be done by raising or lowering the router in the router base. Ensure that the bit is securely tightened in place.
-
Secure the Router to the Plate: Once the router is at the desired height, secure it to the router plate using the provided screws. Ensure that the router is firmly attached to the plate, providing stability during woodworking operations.
-
Connect Dust Collection: If your router is equipped with a dust collection port, connect it to a dust collection system or vacuum. This helps to minimize sawdust and debris, providing a cleaner and safer working environment.
-
Test the Router: Before proceeding with any woodworking tasks, turn on the router and ensure that it runs smoothly. Check for any unusual vibrations or noises that may indicate an issue with the router.
-
Adjust Fence Clearance: Verify that the router bit clears the fence and that there is no interference during operation. Make any necessary adjustments to the fence position to ensure proper clearance.
By following these steps, you can successfully install the router onto the router plate, ensuring a stable and functional setup for your woodworking projects. Now that the router is in place, let's move on to the final step – adding safety features.
Adding Safety Features
-
Featherboards: Install featherboards on the fence and tabletop to apply pressure and control to the workpiece during routing. These help prevent kickback and ensure a consistent feed rate, enhancing safety and precision.
-
Clear Dust Collection: Implement a dust collection system to minimize airborne sawdust and debris. This not only keeps the work area clean but also reduces the risk of respiratory issues and improves visibility during routing.
-
Emergency Shut-Off: Consider adding an emergency shut-off switch within easy reach of the router table. In the event of an unexpected situation, this feature allows for quick and immediate shutdown, prioritizing safety.
-
Router Bit Guard: Utilize a router bit guard to enclose the spinning router bit during operation. This guard helps prevent accidental contact with the bit and provides an additional layer of safety for the user.
-
Personal Protective Equipment (PPE): Emphasize the use of personal protective equipment, including safety glasses, ear protection, and a dust mask. These items are essential for safeguarding against potential hazards and ensuring a safe woodworking environment.
-
Workpiece Clamps: Use hold-down clamps to secure the workpiece to the tabletop, preventing movement and ensuring stability during routing. This minimizes the risk of the workpiece shifting and enhances overall safety.
By incorporating these safety features into your router table setup, you prioritize the well-being of yourself and others in the workshop while promoting a secure and controlled woodworking environment.
Conclusion
In conclusion, building your own router table is a fulfilling and practical endeavor for woodworking enthusiasts. By following the step-by-step process outlined in this guide, you can create a customized router table that meets your specific woodworking needs. From constructing the tabletop and fence to installing the router and adding essential safety features, each aspect contributes to a functional and reliable tool for shaping wood with precision and control.
As you embark on this DIY project, remember to prioritize safety at every stage of construction and operation. Implementing safety features such as featherboards, dust collection, emergency shut-off switches, and personal protective equipment is crucial for creating a secure woodworking environment.
With your newly constructed router table, you'll have the capability to tackle a wide range of woodworking projects with confidence and precision. Whether you're crafting intricate joinery or shaping edges, your custom-built router table will be a valuable asset in your workshop, empowering you to bring your woodworking ideas to life.