
Home>Create & Decorate>DIY & Crafts>DIY Fireplace Mantel: Create A Stunning Focal Point For Your Living Space
DIY & Crafts
DIY Fireplace Mantel: Create A Stunning Focal Point For Your Living Space
Published: February 24, 2024

Senior Editor in Create & Decorate, Kathryn combines traditional craftsmanship with contemporary trends. Her background in textile design and commitment to sustainable crafts inspire both content and community.
Transform your living space with a stunning DIY fireplace mantel. Get inspired with our DIY & Crafts ideas and create a captivating focal point.
(Many of the links in this article redirect to a specific reviewed product. Your purchase of these products through affiliate links helps to generate commission for Twigandthistle.com, at no extra cost. Learn more)
Introduction
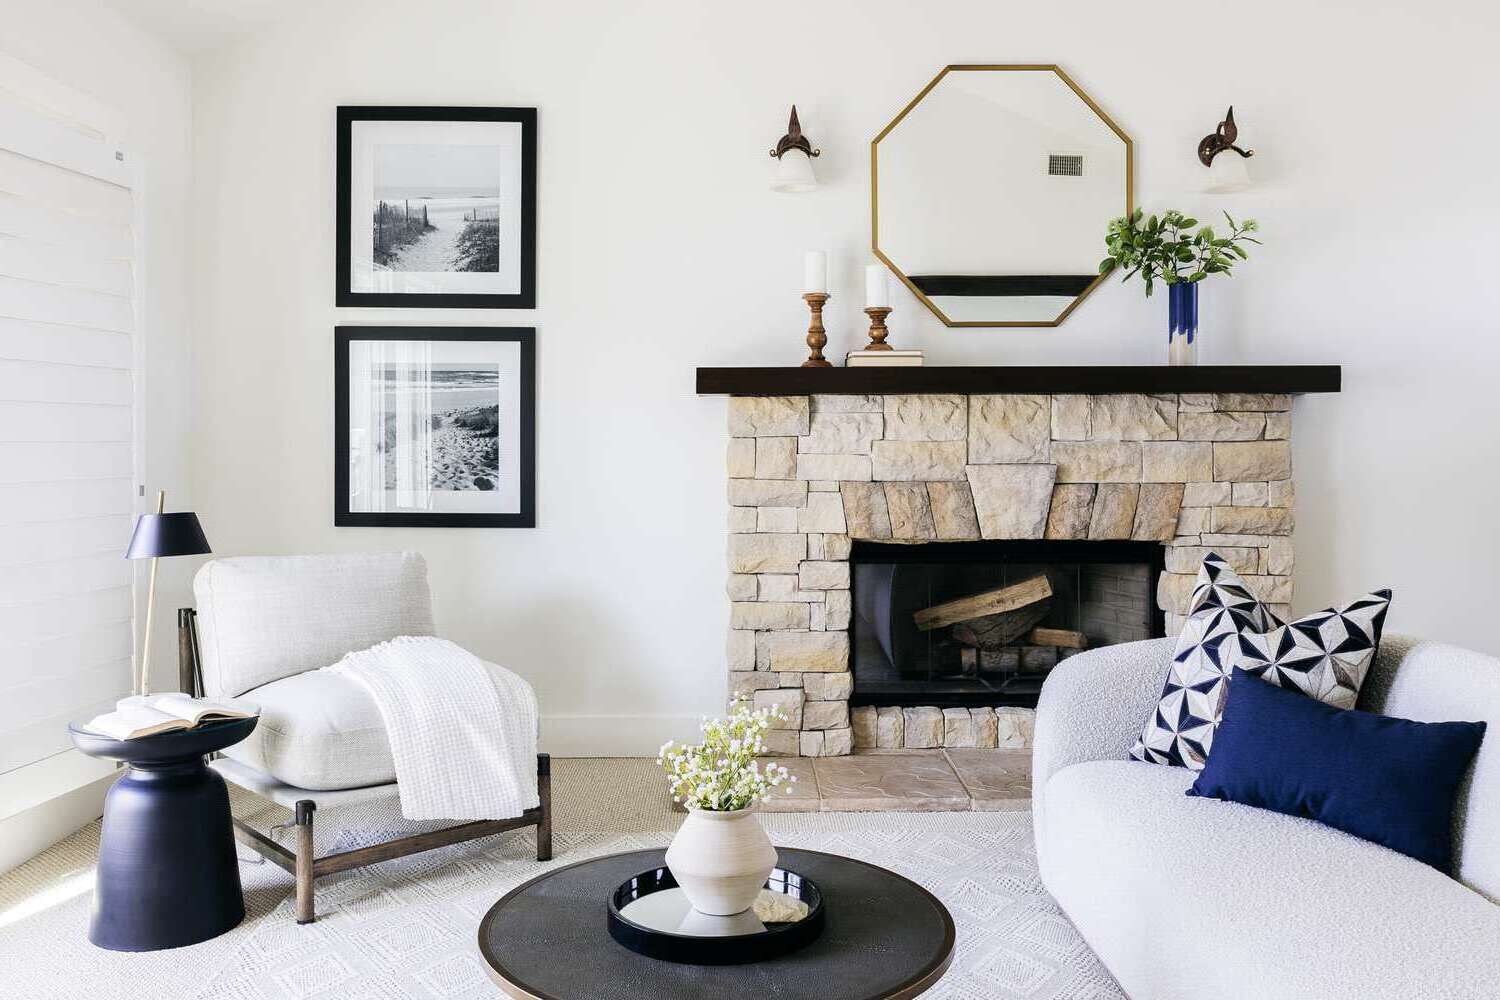
A fireplace mantel serves as the focal point of a living space, adding warmth, charm, and character to the room. Whether you're looking to enhance the aesthetic appeal of your home or seeking a cozy spot to display cherished mementos, creating a DIY fireplace mantel can be a rewarding and fulfilling project. By infusing your personal style and creativity, you can transform a plain fireplace into a stunning centerpiece that reflects your unique taste and elevates the ambiance of your living area.
The process of crafting a fireplace mantel provides an opportunity to unleash your inner craftsman or craftswoman, allowing you to showcase your woodworking skills and artistic flair. From selecting the perfect materials to adding intricate decorative details, each step in the construction process contributes to the creation of a one-of-a-kind masterpiece that will undoubtedly draw admiration from family and friends.
In this comprehensive guide, we will delve into the intricacies of designing and building a DIY fireplace mantel. We'll explore the essential considerations for choosing the right materials, provide insights into precise measuring and planning, and offer step-by-step instructions for constructing the frame and adding decorative elements. Additionally, we'll discuss the finishing touches that will bring your fireplace mantel to life, ensuring that it seamlessly integrates with your living space's overall aesthetic.
Embarking on this DIY journey will not only result in a visually captivating fireplace mantel but will also imbue your living space with a sense of warmth and personality. Whether you're a seasoned DIY enthusiast or a novice looking to explore the world of home improvement, this guide will equip you with the knowledge and inspiration needed to embark on this fulfilling and transformative project. So, roll up your sleeves, gather your tools, and let's embark on the exhilarating journey of creating a stunning focal point for your living space.
Choosing the Right Materials
Selecting the right materials is a crucial first step in creating a DIY fireplace mantel that exudes quality and style. The chosen materials will not only determine the overall aesthetic of the mantel but also its durability and ability to withstand the heat emanating from the fireplace. Here's a detailed look at the key considerations when choosing the materials for your DIY fireplace mantel:
Wood Selection
When it comes to crafting a timeless and elegant fireplace mantel, wood is a popular choice for its natural beauty and versatility. Hardwoods such as oak, maple, cherry, or walnut are excellent options due to their durability and ability to take stains and finishes exceptionally well. Each wood type possesses distinct grain patterns and color variations, allowing you to select a species that complements your home's interior design.
Stone and Brick
For a rustic or traditional aesthetic, stone or brick mantels can infuse a sense of old-world charm into your living space. Natural stone, such as limestone or slate, can create a striking focal point, while reclaimed bricks offer a weathered and vintage appeal. These materials can be used to construct the mantel shelf and surround, adding texture and character to the fireplace area.
MDF and Composite Materials
If you're seeking a cost-effective alternative to natural wood, medium-density fiberboard (MDF) and composite materials provide a durable and versatile option. MDF, in particular, is prized for its smooth surface, making it ideal for achieving a seamless, painted finish. Additionally, composite materials offer the look of natural wood without the maintenance requirements, making them a practical choice for modern or transitional interior designs.
Metal Accents
Incorporating metal accents, such as wrought iron brackets or decorative metal straps, can add a touch of industrial or rustic charm to your fireplace mantel. These elements can be used to reinforce the structure and lend a unique visual appeal, creating a captivating juxtaposition against the warmth of the wood or the ruggedness of stone.
By carefully considering these material options and their respective characteristics, you can make an informed decision that aligns with your design preferences, budget, and the overall aesthetic of your living space. The chosen materials will lay the foundation for a visually stunning and enduring fireplace mantel that will undoubtedly become the centerpiece of your home.
In the next section, we'll delve into the crucial steps of measuring and planning, setting the stage for the construction of your DIY fireplace mantel.
Measuring and Planning
Accurate measurements and meticulous planning are fundamental to the successful execution of a DIY fireplace mantel project. Before diving into the construction phase, it's imperative to take precise measurements of the fireplace and its surroundings to ensure that the mantel fits seamlessly within the space. Here's a detailed exploration of the crucial steps involved in measuring and planning for your DIY fireplace mantel:
Assessing the Fireplace Dimensions
Begin by measuring the width, height, and depth of the fireplace opening. Take note of any protrusions, such as hearths or mantel legs, as these will influence the design and placement of the mantel. Additionally, consider the clearance requirements for combustible materials, ensuring that the mantel complies with safety regulations and does not obstruct the heat emanating from the fireplace.
Determining the Mantel Size
Based on the fireplace dimensions and the desired visual impact, determine the appropriate size for the mantel. Consider the proportions of the room and the surrounding décor to strike a harmonious balance. The mantel's width and depth should complement the fireplace opening while allowing ample space for decorative items or functional accessories.
Creating a Detailed Plan
Sketch a rough design of the fireplace mantel, incorporating your preferred style elements and decorative details. Consider the architectural style of your home and the overall aesthetic you wish to achieve. Take into account the materials chosen for the mantel and visualize how they will harmonize with the existing interior design. This plan will serve as a roadmap for the construction phase, guiding you through each step of the process.
Accounting for Installation Considerations
Anticipate any installation challenges, such as uneven walls or irregularities in the fireplace structure. Plan for the necessary adjustments and modifications to ensure a secure and stable installation. Consider consulting with a professional if you encounter complexities that require specialized expertise.
Gathering Essential Tools and Materials
Based on the planned design and measurements, compile a comprehensive list of tools and materials required for the construction of the fireplace mantel. This may include wood, stone, adhesives, fasteners, and finishing products. Ensuring that all necessary items are readily available will streamline the construction process and minimize interruptions.
By meticulously measuring and planning every aspect of the DIY fireplace mantel project, you'll lay a solid foundation for a seamless and visually captivating installation. The next phase will delve into the construction of the mantel frame, bringing your envisioned design to life with precision and craftsmanship.
Building the Frame
The construction of the frame forms the structural backbone of the DIY fireplace mantel, providing the support and framework for the decorative elements that will adorn the finished piece. This phase requires precision, attention to detail, and a focus on ensuring the frame aligns seamlessly with the measurements and design plan established in the previous steps.
Step 1: Selecting the Lumber
Choose high-quality lumber that aligns with the desired aesthetic and complements the overall design of the mantel. Opt for sturdy hardwoods such as oak, maple, or cherry, ensuring that the wood is free from defects and possesses the necessary strength to support the weight of the mantel shelf and any additional decorative elements.
Step 2: Cutting and Assembling the Components
Using the precise measurements outlined in the planning phase, cut the lumber to the required dimensions for the mantel legs, shelf, and any additional trim pieces. Employ traditional woodworking techniques or modern joinery methods to assemble the components, ensuring a secure and stable frame that will withstand the test of time.
Step 3: Incorporating Joinery Techniques
Utilize appropriate joinery techniques such as mortise and tenon joints, dowel joints, or pocket hole joinery to securely connect the frame components. These methods not only enhance the structural integrity of the mantel but also contribute to its visual appeal, showcasing craftsmanship and attention to detail.
Step 4: Customizing the Design
Incorporate design elements such as decorative moldings, carved details, or beveled edges to infuse the frame with character and sophistication. These personalized touches elevate the visual impact of the mantel, transforming it into a bespoke centerpiece that reflects your unique style and craftsmanship.
Step 5: Ensuring Stability and Alignment
Prior to installation, meticulously inspect the frame to ensure that all components are aligned, level, and free from any imperfections. This meticulous attention to detail will guarantee a seamless and professional-looking installation, setting the stage for the addition of decorative details and finishing touches.
By meticulously following these steps and infusing the construction process with precision and artistry, you'll lay the foundation for a visually captivating and enduring DIY fireplace mantel. The frame serves as the canvas upon which the mantel's personality and charm will unfold, setting the stage for the addition of decorative details and finishing touches that will bring your vision to life.
Adding Decorative Details
Once the frame of the DIY fireplace mantel is securely in place, it's time to infuse it with decorative details that will elevate its visual appeal and harmonize with the overall aesthetic of your living space. This phase allows for creative expression and personalization, enabling you to imbue the mantel with elements that reflect your unique style and preferences.
Step 1: Ornamental Molding and Trim
Incorporate ornamental molding and trim to add depth and visual interest to the mantel. Crown molding, dentil molding, or intricate trim pieces can be strategically positioned to frame the mantel shelf and legs, creating a sense of elegance and sophistication. These details not only enhance the overall aesthetic but also contribute to the cohesive integration of the mantel with the surrounding architecture.
Step 2: Carved Accents and Embellishments
Consider adding carved accents and embellishments to infuse the mantel with a touch of artistry and intricacy. Hand-carved motifs, rosettes, or scrollwork can adorn the frame, serving as focal points that draw the eye and evoke a sense of timeless craftsmanship. These embellishments can be tailored to complement the design motifs present in your home, creating a seamless visual narrative.
Step 3: Customized Corbels and Supports
Integrate custom-designed corbels and supports to reinforce the structural integrity of the mantel while adding a distinctive touch of character. Whether crafted from wood, metal, or a combination of materials, these architectural elements contribute to the overall visual impact of the mantel, infusing it with a sense of individuality and craftsmanship.
Step 4: Artistic Finishes and Surface Treatments
Explore artistic finishes and surface treatments to enhance the texture and visual allure of the mantel. Techniques such as distressing, antiquing, or faux finishing can impart a sense of age and character, creating a captivating juxtaposition against the warmth of the fireplace. Additionally, consider incorporating hand-painted motifs or stenciled designs to infuse the mantel with personalized artistry.
Step 5: Personalized Display and Arrangements
Once the decorative details are in place, consider the manner in which you'll adorn the mantel with personalized displays and arrangements. Whether showcasing cherished family photographs, heirloom collectibles, or seasonal décor, the mantel serves as a platform for self-expression and storytelling. Thoughtfully curating the items displayed will further enhance the mantel's visual impact and imbue the living space with warmth and personality.
By meticulously attending to these decorative details, you'll transform the DIY fireplace mantel into a captivating centerpiece that reflects your individuality and craftsmanship. Each element contributes to the mantel's narrative, infusing it with a sense of artistry and personalization that will undoubtedly become a cherished focal point in your home.
Finishing Touches
With the structural framework in place and the decorative elements adorning the DIY fireplace mantel, attention turns to the crucial phase of adding the finishing touches. This stage serves as the culmination of meticulous craftsmanship and thoughtful design, elevating the mantel to its full potential as a stunning focal point within your living space.
Step 1: Surface Refinement
Prior to applying any finishes, meticulously inspect the mantel's surface for imperfections, ensuring that it is smooth and free from blemishes. Sand any rough areas and fill in any gaps or indentations to achieve a flawless canvas for the finishing treatments.
Step 2: Staining or Painting
Select a staining or painting technique that aligns with your desired aesthetic. For wood mantels, rich stains can enhance the natural grain and color variations, while painted finishes offer versatility in achieving a specific color scheme or style. Apply the chosen finish with precision, ensuring even coverage and a professional, polished appearance.
Step 3: Protective Coating
Once the staining or painting process is complete, apply a protective coating to safeguard the mantel against wear and tear. Polyurethane, lacquer, or varnish can provide a durable and lustrous finish, enhancing the wood's natural beauty while offering resistance to scratches and moisture.
Step 4: Integration with Surrounding Décor
Consider the mantel's seamless integration with the surrounding décor, ensuring that its color, finish, and design elements harmonize with the room's overall aesthetic. The mantel should serve as a unifying element, enhancing the visual appeal of the entire space while commanding attention as a captivating centerpiece.
Step 5: Lighting and Ambiance
Strategically incorporate lighting elements to accentuate the mantel's features and create a warm, inviting ambiance. Recessed lighting, wall sconces, or carefully positioned lamps can illuminate the mantel, casting a gentle glow that highlights its decorative details and the items displayed upon it.
Step 6: Final Styling and Arrangement
Curate the final styling and arrangement of items on the mantel, ensuring a balanced and visually appealing display. Consider the principles of symmetry, varying heights, and complementary colors to create a cohesive and captivating presentation that reflects your personal style and storytelling.
By meticulously attending to these finishing touches, the DIY fireplace mantel will emerge as a refined and captivating centerpiece, embodying the culmination of craftsmanship, artistry, and personal expression. Each detail contributes to the mantel's narrative, infusing it with a sense of warmth, character, and individuality that will undoubtedly enrich your living space for years to come.
Conclusion
Embarking on the journey of creating a DIY fireplace mantel is a testament to your creativity, craftsmanship, and dedication to enhancing the beauty and warmth of your living space. Throughout this comprehensive guide, we've explored the essential steps and considerations involved in designing, constructing, and embellishing a stunning focal point for your home. From selecting the right materials to adding the finishing touches, each phase of the process has been infused with artistry, precision, and a deep sense of personalization.
As you stand back and admire the completed fireplace mantel, you'll witness the culmination of your vision and labor, manifested in a captivating centerpiece that exudes charm and character. The mantel serves as more than a decorative element; it becomes a storytelling platform, showcasing your cherished mementos, seasonal adornments, and personal artifacts. It embodies the essence of your home, reflecting your individuality and style while enriching the ambiance of the living space.
The creation of a DIY fireplace mantel transcends the realm of home improvement; it represents a journey of self-expression, creativity, and the fulfillment of a vision. It's a testament to the transformative power of craftsmanship and the ability to infuse a space with warmth, personality, and visual allure. Whether you've chosen a classic wood mantel, a rustic stone surround, or a modern composite design, the mantel stands as a testament to your ingenuity and dedication to creating a space that resonates with comfort and beauty.
As you gather around the fireplace with loved ones, the mantel becomes a focal point for shared moments, conversations, and cherished memories. It serves as a backdrop for holiday celebrations, intimate gatherings, and quiet evenings spent in the comfort of home. Its presence elevates the entire living space, imparting a sense of coziness and sophistication that leaves a lasting impression on all who enter.
In the end, the DIY fireplace mantel is more than a mere construction project; it's a labor of love, a testament to your creativity, and a reflection of your commitment to crafting a home that is as inviting as it is visually captivating. It stands as a reminder of the joy found in the process of creation and the pride that comes with transforming raw materials into a work of art. May your DIY fireplace mantel continue to kindle warmth, inspire admiration, and serve as a cherished focal point in your home for years to come.