
Home>Create & Decorate>DIY & Crafts>DIY Sliding Gate For Your Deck
DIY & Crafts
DIY Sliding Gate For Your Deck
Published: February 23, 2024

Content Creator specializing in woodworking and interior transformations. Caegan's guides motivate readers to undertake their own projects, while his custom furniture adds a personal touch.
Learn how to build a DIY sliding gate for your deck with our step-by-step guide. Perfect for DIY & Crafts enthusiasts looking to add functionality and style to their outdoor space.
(Many of the links in this article redirect to a specific reviewed product. Your purchase of these products through affiliate links helps to generate commission for Twigandthistle.com, at no extra cost. Learn more)
Introduction
Are you looking to add both functionality and style to your deck? A DIY sliding gate could be the perfect solution. Whether you have pets or young children to keep safe, or simply want to enhance the aesthetic appeal of your outdoor space, a sliding gate offers convenience and security. With the right materials, tools, and a bit of DIY spirit, you can create a custom sliding gate that complements your deck while serving its practical purpose.
A sliding gate is an excellent choice for decks with limited space, as it doesn't swing open and take up valuable square footage. Instead, it smoothly glides to the side, allowing for easy access while maximizing the usable area of your deck. Additionally, a well-designed sliding gate can become a standout feature, adding a touch of elegance to your outdoor environment.
By taking on this DIY project, you have the opportunity to tailor the gate to your specific needs and preferences. You can choose the materials and colors that match your deck's existing design, ensuring a seamless integration with the overall look and feel of your outdoor space. Furthermore, building your own sliding gate allows for customization in size, ensuring a perfect fit for your deck's dimensions.
In this comprehensive guide, we will walk you through the step-by-step process of creating and installing a sliding gate for your deck. From gathering the necessary materials and tools to the final installation, you'll gain the knowledge and confidence to tackle this project with ease. So, roll up your sleeves, gather your supplies, and let's embark on this rewarding DIY journey to craft a functional and visually appealing sliding gate for your deck.
Materials Needed
To embark on the exciting DIY project of building a sliding gate for your deck, you'll need to gather a range of materials to ensure a smooth and successful construction process. Here's a comprehensive list of the essential items you'll require:
-
Wood: Select high-quality lumber for the frame of the gate. Opt for a durable wood species such as cedar, redwood, or pressure-treated pine to ensure longevity and resistance to outdoor elements.
-
Gate Hardware Kit: Invest in a reliable gate hardware kit that includes components such as wheels, a track, and a latch. Ensure that the kit is designed specifically for sliding gates to guarantee smooth operation and secure closure.
-
Screws and Nails: Stock up on an assortment of screws and nails suitable for outdoor use. Stainless steel or galvanized fasteners are ideal for withstanding exposure to the elements without rusting.
-
Wood Glue: Choose a high-quality wood glue to reinforce the joints and connections within the gate frame, enhancing its structural integrity.
-
Wood Stain or Paint: Depending on your aesthetic preferences, acquire wood stain or paint to finish the gate. This not only adds visual appeal but also provides protection against weathering.
-
Concrete Mix: If your deck surface is made of concrete, you'll need concrete mix to secure the gate track in place.
-
Gravel or Sand: For decks with soil or gravel surfaces, gravel or sand will be necessary to create a stable foundation for the gate track.
-
Level: A reliable level is essential for ensuring that the gate is installed perfectly straight and level, preventing any operational issues.
-
Measuring Tape: Accurate measurements are crucial for constructing a gate that fits your deck precisely. A measuring tape will be indispensable throughout the project.
-
Safety Equipment: Prioritize safety by equipping yourself with protective gear such as gloves and safety glasses to prevent injuries during construction.
By gathering these materials, you'll be well-prepared to commence the construction of your sliding gate, setting the stage for a successful and rewarding DIY endeavor.
Tools Required
To bring your DIY sliding gate project to life, having the right tools at your disposal is paramount. These essential tools will empower you to work with precision and efficiency, ensuring that each step of the construction process is executed seamlessly. Here's a detailed look at the tools you'll need to have on hand:
-
Circular Saw: A high-quality circular saw will be indispensable for cutting the lumber to the precise dimensions required for constructing the gate frame. Opt for a saw with a sharp blade and adjustable cutting depth to achieve clean and accurate cuts.
-
Drill and Bits: A power drill equipped with a selection of drill bits is essential for creating pilot holes and driving screws into the wood. Ensure that your drill is charged and ready for the task at hand, and have an assortment of drill bits suitable for wood on standby.
-
Screwdriver: While a power drill can handle most screw-driving tasks, having a manual screwdriver as a backup is wise. It can be particularly useful for delicate or intricate assembly work.
-
Adjustable Wrench: An adjustable wrench will come in handy for tightening nuts and bolts, especially when installing the gate hardware components. Look for a wrench with a comfortable grip and smooth adjustment mechanism.
-
Hammer: A sturdy hammer is a fundamental tool for securing nails and providing gentle persuasion when assembling the gate frame. Choose a hammer with a comfortable grip and a balanced weight for optimal control.
-
Level: Achieving a perfectly level gate is crucial for smooth operation and a professional finish. A reliable level will enable you to ensure that the gate frame and track are installed accurately and without any tilt.
-
Measuring Tape: Accurate measurements are the foundation of a well-fitted sliding gate. A durable measuring tape with clear markings will be your go-to tool for ensuring precision throughout the construction process.
-
Work Gloves: Protect your hands from splinters, sharp edges, and general wear and tear by wearing a pair of sturdy work gloves. Look for gloves that offer a balance of dexterity and protection.
-
Safety Glasses: Prioritize eye safety by wearing protective glasses throughout the construction process. This simple yet crucial tool will shield your eyes from wood chips, dust, and potential debris.
-
Carpenter's Square: A carpenter's square is invaluable for ensuring that corners are perfectly perpendicular and angles are precisely measured. This tool is essential for maintaining the structural integrity and alignment of the gate frame.
By ensuring that these essential tools are within reach, you'll be well-equipped to tackle each phase of the sliding gate construction with confidence and precision. With the right tools at your disposal, you're poised to transform your vision of a custom sliding gate into a tangible and functional reality.
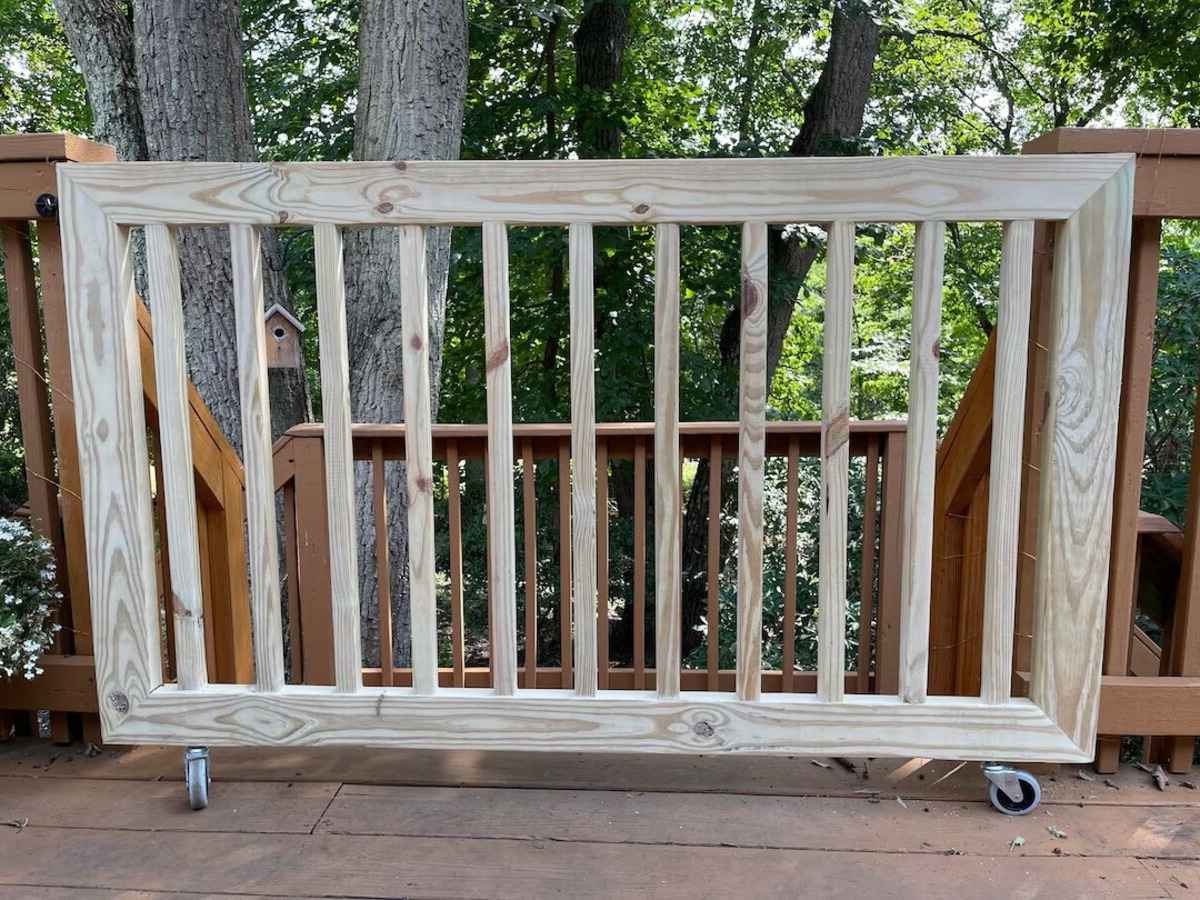
Step 1: Measure and Cut the Frame
The initial step in crafting a sliding gate for your deck involves precise measurements and accurate cuts to create the foundational frame. This pivotal phase sets the stage for the entire construction process, dictating the gate's dimensions and structural integrity. By meticulously following these steps, you'll lay the groundwork for a sturdy and well-fitted gate that seamlessly integrates with your deck.
Gather the Necessary Materials
Before commencing the measuring and cutting process, ensure that you have the required materials at hand, including the selected wood for the frame, a measuring tape, a pencil, and a reliable circular saw. Opt for high-quality lumber that aligns with your deck's aesthetic and structural requirements, such as cedar, redwood, or pressure-treated pine. With these materials in place, you're ready to embark on the precise task of creating the gate frame.
Take Accurate Measurements
Begin by measuring the designated area where the sliding gate will be installed. Take precise measurements of the width and height, accounting for any potential variations in the deck's surface. It's crucial to factor in the necessary clearance space for smooth operation, ensuring that the gate can open and close without obstruction. Once you have the exact measurements, transfer them to the selected wood, marking the cutting lines with a pencil.
Cut the Lumber to Size
With the measurements clearly marked, carefully use a circular saw to cut the wood according to the specified dimensions. Exercise caution and precision during this step to achieve clean and accurate cuts, as the frame's structural integrity hinges on the quality of the cuts. Double-check the measurements before making any cuts to avoid errors that could compromise the gate's fit and functionality.
Assemble the Frame Components
After cutting the lumber to size, assemble the frame components according to the predetermined design. Utilize wood glue and appropriate fasteners to securely join the pieces, ensuring that the frame is sturdy and well-aligned. A carpenter's square can be invaluable for verifying that the corners are perfectly perpendicular, maintaining the frame's structural integrity.
By meticulously measuring and cutting the frame components, you'll lay a solid foundation for the construction of your sliding gate. This crucial step sets the stage for the subsequent phases, bringing you closer to the realization of a custom sliding gate that seamlessly integrates with your deck, combining functionality and visual appeal.
Step 2: Assemble the Frame
With the frame components cut to the precise dimensions, the next pivotal phase in constructing your sliding gate for the deck is the assembly of the frame. This step is crucial in ensuring that the gate possesses the structural integrity and stability necessary for smooth operation and long-term durability. By following these detailed guidelines, you'll seamlessly progress from individual lumber pieces to a cohesive and robust gate frame.
Gather the Necessary Tools and Materials
Before commencing the assembly process, gather the essential tools and materials required for this phase. Ensure that you have wood glue, a reliable power drill with appropriate bits, screws, and a carpenter's square on hand. Additionally, have a sturdy work surface prepared to facilitate the assembly process, providing a stable and level platform for constructing the gate frame.
Apply Wood Glue and Secure Fasteners
Begin the assembly process by applying a liberal amount of high-quality wood glue to the joints of the frame components. Wood glue serves as a crucial bonding agent, reinforcing the connections and enhancing the overall strength of the frame. Once the glue is applied, carefully position the frame components according to the predetermined design, ensuring precise alignment and a snug fit.
With the components in place, utilize the power drill and suitable screws to secure the joints. Pilot holes may be necessary to prevent the wood from splitting during the screwing process. Exercise caution and precision when driving the screws, ensuring that they are firmly embedded to create robust connections. Pay close attention to the corners and intersections, as these areas are pivotal for the frame's structural integrity.
Verify Alignment and Stability
As the frame takes shape, periodically assess the alignment and stability of the components. Utilize a carpenter's square to confirm that the corners are perfectly perpendicular, maintaining the frame's structural integrity. Additionally, check for any potential gaps or misalignments, making any necessary adjustments to ensure a cohesive and stable assembly.
Allow Sufficient Drying Time
Once the frame is fully assembled, allow the wood glue to dry thoroughly according to the manufacturer's recommendations. This crucial step ensures that the joints achieve maximum strength and cohesion, laying the groundwork for a robust and enduring gate frame.
By meticulously assembling the frame with precision and attention to detail, you'll establish a solid foundation for the subsequent phases of the sliding gate construction. This pivotal step brings you closer to the realization of a custom sliding gate that seamlessly integrates with your deck, combining functionality and visual appeal.
Step 3: Attach the Wheels
Once the frame of the sliding gate is securely assembled, the next critical step is to attach the wheels that will facilitate smooth and effortless movement along the designated track. Proper installation of the wheels is essential for ensuring the gate's functionality and ease of operation. By following these detailed guidelines, you'll seamlessly progress from a static frame to a fully functional sliding gate, poised to enhance the accessibility and visual appeal of your deck.
Gather the Necessary Components
Before commencing the wheel attachment process, gather the essential components required for this phase. Ensure that you have the gate hardware kit readily available, specifically the wheels designed for sliding gates. Additionally, confirm that you have the necessary screws, a power drill with appropriate bits, and a level to facilitate the installation process. Having these components at hand will streamline the wheel attachment and set the stage for the gate's smooth and reliable operation.
Position and Secure the Wheels
Begin by positioning the wheels at the bottom of the gate frame, aligning them with the designated track. It's crucial to ensure that the wheels are evenly spaced and parallel to each other, as this alignment is pivotal for the gate's stability and balanced movement. Utilize a level to verify that the wheels are perfectly horizontal, preventing any potential issues with uneven weight distribution or operational friction.
With the wheels in the correct position, utilize the power drill and suitable screws to securely attach them to the gate frame. Exercise caution and precision during this process, ensuring that the screws are firmly embedded to create robust connections. Periodically assess the stability and alignment of the wheels, making any necessary adjustments to guarantee smooth and balanced movement along the track.
Test the Movement
Once the wheels are securely attached, perform a preliminary test of the gate's movement along the track. Gently push the gate to ensure that the wheels glide smoothly and without resistance. This test allows you to identify any potential issues with the wheel alignment or track compatibility, enabling you to address and rectify these issues before proceeding to the final installation phase.
By meticulously attaching the wheels with precision and attention to detail, you'll pave the way for the seamless and reliable movement of the sliding gate along the designated track. This pivotal step brings you closer to the realization of a custom sliding gate that seamlessly integrates with your deck, combining functionality and visual appeal.
Step 4: Install the Track
With the frame assembled and the wheels securely attached, the next crucial phase in the construction of your sliding gate for the deck is the installation of the track. The track serves as the guiding mechanism for the gate, facilitating smooth and controlled movement along the designated path. Proper installation of the track is essential for ensuring the gate's stability, alignment, and overall functionality. By following these detailed guidelines, you'll seamlessly progress from a static frame to a fully operational sliding gate, poised to enhance the accessibility and visual appeal of your deck.
Gather the Necessary Components
Before commencing the track installation process, gather the essential components required for this phase. Ensure that you have the designated track from the gate hardware kit readily available, along with the necessary screws, a power drill with appropriate bits, and a level to facilitate the installation process. Additionally, confirm that you have the concrete mix, gravel, or sand if required to create a stable foundation for the track. Having these components at hand will streamline the track installation and set the stage for the gate's smooth and reliable operation.
Prepare the Installation Area
Begin by preparing the designated area where the track will be installed. If your deck surface is made of concrete, ensure that the installation area is clean and free of debris. If the deck has a soil or gravel surface, create a stable foundation by leveling the area and adding gravel or sand to provide a solid base for the track. Proper preparation of the installation area is crucial for ensuring the track's stability and alignment, laying the groundwork for the gate's smooth movement.
Position and Secure the Track
Carefully position the track along the designated path, ensuring that it is evenly aligned and parallel to the gate frame. Utilize a level to verify that the track is perfectly horizontal, preventing any potential issues with uneven movement or operational friction. Once the track is in the correct position, utilize the power drill and suitable screws to securely attach it to the deck surface. If the deck surface is concrete, follow the manufacturer's guidelines to properly secure the track using concrete mix. Exercise caution and precision during this process, ensuring that the track is firmly installed and capable of supporting the gate's movement.
Test the Gate's Movement
After the track is securely installed, perform a comprehensive test of the gate's movement along the track. Open and close the gate multiple times to ensure that it glides smoothly and without resistance. This test allows you to identify any potential issues with the track alignment or stability, enabling you to address and rectify these issues before proceeding to the final installation phase.
By meticulously installing the track with precision and attention to detail, you'll pave the way for the seamless and reliable movement of the sliding gate along the designated path. This pivotal step brings you closer to the realization of a custom sliding gate that seamlessly integrates with your deck, combining functionality and visual appeal.
Step 5: Hang the Gate
With the frame assembled, wheels attached, and track securely installed, the next critical phase in the construction of your sliding gate for the deck is the process of hanging the gate. This pivotal step involves mounting the gate onto the installed track, ensuring that it moves smoothly and securely along the designated path. Proper hanging of the gate is essential for the gate's functionality, stability, and overall operational performance. By following these detailed guidelines, you'll seamlessly progress from a static frame to a fully operational sliding gate, poised to enhance the accessibility and visual appeal of your deck.
Gather the Necessary Tools and Components
Before commencing the gate hanging process, gather the essential tools and components required for this phase. Ensure that you have the gate itself, along with any additional hardware required for mounting, such as brackets or hangers. Additionally, confirm that you have the necessary screws, a power drill with appropriate bits, and a level to facilitate the hanging process. Having these components at hand will streamline the gate hanging and set the stage for the gate's smooth and reliable operation.
Position the Gate for Installation
Carefully position the gate at the entrance of the track, ensuring that it aligns with the installed track and the wheels are poised to engage with the track. Utilize a level to verify that the gate is perfectly aligned and level, preventing any potential issues with uneven movement or operational friction. It's crucial to ensure that the gate is positioned accurately before proceeding with the installation process.
Secure the Gate onto the Track
Once the gate is correctly positioned, utilize the designated hardware, such as brackets or hangers, to securely attach the gate to the track. Ensure that the gate is firmly mounted and capable of smoothly gliding along the track without any obstructions or misalignments. Utilize the power drill and suitable screws to secure the gate in place, paying close attention to the stability and alignment of the installation.
Test the Gate's Movement
After the gate is securely hung, perform a comprehensive test of its movement along the track. Open and close the gate multiple times to ensure that it operates smoothly and without resistance. This test allows you to identify any potential issues with the gate's alignment or stability, enabling you to address and rectify these issues before finalizing the installation.
By meticulously hanging the gate with precision and attention to detail, you'll complete the transformation of the frame into a fully operational sliding gate. This pivotal step brings you closer to the realization of a custom sliding gate that seamlessly integrates with your deck, combining functionality and visual appeal.
Step 6: Add the Latch
As the construction of the sliding gate for your deck nears completion, the addition of a secure and reliable latch is essential for ensuring the gate's functionality and safety. The latch serves as the mechanism for securely closing and locking the gate, providing peace of mind and convenience for everyday use. By following these detailed guidelines, you'll finalize the installation of the sliding gate, culminating in a fully operational and visually appealing addition to your deck.
Select the Appropriate Latch
Before commencing the latch installation process, carefully select a latch that aligns with your specific requirements and complements the design of the gate. Choose a high-quality latch that offers durability and secure locking functionality, ensuring that it can withstand outdoor elements and frequent use. Consider factors such as the gate's size, material, and overall aesthetic to select a latch that seamlessly integrates with the gate while providing reliable performance.
Position the Latch for Installation
Carefully position the selected latch on the gate, ensuring that it aligns with the corresponding catch or receiver on the adjacent structure. Verify that the latch is positioned at a convenient height and distance from the gate's edge, allowing for easy access and smooth operation. Utilize a level to ensure that the latch is perfectly aligned and positioned, preventing any potential issues with functionality or security.
Secure the Latch in Place
Once the latch is correctly positioned, utilize the designated hardware, such as screws or bolts, to securely attach the latch to the gate. Ensure that the latch is firmly mounted and capable of engaging with the catch or receiver without any obstructions or misalignments. Utilize the appropriate tools to secure the latch in place, paying close attention to the stability and alignment of the installation.
Test the Latch Functionality
After the latch is securely installed, perform a comprehensive test of its functionality. Open and close the gate multiple times to ensure that the latch securely engages with the catch or receiver, providing a reliable and robust locking mechanism. Verify that the latch operates smoothly and without resistance, allowing for effortless and secure closure of the sliding gate.
By meticulously adding the latch with precision and attention to detail, you'll finalize the installation of the sliding gate, ensuring that it seamlessly integrates with your deck while providing enhanced functionality and security. This pivotal step brings you closer to the realization of a custom sliding gate that combines practicality and visual appeal, serving as a valuable addition to your outdoor space.
Conclusion
Congratulations on successfully completing the construction and installation of your custom sliding gate for the deck! Through meticulous measurements, precise cuts, and careful assembly, you've transformed a vision into a tangible and functional addition to your outdoor space. The sliding gate not only enhances the accessibility and security of your deck but also adds a touch of elegance and personalization to the environment.
As you reflect on the journey of crafting and installing the sliding gate, it's important to acknowledge the sense of accomplishment that comes with completing a hands-on DIY project. The dedication and attention to detail invested in each phase of the construction process have culminated in a practical and visually appealing gate that seamlessly integrates with your deck.
Beyond the tangible outcome, this DIY endeavor has provided valuable opportunities for learning and skill development. From mastering the use of essential tools to understanding the principles of structural integrity and alignment, you've expanded your knowledge and capabilities in woodworking and construction. These newfound skills can serve as a foundation for future projects and creative endeavors, empowering you to take on increasingly complex and rewarding DIY challenges.
Moreover, the process of building a sliding gate has fostered a deeper connection with your outdoor living space. By actively participating in the creation of a functional element for your deck, you've strengthened your sense of ownership and pride in the environment you've cultivated. The sliding gate stands as a testament to your creativity, resourcefulness, and commitment to enhancing the utility and aesthetics of your outdoor area.
As you admire the completed sliding gate, take a moment to appreciate the craftsmanship and attention to detail that have gone into its construction. The gate serves as a symbol of your dedication to creating a space that is both practical and inviting, reflecting your unique style and preferences. Whether it's the smooth gliding motion, the sturdy frame, or the carefully selected materials, every aspect of the gate speaks to the thought and effort invested in its realization.
Moving forward, the sliding gate will continue to serve as a functional and visually striking feature of your deck, enriching your daily experiences and interactions with the outdoor environment. As it seamlessly opens and closes, providing access and security, it will stand as a testament to the power of DIY craftsmanship and the transformative impact of hands-on creativity.
In conclusion, the completion of the sliding gate project marks not only the addition of a practical element to your deck but also a personal achievement that embodies creativity, skill, and dedication. It stands as a reminder of the potential within each of us to shape our surroundings and bring our visions to life through the art of DIY craftsmanship.