
Home>Create & Decorate>DIY & Crafts>DIY Platform Bed: How To Build Your Own Stylish And Functional Bed
DIY & Crafts
DIY Platform Bed: How To Build Your Own Stylish And Functional Bed
Published: February 24, 2024

Content Creator specializing in woodworking and interior transformations. Caegan's guides motivate readers to undertake their own projects, while his custom furniture adds a personal touch.
Learn how to create your own stylish and functional DIY platform bed with our step-by-step guide. Perfect for DIY & Crafts enthusiasts.
(Many of the links in this article redirect to a specific reviewed product. Your purchase of these products through affiliate links helps to generate commission for Twigandthistle.com, at no extra cost. Learn more)
Introduction
Are you looking to add a touch of modern elegance to your bedroom while maximizing space and functionality? Building your own DIY platform bed might just be the perfect project for you. Not only does a platform bed offer a sleek and minimalist design, but it also provides ample storage space underneath, making it a practical and stylish addition to any bedroom.
By embarking on this DIY journey, you have the opportunity to customize your bed to perfectly suit your personal style and preferences. Whether you prefer a rustic, industrial, or contemporary look, the design possibilities are endless. Additionally, constructing your own platform bed allows you to select high-quality materials that align with your sustainability values, ensuring a durable and eco-friendly piece of furniture.
In this comprehensive guide, we will walk you through the step-by-step process of building your very own platform bed. From gathering the necessary materials and tools to assembling the bed frame and headboard, you will gain the knowledge and confidence to tackle this rewarding project. With a bit of creativity, dedication, and the right guidance, you can create a stunning and functional piece of furniture that will elevate the ambiance of your bedroom.
So, roll up your sleeves, gather your tools, and let's dive into the exciting world of DIY platform bed construction. Get ready to unleash your inner craftsman and embark on a fulfilling journey that culminates in the creation of a stylish and practical centerpiece for your bedroom. Let's get started!
Materials and Tools Needed
Before diving into the construction process, it's essential to gather all the necessary materials and tools to ensure a smooth and efficient DIY experience. Here's a comprehensive list of what you'll need:
Materials:
- Wood: Select high-quality lumber for the bed frame and headboard. Opt for sturdy and durable wood such as pine, oak, or maple, ensuring that it is free from warps and cracks.
- Plywood: Choose plywood for the bed base and headboard backing. Ensure that it is of sufficient thickness to provide adequate support.
- Wood Screws: Invest in a variety of wood screws in different lengths to accommodate various assembly requirements.
- Wood Glue: High-quality wood glue will be essential for reinforcing joints and ensuring the overall stability of the bed frame.
- Sandpaper: Acquire sandpaper of varying grits to smoothen the wood surfaces and achieve a polished finish.
- Wood Stain or Paint: Depending on your design preferences, select a suitable wood stain or paint to enhance the aesthetic appeal of the bed.
Tools:
- Measuring Tape: A reliable measuring tape is crucial for accurately determining the dimensions of the bed components.
- Circular Saw or Miter Saw: A versatile cutting tool will be indispensable for precisely cutting the wood to the required lengths and angles.
- Drill and Bits: A power drill with a selection of drill bits is essential for creating pilot holes and driving screws into the wood.
- Screwdriver: Both manual and electric screwdrivers will be necessary for assembling the bed components securely.
- Clamps: Utilize clamps to hold the wood pieces in place during assembly, ensuring precise and stable joints.
- Sanding Block or Orbital Sander: To achieve a smooth and professional finish, a sanding block or orbital sander will be invaluable for smoothing the wood surfaces.
- Paintbrushes or Stain Applicators: Depending on your chosen finish, acquire suitable brushes or applicators for applying wood stain or paint evenly.
By ensuring that you have all the required materials and tools at your disposal, you'll be well-prepared to embark on the exciting journey of constructing your very own DIY platform bed. With these essentials in hand, you can proceed to the next steps with confidence, knowing that you have everything you need to bring your vision to life.
Step 1: Measure and Cut the Wood
The initial step in constructing your DIY platform bed involves precise measurements and accurate wood cutting to lay the foundation for the bed frame and headboard. This crucial phase sets the stage for a sturdy and well-proportioned structure, ensuring that each component fits seamlessly together.
Begin by measuring and marking the wood according to the specific dimensions outlined in your design plan. Utilize a reliable measuring tape to ensure accuracy, and mark the wood with a pencil or a scoring knife to indicate the precise points for cutting. Whether you're working with the bed frame or the headboard, attention to detail during this stage is paramount to the overall success of the project.
Once the wood is marked, it's time to proceed with cutting. Depending on the design complexity and your available tools, you may use a circular saw or miter saw to make the necessary cuts. It's essential to adhere to the marked measurements and exercise caution during the cutting process to achieve clean and precise edges.
For the bed frame, ensure that the platform slats and support beams are cut to the exact lengths required for a snug and secure fit. Additionally, if your design incorporates a headboard, carefully cut the wood to form the desired shape and dimensions, paying close attention to any intricate details or decorative elements.
As you progress through the cutting phase, periodically verify the accuracy of the dimensions to maintain consistency across all components. This meticulous approach will contribute to the overall structural integrity and visual appeal of the finished platform bed.
By meticulously measuring and cutting the wood with precision and care, you are laying the groundwork for a well-crafted and visually appealing DIY platform bed. This foundational step sets the stage for seamless assembly and ensures that the subsequent stages of the construction process proceed smoothly. With the wood accurately cut to size, you are now ready to advance to the next phase of assembling the base, bringing you one step closer to the completion of your custom-built platform bed.
Step 2: Assemble the Base
With the wood components accurately cut to size, the next pivotal phase in constructing your DIY platform bed involves assembling the base. This foundational element forms the support structure for the mattress and sets the stage for the overall stability and functionality of the bed.
Begin by arranging the platform slats and support beams according to the predetermined design layout. Ensure that the slats are evenly spaced to provide consistent support for the mattress while promoting adequate airflow. Depending on your design, the support beams may be positioned horizontally or vertically to reinforce the base and distribute the weight evenly.
Once the components are aligned, it's time to secure them together using wood screws and high-quality wood glue. Pre-drill pilot holes to prevent the wood from splitting and facilitate seamless screw insertion. Apply a generous amount of wood glue at the joints to enhance the overall strength and stability of the base, ensuring a durable and long-lasting foundation for your platform bed.
As you progress with the assembly, periodically verify the alignment and levelness of the base to guarantee a uniform and balanced structure. Utilize clamps to hold the components in place during the assembly process, promoting precise and secure joints.
Depending on your design preferences, you may choose to incorporate additional features such as integrated storage compartments or built-in lighting within the base. These customizations can further enhance the functionality and aesthetic appeal of your DIY platform bed, elevating it from a simple sleeping surface to a multifaceted furniture piece that caters to your specific needs.
By meticulously assembling the base with attention to detail and structural integrity, you are laying the groundwork for a robust and well-crafted platform bed. This essential phase sets the stage for the subsequent steps of building the headboard and completing the assembly, bringing you one step closer to the realization of your custom-designed platform bed.
With the base securely assembled, you have established a solid foundation for your DIY platform bed, setting the stage for the next phase of constructing the headboard. This pivotal step brings you closer to the completion of your personalized and functional piece of furniture, showcasing your craftsmanship and attention to detail.
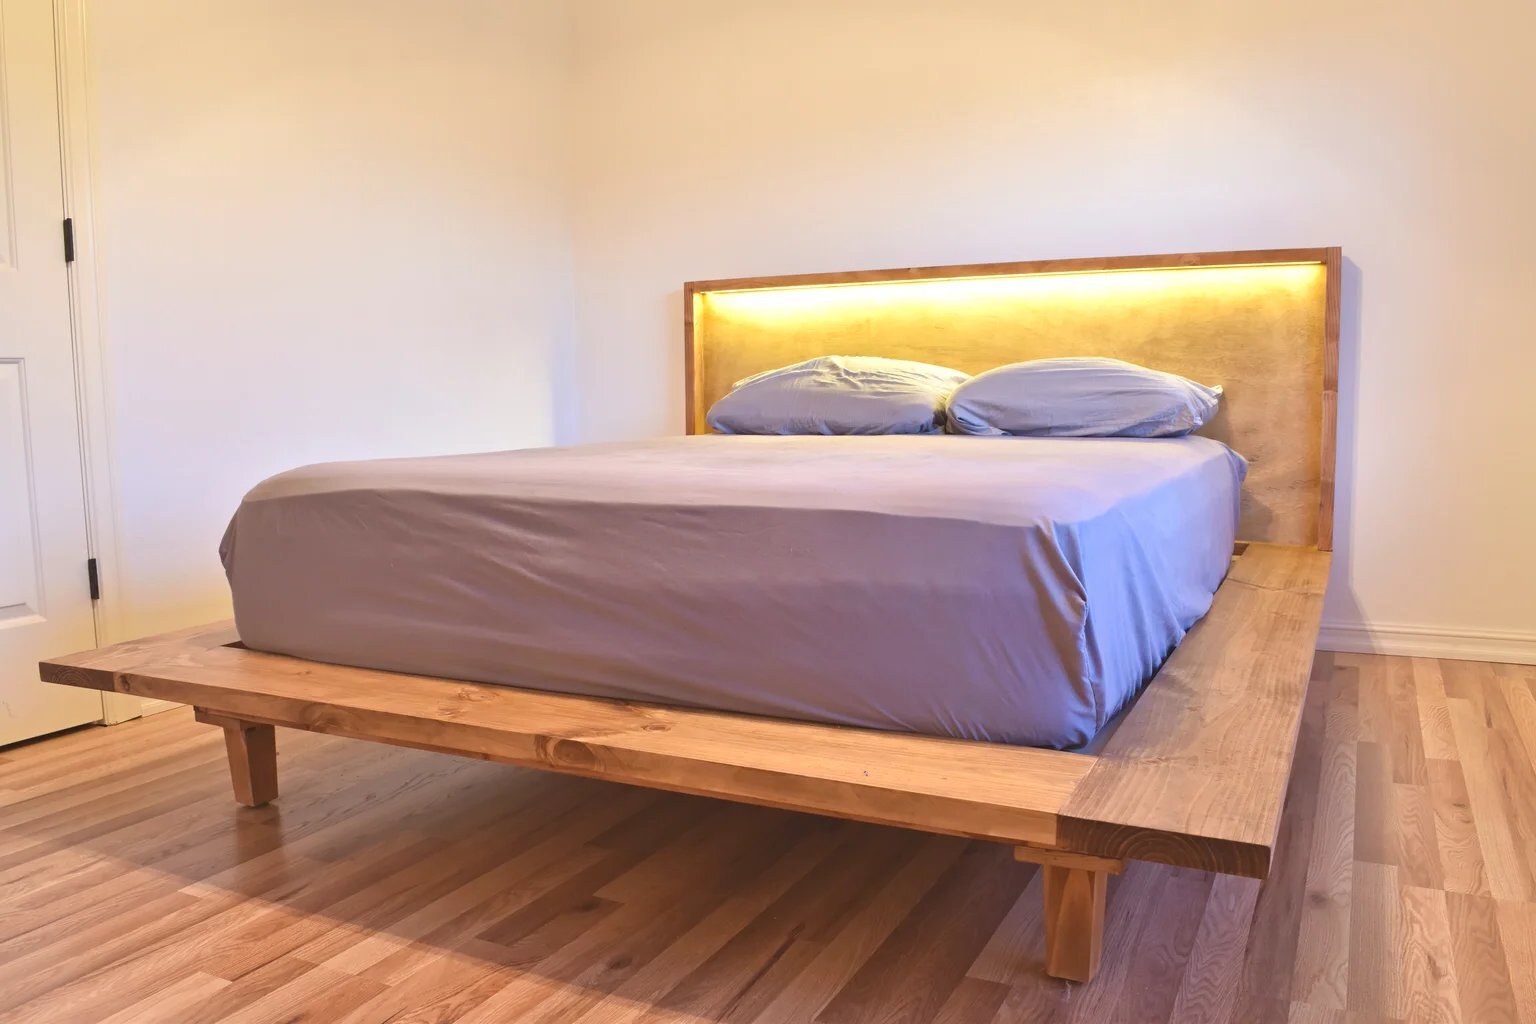
Step 3: Build the Headboard
The headboard serves as a focal point of the platform bed, adding a touch of elegance and personality to the overall design. Building the headboard presents an opportunity to infuse creativity and individuality into the bed, elevating its visual appeal and contributing to a comfortable and inviting bedroom ambiance.
Begin by selecting the appropriate wood for the headboard, ensuring that it complements the overall aesthetic of the bed while aligning with your design preferences. Whether you opt for a solid wood panel, reclaimed lumber, or intricately designed slats, the headboard material sets the tone for the bed's visual impact.
Once the wood is chosen, proceed with cutting it to the desired dimensions, taking into account the height and width that best suits your bed frame and personal style. Whether you prefer a towering headboard that makes a bold statement or a sleek, minimalist design, precision in cutting the wood is essential to achieve the intended look.
Depending on your design vision, you may choose to incorporate additional elements such as decorative trim, carved details, or integrated lighting within the headboard. These embellishments can impart a sense of luxury and sophistication to the bed, transforming it into a captivating centerpiece of the bedroom.
Assemble the headboard components with meticulous attention to detail, ensuring that the joints are secure and the overall structure is stable. Utilize wood glue and screws to reinforce the connections, promoting durability and longevity in the finished piece.
Once the headboard is assembled, consider applying a wood finish that complements the overall aesthetic of the bed. Whether you opt for a rich stain that accentuates the natural grain of the wood or a coat of paint that harmonizes with the bedroom decor, the finishing touch adds depth and character to the headboard, enhancing its visual allure.
By meticulously building the headboard with precision and creativity, you are adding a distinctive and personalized touch to your DIY platform bed. The headboard serves as a testament to your craftsmanship and design sensibilities, elevating the bed from a simple sleeping surface to a captivating and inviting furniture piece that reflects your unique style.
With the headboard skillfully crafted and integrated into the bed, you have reached a significant milestone in the construction process, bringing you closer to the completion of your custom-built platform bed. The next phase involves sanding and finishing the wood, refining the visual appeal and ensuring a polished and professional outcome.
Step 4: Sand and Finish the Wood
After the meticulous construction of the bed frame and headboard, the next crucial step in the DIY platform bed project involves the process of sanding and finishing the wood. This pivotal phase not only enhances the visual appeal of the bed but also ensures a smooth and polished surface, elevating the overall craftsmanship and aesthetic allure of the finished piece.
Begin the sanding process by utilizing sandpaper of varying grits to smoothen the wood surfaces. Start with a coarser grit to remove any rough spots, imperfections, or uneven edges, gradually progressing to finer grits to achieve a silky and refined texture. Pay special attention to the edges and corners, ensuring that they are gently rounded to prevent splinters and promote a comfortable and safe user experience.
As you progress with the sanding, periodically inspect the wood surfaces to ensure uniformity and consistency in the texture. The goal is to achieve a flawlessly smooth finish that accentuates the natural beauty of the wood while preparing it for the application of the chosen wood finish.
Once the sanding process is complete, it's time to apply the selected wood finish to enrich the color and grain of the wood, adding depth and character to the bed. Whether you opt for a lustrous wood stain that highlights the natural hues of the wood or a protective coat of paint that complements the bedroom decor, the finishing touch plays a pivotal role in defining the visual impact of the platform bed.
Carefully apply the wood finish using a brush or applicator, ensuring even coverage and paying attention to any intricate details or grain patterns. Multiple coats may be applied as needed to achieve the desired depth and richness in the finish, allowing each layer to dry thoroughly before proceeding with the next application.
As the wood finish dries, the transformation of the bed's appearance becomes increasingly apparent, with the natural beauty of the wood coming to life in a stunning display of craftsmanship and artistry. The carefully applied finish not only enhances the visual allure of the bed but also provides protection against wear and tear, ensuring the longevity and resilience of the custom-built platform bed.
By meticulously sanding and finishing the wood with precision and care, you are elevating the DIY platform bed to a level of sophistication and refinement that reflects your dedication to craftsmanship and attention to detail. This transformative phase brings you one step closer to the completion of your personalized and visually captivating piece of furniture, showcasing your creativity and skill in the art of woodworking.
Step 5: Assemble the Bed
With the base and headboard expertly crafted and finished, the final and pivotal step in bringing your DIY platform bed to fruition is the assembly process. This transformative phase brings together all the meticulously crafted components, culminating in the realization of a stylish, functional, and personalized piece of furniture that embodies your craftsmanship and design vision.
Begin the assembly by positioning the base in the designated area of your bedroom, ensuring that it is aligned and leveled for a stable and secure foundation. With the support beams and platform slats in place, the base forms the essential framework for the mattress, providing reliable support and promoting a comfortable sleeping experience.
Next, carefully position the headboard against the back of the base, ensuring a snug and seamless fit. Depending on your design, the headboard may be attached to the base using wood screws and secure fastening techniques, ensuring that it is firmly anchored and aligned with the overall structure of the bed.
As the base and headboard are integrated, take a moment to admire the cohesive and harmonious assembly, witnessing the culmination of your dedicated efforts and meticulous craftsmanship. The seamless alignment of the components reflects your attention to detail and commitment to creating a visually captivating and functional piece of furniture.
With the base and headboard securely assembled, it's time to position the mattress atop the platform, reveling in the realization of a custom-built sleeping surface that perfectly complements your bedroom decor. Whether you opt for a traditional mattress or a modern memory foam variant, the platform bed provides a versatile and stylish foundation for a restful and rejuvenating sleep experience.
As you step back and admire the completed assembly, take pride in the journey you've undertaken, from meticulously measuring and cutting the wood to skillfully crafting and finishing each component. The assembled platform bed stands as a testament to your creativity, dedication, and skill in the art of woodworking, showcasing your ability to transform raw materials into a functional and visually captivating piece of furniture.
With the bed expertly assembled and positioned in your bedroom, you have achieved the realization of your DIY platform bed project, elevating the ambiance of your living space with a personalized and stylish centerpiece. The bed not only serves as a functional and comfortable sleeping surface but also stands as a symbol of your craftsmanship and creativity, inviting you to enjoy the fruits of your labor and revel in the satisfaction of a project well-executed.
Conclusion
In conclusion, the journey of constructing your own DIY platform bed has been a fulfilling and rewarding endeavor, culminating in the creation of a stylish, functional, and personalized piece of furniture that adds a touch of elegance to your bedroom. From the initial stages of gathering materials and tools to the meticulous crafting and assembly process, every step has contributed to the realization of a custom-built platform bed that reflects your creativity and craftsmanship.
As you stand back and admire the completed platform bed, you can take pride in the dedication and attention to detail that have shaped this project. The bed serves as a testament to your ability to transform raw materials into a visually captivating and functional piece of furniture, showcasing your skill in the art of woodworking.
Beyond its aesthetic appeal, the DIY platform bed offers practical benefits, including ample storage space underneath the base, promoting organization and maximizing the utility of your bedroom. The integration of a personalized headboard adds a touch of individuality and character to the bed, elevating its visual impact and contributing to a comfortable and inviting ambiance.
The completion of the platform bed marks not only the end of a construction project but also the beginning of a new chapter in your living space. The bed stands as a symbol of your creativity and ingenuity, inviting you to enjoy restful and rejuvenating sleep while reveling in the satisfaction of a project well-executed.
As you embark on future DIY endeavors, the experience gained from constructing the platform bed will serve as a valuable foundation, empowering you to tackle new projects with confidence and creativity. Whether it's crafting additional furniture pieces or undertaking home improvement projects, the skills and knowledge acquired throughout this journey will continue to inspire and guide your future endeavors.
In the end, the DIY platform bed stands as a testament to the joy of creating something with your own hands, infusing your living space with a personalized touch that reflects your unique style and vision. It serves as a reminder of the transformative power of craftsmanship and the fulfillment that comes from bringing a creative vision to life.
With the completion of the DIY platform bed, you have not only crafted a piece of furniture but also woven a story of dedication, creativity, and accomplishment. It stands as a tangible representation of your ability to turn inspiration into reality, leaving a lasting impression on your living space and offering a daily reminder of the joy found in the art of creation.