
Home>Create & Decorate>DIY & Crafts>DIY Closet Shelves: Organize Your Space With These Simple Steps
DIY & Crafts
DIY Closet Shelves: Organize Your Space With These Simple Steps
Published: February 23, 2024

Content Creator specializing in woodworking and interior transformations. Caegan's guides motivate readers to undertake their own projects, while his custom furniture adds a personal touch.
Transform your space with DIY closet shelves! Follow these simple steps to create organized and stylish storage. Perfect for DIY & Crafts enthusiasts.
(Many of the links in this article redirect to a specific reviewed product. Your purchase of these products through affiliate links helps to generate commission for Twigandthistle.com, at no extra cost. Learn more)
Introduction
Are you tired of struggling to find your favorite sweater or pair of shoes in a cluttered closet? Do you dream of a well-organized space where everything has its place? If so, it's time to roll up your sleeves and embark on a DIY closet shelves project. With a few simple steps and a touch of creativity, you can transform your chaotic closet into a functional and visually appealing storage area.
Creating custom closet shelves not only maximizes your storage space but also adds a personal touch to your home. Whether you're a seasoned DIY enthusiast or a novice looking for a rewarding project, this guide will walk you through the process of designing and installing your own closet shelves.
By taking the DIY route, you have the freedom to customize the shelves to perfectly fit your closet's dimensions and your specific storage needs. Say goodbye to generic, ill-fitting shelves and hello to a tailored storage solution that reflects your style and organizational preferences.
As you embark on this DIY journey, envision the end result: a neatly organized closet where every item has its own designated spot. Imagine the satisfaction of effortlessly locating your favorite accessories, neatly folded clothes, and perfectly paired shoes. With a well-executed closet shelves project, you can turn this vision into a reality.
In the following steps, we will guide you through the process of measuring your closet space, gathering the necessary materials and tools, cutting and preparing the shelves, installing shelf brackets, placing the shelves on the brackets, and finally, organizing your closet. By the time you complete this project, you'll not only have a beautifully organized closet but also a sense of accomplishment and pride in your DIY skills.
So, roll up your sleeves, gather your tools, and let's dive into the world of DIY closet shelves. Get ready to transform your cluttered closet into a harmonious space where everything has its place. Let's get started!
Step 1: Measure Your Closet Space
Before diving into the DIY closet shelves project, it's crucial to start with precise measurements of your closet space. This step sets the foundation for a successful and tailored shelving solution that maximizes every inch of available space.
Begin by clearing out your closet, removing all clothing, shoes, and other items to ensure unobstructed access to the walls and corners. With a tape measure in hand, carefully measure the width, height, and depth of the closet. Take note of any irregularities, such as sloped ceilings or protruding baseboards, as these will influence the design and placement of your shelves.
When measuring the width of the closet, take multiple measurements at different heights to account for any variations in the wall's straightness. Similarly, measure the height from the floor to the top of the closet, considering any ceiling slopes or obstructions that may affect the shelf height.
Next, measure the depth of the closet to determine how far the shelves can extend without encroaching on the hanging space or obstructing the closet doors. It's essential to leave sufficient clearance for hangers and easy access to the items stored on the shelves.
As you record these measurements, make a rough sketch of your closet layout, indicating the dimensions and any architectural features that may impact the shelving design. This visual representation will serve as a valuable reference when planning the shelf placement and determining the number of shelves needed.
Remember, precision is key at this stage. Double-check your measurements to ensure accuracy, as any discrepancies can lead to ill-fitting shelves that compromise the functionality and aesthetics of your closet.
By meticulously measuring your closet space, you lay the groundwork for a customized shelving solution that seamlessly integrates with the dimensions and layout of your closet. With these measurements in hand, you're ready to move on to the next step: gathering the materials and tools needed to bring your DIY closet shelves to life.
Step 2: Gather Materials and Tools
Gathering the right materials and tools is a crucial step in the DIY closet shelves project. By ensuring you have everything you need before diving into the construction phase, you can streamline the process and avoid unnecessary delays. Here's a comprehensive list of materials and tools to gather for this project:
Materials:
-
Wooden Boards: Select high-quality wooden boards that align with your aesthetic preferences and budget. Consider the dimensions of your closet space when choosing the boards, ensuring they are sturdy enough to support the weight of your belongings.
-
Shelf Brackets: Invest in durable and visually appealing shelf brackets that complement the style of your closet. These brackets will provide essential support for the shelves, so prioritize strength and stability when making your selection.
-
Screws and Fasteners: Stock up on screws and fasteners suitable for securing the shelf brackets to the wall and attaching the shelves to the brackets. Opt for screws that are long enough to penetrate the wall studs for maximum support.
-
Paint or Stain (Optional): If you desire a customized finish for your shelves, consider purchasing paint or wood stain to add a pop of color or enhance the natural beauty of the wood.
-
Sandpaper and Wood Finish (Optional): To achieve a smooth and polished look for your shelves, acquire sandpaper for sanding the wooden boards and a wood finish to protect the wood and enhance its appearance.
-
Level: A reliable level is essential for ensuring that your shelves are installed perfectly horizontal, preventing any slanted or uneven shelving.
-
Measuring Tape and Pencil: These basic tools are indispensable for marking precise measurements and guiding the cutting and installation processes.
Tools:
-
Circular Saw or Handsaw: Depending on your preference and access to tools, a circular saw or handsaw will be necessary for cutting the wooden boards to the desired dimensions.
-
Drill and Drill Bits: A power drill equipped with the appropriate drill bits is essential for creating pilot holes, securing the shelf brackets, and attaching the shelves to the brackets.
-
Screwdriver: Ensure you have a screwdriver that matches the screws you've selected, allowing for efficient installation of the brackets and shelves.
-
Paintbrushes or Stain Applicators (Optional): If you opt to paint or stain your shelves, have the necessary brushes or applicators on hand to achieve a professional and even finish.
By gathering these materials and tools, you'll be well-prepared to embark on the construction of your DIY closet shelves. With everything in place, you can proceed to the next step: cutting and preparing the shelves for installation.
Step 3: Cut and Prepare Shelves
With the measurements in hand and all the necessary materials and tools gathered, it's time to bring your DIY closet shelves to life by cutting and preparing the shelves. This step is crucial as it sets the stage for the installation of the shelves and ensures that they seamlessly integrate with your closet space.
Begin by marking the dimensions of the shelves on the selected wooden boards using a measuring tape and pencil. Double-check the measurements to guarantee accuracy before making any cuts. If you prefer a uniform look, consider using a straight edge or a carpenter's square to ensure precise and straight lines for your cuts.
Next, using a circular saw or handsaw, carefully cut along the marked lines to create the individual shelves. Take your time to maintain steady and controlled movements, as clean and accurate cuts are essential for achieving a professional and polished result. If you're new to using power tools, practice on scrap wood to familiarize yourself with the saw and its capabilities before working on the actual shelves.
Once the shelves are cut to size, use sandpaper to smooth any rough edges and surfaces, ensuring a splinter-free and refined finish. Pay attention to the corners and edges, as these areas contribute to the overall appearance and safety of the shelves. If desired, apply a wood finish to protect the shelves and enhance their natural beauty. Whether you opt for a clear sealant to maintain the wood's original look or a colored stain to add character, the finishing touch will elevate the visual appeal of your shelves.
As you prepare the shelves, visualize how they will fit into your closet space and complement the overall aesthetic. Consider the placement of each shelf and how they will accommodate your belongings, from folded clothes and shoe boxes to accessories and storage bins. By taking the time to cut and prepare the shelves with precision and care, you're one step closer to achieving a well-organized and visually pleasing closet.
With the shelves cut, smoothed, and finished to your liking, you're ready to move on to the next step: installing the shelf brackets. This pivotal stage will bring your vision of an organized and functional closet one step closer to reality.
Step 4: Install Shelf Brackets
With the shelves cut and prepared, the next critical step in your DIY closet shelves project is to install the shelf brackets. These brackets serve as the sturdy support system for your shelves, ensuring they can bear the weight of your belongings while maintaining stability and durability.
Begin by determining the optimal placement for the shelf brackets within your closet. Take into account the measurements and layout of your closet space, ensuring that the brackets are evenly spaced and aligned to accommodate the shelves. Using a pencil and a level, mark the positions where the brackets will be installed, taking care to maintain consistent height and alignment for a polished and professional look.
Once the bracket placements are marked, it's time to secure them to the walls. Using a power drill and the appropriate drill bits, create pilot holes at the marked positions to facilitate the installation of the brackets. When drilling into the walls, ensure that the pilot holes align with the intended positions and penetrate the wall studs for maximum support.
With the pilot holes in place, position the shelf brackets over the holes and secure them to the walls using screws and a screwdriver. Ensure that the brackets are firmly anchored and level, as this will directly impact the stability and weight-bearing capacity of the shelves. Double-check the alignment and stability of each bracket to guarantee a secure foundation for your shelves.
As you install the shelf brackets, envision how they will seamlessly integrate with the overall design of your closet. Consider the visual impact of the brackets and how they contribute to the functionality and aesthetic appeal of the shelving system. By taking the time to install the brackets with precision and attention to detail, you're laying the groundwork for a well-organized and visually pleasing closet space.
With the shelf brackets securely installed, your DIY closet shelves project is one step closer to completion. The next phase will involve placing the shelves on the brackets, bringing your vision of a personalized and organized closet to fruition. Get ready to witness your efforts transform into a functional and visually appealing storage solution tailored to your unique needs and style.
Step 5: Place Shelves on Brackets
With the shelf brackets securely installed, it's time to bring your DIY closet shelves to life by placing the shelves on the brackets. This pivotal step marks the transition from the construction phase to the realization of a functional and visually appealing storage solution tailored to your unique needs and style.
Carefully lift each prepared shelf and position it onto the installed brackets, ensuring a snug and stable fit. Take a moment to assess the alignment and levelness of each shelf, making any necessary adjustments to guarantee a uniform and polished appearance. As you place the shelves, visualize how they will accommodate your belongings and contribute to the overall organization and aesthetic of your closet.
Once the shelves are in position, test their stability by gently applying pressure and ensuring that they can support the anticipated weight of your items. It's essential to confirm that each shelf is securely seated on the brackets, as this will contribute to the overall safety and functionality of your closet storage.
As the shelves find their place on the brackets, take a step back and admire the transformation taking place in your closet. Visualize the newfound organization and the potential for a clutter-free space where every item has its designated spot. With the shelves in position, you're one step closer to achieving a well-organized and visually pleasing closet that reflects your personal style and organizational preferences.
By placing the shelves on the brackets with care and precision, you're bringing your vision of a customized storage solution to fruition. Each shelf represents a dedicated space for your belongings, from neatly folded clothes and shoe collections to accessories and storage bins. With this step complete, your DIY closet shelves project is nearing its culmination, and the final touch of organizing your closet awaits.
As you move forward to the next phase of organizing your closet, take a moment to appreciate the progress made and the transformation unfolding before your eyes. The shelves, meticulously crafted and thoughtfully installed, stand as a testament to your dedication to creating a harmonious and functional storage space. With the shelves in place, it's time to turn your attention to the final step: organizing your closet to maximize the newfound storage potential and showcase your DIY prowess.
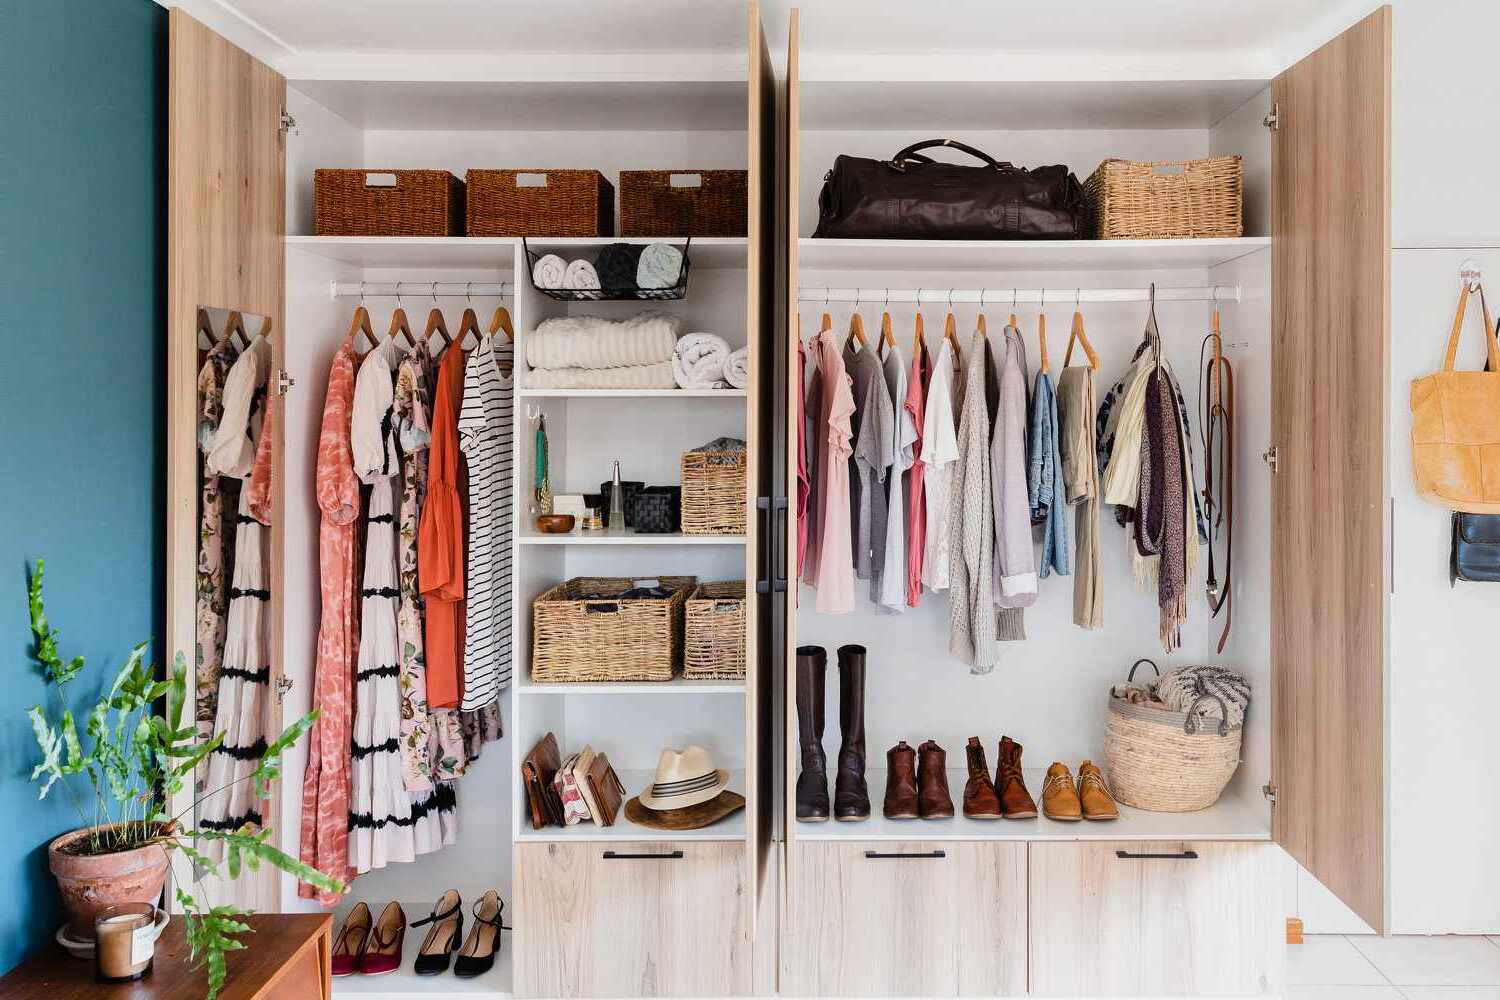
Step 6: Organize Your Closet
With the DIY closet shelves firmly in place, it's time to embark on the transformative process of organizing your closet. This step is where the true magic happens, as you curate and arrange your belongings to maximize the newfound storage potential and showcase your DIY prowess.
Begin by assessing the specific storage needs and usage patterns that define your daily routine. Consider the types of items you'll be storing on the shelves, from folded garments and accessories to shoes and storage bins. By categorizing your belongings, you can strategically allocate space on the shelves, ensuring that each item has its designated spot.
As you organize your closet, prioritize accessibility and functionality. Place frequently used items within easy reach, optimizing the shelf space to accommodate your everyday essentials. Consider utilizing storage bins or baskets to corral smaller items and keep them neatly contained, reducing visual clutter and enhancing the overall organization.
Take advantage of the vertical space afforded by the newly installed shelves. Utilize the upper tiers for seasonal or less frequently accessed items, maximizing the available storage capacity without overcrowding the lower shelves. By strategically arranging your belongings, you can create a visually pleasing and efficiently organized closet that simplifies your daily routine.
Consider incorporating decorative elements to infuse personality into your organized space. Whether it's a potted plant, a framed artwork, or decorative storage boxes, these touches can elevate the aesthetic appeal of your closet while adding a personalized touch to the overall design.
As you curate and arrange your belongings, take a moment to appreciate the transformation that has taken place. The once cluttered and chaotic closet has evolved into a harmonious and functional storage space, tailored to your unique needs and style. Each item finds its place on the meticulously crafted shelves, reflecting your commitment to creating an organized and visually appealing environment.
With the closet now impeccably organized, take a step back and admire the culmination of your DIY efforts. The shelves, thoughtfully designed and skillfully installed, stand as a testament to your dedication to creating a space that seamlessly integrates functionality and aesthetics. Your organized closet not only streamlines your daily routine but also serves as a source of pride, showcasing the results of your DIY endeavor.
As you complete the process of organizing your closet, revel in the satisfaction of a job well done. Your DIY closet shelves project has not only transformed your storage space but has also empowered you to create a personalized and organized environment that reflects your unique style and organizational preferences.
Conclusion
In conclusion, the journey of creating DIY closet shelves has been a rewarding and transformative experience. From meticulously measuring the closet space to curating and arranging belongings on the newly installed shelves, every step has contributed to the evolution of a cluttered closet into a harmonious and functional storage space.
The process began with the fundamental step of measuring the closet space, laying the groundwork for a customized shelving solution that seamlessly integrates with the dimensions and layout of the closet. This meticulous approach ensured that the subsequent steps, from cutting and preparing the shelves to installing the shelf brackets, unfolded with precision and purpose.
Gathering the necessary materials and tools was a crucial phase that set the stage for the construction of the shelves. The careful selection of high-quality wooden boards, durable shelf brackets, and essential tools ensured that the project progressed smoothly, with every element contributing to the functionality and aesthetic appeal of the final result.
The act of cutting and preparing the shelves was a pivotal moment, where raw materials were transformed into functional components of the closet storage system. The attention to detail in achieving precise cuts, smoothing rough edges, and applying a wood finish elevated the shelves from mere wooden boards to polished and visually appealing storage platforms.
Installing the shelf brackets marked a significant turning point, as the foundational support for the shelves was firmly anchored to the walls. The alignment and stability of the brackets laid the groundwork for a secure and durable shelving system, setting the stage for the culmination of the project.
Placing the shelves on the brackets was a moment of realization, where the vision of a well-organized closet began to materialize. The shelves, carefully positioned and secured, represented dedicated spaces for belongings, from folded clothes and shoes to accessories and storage bins.
Finally, the process of organizing the closet brought the project full circle, as the meticulously crafted shelves became the canvas for curating and arranging belongings. The transformation from chaos to order, from clutter to cohesion, exemplified the power of DIY efforts in creating a personalized and organized environment.
As the journey of creating DIY closet shelves concludes, the sense of accomplishment and pride in crafting a functional and visually appealing storage solution is palpable. The once chaotic closet has evolved into a space that not only streamlines daily routines but also reflects the individual style and organizational preferences of its creator.
In the end, the DIY closet shelves project stands as a testament to the transformative power of hands-on craftsmanship and the ability to turn a vision of organization and functionality into a tangible reality.