
Home>Create & Decorate>DIY & Crafts>How To Build A Lean-To Off A Metal Shed
DIY & Crafts
How To Build A Lean-To Off A Metal Shed
Published: February 23, 2024

Senior Editor in Create & Decorate, Kathryn combines traditional craftsmanship with contemporary trends. Her background in textile design and commitment to sustainable crafts inspire both content and community.
Learn how to build a lean-to off a metal shed with our DIY & Crafts guide. Get step-by-step instructions and tips for a successful project.
(Many of the links in this article redirect to a specific reviewed product. Your purchase of these products through affiliate links helps to generate commission for Twigandthistle.com, at no extra cost. Learn more)
Introduction
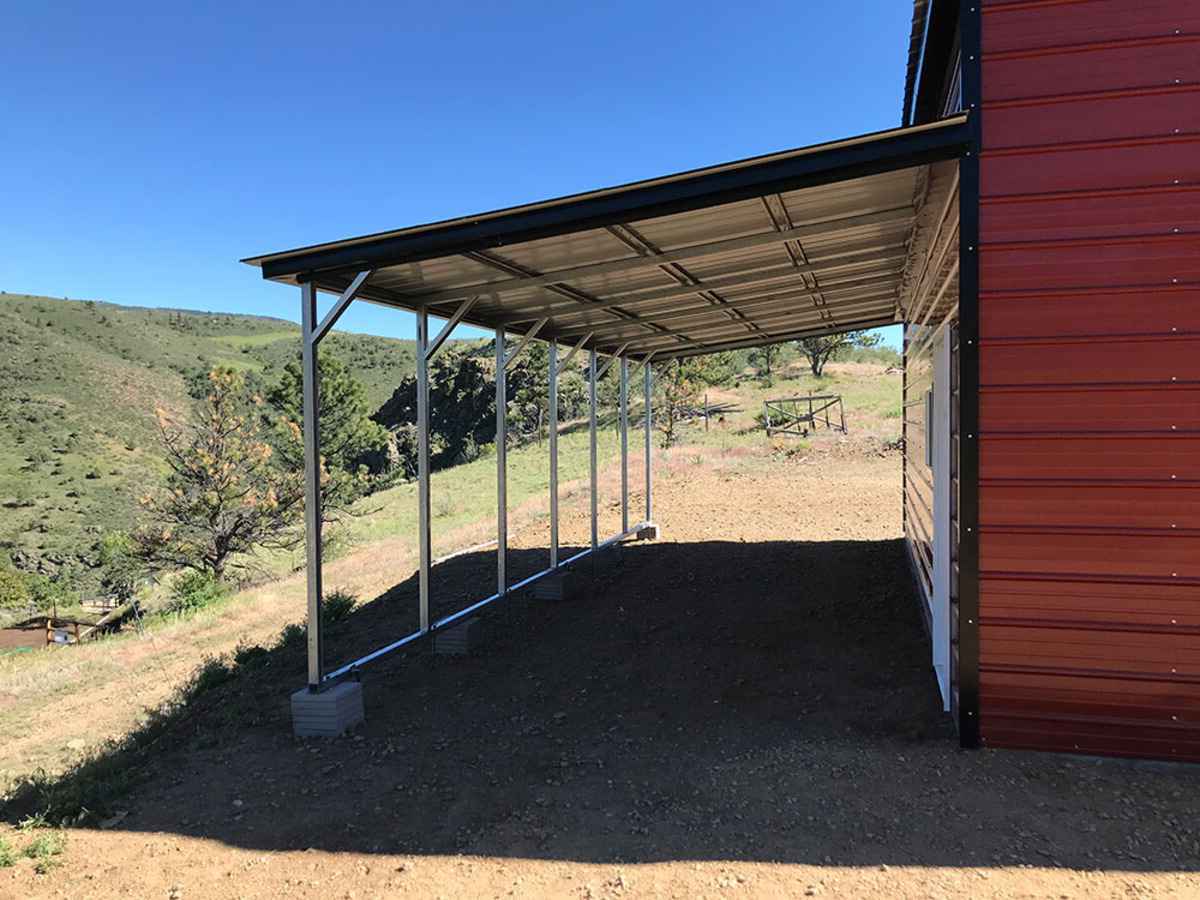
Adding a lean-to to a metal shed is a fantastic way to expand your storage space or create a sheltered area for outdoor activities. Whether you're looking to protect your gardening tools, create a cozy spot for relaxation, or store firewood, a lean-to offers versatility and functionality. By following this step-by-step guide, you can embark on a rewarding DIY project that enhances the usability and aesthetic appeal of your outdoor space.
A lean-to structure is a simple and cost-effective solution for maximizing the utility of your existing metal shed. It provides a convenient extension that complements the original structure while offering additional space for various purposes. With the right materials, tools, and a clear plan, you can successfully build a lean-to off your metal shed, adding value to your property and meeting your specific needs.
This comprehensive guide will walk you through the process of building a lean-to off a metal shed, from gathering the necessary materials and tools to completing the final touches. Each step is carefully outlined to ensure that you have a clear understanding of the tasks involved and the sequence in which they should be carried out. By following these instructions, you can confidently take on this DIY project and achieve a satisfying outcome.
Whether you're a seasoned DIY enthusiast or a beginner looking to expand your skills, building a lean-to off a metal shed is an achievable endeavor that offers a sense of accomplishment and practical benefits. With careful planning and attention to detail, you can create a functional and visually appealing extension that seamlessly integrates with your existing shed. Get ready to embark on this rewarding journey and transform your outdoor space with a well-constructed lean-to.
Step 1: Gather Materials and Tools
Before embarking on the construction of a lean-to off a metal shed, it's essential to gather all the necessary materials and tools to ensure a smooth and efficient building process. Here's a comprehensive list of items you'll need:
Materials:
- Pressure-treated lumber for the support posts and rafters
- Ledger board for attaching the lean-to to the shed
- Concrete mix for securing the support posts
- Galvanized screws and nails for fastening the components
- Roofing material such as corrugated metal panels or shingles
- Flashing to prevent water seepage between the shed and the lean-to
- Gravel or crushed stone for preparing the ground
Tools:
- Measuring tape and level for accurate measurements and alignment
- Circular saw for cutting lumber to the required dimensions
- Power drill with screwdriver bits for fastening screws
- Shovel for digging holes and preparing the ground
- Ladder for reaching elevated areas during installation
- Safety gear including gloves, goggles, and a dust mask for protection
By ensuring that you have all the materials and tools listed above, you can streamline the construction process and minimize interruptions. It's important to procure high-quality materials to ensure the durability and structural integrity of the lean-to. Additionally, having the right tools at your disposal will facilitate precise and efficient assembly, allowing you to progress through the subsequent steps with confidence.
As you gather the materials and tools, consider the specific dimensions and design of your lean-to to determine the quantities required. It's advisable to purchase a bit more than the estimated amounts to account for any unexpected needs or adjustments during the construction phase. With everything in place, you'll be well-prepared to move on to the next step and begin the exciting process of building a functional and visually appealing lean-to off your metal shed.
Step 2: Choose the Location for the Lean-To
Selecting the optimal location for your lean-to is a crucial decision that significantly influences the functionality and visual harmony of the structure. Before proceeding with the installation, carefully assess the available space around your metal shed and consider the following factors to make an informed choice.
Consider Shed Orientation
Evaluate the orientation of your metal shed in relation to the prevailing weather patterns. If you intend to use the lean-to as a sheltered workspace or storage area, positioning it on the side of the shed that receives minimal direct sunlight can help maintain a cooler interior temperature. Additionally, aligning the lean-to with the shed's primary entrance or access point can enhance convenience and streamline the flow of movement between the two structures.
Assess Ground Stability
Examine the ground where you plan to install the lean-to to ensure it provides a stable foundation. Avoid areas prone to water accumulation or excessive moisture, as these conditions can compromise the structural integrity of the lean-to over time. Ideally, choose a location with firm, level ground that facilitates straightforward installation and long-term stability.
Evaluate Visual Cohesion
Consider the visual impact of the lean-to's placement in relation to the existing shed and the surrounding landscape. Aim to create a cohesive and aesthetically pleasing arrangement that seamlessly integrates the lean-to with the overall outdoor environment. By aligning the structure with the shed's architectural lines and maintaining proportional spacing, you can achieve a harmonious and visually appealing composition.
Account for Functional Needs
Assess the intended use of the lean-to and its proximity to other outdoor features or functional areas. Whether you plan to store equipment, create a shaded seating area, or establish a workspace, positioning the lean-to in close proximity to relevant outdoor activities can enhance its practical utility. Additionally, consider factors such as wind direction and natural lighting to optimize the functionality of the lean-to for its intended purpose.
By carefully considering these aspects and evaluating the available space, you can make an informed decision regarding the location of the lean-to. This thoughtful approach ensures that the structure not only serves its functional purpose but also enhances the overall appeal and usability of your outdoor space. Once you've identified the ideal location, you can proceed to the next steps with confidence, knowing that your lean-to will be strategically positioned to fulfill its intended role.
Step 3: Prepare the Ground
Preparing the ground for the installation of the lean-to is a critical precursor to ensuring the stability and longevity of the structure. This step involves several essential tasks that lay the foundation for a secure and durable attachment to the metal shed. By meticulously preparing the ground, you can create an optimal environment for the subsequent construction phases, setting the stage for a successful and resilient lean-to.
Clear the Area
Begin by clearing the designated area where the lean-to will be installed. Remove any debris, vegetation, or obstacles that may impede the construction process or interfere with the structural integrity of the lean-to. Clearing the ground allows for a clean and unobstructed workspace, facilitating efficient installation and minimizing potential hazards.
Level the Ground
Once the area is cleared, focus on leveling the ground to establish a stable base for the lean-to. Utilize a shovel and a leveling tool to smooth out any uneven terrain and create a flat surface. Leveling the ground is essential for ensuring that the support posts and the subsequent components of the lean-to are installed on a solid and balanced foundation.
Add a Layer of Gravel
After leveling the ground, adding a layer of gravel or crushed stone further enhances the stability and drainage capabilities of the installation site. The gravel layer serves as a reliable base that promotes proper water runoff and prevents moisture accumulation around the support posts. This step is particularly crucial for mitigating potential water-related issues that could compromise the structural integrity of the lean-to over time.
Verify Alignment and Stability
Once the gravel layer is in place, verify the alignment and stability of the prepared ground. Use a level to ensure that the surface is uniformly flat and that the support posts will be installed on a secure and balanced foundation. Taking the time to double-check the alignment and stability of the prepared ground is instrumental in laying the groundwork for a structurally sound and long-lasting lean-to.
By meticulously following these preparatory steps, you can establish a solid and reliable foundation for the lean-to, setting the stage for the subsequent installation phases. The careful preparation of the ground is a fundamental aspect of the construction process, contributing to the overall stability, durability, and performance of the lean-to off the metal shed. With the ground meticulously prepared, you are now ready to progress to the next stages of building your functional and visually appealing lean-to.
Step 4: Install the Support Posts
The installation of support posts forms a foundational aspect of building a sturdy and reliable lean-to off a metal shed. These posts provide essential structural support and serve as the framework for the entire extension. By meticulously executing this step, you can ensure the stability and resilience of the lean-to, laying the groundwork for a successful and enduring addition to your outdoor space.
Marking the Post Locations
Begin by marking the precise locations where the support posts will be installed. Use a measuring tape and marking tools to identify the positions for the posts, ensuring that they are evenly spaced and aligned according to the predetermined dimensions of the lean-to. Accurate marking is crucial for establishing a symmetrical and well-balanced foundation for the structure.
Digging the Post Holes
Once the post locations are marked, proceed to dig the holes for the support posts. The depth and diameter of the holes should correspond to the specific requirements dictated by the size and load-bearing capacity of the lean-to. Use a post hole digger or an auger to excavate the holes, ensuring that they are deep enough to accommodate the support posts securely.
Setting the Posts in Concrete
After the holes are prepared, it's time to set the support posts in concrete for maximum stability. Place the posts in the holes and use a level to ensure they are perfectly upright and aligned. Then, pour concrete mix into the holes around the posts, following the manufacturer's instructions for the appropriate mixing ratio and curing time. The concrete provides a solid and immovable foundation for the support posts, anchoring them securely in place.
Verifying Alignment and Plumb
Once the concrete has set, verify the alignment and plumb of the installed support posts. Use a level to confirm that the posts are perfectly vertical and aligned with the predetermined layout of the lean-to. This meticulous attention to detail ensures that the support posts are structurally sound and ready to bear the weight of the subsequent components.
Securing the Posts to the Ledger Board
With the support posts securely anchored in concrete, proceed to attach them to the ledger board that will be affixed to the metal shed. Utilize appropriate fasteners such as lag screws or bolts to secure the posts to the ledger board, ensuring a robust and reliable connection between the lean-to and the existing shed. This step further reinforces the structural integrity of the entire assembly.
By meticulously following these steps to install the support posts, you can establish a solid and dependable foundation for the lean-to off the metal shed. The careful execution of this crucial phase sets the stage for the seamless progression to subsequent construction tasks, bringing you closer to the realization of a functional and visually appealing extension that enhances the usability and aesthetic appeal of your outdoor space.
Step 5: Attach the Ledger Board to the Shed
Attaching the ledger board to the metal shed is a pivotal step in the construction of a lean-to, as it establishes a secure and stable connection between the existing structure and the extension. The ledger board serves as a crucial anchor point for the lean-to, providing structural support and facilitating the seamless integration of the new addition with the shed.
Preparation and Measurement
Before attaching the ledger board, carefully measure and mark the precise location where it will be installed on the exterior wall of the metal shed. Use a level to ensure that the ledger board will be perfectly horizontal, maintaining alignment with the shed's existing structure. Accurate measurements and alignment are essential for establishing a solid foundation for the lean-to and ensuring a seamless transition between the two structures.
Ledger Board Installation
Once the location is determined, position the ledger board against the shed's exterior wall, aligning it with the marked guidelines. Utilize appropriate fasteners, such as lag screws or through-bolts, to securely attach the ledger board to the shed. Ensure that the fasteners penetrate the shed's framing or structural elements to guarantee a robust and reliable connection. It's imperative to follow recommended spacing and fastening guidelines to uphold the structural integrity of the ledger board attachment.
Waterproofing and Flashing
To prevent water seepage and protect the joint between the ledger board and the shed, apply a waterproof sealant or flashing along the top edge of the ledger board. This additional measure helps safeguard against moisture infiltration, preserving the integrity of the attachment and minimizing the risk of water-related damage. Proper waterproofing is essential for ensuring the long-term durability and performance of the lean-to structure.
Verification and Adjustment
After securing the ledger board, verify its alignment and stability to confirm that it is firmly affixed to the shed. Use a level to check for any discrepancies and make necessary adjustments to ensure that the ledger board is uniformly positioned and securely attached. This meticulous verification process is crucial for guaranteeing the structural integrity and reliability of the ledger board installation.
By meticulously executing the attachment of the ledger board to the shed, you establish a fundamental link between the existing metal shed and the forthcoming lean-to extension. This pivotal step lays the groundwork for the subsequent phases of construction, bringing you closer to the realization of a well-integrated and functional lean-to that seamlessly extends the utility and visual appeal of your outdoor space.
Step 6: Install the Rafters
The installation of rafters marks a significant phase in the construction of a lean-to off a metal shed, as it contributes to the structural framework and defines the shape of the roof. This step involves precise measurements, strategic placement, and secure fastening to ensure the stability and integrity of the lean-to structure. By meticulously executing the installation of the rafters, you can progress towards the completion of a functional and visually appealing extension that enhances the usability and aesthetic appeal of your outdoor space.
Preparation and Measurement
Before installing the rafters, meticulous preparation and accurate measurement are essential to ensure that the components align seamlessly with the predetermined design and dimensions of the lean-to. Begin by determining the required length and angle of the rafters based on the specific roof pitch and overall dimensions of the structure. Use a framing square and a level to mark the precise angles and cuts, ensuring that the rafters will fit snugly and contribute to the desired roof shape.
Rafter Installation Process
With the measurements and cuts completed, proceed to position the rafters in place, aligning them with the predetermined layout and spacing. Utilize appropriate fasteners, such as galvanized screws or nails, to securely attach the rafters to the support posts and the ledger board. It's crucial to maintain uniform spacing and alignment throughout the installation process to ensure a structurally sound and visually cohesive framework for the lean-to.
Structural Reinforcement
As the rafters are installed, consider incorporating additional structural reinforcement to enhance the stability and load-bearing capacity of the lean-to. This may involve adding collar ties or braces between the rafters to prevent lateral movement and strengthen the overall framework. By reinforcing the structural elements, you can fortify the integrity of the lean-to, ensuring its resilience against external forces and environmental conditions.
Verification and Adjustment
After installing the rafters, carefully verify their alignment, level, and overall structural integrity. Use a level to confirm that the rafters are uniformly positioned and that the roof plane is consistent and well-supported. Make any necessary adjustments to address discrepancies and ensure that the rafters form a robust and stable framework that will support the subsequent roofing materials.
By meticulously executing the installation of the rafters, you establish a fundamental framework for the roof structure of the lean-to, bringing you closer to the realization of a well-constructed and visually appealing extension. This pivotal step sets the stage for the seamless progression to the addition of roofing materials, further enhancing the functionality and aesthetic charm of your outdoor space.
Step 7: Add Roofing Material
The addition of roofing material is a crucial phase in the construction of a lean-to off a metal shed, as it not only provides protection from the elements but also contributes to the overall aesthetic appeal of the structure. Selecting the appropriate roofing material and executing its installation with precision are essential for ensuring the durability, functionality, and visual harmony of the lean-to.
Choosing the Right Roofing Material
When considering roofing options for the lean-to, it's important to evaluate factors such as durability, weather resistance, and aesthetic compatibility with the existing metal shed. Common roofing materials suitable for lean-to structures include corrugated metal panels, asphalt shingles, polycarbonate sheets, and cedar shakes. Each material offers distinct advantages in terms of longevity, weatherproofing, and visual appeal, allowing you to tailor the choice to your specific preferences and practical requirements.
Installation Process
Before commencing the installation of the selected roofing material, it's essential to prepare the framework of the lean-to to ensure a smooth and secure attachment. Begin by positioning the roofing material over the rafters, aligning it with the edges and ensuring proper overhang to facilitate water runoff. Utilize appropriate fasteners, such as roofing nails or screws, to securely affix the material to the rafters, maintaining consistent spacing and alignment throughout the installation process.
Weatherproofing and Sealing
To enhance the weather resistance and longevity of the lean-to, it's advisable to incorporate weatherproofing measures during the roofing material installation. This may involve applying a sealant or flashing along the seams and edges of the roofing material to prevent water infiltration and reinforce the protective barrier against moisture. Proper sealing and weatherproofing measures are instrumental in safeguarding the interior of the lean-to and preserving the structural integrity of the roofing assembly.
Aesthetic Considerations
In addition to functionality and weather resistance, the choice of roofing material contributes to the visual appeal and architectural coherence of the lean-to. Select a roofing material that complements the design and color palette of the existing metal shed, creating a harmonious and unified aesthetic. Whether opting for a sleek and modern metal finish or a classic and rustic shingle design, the roofing material should enhance the overall visual impact of the lean-to, elevating its presence within the outdoor space.
Final Verification
Upon completing the installation of the roofing material, carefully inspect the entire assembly to verify its structural integrity, weatherproofing, and visual appeal. Ensure that the roofing material is securely fastened, free from defects, and aligned with the predetermined design specifications. This meticulous verification process is essential for confirming the successful integration of the roofing material with the lean-to framework, marking a significant milestone in the construction process.
By adding the appropriate roofing material with precision and attention to detail, you fortify the functionality and visual appeal of the lean-to, bringing you closer to the realization of a well-constructed and aesthetically pleasing extension off the metal shed. This pivotal step sets the stage for the final phase of finishing and securing the lean-to, culminating in the completion of a versatile and visually captivating addition to your outdoor space.
Step 8: Finish and Secure the Lean-To
With the roofing material in place, the final phase of finishing and securing the lean-to encompasses critical tasks that culminate in the completion of a robust, functional, and visually appealing extension off the metal shed. This pivotal step involves meticulous attention to detail and strategic implementation of finishing elements to ensure the structural integrity, weather resistance, and overall cohesiveness of the lean-to.
Soffit and Fascia Installation
Commencing the finishing phase involves the installation of soffit and fascia to enclose the eaves and enhance the aesthetic appeal of the lean-to. Soffit panels are affixed to the underside of the rafters, providing a clean and polished appearance while effectively concealing the rafters and insulation. Simultaneously, the fascia, installed along the exposed edges of the rafters, serves both functional and decorative purposes, contributing to the overall visual coherence and weather protection of the lean-to.
Trim and Detailing
Incorporating trim and detailing elements further elevates the aesthetic charm and architectural refinement of the lean-to. This involves adding trim pieces around windows, doors, and corners, accentuating the structure's lines and creating a polished, cohesive appearance. The meticulous application of trim and detailing elements enhances the visual impact of the lean-to, infusing it with a sense of craftsmanship and attention to design intricacies.
Sealing and Weatherproofing
Ensuring the comprehensive weatherproofing of the lean-to is paramount to its long-term durability and performance. Apply sealant and weatherproofing materials to all seams, joints, and exposed surfaces to create a robust barrier against moisture infiltration and environmental elements. This meticulous sealing process safeguards the interior of the lean-to, preserving its structural integrity and protecting stored items or activity areas from adverse weather conditions.
Secure Fastening and Structural Verification
Concluding the finishing phase involves a comprehensive verification of the lean-to's structural integrity and secure fastening of all components. Carefully inspect the entire assembly, including the roofing material, soffit, fascia, trim, and weatherproofing elements, to confirm their secure attachment and alignment. Utilize appropriate fasteners and reinforcement where necessary to fortify the structural stability of the lean-to, ensuring its resilience against external forces and environmental factors.
Final Aesthetic Assessment
Upon completing the finishing and securing tasks, conduct a final aesthetic assessment to ensure that the lean-to exudes visual harmony, architectural coherence, and meticulous attention to detail. Verify that all finishing elements blend seamlessly with the existing metal shed, creating a unified and visually captivating outdoor space. This comprehensive assessment marks the culmination of the finishing and securing phase, signifying the successful realization of a well-constructed and visually appealing lean-to off the metal shed.
By meticulously executing the finishing and securing phase, you bring the construction of the lean-to to its culmination, achieving a versatile, durable, and aesthetically captivating addition to your outdoor space. This final step solidifies the structural integrity, weather resistance, and visual appeal of the lean-to, marking the successful completion of a rewarding DIY project that enhances the usability and aesthetic charm of your property.