
Home>Create & Decorate>DIY & Crafts>DIY: Building A Lean To Shed
DIY & Crafts
DIY: Building A Lean To Shed
Published: February 29, 2024

Senior Editor in Create & Decorate, Kathryn combines traditional craftsmanship with contemporary trends. Her background in textile design and commitment to sustainable crafts inspire both content and community.
Learn how to build a lean-to shed with our step-by-step DIY guide. Perfect for your crafts and DIY projects. Start building today!
(Many of the links in this article redirect to a specific reviewed product. Your purchase of these products through affiliate links helps to generate commission for Twigandthistle.com, at no extra cost. Learn more)
Introduction
Welcome to the world of DIY shed building! Whether you're a seasoned DIY enthusiast or just starting out, constructing a lean-to shed can be a rewarding and practical project. A lean-to shed is a versatile and space-efficient outdoor storage solution that can be customized to fit your specific needs. From storing gardening tools and equipment to providing shelter for firewood or outdoor furniture, a well-built lean-to shed can add both functionality and aesthetic appeal to your outdoor space.
In this comprehensive guide, we will walk you through the step-by-step process of building your own lean-to shed. From gathering the necessary materials and tools to putting the finishing touches on your completed project, we've got you covered. By following these instructions, you'll be able to create a durable and attractive lean-to shed that complements your property and provides valuable storage space for years to come.
So, roll up your sleeves, grab your tools, and get ready to embark on a DIY adventure that will not only enhance your outdoor living space but also leave you with a sense of accomplishment and pride. Whether you're a weekend warrior looking for a new project or a homeowner in need of extra storage, building a lean-to shed is a practical and fulfilling endeavor that anyone can tackle with the right guidance and a can-do attitude.
Now, let's dive into the exciting world of DIY shed construction and learn how to build a lean-to shed that meets your specific storage needs and enhances the functionality of your outdoor space. With a bit of creativity, hard work, and attention to detail, you'll soon have a stylish and functional lean-to shed that you can proudly call your own.
Step 1: Gather Materials and Tools
Before diving into the construction process, it's essential to gather all the necessary materials and tools to ensure a smooth and efficient building experience. Here's a comprehensive list of items you'll need to get started:
Materials:
- Lumber: Purchase high-quality pressure-treated lumber for the shed's frame and floor joists. Opt for weather-resistant wood to ensure durability.
- Roofing Materials: Select durable roofing materials such as corrugated metal, asphalt shingles, or polycarbonate panels to protect the shed from the elements.
- Fasteners: Stock up on galvanized screws, nails, and other fasteners to secure the shed's components and ensure structural integrity.
- Concrete Blocks or Gravel: Depending on the shed's foundation type, acquire concrete blocks or gravel for stable ground support.
- Siding: Choose from options like T1-11 plywood, vinyl, or metal siding to enclose the shed's exterior and provide protection from the elements.
- Doors and Hardware: Purchase a sturdy pre-hung door, along with hinges, handles, and a latch to secure the shed's entry point.
- Windows (Optional): If desired, select suitable windows to allow natural light into the shed's interior.
Tools:
- Circular Saw: A versatile tool for cutting lumber to the required dimensions.
- Power Drill: Essential for driving screws and drilling pilot holes.
- Level: Ensure precise and even construction by using a reliable level throughout the building process.
- Tape Measure: Accurate measurements are crucial for a well-constructed shed, making a tape measure indispensable.
- Hammer: For driving nails and securing components.
- Shovel: If preparing a gravel foundation, a sturdy shovel will be necessary for excavation and leveling.
- Safety Gear: Prioritize safety with protective eyewear, gloves, and a dust mask to safeguard against potential hazards.
By gathering these materials and tools, you'll set the stage for a successful lean-to shed construction project. With everything in hand, you'll be ready to move on to the next step: choosing the perfect location for your new outdoor storage space.
Step 2: Choose a Location
Selecting the ideal location for your lean-to shed is a crucial decision that can significantly impact its functionality and visual appeal. Before breaking ground, carefully assess your property to determine the most suitable spot for your new outdoor storage space. Here are essential factors to consider when choosing the location for your lean-to shed:
Accessibility:
Ensure that the chosen location provides convenient access to the shed. Consider proximity to pathways, driveways, or areas where you frequently use outdoor equipment or tools. Easy accessibility will enhance the shed's practicality and make it more likely to be utilized regularly.
Sunlight and Shade:
Evaluate the sun's path throughout the day to determine the shed's sun exposure. While some items, such as firewood, may benefit from ample sunlight for drying, others, like certain chemicals or paints, may require shaded storage to prevent deterioration. Additionally, consider the shed's orientation to maximize natural light inside if you plan to use it as a workspace or hobby area.
Drainage:
Assess the ground's natural drainage patterns to avoid potential water accumulation around the shed. Select a location with proper drainage to prevent water damage and ensure the shed's interior remains dry and free from moisture-related issues.
Property Boundaries and Regulations:
Familiarize yourself with local building codes, zoning regulations, and property boundaries before finalizing the shed's location. Compliance with these regulations is essential to avoid potential legal issues and ensure the shed's placement adheres to all relevant guidelines.
Aesthetic Considerations:
Take into account the shed's visual impact on your property. Consider how the shed will complement the existing landscape and structures. Choosing a location that harmonizes with the overall aesthetic of your property can enhance its appeal and contribute to a cohesive outdoor environment.
Future Landscaping Plans:
If you have future landscaping or outdoor improvement projects in mind, consider how the shed's location may impact these plans. Selecting a location that allows for future expansion or landscaping modifications can provide flexibility for your property's long-term development.
By carefully considering these factors, you can confidently choose a location that optimizes the functionality, durability, and visual appeal of your lean-to shed. Once you've identified the perfect spot, you'll be ready to move on to the next step: preparing the ground for shed construction.
Step 3: Prepare the Ground
Preparing the ground for your lean-to shed is a critical step that sets the foundation for a stable and long-lasting structure. Proper ground preparation not only ensures the shed's structural integrity but also contributes to its overall functionality and durability. Here's a detailed guide on how to prepare the ground for your lean-to shed:
Clear the Area
Begin by clearing the selected area of any debris, vegetation, or obstacles that may impede the shed's construction. Use a rake, shovel, or brush cutter to remove grass, weeds, rocks, and any other obstructions from the site. Clearing the area will provide a clean and level surface for the subsequent steps of ground preparation.
Mark the Shed's Footprint
Using stakes and string, mark the perimeter of the shed's footprint on the cleared ground. This visual outline will serve as a guide for excavating and leveling the area to accommodate the shed's foundation.
Excavate and Level the Ground
Depending on the shed's foundation type, such as concrete blocks or gravel, excavate the marked area to the required depth. Use a shovel and a level to ensure the ground is evenly graded and free from any slopes or uneven terrain. A well-leveled surface is essential for the stability and proper installation of the shed's foundation.
Install Foundation Support
If using concrete blocks, carefully place and level the blocks within the excavated area to create a stable foundation for the shed. Alternatively, if opting for a gravel foundation, spread and compact the gravel evenly to establish a solid and well-drained base for the shed.
Consider Drainage
Assess the ground's natural drainage patterns and make any necessary adjustments to ensure proper water runoff away from the shed's location. This may involve creating a slight slope away from the shed or incorporating additional drainage solutions to prevent water accumulation around the structure.
Verify Alignment and Stability
Once the foundation support is in place, verify that it is aligned with the shed's footprint and that it provides a stable base for the shed's frame. Use a level to confirm that the foundation support is even and secure, as this will directly impact the shed's structural integrity.
By meticulously preparing the ground for your lean-to shed, you'll establish a solid and level foundation that forms the basis for a successful construction process. With the ground ready, you'll be well-prepared to proceed to the next exciting phase: building the shed's frame.
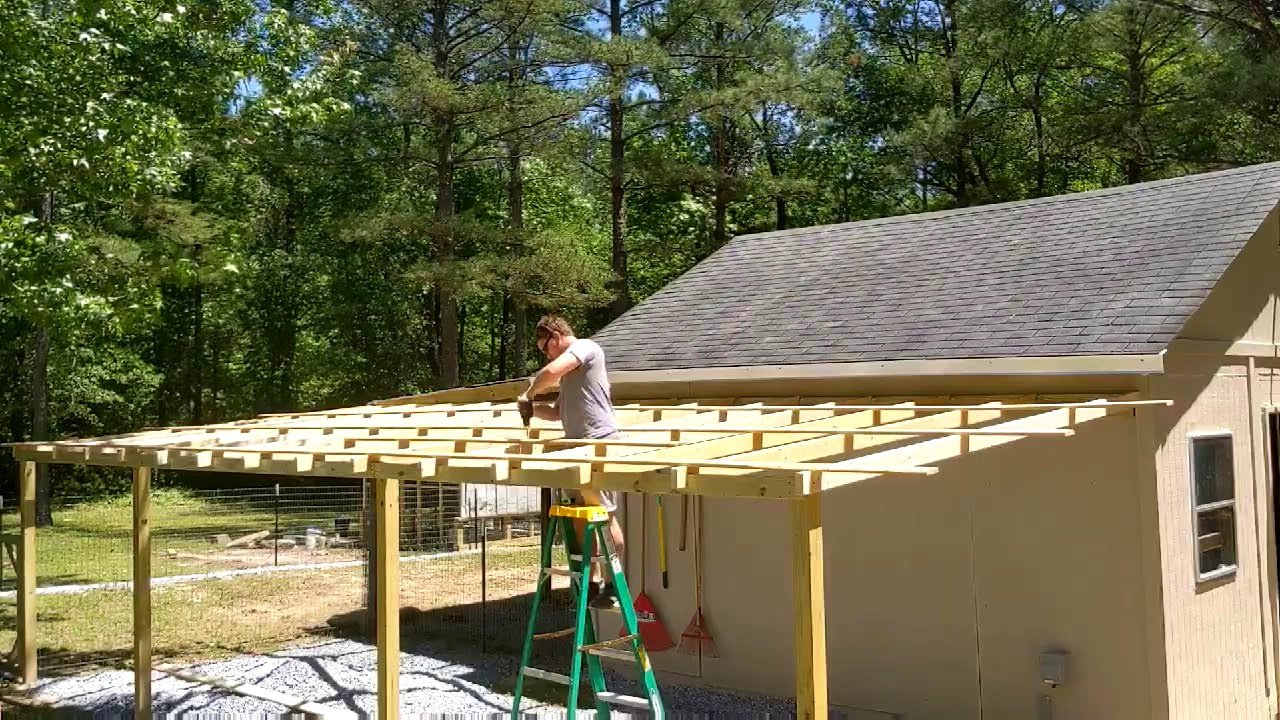
Step 4: Build the Frame
With the ground prepared and the shed's location determined, it's time to embark on the exciting phase of building the shed's frame. The frame serves as the structural backbone of the lean-to shed, providing support for the walls, roof, and overall stability of the structure. Here's a detailed guide on how to construct the frame for your lean-to shed:
1. Cut and Assemble the Lumber
Begin by measuring and cutting the pressure-treated lumber to the required dimensions for the shed's frame components. Use a circular saw to make precise cuts, ensuring that the pieces fit together seamlessly during assembly. Organize the cut lumber according to its designated use, such as wall studs, rafters, and joists, to streamline the assembly process.
2. Construct the Wall Frames
Assemble the wall frames on the prepared ground, following the shed's design specifications. Use galvanized screws and a power drill to securely fasten the wall studs, top and bottom plates, and any additional framing members. Ensure that the wall frames are square and level, as this will facilitate the subsequent steps of the construction process.
3. Install the Roof Rafters
Once the wall frames are in place, it's time to install the roof rafters to create the shed's sloped roof structure. Position the rafters at the designated intervals, ensuring they are aligned and securely attached to the wall frames. Use a level to confirm the proper pitch and alignment of the rafters, as this will contribute to the shed's overall structural integrity and weather resistance.
4. Add Support Beams and Bracing
Incorporate support beams and bracing as necessary to reinforce the frame's stability and load-bearing capacity. These additional structural elements contribute to the shed's resilience against external forces, such as wind and snow loads, and help maintain the frame's integrity over time.
5. Verify Alignment and Structural Integrity
Throughout the frame construction process, regularly verify the alignment, squareness, and overall structural integrity of the assembled components. Use a level, measuring tape, and visual inspection to ensure that the frame meets the required specifications and is ready for the next phase of shed construction.
By meticulously constructing the frame according to the shed's design plans and structural requirements, you'll establish a solid and reliable foundation for the lean-to shed. With the frame in place, you'll be well-prepared to move on to the next exciting phase: installing the shed's roof.
Step 5: Install the Roof
With the frame of the lean-to shed securely in place, the next crucial step is to install the roof, providing essential protection from the elements and completing the structure. The roof not only enhances the shed's functionality by safeguarding its contents but also contributes to its overall aesthetic appeal. Here's a detailed guide on how to effectively install the roof for your lean-to shed:
1. Select Roofing Materials
Begin by selecting the appropriate roofing materials based on your preferences, budget, and climate considerations. Common options include corrugated metal panels, asphalt shingles, or polycarbonate panels. Ensure that the chosen materials are durable, weather-resistant, and compatible with the shed's design and structural requirements.
2. Prepare the Roofing Surface
Before installing the roofing materials, ensure that the shed's roof surface is clean, dry, and free from any debris or protrusions. Use a broom or blower to remove dirt, dust, and loose particles, creating a smooth and even surface for the roofing installation.
3. Install Roof Underlayment
If using asphalt shingles or similar roofing materials, consider installing a waterproof underlayment to provide an additional layer of protection against moisture infiltration. Secure the underlayment to the roof surface, ensuring complete coverage and a watertight seal to safeguard the shed's interior from potential water damage.
4. Lay and Secure Roofing Materials
Carefully lay and secure the selected roofing materials according to the manufacturer's guidelines and best practices. Whether using metal panels, shingles, or other options, ensure that each piece is properly aligned, securely fastened, and overlapped as required to create a weatherproof barrier. Pay attention to the recommended fastening methods and spacing to ensure the roof's structural integrity and resistance to wind and other environmental factors.
5. Incorporate Roof Ventilation (Optional)
Consider incorporating roof ventilation elements, such as ridge vents or roof turbines, to promote air circulation and prevent excessive heat buildup within the shed. Proper ventilation can help regulate temperature and humidity levels, contributing to a more comfortable and functional interior environment.
6. Verify Roof Alignment and Integrity
Throughout the roofing installation process, regularly verify the alignment, pitch, and overall integrity of the installed materials. Use a level, measuring tape, and visual inspection to ensure that the roof meets the required specifications and provides reliable protection for the shed's interior and contents.
By meticulously installing the roof with attention to detail and adherence to best practices, you'll complete the essential structure of the lean-to shed, creating a durable and weather-resistant enclosure for your outdoor storage needs. With the roof securely in place, you'll be ready to proceed to the final phase of shed construction: adding siding and finishing touches.
Step 6: Add Siding and Finishing Touches
As the lean-to shed nears completion, the addition of siding and finishing touches plays a pivotal role in enhancing both its aesthetic appeal and structural resilience. The siding not only contributes to the shed's visual integration with the surrounding environment but also provides essential protection against the elements. Here's a detailed guide on how to effectively add siding and finishing touches to your lean-to shed:
1. Select Suitable Siding Materials
Begin by selecting the appropriate siding materials based on your preferences, budget, and desired aesthetic. Common options include T1-11 plywood, vinyl siding, or metal panels. Consider the durability, weather resistance, and maintenance requirements of each material to ensure it aligns with the shed's design and long-term performance expectations.
2. Prepare the Exterior Surface
Before installing the siding, ensure that the shed's exterior surface is clean, dry, and free from any debris or irregularities. Use a power washer or scrub brush to remove dirt, dust, and any residual construction materials, creating a smooth and uniform surface for the siding installation.
3. Install the Siding
Carefully install the selected siding materials according to the manufacturer's guidelines and recommended installation practices. Whether using panels, planks, or other options, ensure that each piece is securely fastened, properly aligned, and adequately overlapped to create a seamless and weather-resistant exterior enclosure. Pay attention to the recommended fastening methods and spacing to ensure the siding's structural integrity and resistance to environmental factors.
4. Incorporate Trim and Detailing
Enhance the shed's visual appeal and weatherproofing by incorporating trim elements, such as corner boards, fascia, and soffit. These finishing touches not only provide a polished look but also contribute to the shed's structural integrity and longevity. Pay attention to the precise installation of trim pieces to ensure a cohesive and professional finish.
5. Add Functional and Aesthetic Features
Consider adding functional and aesthetic features to further personalize and optimize the shed's usability. This may include installing windows for natural light, adding decorative shutters, or incorporating flower boxes or trellises to enhance the shed's visual appeal. Additionally, consider the installation of gutters and downspouts to manage rainwater runoff and protect the shed's foundation and surroundings.
6. Verify Exterior Alignment and Detailing
Throughout the siding and finishing touches installation process, regularly verify the alignment, detailing, and overall integrity of the exterior elements. Use a level, measuring tape, and visual inspection to ensure that the siding and finishing touches meet the required specifications and contribute to the shed's overall functionality and visual harmony with its surroundings.
By meticulously adding siding and finishing touches with attention to detail and adherence to best practices, you'll complete the transformation of the lean-to shed into a functional, visually appealing, and resilient outdoor storage space. With the siding and finishing touches in place, your lean-to shed will stand as a testament to your craftsmanship and attention to detail, ready to serve its intended purpose for years to come.
Conclusion
Congratulations on successfully completing the construction of your lean-to shed! By following the step-by-step guide outlined in this comprehensive DIY resource, you have not only acquired valuable skills in shed construction but have also created a practical and visually appealing outdoor storage solution tailored to your specific needs.
As you stand back and admire the finished lean-to shed, take pride in the dedication and craftsmanship you've invested in this project. Your commitment to meticulous ground preparation, precise frame construction, and careful installation of the roof, siding, and finishing touches has culminated in a structure that seamlessly integrates with your outdoor space while providing essential storage and protection for your belongings.
Beyond the tangible results, the process of building a lean-to shed has likely enriched your DIY skills and deepened your appreciation for hands-on craftsmanship. The satisfaction of transforming raw materials into a functional and aesthetically pleasing structure is a testament to your resourcefulness and determination.
As you begin to utilize the shed for storing tools, equipment, or other items, you'll experience the practical benefits of your hard work. The convenience of having a dedicated storage space that complements your property's aesthetics and meets your specific storage needs is a testament to the value of DIY construction projects.
Furthermore, the knowledge and experience gained from this project can serve as a foundation for future DIY endeavors, empowering you to tackle new challenges and expand your repertoire of skills. Whether it's building additional outdoor structures, undertaking home improvement projects, or exploring other creative pursuits, the confidence and expertise gained from building a lean-to shed will undoubtedly carry over into future endeavors.
As you reflect on the journey from gathering materials and tools to adding the final finishing touches, remember that the process itself is as enriching as the end result. The sense of accomplishment and the memories created during the construction process are invaluable, shaping not only the shed itself but also your personal growth as a capable and resourceful DIY enthusiast.
In conclusion, the completion of your lean-to shed marks the culmination of a rewarding and transformative DIY experience. As you enjoy the practical benefits and aesthetic appeal of your new outdoor storage space, take pride in the skills acquired, the challenges overcome, and the lasting impact of this project on your DIY journey. With a lean-to shed that reflects your dedication and creativity, you've not only expanded your living space but have also enriched your life with the fulfillment of a successful DIY construction project.