
Home>Home & Furniture>Roof>How To Build A Porch Roof
Roof
How To Build A Porch Roof
Published: February 20, 2024
Editor-in-Chief with a decade in home renovation and a passion for vintage furniture. Diane is known for her weekend treasure hunts at flea markets, enriching our content with unique style insights.
Learn how to build a sturdy porch roof with our step-by-step guide. Get expert tips and advice for a durable and attractive roof.
(Many of the links in this article redirect to a specific reviewed product. Your purchase of these products through affiliate links helps to generate commission for Twigandthistle.com, at no extra cost. Learn more)
Introduction
Building a porch roof is a rewarding project that not only enhances the aesthetic appeal of your home but also provides a functional outdoor space for relaxation and entertainment. Whether you're a seasoned DIY enthusiast or a novice looking to embark on your first major construction endeavor, constructing a porch roof can be a fulfilling and achievable task with the right guidance and preparation.
A well-designed porch roof not only adds value to your property but also extends your living space, allowing you to enjoy the outdoors in comfort and style. From providing shade on sunny days to sheltering you from the elements during inclement weather, a thoughtfully constructed porch roof can significantly enhance the usability and charm of your home's exterior.
In this comprehensive guide, we will walk you through the step-by-step process of building a porch roof, covering everything from gathering the necessary materials and tools to the final touches of adding roofing materials and trim. By following these instructions and tips, you'll be equipped with the knowledge and confidence to tackle this project with precision and finesse.
So, roll up your sleeves, gather your tools, and let's embark on this exciting journey of transforming your porch into a stylish and functional outdoor oasis. Whether you envision a classic gable roof or a modern shed roof design, this guide will equip you with the essential know-how to bring your vision to life. Let's dive into the details and get ready to elevate your home's curb appeal and outdoor living experience with a beautifully crafted porch roof.
Step 1: Gather necessary materials and tools
Before embarking on the construction of a porch roof, it's crucial to gather all the essential materials and tools to ensure a smooth and efficient building process. Here's a comprehensive list of items you'll need to kick-start your porch roof project:
Materials:
- Lumber: Select high-quality pressure-treated or weather-resistant lumber for the structural components, including posts, beams, rafters, and joists.
- Roofing Materials: Depending on your design preference, choose from asphalt shingles, metal roofing panels, or other suitable roofing materials to cover the porch roof.
- Fasteners: Stock up on galvanized nails, screws, and other appropriate fasteners to secure the structural elements and roofing materials.
- Ledger Board: A sturdy ledger board will be required to attach the porch roof to the existing house structure.
- Flashing and Sealant: Invest in flashing materials and high-quality sealant to ensure proper waterproofing and weatherproofing of the roof.
- Support Brackets and Hardware: If your design includes decorative brackets or hardware, make sure to acquire these components in the desired style and finish.
Tools:
- Measuring Tools: A reliable tape measure, level, and angle square are indispensable for accurate measurements and layout.
- Cutting Tools: Circular saw, miter saw, or handsaw for cutting lumber and roofing materials to the required dimensions.
- Drilling and Fastening Tools: Cordless drill/driver, impact driver, and appropriate drill bits for fastening and assembly.
- Ladder or Scaffolding: Depending on the height of your porch roof, a sturdy ladder or scaffolding will be essential for safe access and construction.
- Safety Gear: Prioritize safety with protective gear, including work gloves, safety glasses, and a hard hat.
- Roofing Tools: If you're installing asphalt shingles or metal roofing, gather tools such as a roofing nail gun, utility knife, and roofing hammer for efficient installation.
By ensuring that you have all the necessary materials and tools at your disposal, you'll set the stage for a well-organized and productive porch roof construction process. With these essentials in hand, you're ready to move on to the next crucial steps of measuring and marking the porch area for construction.
Step 2: Measure and mark the porch area
Accurate measurements and precise marking are fundamental to the successful construction of a porch roof. Before diving into the physical assembly, it's crucial to meticulously measure and mark the designated porch area to ensure that the roof structure aligns seamlessly with the existing architecture and meets your functional and aesthetic requirements.
Measuring the Porch Dimensions
Begin by measuring the length and width of the porch area where the roof will be constructed. Use a reliable tape measure to record these dimensions, taking into account any architectural features or obstructions that may impact the roof design. It's essential to measure from multiple vantage points to account for any irregularities in the porch's layout.
Marking the Support Locations
Once the dimensions are determined, mark the locations for the support posts that will uphold the porch roof. These posts are pivotal in providing structural integrity and support. Use spray paint or chalk to clearly demarcate where each support post will be positioned, ensuring that they are evenly spaced and aligned with the porch's layout.
Verifying Level and Plumb
After marking the support post locations, use a level and plumb bob to verify that the markings are accurately aligned and perpendicular to the ground. This step is critical in ensuring that the porch roof will be structurally sound and visually appealing. Adjust the markings as needed to achieve precise alignment and vertical orientation.
Consideration for Roof Overhang
If your porch roof design includes an overhang, carefully measure and mark the desired overhang distance from the edge of the porch. This will guide the installation of the ledger board and the subsequent placement of rafters and roofing materials, ensuring a harmonious and balanced overhang that complements the overall design.
Double-Check Measurements
Before proceeding to the next phase of construction, double-check all measurements and markings to confirm their accuracy. It's advisable to review the dimensions and layout with a critical eye, as any discrepancies at this stage can have significant implications for the entire construction process.
By meticulously measuring and marking the porch area, you'll establish a solid foundation for the subsequent stages of the roof construction. This attention to detail sets the stage for a precise and well-executed project, ensuring that the porch roof seamlessly integrates with the existing architecture while fulfilling your functional and aesthetic aspirations.
Step 3: Install support posts
The installation of support posts forms the backbone of the porch roof structure, providing essential stability and load-bearing capacity. Properly positioned and securely anchored support posts are crucial for ensuring the structural integrity and longevity of the porch roof. Here's a detailed walkthrough of the process to effectively install support posts for your porch roof:
Selecting Quality Lumber
Begin by selecting high-quality pressure-treated or weather-resistant lumber for the support posts. The dimensions of the lumber should align with the structural requirements of your porch roof design, taking into account factors such as the roof span, anticipated loads, and local building codes. It's imperative to choose lumber that exhibits minimal warping, twisting, and structural defects to guarantee the durability and stability of the support posts.
Digging Post Holes
Using a post hole digger or an auger, excavate the designated locations for the support posts. The depth of the holes should comply with local building codes and be sufficient to accommodate the frost line and provide a solid foundation for the posts. It's essential to ensure uniform depth and precise positioning of the post holes to facilitate consistent support post installation.
Installing Support Post Anchors
Prior to setting the support posts in the excavated holes, consider using post anchors or concrete footings to enhance the stability and longevity of the porch roof structure. Post anchors provide a secure connection between the support posts and the concrete footings, effectively mitigating potential issues related to ground moisture and settling. Carefully follow the manufacturer's guidelines for installing and securing the post anchors to guarantee optimal performance.
Placing and Leveling Support Posts
With the post anchors in place, carefully position the support posts in the prepared holes, ensuring that they are aligned with the marked locations and securely anchored to the post anchors. Utilize a level to verify the vertical alignment of each support post, making necessary adjustments to achieve plumb orientation. This meticulous leveling process is essential for establishing a stable and visually appealing foundation for the porch roof.
Securing Support Posts
Once the support posts are accurately positioned and leveled, proceed to secure them in place using concrete or suitable backfill material. Ensure that the posts are firmly anchored and that any voids around the posts are adequately filled to prevent shifting or settlement. It's imperative to verify the stability and alignment of each support post before finalizing the securing process, as this step significantly influences the overall structural integrity of the porch roof.
By meticulously following these steps, you'll effectively install support posts that serve as the cornerstone of your porch roof structure. The careful selection of lumber, precise excavation of post holes, utilization of post anchors, and meticulous leveling and securing of support posts collectively contribute to the robustness and reliability of the porch roof framework. With the support posts securely in place, you're ready to progress to the subsequent stages of constructing a functional and visually captivating porch roof.
Step 4: Attach the ledger board to the house
The ledger board, a horizontal lumber component, plays a pivotal role in connecting the porch roof to the existing house structure. Proper attachment of the ledger board is essential for ensuring the stability, alignment, and weatherproofing of the porch roof. Here's a detailed exploration of the process involved in securely attaching the ledger board to the house:
Selecting Suitable Lumber and Hardware
Begin by selecting a sturdy and weather-resistant lumber board that is compatible with the exterior of your house. Pressure-treated or rot-resistant lumber is highly recommended to withstand outdoor elements and ensure long-term durability. Additionally, choose corrosion-resistant lag screws, washers, and appropriate flashing materials to facilitate a secure and weatherproof attachment of the ledger board.
Determining Ledger Board Placement
Carefully determine the precise placement of the ledger board along the exterior wall of the house. The location should align with the previously marked porch dimensions and support post positions. Use a level and measuring tools to ensure that the ledger board will be installed at the correct height and orientation, accounting for any desired roof pitch or overhang.
Flashing Installation and Waterproofing
Before affixing the ledger board, it's crucial to install flashing to create a watertight seal between the ledger board and the house. Proper flashing placement and integration with the house's exterior cladding are essential for preventing water intrusion and safeguarding the structural integrity of the porch roof. Follow best practices for flashing installation to effectively channel water away from the ledger board and house framing.
Attaching the Ledger Board
With the flashing in place, carefully position the ledger board against the house exterior, ensuring that it is level and securely aligned with the marked layout. Pre-drill pilot holes through the ledger board and into the house framing, then fasten the ledger board using lag screws and washers. It's imperative to adhere to local building codes and manufacturer specifications for lag screw spacing and penetration into the house framing.
Verifying Structural Integrity
After attaching the ledger board, thoroughly inspect the attachment points and overall alignment to confirm the structural integrity of the installation. Verify that the ledger board is securely anchored to the house framing and that there are no visible signs of misalignment or structural compromise. This meticulous verification process is essential for ensuring the safety and longevity of the porch roof attachment.
By meticulously following these steps, you'll effectively attach the ledger board to the house, establishing a robust and weather-resistant connection that forms the foundation for the porch roof structure. The careful selection of lumber and hardware, precise ledger board placement, thorough waterproofing, and secure attachment procedures collectively contribute to the stability and longevity of the porch roof attachment. With the ledger board securely in place, you're poised to advance to the subsequent stages of constructing a functional and visually captivating porch roof.
Step 5: Install the header beam
The installation of the header beam marks a significant milestone in the construction of a porch roof, as it serves as a crucial structural element that supports the weight of the roof and facilitates the attachment of rafters and joists. The header beam, typically a robust horizontal timber, plays a pivotal role in distributing the roof load and ensuring the overall stability and integrity of the porch roof structure. Here's a detailed exploration of the process involved in effectively installing the header beam:
Selecting Quality Lumber and Hardware
Commence the installation process by selecting a high-quality header beam that aligns with the structural requirements of your porch roof design. Pressure-treated or weather-resistant lumber is recommended to withstand outdoor elements and provide long-term durability. Additionally, ensure that the dimensions of the header beam are compatible with the span of the porch roof and the anticipated loads it will bear. Select appropriate fasteners, such as lag screws or through-bolts, to secure the header beam to the support posts and ledger board, ensuring a robust and reliable connection.
Positioning and Leveling the Header Beam
Carefully position the header beam at the designated height and alignment, ensuring that it seamlessly integrates with the support posts and ledger board. Utilize a level and measuring tools to verify the horizontal orientation and precise positioning of the header beam. It's essential to achieve accurate alignment and levelness to facilitate the subsequent installation of rafters and joists, as any deviations at this stage can impact the overall functionality and aesthetics of the porch roof.
Securing the Header Beam
Once the header beam is accurately positioned, proceed to secure it to the support posts and ledger board using the selected fasteners. Pre-drill pilot holes to prevent splitting of the lumber and facilitate the insertion of fasteners. Ensure that the header beam is firmly anchored and that the fasteners penetrate the support posts and ledger board with adequate depth to guarantee a secure and stable connection. Thoroughly inspect the attachment points to confirm the structural integrity and reliability of the header beam installation.
Load Distribution and Structural Verification
After securing the header beam, assess its load-bearing capacity and distribution to ensure that it effectively supports the anticipated roof load. Verify that the header beam is uniformly aligned with the support posts and ledger board, providing a solid foundation for the subsequent installation of rafters and joists. This meticulous verification process is essential for confirming the structural soundness and load-bearing capability of the header beam, laying the groundwork for the seamless progression of the porch roof construction.
By meticulously following these steps, you'll effectively install the header beam, a critical component that forms the backbone of the porch roof structure. The careful selection of lumber and hardware, precise positioning and leveling, secure attachment procedures, and thorough structural verification collectively contribute to the stability and load-bearing capacity of the header beam. With the header beam securely in place, you're well-prepared to advance to the next stages of constructing a functional and visually captivating porch roof.
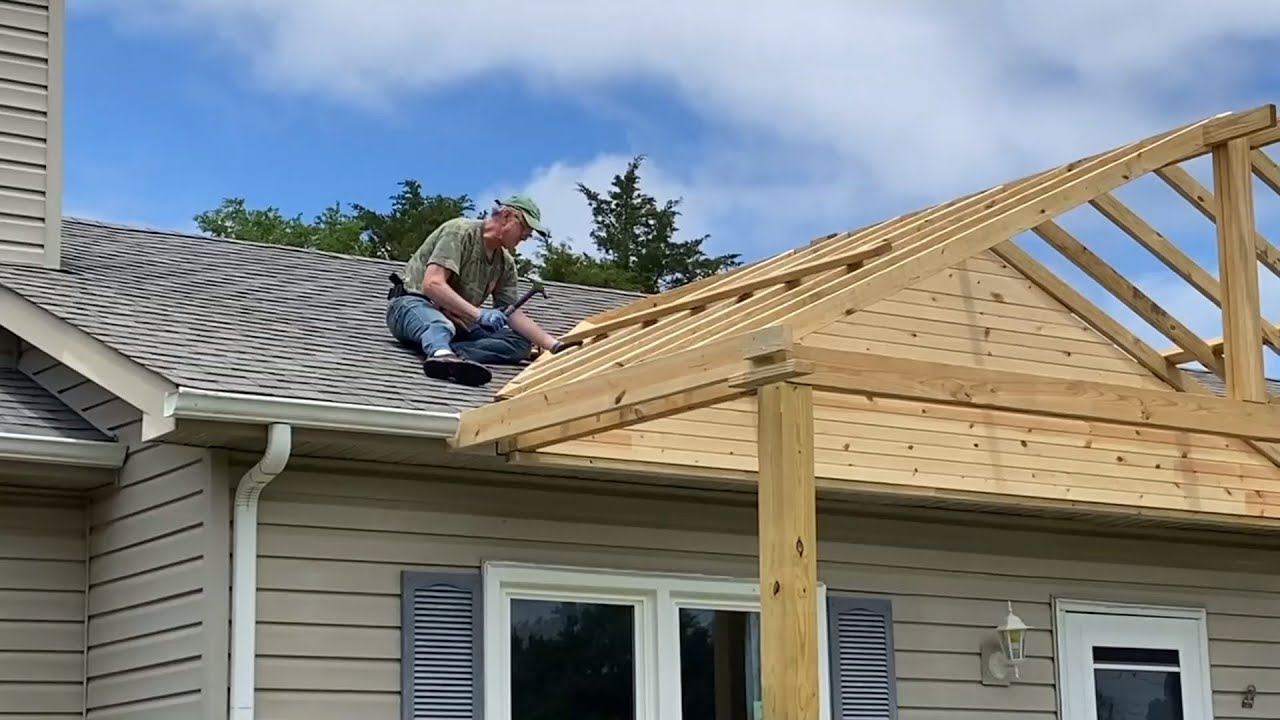
Step 6: Add rafters and joists
With the foundational elements in place, the next crucial step in constructing a porch roof involves adding the rafters and joists, which form the framework for supporting the roofing materials and shaping the roof's structure. This phase requires meticulous attention to detail and precision to ensure the seamless integration of these essential components. Here's a comprehensive exploration of the process involved in adding rafters and joists to bring your porch roof to life.
Installing Rafters
Begin by carefully positioning and securing the rafters, the inclined structural beams that form the framework of the roof. The precise placement of rafters is pivotal in determining the pitch and overall shape of the porch roof. Utilize measuring tools and layout guides to ensure uniform spacing and alignment of the rafters, creating a sturdy and visually appealing framework for the roof structure. Secure the rafters to the header beam and ledger board using appropriate fasteners, ensuring that they are firmly anchored and capable of withstanding the anticipated roof loads.
Adding Joists
In conjunction with the rafters, the installation of joists further reinforces the structural integrity of the porch roof framework. Joists, the horizontal beams that provide support for the roofing materials, play a critical role in distributing the roof load and ensuring the stability of the roof structure. Carefully position and secure the joists between the ledger board and the header beam, maintaining consistent spacing and alignment to create a robust foundation for the roofing materials. Utilize appropriate fasteners and hardware to secure the joists, ensuring a secure and reliable connection that can withstand the rigors of outdoor exposure.
Structural Alignment and Verification
Throughout the installation of rafters and joists, meticulous attention should be given to verifying the structural alignment and integrity of the framework. Utilize measuring tools and levels to confirm the precise positioning and alignment of the rafters and joists, making necessary adjustments to achieve uniformity and stability. Thoroughly inspect the attachment points and connections to ensure that the rafters and joists are securely anchored and capable of supporting the subsequent roofing materials. This rigorous verification process is essential for laying the groundwork for the successful installation of roofing materials and the completion of the porch roof structure.
By meticulously following these steps, you'll effectively add rafters and joists, establishing a robust and visually appealing framework for your porch roof. The careful positioning and secure attachment of rafters and joists, coupled with thorough structural verification, collectively contribute to the stability and functionality of the roof framework. With the rafters and joists seamlessly integrated, you're poised to progress to the final stages of installing roofing materials and adding the finishing touches to complete your meticulously crafted porch roof.
Step 7: Install roofing materials
The installation of roofing materials represents the culmination of the porch roof construction process, transforming the framework into a weather-resistant and visually striking shelter. The selection and installation of roofing materials play a pivotal role in defining the aesthetic appeal, durability, and weatherproofing capabilities of the porch roof. Here's a comprehensive exploration of the process involved in effectively installing roofing materials to bring your porch roof to its full potential.
Selecting Suitable Roofing Materials
Before commencing the installation, carefully select roofing materials that align with your design preferences, climate considerations, and long-term durability requirements. Options such as asphalt shingles, metal roofing panels, or composite materials offer diverse aesthetics and performance characteristics. Consider factors such as color, texture, and architectural style to ensure that the chosen roofing materials harmonize with the overall design of your home.
Preparing the Roof Surface
Ensure that the roof surface is clean, dry, and free of debris before initiating the installation of roofing materials. Inspect the framework for any protruding nails, uneven surfaces, or structural irregularities that may impede the seamless installation of the roofing materials. Address any necessary repairs or adjustments to create a smooth and uniform substrate for the roofing materials.
Efficient Installation Techniques
Follow manufacturer guidelines and best practices for the installation of the selected roofing materials. Whether you opt for traditional asphalt shingles or modern metal roofing, adhere to recommended installation techniques to ensure optimal performance and longevity. Utilize appropriate fasteners, adhesives, or interlocking mechanisms to securely affix the roofing materials to the framework, minimizing the risk of wind uplift and water infiltration.
Weatherproofing and Sealing
Prioritize weatherproofing measures to safeguard the integrity of the porch roof against moisture intrusion and environmental elements. Install flashing materials around roof penetrations, edges, and transitions to create a watertight seal and prevent water seepage. Apply high-quality sealants and adhesives as recommended by the roofing material manufacturer to reinforce the weatherproofing capabilities of the roof assembly.
Quality Assurance and Inspection
Upon completing the installation of roofing materials, conduct a thorough inspection to verify the uniformity, alignment, and secure attachment of the roofing components. Pay close attention to critical areas such as valleys, ridges, and eaves to ensure that the roofing materials are seamlessly integrated and capable of withstanding the elements. Address any discrepancies or imperfections to achieve a flawless and resilient porch roof assembly.
By meticulously following these steps, you'll effectively install roofing materials, elevating the porch roof from a framework to a fully functional and visually captivating shelter. The careful selection, preparation, and installation of roofing materials, coupled with rigorous weatherproofing and quality assurance measures, collectively contribute to the durability, aesthetics, and performance of the porch roof. With the roofing materials securely in place, your meticulously crafted porch roof is ready to provide enduring protection and timeless charm to your home's exterior.
Step 8: Finish with trim and details
The final stage of constructing a porch roof involves adding the finishing touches with trim and details, elevating the visual appeal and cohesiveness of the structure while ensuring functional and aesthetic integration with the existing architecture. This phase encompasses the meticulous installation of trim elements, decorative features, and weatherproofing components to complete the porch roof with finesse and attention to detail.
Adding Decorative Trim
Incorporating decorative trim elements, such as fascia boards, soffits, and molding, enhances the architectural character of the porch roof. Carefully select trim materials that complement the design aesthetic of your home, whether it's a classic, ornate trim for a traditional look or sleek, minimalist trim for a modern touch. Precision installation of trim components creates a polished and harmonious transition between the roof structure and the surrounding facade, contributing to the overall curb appeal of the property.
Weatherproofing and Sealing
Prioritize weatherproofing measures to fortify the porch roof against the elements. Install drip edges, flashing, and sealants at vulnerable areas to prevent water infiltration and protect the underlying framework. Properly sealed seams and junctions ensure that the porch roof remains resilient and impervious to moisture, safeguarding the structural integrity and longevity of the entire assembly.
Architectural Accents
Consider incorporating architectural accents, such as decorative brackets, corbels, or gable ornaments, to infuse the porch roof with distinctive character and charm. These embellishments not only add visual interest but also reflect the homeowner's personal style and attention to detail. Thoughtfully placed architectural accents contribute to the overall aesthetic cohesion of the porch roof, creating a captivating focal point that enhances the architectural appeal of the home.
Paint and Finishing Touches
Applying a fresh coat of paint or stain to the porch roof components provides the opportunity to harmonize the color scheme with the rest of the home's exterior. Select a color that complements the facade and trim, creating a cohesive and unified appearance. Additionally, attend to any necessary touch-ups and detailing to ensure a flawless and polished presentation of the porch roof, elevating its visual impact and contributing to the overall exterior aesthetics.
By meticulously attending to these finishing details, you'll complete the porch roof with a refined and cohesive presentation, seamlessly integrating it with the existing architecture while infusing it with character and charm. The thoughtful addition of trim, weatherproofing measures, architectural accents, and finishing touches culminates in a porch roof that not only provides functional shelter but also enhances the overall visual appeal and architectural integrity of the home.
Conclusion
In conclusion, the construction of a porch roof represents a transformative endeavor that not only enhances the functionality and visual appeal of a home but also embodies the craftsmanship and attention to detail of the homeowner. From the initial stages of gathering materials and marking the porch area to the final touches of adding trim and architectural accents, every step in the process contributes to the creation of a well-crafted and enduring outdoor space.
The journey of building a porch roof is a testament to the fusion of structural precision and creative expression, where the selection of materials, the alignment of components, and the integration of architectural details converge to form a cohesive and captivating addition to the home's exterior. Each phase of the construction process demands meticulous planning, thoughtful execution, and a keen eye for detail to ensure that the porch roof not only fulfills its functional purpose but also harmonizes with the architectural character of the residence.
As the porch roof takes shape, it becomes a symbol of shelter, comfort, and aesthetic refinement, offering a welcoming retreat that extends the living space into the outdoors. The careful installation of roofing materials, the addition of decorative trim, and the application of weatherproofing measures collectively contribute to the porch roof's resilience and enduring charm, standing as a testament to the homeowner's dedication to creating a harmonious and inviting environment.
Furthermore, the completion of a porch roof signifies the fulfillment of a vision, the realization of a design concept, and the embodiment of craftsmanship. It represents a space where moments of relaxation, social gatherings, and quiet contemplation can unfold amidst the backdrop of a thoughtfully constructed and visually captivating outdoor sanctuary.
In essence, the construction of a porch roof transcends the mere assembly of structural components; it embodies the fusion of functionality and aesthetics, the realization of architectural vision, and the creation of a space that enriches the daily experience of home life. It stands as a testament to the homeowner's commitment to enhancing their living environment and creating a place where cherished memories are made and enduring connections are forged.