
Home>Home & Furniture>Roof>How To Build An A Frame Roof
Roof
How To Build An A Frame Roof
Published: March 6, 2024
Editor-in-Chief with a decade in home renovation and a passion for vintage furniture. Diane is known for her weekend treasure hunts at flea markets, enriching our content with unique style insights.
Learn how to build an A-frame roof for your structure with our step-by-step guide. Get expert tips and advice for a sturdy and reliable roof.
(Many of the links in this article redirect to a specific reviewed product. Your purchase of these products through affiliate links helps to generate commission for Twigandthistle.com, at no extra cost. Learn more)
Introduction
So, you're thinking about building an A-frame roof, huh? Well, you've come to the right place! A-frame roofs are not only stylish and visually appealing, but they also offer excellent structural support and are relatively easy to construct. Whether you're looking to add a cozy cabin to your property or simply want to upgrade your existing roof, building an A-frame roof can be a rewarding and cost-effective DIY project. In this guide, we'll walk you through the step-by-step process of building your very own A-frame roof, from selecting the right materials to adding the finishing touches. Let's dive in and get started on this exciting home improvement journey!
Materials Needed
When embarking on the journey of building an A-frame roof, it's essential to gather all the necessary materials beforehand to ensure a smooth and efficient construction process. Here's a comprehensive list of the materials you'll need:
- Lumber: Purchase high-quality lumber for the frame, rafters, and decking. Opt for pressure-treated lumber for enhanced durability and resistance to rot and decay.
- Roofing Materials: Select roofing materials such as shingles, metal panels, or cedar shakes based on your aesthetic preferences and the climate of your area.
- Fasteners: Stock up on nails, screws, and other fasteners required for securing the frame, sheathing, and roofing materials.
- Bracing Materials: Acquire bracing materials such as plywood or oriented strand board (OSB) to provide additional support and stability to the A-frame structure.
- Tools: Ensure you have the necessary tools on hand, including a circular saw, hammer, drill, level, ladder, and safety equipment such as gloves and goggles.
- Waterproofing and Sealants: Invest in quality waterproofing materials and sealants to protect the roof from moisture and potential leaks.
- Insulation: If you plan to insulate your A-frame roof for energy efficiency, purchase insulation materials suitable for your climate and local building codes.
- Flashing: Don't forget to include flashing materials to prevent water infiltration at vulnerable areas such as roof intersections and valleys.
- Paint or Stain: If you prefer a finished look for your A-frame roof, consider purchasing paint or stain to enhance the appearance and longevity of the wood.
By ensuring you have all the necessary materials at the outset, you can streamline the construction process and minimize delays, allowing you to focus on bringing your A-frame roof to life.
Choosing the Right Location
Selecting the optimal location for your A-frame roof is a crucial decision that can significantly impact its longevity and performance. Here are essential factors to consider when choosing the right location for your A-frame roof:
-
Orientation: Determine the ideal orientation of the A-frame roof based on the prevailing wind direction and the positioning of the sun. Orienting the roof to minimize exposure to strong winds and maximize solar gain can enhance energy efficiency and overall comfort within the structure.
-
Foundation: Assess the condition and stability of the ground where the A-frame roof will be constructed. Ensure that the chosen location provides a solid and level foundation to support the weight of the structure and withstand environmental factors.
-
Drainage: Evaluate the natural drainage patterns of the site to prevent potential water accumulation or flooding around the A-frame roof. Choosing a location with proper drainage can help mitigate water-related issues and preserve the integrity of the roof over time.
-
Views and Aesthetics: Consider the surrounding landscape and views when selecting the location for your A-frame roof. Positioning the structure to take advantage of scenic vistas or natural features can enhance the overall appeal and enjoyment of the space.
-
Local Regulations: Familiarize yourself with local building codes, zoning regulations, and any applicable covenants or restrictions that may influence the placement of the A-frame roof. Compliance with these regulations is essential to avoid potential legal issues and ensure the safety and integrity of the structure.
By carefully considering these factors, you can choose a location that not only complements the architectural design of the A-frame roof but also promotes its long-term functionality and resilience.
Building the Foundation
The foundation serves as the anchor for the entire A-frame roof structure, providing stability and support against external forces. Here's a detailed overview of the steps involved in building a solid foundation for your A-frame roof:
-
Site Preparation: Begin by clearing the chosen site of any debris, vegetation, or obstacles that may impede the construction of the foundation. Ensure that the ground is level and compacted to create a stable base for the foundation.
-
Marking the Layout: Use stakes and string to outline the dimensions of the foundation, following the precise measurements and layout specified in your building plans. This step is crucial for accurately positioning the foundation and ensuring proper alignment with the A-frame structure.
-
Excavation: Excavate the marked area to the required depth, taking into account the type of soil and the load-bearing capacity needed to support the A-frame roof. Use a shovel, excavator, or other appropriate equipment to remove soil and create a uniform trench for the foundation.
-
Installing Footings: Pour concrete footings at strategic locations within the trench to support the weight of the A-frame roof. The size and depth of the footings should comply with local building codes and engineering standards to ensure structural integrity.
-
Constructing Piers or Columns: Depending on the design and load requirements, construct concrete piers or columns on top of the footings to serve as vertical supports for the A-frame roof. These piers should be evenly spaced and aligned to accommodate the frame of the roof.
-
Adding Reinforcement: To enhance the strength and stability of the foundation, consider incorporating steel reinforcement, such as rebar, within the concrete footings and piers. This reinforcement helps mitigate cracking and settling over time, especially in regions prone to seismic activity.
-
Curing and Inspection: Allow the concrete footings, piers, and any added reinforcement to cure according to the manufacturer's recommendations. Once cured, schedule an inspection by a qualified professional to verify that the foundation meets structural requirements and complies with building codes.
By meticulously executing each step in the foundation-building process, you can establish a robust and reliable base for your A-frame roof, setting the stage for the subsequent construction phases with confidence and precision.
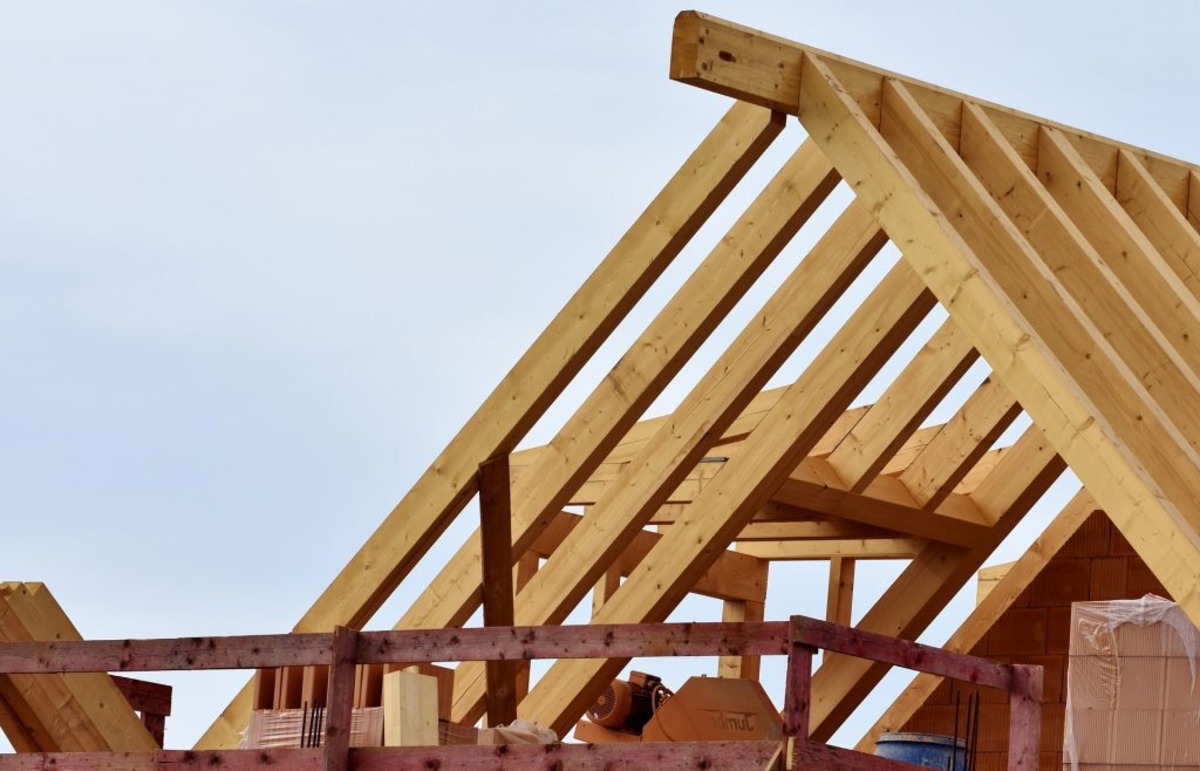
Constructing the A-Frame Structure
Constructing the A-frame structure is a pivotal phase in the process of building an A-frame roof. This section outlines the essential steps involved in creating the A-frame structure with precision and structural integrity.
-
Assembling the Ridge Beam: Begin by assembling the ridge beam, which forms the peak of the A-frame structure. The ridge beam should be constructed from sturdy, dimensionally stable lumber that can withstand the load of the roof. Ensure that the ridge beam is accurately sized and positioned according to the design specifications, providing ample support for the rafters and the overall roof structure.
-
Installing Rafters: Once the ridge beam is in place, proceed to install the rafters that form the inclined sides of the A-frame. Rafters are typically cut to precise angles to achieve the desired pitch of the roof. Carefully position and secure each rafter to the ridge beam and the corresponding locations on the foundation, ensuring uniform spacing and alignment for structural uniformity.
-
Bracing the Structure: To reinforce the A-frame structure and enhance its stability, incorporate diagonal bracing between the rafters. Bracing helps distribute the load evenly across the structure, minimizing the risk of sway or structural deformation. Use high-quality bracing materials and secure them firmly to the rafters to maximize their effectiveness.
-
Adding Collar Ties or Purlins: Depending on the design and span of the A-frame roof, consider adding collar ties or purlins to connect and stabilize the rafters. Collar ties are horizontal members that prevent the rafters from spreading apart, while purlins provide additional support and load distribution. Integrate these elements strategically to optimize the structural performance of the A-frame roof.
-
Securing Connections: Pay close attention to the connections between the ridge beam, rafters, and bracing elements. Utilize appropriate fasteners, such as nails, screws, or metal connectors, to secure these critical connections. Adhering to best practices for fastening and joinery is essential to ensure the structural integrity and safety of the A-frame roof.
-
Inspecting for Alignment and Plumb: Throughout the construction process, regularly inspect the A-frame structure for proper alignment, plumb, and overall symmetry. Any deviations from the intended dimensions or angles should be promptly addressed to maintain the structural integrity and visual appeal of the A-frame roof.
By meticulously executing each step in the construction of the A-frame structure, you can establish a robust and visually striking framework for the roof, laying the groundwork for the subsequent phases of the construction process.
Adding Roofing Materials
Once the A-frame structure is in place, the next crucial step is adding the roofing materials to provide weather protection and enhance the aesthetic appeal of the roof. The choice of roofing materials can significantly impact the durability, energy efficiency, and overall appearance of the A-frame roof. Here's a detailed overview of the process of adding roofing materials to your A-frame roof:
-
Selecting the Right Roofing Material: Consider the climate, architectural style, and maintenance requirements when choosing the roofing material for your A-frame roof. Options such as asphalt shingles, metal panels, cedar shakes, or composite roofing offer varying degrees of durability, longevity, and visual appeal. Select a material that complements the overall design of the structure while meeting your performance expectations.
-
Preparing the Roof Surface: Ensure that the surface of the A-frame roof is clean, smooth, and free of any debris or protrusions before installing the roofing materials. Use a suitable underlayment, such as roofing felt or synthetic underlayment, to provide an additional layer of protection against moisture and enhance the weatherproofing capabilities of the roof.
-
Installing the Roofing Material: Follow the manufacturer's guidelines and best practices for installing the chosen roofing material. Whether you opt for shingles, metal panels, or cedar shakes, ensure that each piece is securely fastened and aligned to create a watertight barrier. Pay attention to the recommended installation techniques, such as staggering shingle courses, interlocking metal panels, or properly spacing cedar shakes, to optimize the performance and longevity of the roof.
-
Addressing Roof Penetrations and Flashing: Properly address roof penetrations, such as chimneys, vents, and skylights, by integrating flashing and sealants to prevent water infiltration at vulnerable areas. Flashing should be meticulously installed around roof intersections, valleys, and protrusions to create a seamless and waterproof transition between different roofing elements.
-
Ensuring Ventilation and Insulation: Consider incorporating ventilation and insulation components as part of the roofing system to promote air circulation and energy efficiency. Ridge vents, soffit vents, and insulation materials contribute to maintaining a balanced and well-ventilated attic space, reducing the risk of moisture buildup and enhancing the overall comfort and performance of the A-frame roof.
-
Completing the Ridge and Eave Details: Pay special attention to the finishing details at the ridge and eaves of the A-frame roof. Install ridge caps or other appropriate finishing elements to seal the ridge line effectively, while ensuring that the eaves are adequately protected and ventilated to prevent moisture-related issues and maintain the integrity of the roof over time.
By meticulously following these steps and considerations when adding roofing materials to your A-frame roof, you can create a durable, weather-resistant, and visually appealing roofing system that enhances the overall functionality and aesthetic charm of your structure.
Finishing Touches and Maintenance
As you near the completion of your A-frame roof construction, it's essential to focus on the finishing touches and establish a maintenance plan to ensure the longevity and performance of the structure. Here's a comprehensive guide to the final steps and ongoing maintenance considerations for your A-frame roof:
Applying Protective Finishes
Consider applying protective finishes, such as paint, stain, or sealant, to the exposed wood surfaces of the A-frame roof. These finishes not only enhance the visual appeal of the structure but also provide crucial protection against UV exposure, moisture, and wood-damaging organisms. Choose a finish that complements the architectural style of the A-frame while offering long-lasting durability and weather resistance.
Installing Gutters and Downspouts
Integrate a functional gutter and downspout system to manage rainwater runoff from the A-frame roof. Properly installed gutters and downspouts help prevent water accumulation around the foundation, minimize soil erosion, and protect the exterior walls of the structure. Regularly inspect and clean the gutters to ensure unobstructed water flow and prevent potential water-related damage.
Landscaping and Drainage Considerations
Evaluate the landscaping and drainage around the A-frame roof to optimize its long-term performance. Implement landscaping features, such as strategically placed vegetation and permeable surfaces, to mitigate water runoff and enhance the aesthetic integration of the structure within the surrounding environment. Additionally, ensure that the grading and drainage patterns around the A-frame roof promote efficient water dispersion and minimize the risk of water infiltration.
Establishing a Maintenance Schedule
Develop a proactive maintenance schedule to address routine upkeep tasks and inspections for the A-frame roof. Regularly inspect the roof for signs of damage, such as loose shingles, deteriorated sealants, or pest infestations, and promptly address any issues to prevent further deterioration. Schedule periodic cleaning and maintenance activities, such as debris removal, gutter cleaning, and roof surface inspections, to uphold the structural integrity and appearance of the A-frame roof.
Monitoring Structural Integrity
Keep a vigilant eye on the structural integrity of the A-frame roof, particularly during extreme weather events or seasonal transitions. Look for signs of sagging, cracking, or water stains on the interior or exterior surfaces, as these may indicate underlying structural issues that require immediate attention. Engage a qualified professional to conduct comprehensive inspections and structural assessments as part of your ongoing maintenance efforts.
Addressing Repairs and Upgrades
Be prepared to address repairs and upgrades as needed to maintain the optimal condition of the A-frame roof. Whether it involves replacing damaged roofing materials, reinforcing structural components, or enhancing insulation and ventilation, timely repairs and upgrades contribute to the long-term resilience and functionality of the roof. Prioritize proactive measures to address minor issues before they escalate into more significant concerns.
By focusing on the finishing touches and implementing a proactive maintenance strategy, you can ensure that your A-frame roof remains a durable, visually captivating, and structurally sound element of your property for years to come. Regular attention to maintenance and upkeep not only preserves the investment in your A-frame roof but also contributes to the overall enjoyment and value of your home.