Home>Create & Decorate>DIY & Crafts>How To Build A Compost Bin

DIY & Crafts
How To Build A Compost Bin
Published: February 27, 2024

Content Creator specializing in woodworking and interior transformations. Caegan's guides motivate readers to undertake their own projects, while his custom furniture adds a personal touch.
Learn how to build a DIY compost bin with our step-by-step guide. Start composting at home and reduce waste with this easy craft project. Ideal for DIY & Crafts enthusiasts.
(Many of the links in this article redirect to a specific reviewed product. Your purchase of these products through affiliate links helps to generate commission for Twigandthistle.com, at no extra cost. Learn more)
Introduction
Creating your own compost bin is a rewarding and eco-friendly way to manage organic waste while producing nutrient-rich compost for your garden. Whether you're an avid gardener or simply looking to reduce your environmental impact, building a compost bin is a practical and fulfilling DIY project.
Composting is a natural process that decomposes organic materials into a valuable soil amendment. By harnessing the power of decomposition, you can transform kitchen scraps, yard waste, and other organic matter into a nutrient-dense fertilizer that enriches the soil and promotes plant growth. Not only does composting divert organic waste from landfills, but it also reduces the need for chemical fertilizers, making it a sustainable choice for both the environment and your garden.
Building your own compost bin allows you to customize its size, design, and features to suit your specific needs and space constraints. Whether you have a sprawling backyard or a compact urban garden, there's a compost bin design that can fit seamlessly into your environment.
Moreover, creating a compost bin from scratch provides a sense of accomplishment and empowerment. As you construct the bin and witness the transformation of organic waste into dark, crumbly compost, you'll gain a deeper appreciation for the natural cycles of life and the interconnectedness of all living things.
In this comprehensive guide, we'll walk you through the step-by-step process of building a compost bin, from selecting the ideal location to maintaining and using the finished product. By the end of this journey, you'll not only have a functional compost bin but also a newfound understanding of the vital role that composting plays in sustainable living and gardening. So, roll up your sleeves, gather your materials, and let's embark on this enriching DIY adventure together!
Read more: How To Make A Compost Pile
Materials Needed
To embark on the journey of building your own compost bin, you'll need a selection of materials that are readily available and relatively easy to acquire. Here's a comprehensive list of the items you'll need to gather before diving into this enriching DIY project:
-
Wood or Pallets: The primary material for constructing the frame of the compost bin. Opt for untreated wood or pallets to ensure they are safe for composting.
-
Hardware: Nails, screws, or a hammer and drill to assemble the wooden frame securely.
-
Wire Mesh or Hardware Cloth: This will be used to line the interior of the bin, providing ventilation and preventing pests from entering.
-
Hinges and Latch: If you plan to add a lid to your compost bin, these items will be essential for securing and accessing the contents.
-
Brackets or Corner Braces: These will help reinforce the corners of the compost bin frame, ensuring its stability and longevity.
-
Compost Thermometer: While not mandatory, a compost thermometer can be a valuable tool for monitoring the internal temperature of the compost pile, aiding in the composting process.
-
Shovel or Pitchfork: Essential for turning and aerating the compost as it decomposes, promoting even breakdown and efficient composting.
-
Optional: Lid Material: If you choose to include a lid, you'll need additional wood or a suitable material to construct it.
-
Optional: Paint or Stain: If you wish to enhance the appearance of your compost bin or protect the wood from the elements, consider acquiring paint or wood stain.
By gathering these materials, you'll be well-equipped to commence the construction of your compost bin. With these items at your disposal, you'll be ready to move on to the next step: choosing the ideal location for your compost bin.
Step 1: Choose a Location
Selecting the right location for your compost bin is crucial for its functionality and the success of your composting endeavors. When choosing a spot for your compost bin, consider the following factors to ensure optimal composting conditions:
Sunlight and Shade
Look for a location that receives a good balance of sunlight and shade. While some sunlight is beneficial for the composting process, excessive heat can dry out the pile. Conversely, too much shade may impede decomposition. Aim for a spot that receives partial sunlight, especially during the cooler parts of the day.
Proximity to the Garden
If you plan to use the compost primarily for your garden, consider placing the bin near your garden beds. This proximity makes it convenient to access the finished compost when it's time to enrich your soil. Additionally, having the compost bin nearby encourages regular maintenance and monitoring, fostering a more hands-on approach to composting.
Read more: How to Build Adjustable Garage Shelving
Drainage
Ensure that the chosen location has adequate drainage to prevent waterlogging, which can hinder the composting process. Avoid low-lying areas that are prone to collecting excess water, as this can lead to anaerobic conditions and unpleasant odors. Ideally, the site should allow excess moisture to drain away from the compost pile.
Accessibility
Select a location that is easily accessible for adding new compost materials and turning the pile. Accessibility is key to maintaining an active and well-aerated compost pile. Consider the convenience of transporting organic waste from your kitchen or garden to the compost bin, as well as the ease of maneuvering a shovel or pitchfork for turning the compost.
Consideration for Neighbors
If you live in a residential area, be mindful of your neighbors when choosing the location for your compost bin. Opt for a spot that is not directly adjacent to neighboring properties to minimize any potential concerns about odors or aesthetics. Being considerate of your neighbors can help foster positive relationships within your community.
By carefully considering these factors, you can identify an ideal location for your compost bin that promotes efficient composting and seamlessly integrates into your gardening routine. Once you've chosen the perfect spot, you'll be ready to move on to the next step: building the frame of your compost bin.
Step 2: Build the Frame
Constructing the frame of your compost bin is a pivotal step that forms the foundation for the entire structure. The frame provides the structural support for the composting materials and determines the overall stability and durability of the bin. Here's a detailed guide to building the frame of your compost bin:
Read more: DIY Slatwall Garage Organization Guide
Selecting the Wood or Pallets
Begin by choosing the wood or pallets that will form the walls of your compost bin. Opt for untreated wood or pallets to ensure they are safe for composting. Cedar, cypress, or redwood are excellent choices due to their natural resistance to decay and insects. If using pallets, disassemble them carefully, salvaging the sturdy boards for constructing the frame.
Determining the Size
Consider the volume of compost materials you anticipate generating and the available space in your chosen location. The size of the compost bin can vary based on your specific needs. A typical size for a homemade compost bin is approximately 3 feet wide, 3 feet deep, and 3 feet high, providing ample capacity for composting while remaining manageable for turning and maintenance.
Assembling the Frame
Using the selected wood or pallet boards, construct a three-sided enclosure to form the walls of the compost bin. Secure the boards together at the corners using nails, screws, or brackets, ensuring the frame is sturdy and stable. If using pallets, attach the boards securely to create a solid structure that contains the composting materials.
Adding Support and Stability
To reinforce the corners and enhance the stability of the frame, consider adding corner braces or additional support beams. These reinforcements prevent the frame from shifting or becoming misshapen over time, ensuring that it retains its structural integrity throughout the composting process.
Read more: DIY Composting Toilet: A Step-by-Step Guide
Customizing the Design
While the basic frame consists of three walls, you may choose to leave one side open for easy access to turn and remove compost. Alternatively, you can enclose the fourth side with additional boards or wire mesh, depending on your preference and the materials at your disposal.
By following these steps, you can successfully build the frame of your compost bin, laying the groundwork for a functional and efficient composting system. With the frame in place, you're ready to proceed to the next stages of constructing your compost bin and embarking on the fulfilling journey of composting at home.
Step 3: Add Ventilation
Proper ventilation is essential for a successful composting process, as it facilitates the flow of oxygen and the release of excess moisture and heat. By ensuring adequate airflow within the compost bin, you create an environment conducive to the activities of beneficial microorganisms responsible for breaking down organic matter. Here's a detailed guide on adding ventilation to your compost bin:
Incorporating Airflow Openings
To introduce ventilation into your compost bin, you can create airflow openings along the sides or at the top of the structure. These openings allow fresh air to enter the compost pile, promoting aerobic decomposition and preventing the development of anaerobic conditions, which can lead to unpleasant odors. You can achieve this by drilling small holes in the walls of the bin or leaving gaps between the boards to facilitate air circulation.
Installing Wire Mesh or Hardware Cloth
Another effective method for providing ventilation while preventing pests from entering the compost bin is to line the interior walls with wire mesh or hardware cloth. This mesh allows air to flow freely through the compost pile while acting as a barrier against unwanted intruders such as rodents and insects. By incorporating this protective layer, you create a well-ventilated yet secure environment for the composting materials.
Read more: DIY Unfinished Basement Storage Ideas
Elevating the Bottom of the Bin
Elevating the bottom of the compost bin slightly above the ground can also contribute to improved ventilation. This elevation allows air to circulate beneath the compost pile, preventing stagnation and promoting the activity of aerobic microorganisms. Additionally, it helps prevent the accumulation of excess moisture, which can impede the composting process.
Monitoring Ventilation Needs
As you add ventilation to your compost bin, it's important to monitor the airflow and make adjustments as needed. Regularly assess the moisture level and temperature within the compost pile to ensure that the ventilation is adequate for the decomposition process. By staying attuned to the conditions within the bin, you can fine-tune the ventilation to optimize the composting environment.
By incorporating these ventilation strategies, you create an environment within your compost bin that supports the efficient decomposition of organic materials. Adequate ventilation not only accelerates the composting process but also helps maintain a balanced and healthy ecosystem within the bin. With ventilation in place, your compost bin is well-equipped to foster the transformation of organic waste into valuable compost, bringing you one step closer to reaping the rewards of your sustainable efforts.
Step 4: Add a Lid
Adding a lid to your compost bin serves multiple purposes, contributing to the overall functionality and effectiveness of the composting process. A well-designed lid helps regulate moisture levels, control odors, and protect the compost pile from excessive rain and pests. Here's a detailed exploration of the significance of adding a lid to your compost bin and how to do so effectively.
Importance of a Lid
A lid plays a crucial role in managing the moisture content of the compost pile. By shielding the compost from excessive moisture caused by rain or irrigation, the lid helps maintain the optimal level of dampness within the pile. This is essential for promoting the activities of beneficial microorganisms and preventing the compost from becoming waterlogged, which can impede the decomposition process.
Additionally, a lid helps contain odors that may arise during the composting process. While composting is a natural and beneficial activity, it can generate distinct earthy odors that may be undesirable in close proximity to living spaces. A well-fitted lid helps mitigate these odors, making the composting experience more pleasant for you and your neighbors.
Furthermore, the lid acts as a barrier against pests such as rodents, raccoons, and insects that may be attracted to the organic materials in the compost pile. By securing the top of the bin, you create a protective enclosure that safeguards the compost from unwanted intruders, minimizing the risk of disturbances to the composting process.
Read more: DIY Kids Closet Organization Ideas
Design and Installation
When adding a lid to your compost bin, consider using the same material as the rest of the structure, such as wood or hardware cloth, to ensure a cohesive and durable design. If you opt for a hinged lid, attach the hinges securely to one side of the bin to allow easy access for adding new compost materials and turning the pile.
To enhance the functionality of the lid, consider incorporating ventilation features, such as small openings or slats, to promote airflow while still providing protection. This balanced approach allows the compost pile to receive adequate oxygen while preventing excessive moisture buildup and maintaining a controlled environment.
If you prefer a removable lid, ensure it fits snugly over the top of the compost bin to provide complete coverage. This snug fit helps contain odors and prevents pests from accessing the compost, contributing to a more contained and controlled composting system.
By adding a well-designed lid to your compost bin, you create an environment that supports the efficient decomposition of organic materials while minimizing potential challenges such as excess moisture and unwanted odors. With the lid in place, your compost bin is poised to function optimally, bringing you closer to the rewarding process of producing nutrient-rich compost for your garden.
Step 5: Add Compost Materials
With the framework of your compost bin in place, it's time to introduce the essential ingredients that will kickstart the composting process. Adding the right mix of compost materials is crucial for creating a balanced and nutrient-rich environment within the bin. By incorporating a diverse array of organic matter, you can foster the activities of beneficial microorganisms and set the stage for the gradual transformation of these materials into valuable compost.
Organic Kitchen Waste
Begin by incorporating organic kitchen waste, such as fruit and vegetable scraps, coffee grounds, eggshells, and non-greasy food leftovers. These materials are rich in nitrogen and provide a vital source of nutrients for the composting process. Chop or shred larger pieces to accelerate decomposition and create a more uniform mixture within the compost bin.
Yard Waste
Gather a variety of yard waste, including grass clippings, leaves, small twigs, and plant trimmings. These carbon-rich materials complement the nitrogen-rich kitchen waste, contributing to the overall balance of the compost pile. Shredding or mulching larger yard waste items can expedite their breakdown and integration into the compost.
Read more: DIY Small Entryway Closet Organization Ideas
Brown Materials
Incorporate "brown" materials such as straw, shredded newspaper, cardboard, and dry leaves to enhance the carbon-to-nitrogen ratio in the compost. Brown materials provide structure, promote aeration, and help absorb excess moisture within the pile. Layering these materials with kitchen waste and yard waste creates a well-balanced environment for decomposition.
Avoid These Materials
While adding a diverse range of organic materials is beneficial, it's important to avoid including meat, dairy products, oily foods, and pet waste in the compost bin. These items can attract pests, produce unpleasant odors, and introduce pathogens that may hinder the composting process. By excluding these materials, you can maintain a healthy and efficient compost pile.
Layering and Moisture
As you add compost materials to the bin, aim to create alternating layers of kitchen waste, yard waste, and brown materials. This layering technique promotes even decomposition and helps maintain the balance of carbon and nitrogen within the compost pile. Additionally, ensure the compost materials are moist but not waterlogged, as adequate moisture is essential for microbial activity and the breakdown of organic matter.
By thoughtfully adding a diverse array of compost materials and maintaining the ideal moisture level, you establish the foundation for a thriving compost pile. With these materials in place, the composting process can commence, gradually transforming the organic matter into a nutrient-dense amendment for your garden soil. As you progress to the next step of maintaining and using the compost bin, you'll witness the remarkable journey of decomposition and the emergence of valuable compost from these humble beginnings.
Step 6: Maintain and Use the Compost Bin
Maintaining and utilizing your compost bin is a continuous and rewarding process that allows you to actively engage with the natural transformation of organic materials into nutrient-rich compost. By implementing proper maintenance practices and utilizing the finished compost, you can maximize the efficiency of your composting efforts and reap the benefits of this sustainable practice.
Read more: DIY Closet System Ideas
Turning and Aerating the Compost
Regularly turning the compost pile is essential for aerating the materials and promoting even decomposition. Use a shovel or pitchfork to gently mix the contents of the bin, ensuring that air circulates throughout the pile. This process prevents the formation of anaerobic pockets and accelerates the breakdown of organic matter. Aim to turn the compost every few weeks, or whenever the internal temperature begins to drop, to maintain active decomposition.
Monitoring Moisture and Temperature
Consistently monitor the moisture level and temperature within the compost pile to ensure optimal conditions for decomposition. The compost should feel like a damp sponge, with adequate moisture to support microbial activity. If the pile becomes too dry, lightly water it to rehydrate the materials. Additionally, use a compost thermometer to gauge the internal temperature, aiming for a range of 120-150°F (49-65°C) to facilitate efficient decomposition.
Harvesting and Using the Compost
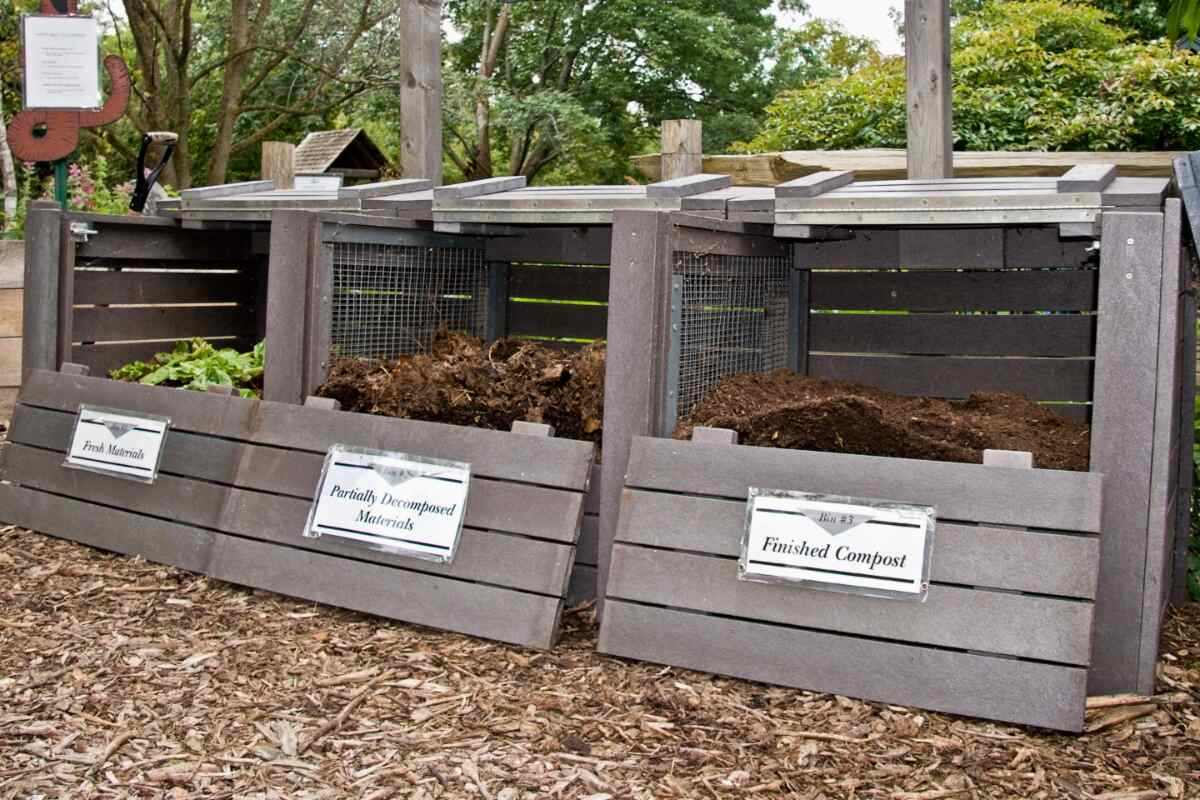
As the composting process progresses, the organic materials will gradually transform into dark, crumbly compost with an earthy aroma. Once the compost reaches a rich, uniform texture and the original ingredients are no longer recognizable, it is ready to be harvested. Use a shovel to scoop out the finished compost from the bottom of the bin, leaving any unfinished materials at the top to continue decomposing.
Application in the Garden
The nutrient-rich compost can be used to enrich garden soil, improve plant growth, and enhance overall soil health. Spread a layer of finished compost over garden beds, around trees, and in containers to provide a natural and beneficial source of nutrients for your plants. The compost acts as a slow-release fertilizer, enriching the soil with essential organic matter and promoting the vitality of your garden.
Read more: Small Closet Organization: DIY Ideas
Continuous Maintenance and Composting Cycle
After harvesting the finished compost, continue to maintain the compost bin by adding new organic materials and repeating the composting cycle. By perpetuating this process, you create a sustainable and self-renewing system that consistently produces valuable compost while minimizing organic waste. Embrace the cyclical nature of composting, and let the compost bin become an enduring source of nourishment for your garden.
By actively maintaining and utilizing your compost bin, you play an integral role in the natural recycling of organic materials, contributing to a more sustainable and environmentally conscious lifestyle. As you engage with the ongoing process of composting, you'll witness the profound impact of this practice on your garden's vitality and the broader ecosystem, fostering a deeper connection to the natural world.
Conclusion
Embarking on the journey of building and maintaining a compost bin is a transformative experience that not only enriches your garden soil but also deepens your connection to the natural world. As you conclude this comprehensive guide, it's essential to reflect on the significance of composting and the profound impact it can have on sustainable living and gardening practices.
By constructing your own compost bin, you've taken a proactive step towards reducing organic waste and minimizing your environmental footprint. The act of diverting kitchen scraps, yard waste, and other organic materials from landfills and transforming them into nutrient-rich compost embodies the principles of sustainability and responsible resource management. Through this process, you've embraced the role of a steward of the environment, actively participating in the natural cycles of decomposition and regeneration.
Moreover, the journey of composting fosters a sense of mindfulness and appreciation for the interconnectedness of all living things. As you engage with the composting process, from adding materials to turning the pile and harvesting the finished compost, you become attuned to the rhythms of nature and the transformative power of organic matter. This hands-on involvement cultivates a deeper understanding of ecological processes and the valuable role that composting plays in nurturing healthy ecosystems.
The utilization of the finished compost in your garden represents the culmination of this enriching journey. By incorporating the nutrient-dense compost into your garden soil, you're not only enhancing plant growth and vitality but also perpetuating a cycle of renewal and regeneration. The compost becomes a tangible embodiment of your sustainable efforts, enriching the earth and fostering a thriving garden that reflects your commitment to environmental stewardship.
As you continue to maintain and utilize your compost bin, you're contributing to a more sustainable and harmonious way of living. The ongoing cycle of composting embodies the ethos of renewal and resourcefulness, demonstrating the potential for positive change through individual actions. By embracing composting as a fundamental practice, you're actively shaping a more resilient and ecologically conscious lifestyle, inspiring others to follow in your footsteps.
In conclusion, the journey of building and maintaining a compost bin transcends the mere act of recycling organic waste. It represents a profound commitment to environmental stewardship, a deepening connection to the natural world, and a tangible expression of sustainable living. As you witness the transformation of organic materials into valuable compost, you're not only nurturing your garden but also sowing the seeds of positive change for a more sustainable future.

