
Home>Create & Decorate>DIY & Crafts>DIY Greenhouse: A Step-by-Step Guide To Building Your Own Garden Oasis
DIY & Crafts
DIY Greenhouse: A Step-by-Step Guide To Building Your Own Garden Oasis
Published: February 27, 2024

Senior Editor in Create & Decorate, Kathryn combines traditional craftsmanship with contemporary trends. Her background in textile design and commitment to sustainable crafts inspire both content and community.
Discover how to create your own garden sanctuary with our step-by-step DIY greenhouse guide. Perfect for DIY & Crafts enthusiasts. Start building today!
(Many of the links in this article redirect to a specific reviewed product. Your purchase of these products through affiliate links helps to generate commission for Twigandthistle.com, at no extra cost. Learn more)
Introduction
Welcome to the world of DIY greenhouses, where you can turn your gardening dreams into reality! Building your own greenhouse is an exciting and rewarding endeavor that allows you to create a thriving oasis for your plants while adding a touch of charm to your outdoor space. Whether you're a seasoned gardener or just starting out, a DIY greenhouse provides the perfect environment for nurturing a wide variety of plants, from delicate flowers to robust vegetables.
In this comprehensive guide, we will walk you through the step-by-step process of constructing your very own greenhouse. From selecting the ideal location to setting up the interior, we'll cover everything you need to know to bring your greenhouse vision to life. By the end of this journey, you'll have the knowledge and confidence to embark on this fulfilling DIY project.
A DIY greenhouse offers numerous benefits beyond just extending the growing season. It provides a controlled environment that shields your plants from harsh weather conditions, pests, and diseases, allowing them to thrive year-round. Additionally, it offers a space for you to experiment with different gardening techniques and grow a wider variety of plants that may not flourish in your outdoor garden alone.
Whether you're passionate about sustainable living, eager to grow your own organic produce, or simply enjoy the therapeutic benefits of gardening, a DIY greenhouse is a versatile and valuable addition to your home. Not only does it provide a sanctuary for your plants, but it also creates a tranquil retreat for you to unwind and connect with nature.
So, roll up your sleeves, gather your tools, and get ready to embark on an enriching journey as we guide you through the process of building your very own DIY greenhouse. Let's dive in and bring your green thumb aspirations to fruition!
Step 1: Choosing the Right Location
Selecting the perfect location for your DIY greenhouse is a crucial first step that sets the foundation for a thriving garden oasis. The ideal location will provide ample sunlight, protection from harsh elements, and easy access to water and electricity. Here's a detailed look at the key factors to consider when choosing the right spot for your greenhouse:
-
Sunlight Exposure: Opt for a location that receives maximum sunlight throughout the day, especially during the growing season. South-facing areas are typically ideal, as they receive ample sunlight from sunrise to sunset, promoting optimal plant growth. Avoid shading from large trees or buildings that could obstruct sunlight.
-
Wind Protection: Shield your greenhouse from strong winds that can damage the structure and stress your plants. Positioning the greenhouse near a natural windbreak, such as a fence, hedge, or existing structures, can provide essential protection and create a more favorable microclimate for your plants.
-
Access to Water: Ensure convenient access to a water source for irrigation. Whether it's a nearby hose connection or a dedicated water supply, easy access to water is essential for maintaining optimal moisture levels within the greenhouse.
-
Electricity Availability: If you plan to incorporate heating, lighting, or automated ventilation systems, proximity to an electrical source is essential. Consider the feasibility of running electrical lines to the chosen location to power essential greenhouse equipment.
-
Topography and Drainage: Assess the topography of the site to ensure proper drainage and avoid potential waterlogging. A level or slightly elevated area with good natural drainage will prevent water accumulation around the greenhouse, safeguarding your plants from excess moisture.
-
Proximity to Home: While not mandatory, situating the greenhouse near your home can offer convenience and easy monitoring. It allows you to keep a close eye on your plants and provides quick access for tending to their needs, especially during extreme weather conditions.
By carefully evaluating these factors, you can identify the optimal location that will provide the best growing conditions for your DIY greenhouse. Once you've selected the perfect spot, you'll be one step closer to creating a flourishing haven for your plants and embarking on an exciting journey of nurturing your own garden oasis.
Step 2: Gathering Materials and Tools
Gathering the necessary materials and tools is a pivotal phase in the journey of building your DIY greenhouse. By ensuring that you have all the essential components at your disposal, you can streamline the construction process and set the stage for a successful project. Here's a comprehensive list of materials and tools you'll need to embark on this fulfilling endeavor:
Materials:
-
Frame Materials: Depending on your design preferences, you'll need materials for the frame, such as PVC pipes, wood, metal tubing, or PVC connectors. Select durable materials that can withstand outdoor conditions and provide a sturdy framework for your greenhouse.
-
Covering Material: The covering material plays a crucial role in regulating the greenhouse environment. Options include greenhouse plastic, polycarbonate panels, or greenhouse film. Choose a covering that offers the desired insulation, light transmission, and durability for your specific climate and plant requirements.
-
Foundation Materials: For a solid foundation, gather materials such as treated lumber, concrete blocks, or gravel. The foundation provides stability and ensures that your greenhouse is securely anchored to the ground.
-
Ventilation Components: To maintain proper airflow, gather materials for ventilation, including exhaust fans, louvers, or automatic vent openers. Adequate ventilation is essential for regulating temperature and humidity within the greenhouse.
-
Heating and Insulation: If you plan to extend the growing season or cultivate heat-sensitive plants, consider materials for insulation and heating, such as thermal blankets, heat mats, or portable heaters. These components help create a conducive environment for year-round gardening.
-
Shelving and Benches: For organizing and displaying your plants, consider materials for constructing shelves and benches within the greenhouse. This provides space for potting, arranging plants, and maximizing the use of vertical space.
-
Fasteners and Hardware: Stock up on screws, bolts, nuts, and other fasteners required for assembling the greenhouse components. Additionally, gather hinges, door handles, and other hardware for installing doors and windows.
Tools:
-
Measuring and Marking Tools: Essential tools include a tape measure, level, and marking tools for precise measurements and alignment during construction.
-
Cutting Tools: Depending on the materials used, gather cutting tools such as a saw, PVC pipe cutter, or utility knife for accurately shaping and trimming components.
-
Drilling and Fastening Tools: Equip yourself with a drill, screwdriver, and appropriate fastening tools to assemble the frame, secure components, and install hardware.
-
Safety Gear: Prioritize safety by obtaining protective gear, including gloves, safety goggles, and a dust mask, especially when working with cutting and drilling tools.
-
Ladder or Scaffolding: Depending on the height of your greenhouse, a sturdy ladder or scaffolding will facilitate safe and efficient construction at elevated positions.
By assembling these materials and tools, you'll be well-prepared to embark on the construction of your DIY greenhouse. With careful planning and the right resources at your disposal, you can proceed to the next phase of designing and customizing your greenhouse to create a nurturing haven for your beloved plants.
Step 3: Designing Your Greenhouse
Designing your greenhouse is a pivotal phase that sets the stage for creating a functional and visually appealing structure tailored to your gardening needs. The design process involves carefully planning the layout, dimensions, and features of your greenhouse to optimize its functionality and aesthetic appeal. Here's a detailed exploration of the key aspects to consider when designing your DIY greenhouse:
Layout and Dimensions
Begin by envisioning the layout of your greenhouse, considering factors such as available space, desired capacity, and potential expansion. Determine the dimensions that align with your gardening goals while ensuring that the greenhouse fits harmoniously within the chosen location. Whether you opt for a compact lean-to greenhouse or a spacious freestanding structure, the layout should facilitate efficient plant management and provide ample space for movement and maintenance.
Structural Considerations
Select a suitable framework material and design that aligns with your climate, aesthetic preferences, and durability requirements. Whether you choose a traditional wood frame, sturdy metal tubing, or versatile PVC components, prioritize structural integrity and weather resistance. Additionally, consider the roof pitch, eave height, and overall shape of the greenhouse to optimize natural light exposure and create an inviting interior environment for your plants.
Glazing and Insulation
Carefully evaluate glazing options, such as single or double-layered greenhouse plastic, polycarbonate panels, or glass, based on your climate and insulation needs. The glazing material plays a crucial role in regulating temperature, diffusing light, and providing a conducive environment for plant growth. Factor in insulation methods, such as thermal blankets or bubble wrap, to enhance heat retention during colder months and minimize energy consumption for heating.
Ventilation and Access
Incorporate strategic ventilation features, including roof vents, side louvers, or automated vent openers, to facilitate proper airflow and temperature control within the greenhouse. Additionally, plan for convenient access points, such as hinged doors and adjustable windows, to ensure easy entry for maintenance and optimal air circulation. Well-planned ventilation and access contribute to a healthy and balanced greenhouse environment for your plants.
Customization and Functional Additions
Consider customizing your greenhouse with functional additions, such as built-in shelving, potting benches, irrigation systems, and supplementary lighting. These elements enhance the practicality and efficiency of your greenhouse, allowing you to organize plants, streamline gardening tasks, and create an adaptable space for various horticultural pursuits.
By meticulously designing your greenhouse with these considerations in mind, you can craft a tailored and harmonious environment that nurtures your plants and aligns with your gardening aspirations. The design phase lays the groundwork for a successful construction process, bringing you closer to the realization of your DIY greenhouse vision.
Step 4: Building the Frame
Building the frame of your DIY greenhouse is a pivotal phase that forms the structural backbone of your garden oasis. The frame provides stability, support, and defines the overall shape of the greenhouse, laying the groundwork for the installation of covering materials and essential components. Here's a detailed exploration of the key steps involved in constructing the frame of your greenhouse:
Selecting the Frame Material
Begin by selecting the appropriate material for the frame, considering factors such as durability, weather resistance, and structural integrity. Common options include treated lumber for a traditional look, metal tubing for added strength, or PVC pipes for a lightweight and versatile framework. Evaluate the pros and cons of each material in relation to your climate, aesthetic preferences, and long-term maintenance requirements.
Planning the Frame Structure
Map out the dimensions and layout of the greenhouse frame, ensuring precise measurements and alignment for a cohesive and stable structure. Consider the roof pitch, eave height, and overall shape of the greenhouse to optimize natural light exposure and create an inviting interior environment for your plants. Additionally, plan for door and window openings, as well as potential attachment points for shelving and other functional additions.
Assembling the Frame Components
Carefully cut and prepare the frame components according to your design specifications, ensuring accurate measurements and clean cuts for seamless assembly. Utilize appropriate fasteners, such as screws, bolts, and connectors, to securely join the frame elements. Prioritize structural stability and alignment during the assembly process to create a robust and reliable framework that can withstand outdoor conditions.
Anchoring the Frame
Secure the frame to the chosen foundation material, whether it's concrete blocks, treated lumber, or other anchoring options. Properly anchoring the frame ensures that the greenhouse remains stable and resistant to external forces, such as wind and inclement weather. Consider using anchor brackets, straps, or embedded anchors to firmly attach the frame to the foundation, providing a solid base for the entire structure.
Reinforcing Key Joints and Connections
Reinforce critical joints and connections within the frame to enhance its overall strength and longevity. Utilize additional bracing, corner supports, or cross beams to fortify key areas of the frame, especially at stress points and load-bearing sections. Strengthening the frame's connections contributes to its resilience and ability to withstand environmental challenges over time.
By meticulously following these steps, you can construct a sturdy and well-crafted frame for your DIY greenhouse, setting the stage for the next phase of adding the covering material, installing ventilation systems, and bringing your greenhouse vision to fruition. The frame serves as the foundation upon which the entire structure is built, embodying the strength and resilience that will support your flourishing garden oasis.
Step 5: Adding the Covering
Adding the covering to your DIY greenhouse is a pivotal stage that directly impacts the environment within the structure. The choice of covering material, installation method, and attention to sealing details significantly contribute to the insulation, light transmission, and overall functionality of the greenhouse. Here's a detailed exploration of the key considerations and steps involved in adding the covering to your greenhouse:
Selecting the Covering Material
Carefully evaluate the available options for greenhouse covering materials, such as greenhouse plastic, polycarbonate panels, or greenhouse film. Consider factors such as light transmission, insulation properties, durability, and suitability for your specific climate. Each material offers unique benefits, ranging from cost-effectiveness and flexibility to superior light diffusion and impact resistance. Select a covering material that aligns with your long-term greenhouse goals and the needs of the plants you intend to cultivate.
Preparing the Frame for Installation
Before adding the covering, ensure that the greenhouse frame is structurally sound and free of any protrusions or sharp edges that could potentially damage the covering material. Clean the frame and remove any debris or obstructions that may hinder the installation process. Additionally, inspect the frame for proper alignment and reinforcement, addressing any necessary adjustments or enhancements to ensure a secure foundation for the covering.
Securing and Sealing the Covering
Lay out the chosen covering material over the greenhouse frame, ensuring a snug and even fit that minimizes wrinkles and sagging. Secure the covering to the frame using appropriate fastening methods, such as clips, channels, or adhesives, depending on the selected material. Pay close attention to sealing details around the edges, seams, and openings to prevent air leakage and moisture infiltration. Proper sealing not only enhances insulation but also safeguards the interior environment from external elements.
Incorporating Ventilation and Access Points
Integrate strategic openings and access points within the covering to facilitate ventilation and convenient entry. Install vents, windows, or adjustable panels that allow for controlled airflow and temperature regulation. Ensure that these features are seamlessly integrated into the covering, providing functionality without compromising the integrity of the greenhouse envelope. Proper ventilation contributes to a healthy and balanced environment for your plants while promoting optimal growing conditions.
Evaluating Light Diffusion and Insulation
Assess the light diffusion and insulation properties of the installed covering to gauge its effectiveness in creating a favorable environment for plant growth. Observe the distribution of natural light within the greenhouse and monitor temperature fluctuations to ensure that the covering material aligns with your desired horticultural outcomes. Adjustments may be necessary to optimize light diffusion and insulation based on the specific requirements of the plants being cultivated.
By meticulously addressing these considerations and following the outlined steps, you can effectively add the covering to your DIY greenhouse, creating a sheltered and nurturing space for your plants to thrive. The covering serves as a protective barrier that regulates the internal climate, harnesses natural light, and contributes to the overall functionality and success of your greenhouse endeavor.
Step 6: Installing Ventilation and Heating
Proper ventilation and heating are essential components of a well-functioning DIY greenhouse, contributing to the creation of an optimal environment for plant growth and overall greenhouse productivity. The installation of effective ventilation systems and heating mechanisms plays a crucial role in regulating temperature, humidity, and air circulation within the greenhouse, fostering ideal conditions for a diverse range of plants to thrive.
Ventilation Systems
Integrating a well-designed ventilation system is paramount to maintaining a balanced and healthy greenhouse environment. Roof vents, side louvers, and automated vent openers are common components that facilitate the regulation of temperature and humidity levels. Roof vents, strategically positioned at the peak of the greenhouse, allow hot air to escape, preventing excessive heat buildup during sunny days. Complementing this, side louvers provide additional airflow control, enabling the expulsion of warm air while promoting fresh air intake. Automated vent openers offer the convenience of automatic temperature-based operation, ensuring that the greenhouse remains adequately ventilated even in the absence of manual adjustments.
Heating Solutions
In regions with colder climates or during the winter months, supplemental heating becomes crucial for sustaining an optimal growing environment. Portable heaters, radiant heating systems, or heat mats are viable options for providing consistent warmth within the greenhouse. By maintaining a stable temperature, these heating solutions protect delicate plants from frost and cold-related stress, extending the growing season and enabling year-round cultivation. Additionally, thermal blankets or insulating materials can be utilized to minimize heat loss during chilly nights, further enhancing the efficiency of the heating system.
Integration and Control
The seamless integration of ventilation and heating systems is essential for harmonizing their operation and optimizing their impact on the greenhouse environment. Automated controls, such as thermostats and humidity sensors, enable precise regulation of ventilation and heating equipment, ensuring that the conditions remain within the desired range for plant growth. By leveraging technology and automation, greenhouse enthusiasts can create a self-sustaining ecosystem that adapts to fluctuating environmental factors, promoting plant health and vitality.
Environmental Monitoring
Regular monitoring of the greenhouse environment is imperative to assess the effectiveness of ventilation and heating systems. Observing temperature fluctuations, humidity levels, and airflow patterns allows for adjustments and fine-tuning to optimize the performance of these essential components. By staying attuned to the dynamics of the greenhouse environment, individuals can proactively address any imbalances and ensure that plants receive the ideal conditions for robust growth and development.
Incorporating efficient ventilation and heating systems into the DIY greenhouse elevates its functionality and versatility, empowering gardeners to cultivate a diverse array of plants while mitigating the challenges posed by external weather conditions. The thoughtful integration of these components fosters a nurturing and sustainable environment, laying the groundwork for a flourishing and bountiful garden oasis.
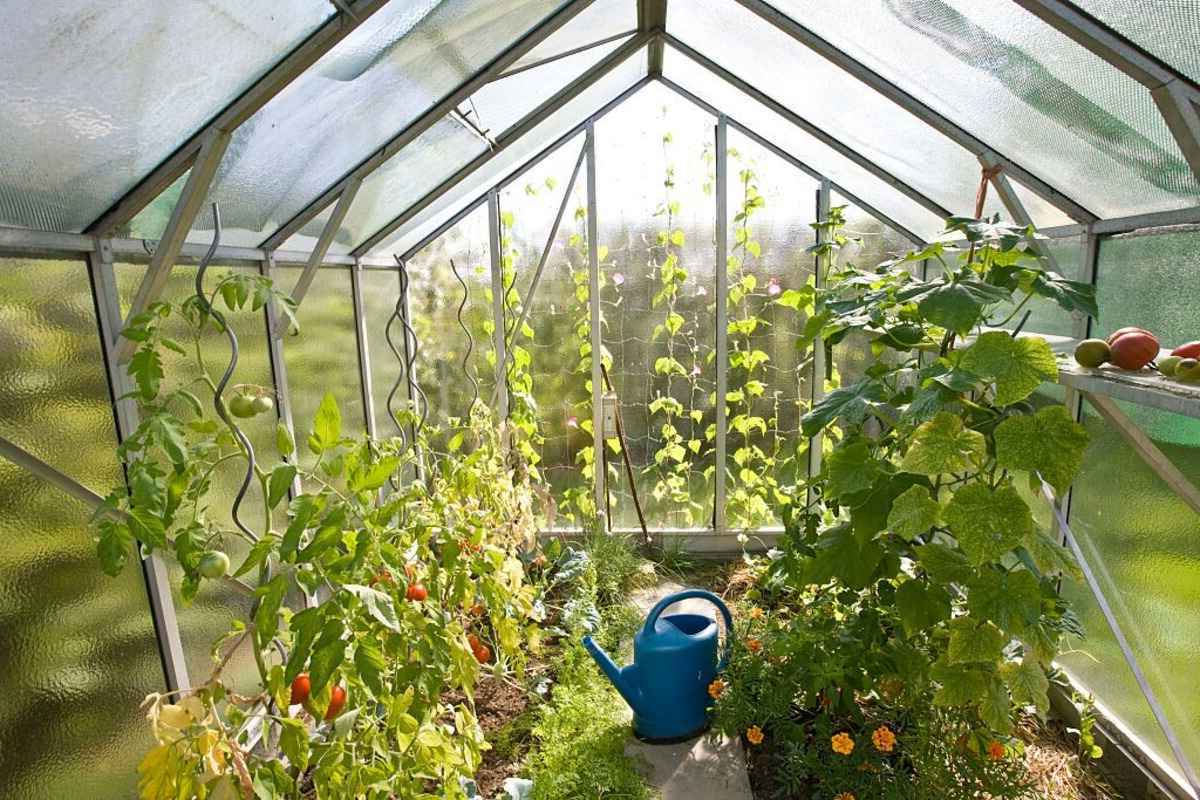
Step 7: Setting Up the Interior
Setting up the interior of your DIY greenhouse is a transformative phase that allows you to personalize the space and create an environment tailored to the needs of your plants. This step involves strategically arranging functional elements, optimizing space utilization, and integrating essential features that contribute to the efficiency and aesthetics of the greenhouse interior.
Organizing Plant Displays
Begin by organizing plant displays to maximize the use of available space and showcase the diverse array of flora within the greenhouse. Utilize sturdy and adjustable shelving to create multi-tiered displays, allowing for efficient categorization of plants based on their size, light requirements, and growth habits. By arranging plants in an organized and visually appealing manner, you can create a captivating and harmonious greenery-filled environment.
Implementing Potting and Work Areas
Designate a dedicated potting and work area within the greenhouse to streamline gardening tasks and provide a functional space for transplanting, pruning, and maintenance activities. Incorporate a sturdy potting bench equipped with storage shelves, hooks for hanging tools, and ample workspace for potting and tending to plants. This designated area serves as a practical hub for nurturing plants and ensures that essential gardening tools and supplies are readily accessible.
Integrating Irrigation Systems
Integrate efficient irrigation systems, such as drip irrigation or soaker hoses, to deliver water directly to the root zones of plants, promoting optimal moisture levels and minimizing water wastage. Strategically position irrigation lines to ensure comprehensive coverage of plant beds and containers, fostering uniform hydration and reducing the need for manual watering. By automating the irrigation process, you can maintain consistent soil moisture and alleviate the burden of frequent watering, especially during periods of high plant demand.
Incorporating Supplementary Lighting
Supplementary lighting plays a crucial role in extending the daily light exposure for plants, especially during the darker months or in regions with limited sunlight. Install energy-efficient LED grow lights or fluorescent fixtures to supplement natural light and provide adequate illumination for plants that require extended photoperiods. Position the lighting fixtures strategically to ensure uniform coverage and adjust the light intensity based on the specific light requirements of different plant species.
Personalizing Decor and Functional Elements
Personalize the greenhouse interior with decorative elements, such as ornamental planters, artistic trellises, and vibrant signage, adding a touch of charm and character to the space. Additionally, incorporate functional elements, such as temperature and humidity monitors, to track environmental conditions and ensure that the greenhouse remains within the optimal range for plant growth. By infusing the interior with a blend of practicality and aesthetics, you can create an inviting and nurturing sanctuary for your beloved plants.
By thoughtfully setting up the interior of your DIY greenhouse, you can create a functional, organized, and visually appealing space that fosters the growth and well-being of your plants. This phase marks the culmination of your efforts in creating a thriving garden oasis, where plants flourish, gardening tasks are streamlined, and the beauty of nature is celebrated within the confines of your personalized greenhouse.
Step 8: Maintaining Your DIY Greenhouse
Maintaining your DIY greenhouse is a continuous commitment that ensures the longevity, productivity, and overall well-being of the enclosed plant ecosystem. Regular upkeep and attentive care are essential to preserve the functionality of the greenhouse, safeguard plant health, and address any potential issues that may arise. Here's a detailed exploration of the key aspects involved in maintaining your DIY greenhouse:
Monitoring Environmental Conditions
Regularly monitor and assess the environmental conditions within the greenhouse, including temperature, humidity levels, and airflow patterns. Utilize digital thermometers, hygrometers, and airflow meters to track and analyze the prevailing conditions. By staying attuned to these factors, you can make informed adjustments to maintain an optimal growing environment for your plants.
Pest and Disease Management
Implement proactive pest and disease management strategies to safeguard your plants from potential threats. Regularly inspect plants for signs of pests, such as aphids or spider mites, and promptly address any infestations using organic pest control methods or integrated pest management techniques. Additionally, practice good sanitation by removing any diseased plant material to prevent the spread of pathogens.
Routine Cleaning and Sanitization
Conduct routine cleaning and sanitization of the greenhouse interior, including benches, shelves, and equipment, to minimize the accumulation of debris and potential disease vectors. Regularly disinfect surfaces using mild organic cleaners to maintain a hygienic environment and reduce the risk of plant infections. Pay special attention to maintaining clean and unclogged drainage systems to prevent waterlogging and associated issues.
Seasonal Maintenance Tasks
Adapt your maintenance routine to address seasonal requirements and challenges. During the winter months, prioritize insulation checks, heating system maintenance, and snow removal to ensure that the greenhouse remains resilient in cold weather. In the summer, focus on optimizing ventilation, shading, and hydration to mitigate heat stress and maintain a comfortable environment for plants.
Structural Integrity Checks
Periodically assess the structural integrity of the greenhouse, paying attention to the frame, covering material, and anchoring systems. Look for signs of wear, damage, or deterioration, and promptly address any issues to prevent structural compromise. Reinforce critical joints, replace worn-out components, and ensure that the greenhouse remains secure and resilient against external forces.
Plant Care and Maintenance
Devote time to the care and maintenance of individual plants within the greenhouse. Regularly prune, fertilize, and water your plants according to their specific needs, promoting healthy growth and vitality. Monitor for signs of nutrient deficiencies, wilting, or overgrowth, and adjust your care regimen accordingly to support the well-being of your cherished plant collection.
By diligently attending to these maintenance tasks, you can uphold the functionality and vitality of your DIY greenhouse, creating an enduring haven for plant cultivation and horticultural pursuits. The ongoing care and attention you invest in maintaining your greenhouse contribute to the sustained success and fulfillment of your gardening endeavors.
Conclusion
Embarking on the journey of building your own DIY greenhouse is not just a fulfilling project; it's a transformative experience that empowers you to cultivate a thriving garden oasis while nurturing your passion for plants. As you reach the conclusion of this comprehensive guide, you stand on the threshold of a vibrant and sustainable horticultural endeavor, equipped with the knowledge and confidence to bring your greenhouse vision to fruition.
Your DIY greenhouse is more than just a structure; it's a sanctuary where the beauty of nature intertwines with your dedication to sustainable living and the joy of gardening. By carefully selecting the ideal location, gathering materials and tools, designing the framework, and meticulously adding the covering, ventilation, and heating systems, you have laid the foundation for a nurturing environment that fosters plant growth and exploration.
As you set up the interior, integrating functional elements and personalizing the space, you've created a haven where plants thrive, gardening tasks are streamlined, and the beauty of nature is celebrated within the confines of your personalized greenhouse. The culmination of your efforts has resulted in a space that not only sustains plant life but also provides a tranquil retreat for you to unwind and connect with the natural world.
The journey doesn't end with the completion of your DIY greenhouse; it evolves into a continuous commitment to maintenance, care, and the ongoing pursuit of horticultural fulfillment. By monitoring environmental conditions, managing pests and diseases, and tending to the needs of your plants, you ensure that your greenhouse remains a flourishing and resilient ecosystem throughout the seasons.
As you navigate the seasons, adapting your maintenance routine to address the unique requirements of each time of year, you embrace the dynamic nature of gardening and the ever-evolving relationship between plants and their environment. Your dedication to the care and maintenance of your greenhouse reflects a deep-rooted passion for sustainable living and the nurturing of a thriving plant community.
In conclusion, your DIY greenhouse is a testament to your commitment to sustainable living, your love for plants, and your unwavering dedication to creating a nurturing environment that transcends the boundaries of a traditional garden. It's a space where seeds of inspiration grow alongside flourishing flora, and where the beauty of nature intertwines with the art of cultivation. As you continue this enriching journey, your DIY greenhouse stands as a testament to the transformative power of gardening and the enduring connection between humans and the natural world.