
Home>Create & Decorate>DIY & Crafts>DIY Small Greenhouse: Step-by-Step Guide To Building Your Own Greenhouse
DIY & Crafts
DIY Small Greenhouse: Step-by-Step Guide To Building Your Own Greenhouse
Published: May 6, 2024

Senior Editor in Create & Decorate, Kathryn combines traditional craftsmanship with contemporary trends. Her background in textile design and commitment to sustainable crafts inspire both content and community.
Learn how to build your own DIY small greenhouse with our step-by-step guide. Perfect for DIY & Crafts enthusiasts looking to create their own garden oasis.
(Many of the links in this article redirect to a specific reviewed product. Your purchase of these products through affiliate links helps to generate commission for Twigandthistle.com, at no extra cost. Learn more)
Introduction
Are you a plant enthusiast looking to extend your growing season or protect your delicate plants from harsh weather conditions? Building your own small greenhouse can be a rewarding and cost-effective solution. With a little bit of DIY spirit and some basic carpentry skills, you can create a nurturing environment for your plants right in your own backyard. In this step-by-step guide, we will walk you through the process of building a small greenhouse, from choosing the right location to setting up the ventilation system. So, roll up your sleeves and get ready to embark on this exciting DIY project!
Choosing the Right Location for Your Greenhouse
When selecting the perfect spot for your small greenhouse, there are several factors to consider. The location should receive ample sunlight throughout the day, ideally facing south to maximize sun exposure. Additionally, ensure that the area is sheltered from strong winds to protect the structure and your plants. It's also important to have easy access to water and electricity, as well as a level surface to build your greenhouse on. Lastly, consider the proximity to your home for convenience and monitoring. By carefully evaluating these aspects, you can choose a location that provides the optimal conditions for your greenhouse and the plants within it.
- Ensure ample sunlight exposure, preferably facing south.
- Shelter the area from strong winds to protect the structure and plants.
- Provide easy access to water and electricity.
- Select a level surface for the greenhouse’s foundation.
- Consider proximity to your home for convenience and monitoring.
Gathering Materials and Tools
Before diving into the construction of your small greenhouse, it's essential to gather all the necessary materials and tools. Here's a comprehensive list to ensure you have everything at hand:
Materials
- Lumber: Purchase high-quality, rot-resistant lumber for the frame, such as cedar or redwood.
- PVC Pipes or Metal Conduit: These will be used to create the arched roof of the greenhouse.
- Clear Plastic Sheeting: Opt for UV-resistant, durable greenhouse plastic to cover the frame.
- Fasteners: Stock up on screws, nails, and bolts of various sizes to secure the structure.
- Hinges and Latches: These will be needed for the door of the greenhouse.
- Brackets and Clamps: These will help reinforce the frame and secure the plastic covering.
- Foundation Materials: Depending on your preference, gather materials for the foundation, such as gravel, concrete, or treated wood.
Tools
- Measuring Tape and Level: Accurate measurements and a level foundation are crucial for a sturdy greenhouse.
- Saw: A handsaw or power saw for cutting lumber and PVC pipes to the required lengths.
- Drill and Bits: A drill will be necessary for creating holes and driving screws.
- Hammer and Nails: Essential for traditional fastening methods.
- Pliers and Wire Cutters: These will come in handy for working with wire and fasteners.
- Work Gloves and Safety Glasses: Protect your hands and eyes during construction.
- Greenhouse Plastic Fastening Tools: These specialized tools, such as wiggle wire and lock channel, will aid in securing the plastic covering.
By ensuring you have all the required materials and tools, you can streamline the construction process and minimize interruptions. Now that you have everything prepared, it's time to roll up your sleeves and start building your small greenhouse!
Building the Frame of the Greenhouse
The frame serves as the backbone of your small greenhouse, providing structural support and stability. Here's a step-by-step guide to constructing the frame:
-
Cutting the Lumber: Begin by cutting the lumber to the required lengths based on your greenhouse design. Use a saw to make precise cuts, ensuring that the pieces fit together seamlessly during assembly.
-
Assembling the Base: Lay out the cut lumber to form the base of the greenhouse. Use a measuring tape and level to ensure the corners are square and the base is level. Secure the pieces together using screws or nails, creating a sturdy foundation for the rest of the frame.
-
Creating the Arched Roof: If you're opting for a curved roof design, use PVC pipes or metal conduit to form the arches. Secure the pipes to the base, evenly spacing them to support the roof structure. Ensure that the arches are securely anchored to withstand external forces.
-
Adding Vertical Supports: Install vertical supports along the sides of the base and attach them to the arched roof structure. These supports will enhance the overall stability of the frame and provide additional reinforcement.
-
Securing the Frame: Once the basic frame is assembled, reinforce the connections with brackets and clamps. This step is crucial for ensuring that the frame can withstand environmental factors such as wind and snow loads.
-
Preparing for the Covering: Before adding the covering, inspect the frame for any sharp edges or protruding fasteners that could damage the plastic sheeting. Smooth out any rough areas and ensure that the frame is free of debris.
By following these steps, you can construct a robust and durable frame for your small greenhouse. The frame lays the groundwork for the rest of the construction process, setting the stage for the installation of the covering and other essential components.
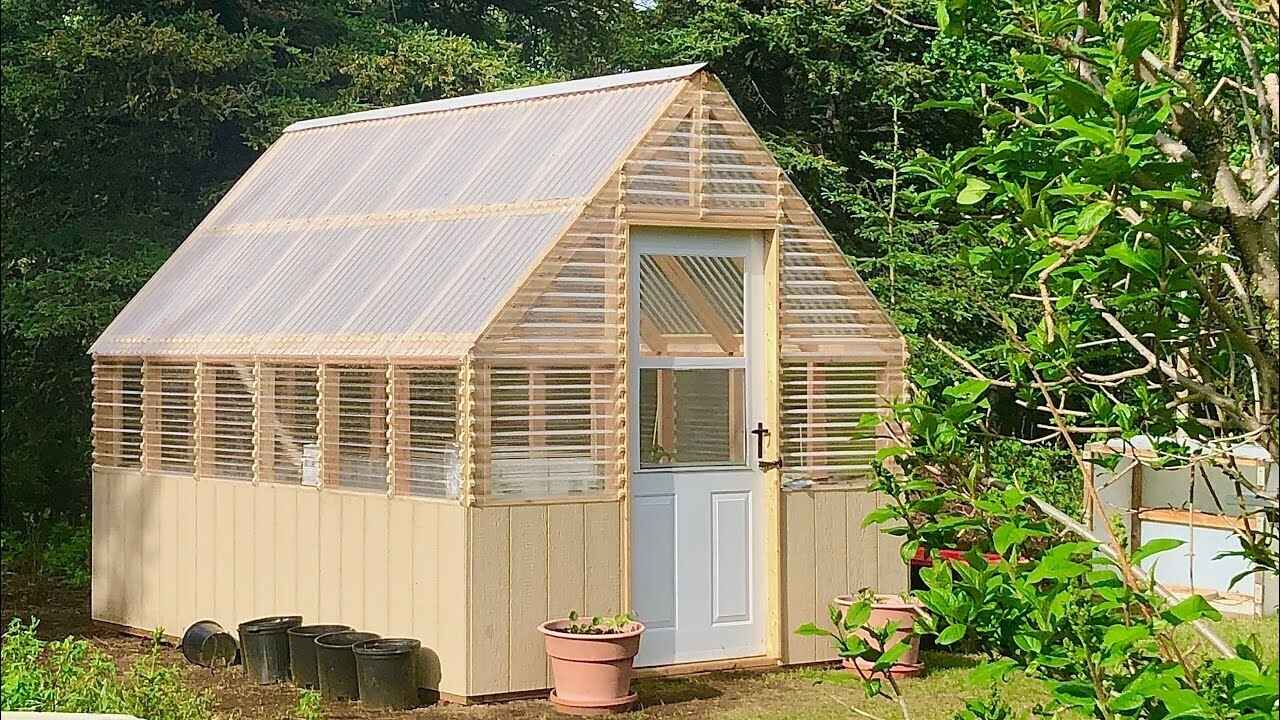
Adding the Covering and Door
With the frame of your small greenhouse in place, it's time to add the covering and door to create a protective and functional enclosure for your plants. Here's a detailed guide on this crucial phase of the construction process:
-
Selecting the Clear Plastic Sheeting: Choose a high-quality, UV-resistant clear plastic sheeting for the covering. Ensure that the material is durable and provides adequate insulation for your plants. Measure the dimensions of the frame to determine the amount of plastic sheeting required, allowing for some overlap for secure fastening.
-
Securing the Plastic Sheeting: Begin by draping the plastic sheeting over the frame, ensuring that it covers the entire structure with some excess on the sides. Use specialized greenhouse plastic fastening tools such as wiggle wire and lock channel to secure the sheeting to the frame. This method provides a tight and secure fit, preventing the sheeting from being dislodged by wind or other external forces.
-
Installing the Door: The door is a vital component of your greenhouse, providing access for maintenance and ventilation. Construct a sturdy door frame using the same lumber used for the rest of the structure. Attach hinges to one side of the door frame and the corresponding side of the greenhouse frame, allowing the door to swing open and close smoothly. Install latches or locks to secure the door when closed, ensuring the safety of your plants.
-
Ventilation Considerations: Depending on your design, consider incorporating vents or windows into the covering to facilitate airflow and regulate the temperature inside the greenhouse. These openings can be fitted with adjustable louvers or screens to control the amount of air and light entering the structure.
-
Sealing and Insulation: Once the plastic sheeting is securely fastened and the door is in place, inspect the edges and seams for any gaps or loose areas. Use weather-resistant tape or sealant to seal any openings and ensure that the greenhouse is well-insulated. Proper sealing is essential for maintaining the internal climate and protecting your plants from external elements.
By following these steps, you can effectively add the covering and door to your small greenhouse, creating a sheltered and controlled environment for your plants to thrive. The covering not only shields your plants from adverse weather conditions but also creates a conducive atmosphere for their growth and development. Now that the structure is enclosed, it's time to focus on the interior setup and functionality of your small greenhouse.
Installing Shelves and Benches
Now that the structural elements of your small greenhouse are in place, it's time to focus on the interior setup, starting with installing shelves and benches. These components are essential for organizing your plants, providing adequate space for them to thrive, and creating a functional workspace within the greenhouse.
Designing the Layout
Before installing shelves and benches, carefully plan the layout to optimize the available space. Consider the types of plants you intend to grow and their specific requirements for sunlight, humidity, and space. Additionally, factor in the pathways and access points to ensure convenient movement and maintenance within the greenhouse.
Selecting Materials
When choosing materials for the shelves and benches, prioritize durability and resistance to moisture and humidity. Opt for materials such as pressure-treated lumber, cedar, or corrosion-resistant metal for longevity in the greenhouse environment. Ensure that the materials are smooth and free of splinters to prevent any damage to your plants.
Constructing Shelves
For the installation of shelves, attach brackets or supports to the frame of the greenhouse at the desired heights. Place the shelves on top of the supports, ensuring they are level and securely anchored. Consider adjustable shelving to accommodate plants of varying heights and to allow flexibility in the arrangement.
Building Benches
Benches provide a convenient surface for potting, grooming, and displaying plants. Construct sturdy benches using the same materials as the shelves, ensuring that they are capable of supporting the weight of potted plants and gardening supplies. Secure the benches to the frame or foundation of the greenhouse to prevent any movement or instability.
Organizing the Space
Once the shelves and benches are in place, organize the space based on the specific needs of your plants. Group plants with similar light and water requirements together, utilizing the shelves and benches to create distinct zones within the greenhouse. Consider incorporating hanging baskets or hooks for trailing plants to maximize vertical space.
Enhancing Functionality
To enhance the functionality of the shelves and benches, consider adding additional features such as drip trays, hooks for hanging tools, and integrated storage for gardening supplies. These enhancements contribute to a well-organized and efficient workspace, making it easier to care for your plants and maintain the greenhouse.
By following these steps, you can effectively install shelves and benches in your small greenhouse, creating a well-organized and functional environment for your plants to thrive. The careful planning and construction of these interior components contribute to the overall success of your greenhouse and provide a nurturing space for your gardening endeavors.
Setting Up the Ventilation System
Proper ventilation is essential for maintaining a healthy and conducive environment within your small greenhouse. An effective ventilation system helps regulate temperature, humidity, and air circulation, creating an optimal growing environment for your plants. Here's a detailed guide on setting up the ventilation system for your greenhouse:
Assessing Ventilation Needs
Before installing the ventilation system, assess the specific ventilation needs of your greenhouse. Consider factors such as the size of the structure, the types of plants being grown, and the prevailing climate in your area. Additionally, evaluate the potential sources of heat buildup within the greenhouse, such as sunlight exposure and the use of heating systems during colder months. This assessment will guide the selection and placement of ventilation components to ensure efficient air exchange.
Choosing Ventilation Components
Selecting the appropriate ventilation components is crucial for achieving effective air circulation. Common ventilation options for small greenhouses include roof vents, side vents, exhaust fans, and louvers. Roof vents are particularly effective for releasing hot air that accumulates near the top of the greenhouse, while side vents facilitate cross-ventilation to maintain uniform temperatures. Exhaust fans can be installed to expel excess heat and humidity, especially during warmer seasons. Louvers provide adjustable airflow control, allowing you to fine-tune the ventilation based on the specific requirements of your plants.
Installing Ventilation Openings
Once you've chosen the ventilation components, carefully install the openings in strategic locations within the greenhouse. Roof vents and side vents should be positioned to facilitate the natural flow of air, taking advantage of prevailing winds and sunlight exposure. Ensure that the openings are equipped with screens to prevent pests and debris from entering the greenhouse while allowing unrestricted airflow. Additionally, consider incorporating automatic vent openers that respond to temperature changes, providing hands-free ventilation control.
Implementing Circulation Fans
In addition to passive ventilation components, consider implementing circulation fans to promote air movement within the greenhouse. Circulation fans help distribute heat and humidity evenly, preventing stagnant air pockets and minimizing the risk of fungal diseases. Position the fans strategically to ensure uniform air circulation throughout the entire space. Opt for energy-efficient fans with adjustable speed settings to accommodate varying ventilation needs based on seasonal changes.
Monitoring and Adjusting Ventilation
After the ventilation system is in place, regularly monitor the internal climate of the greenhouse to ensure that the ventilation is effectively regulating temperature and humidity. Use a combination of thermometers and hygrometers to track these parameters and make adjustments to the ventilation settings as needed. During extreme weather conditions, such as heatwaves or cold snaps, be prepared to modify the ventilation to safeguard your plants from adverse effects.
Enhancing Ventilation Efficiency
To enhance the efficiency of the ventilation system, consider integrating additional features such as shade cloth to reduce solar heat gain, misting systems for humidity control, and thermal mass elements to stabilize temperature fluctuations. These enhancements work in tandem with the ventilation system to create a well-balanced and controlled environment for your plants.
By following these steps, you can effectively set up a ventilation system that promotes optimal growing conditions within your small greenhouse. A well-designed and properly executed ventilation system is instrumental in creating a nurturing environment for your plants, ensuring their health and productivity throughout the year.
Maintaining Your Small Greenhouse
Maintaining your small greenhouse is essential to ensure the longevity of the structure and the well-being of your plants. Regular upkeep and preventive measures can help address potential issues and create an optimal environment for plant growth. Here are the key aspects of maintaining your small greenhouse:
Cleaning and Sanitizing
Regularly clean the interior and exterior of the greenhouse to remove dirt, dust, and debris that can accumulate over time. Use a gentle soap solution and a soft brush to clean the walls, benches, and shelves. Sanitize the surfaces periodically to prevent the buildup of mold, algae, and pests. Additionally, clean the windows and clear plastic sheeting to maximize sunlight penetration and maintain visibility.
Inspecting for Damage
Conduct routine inspections of the greenhouse structure to identify any signs of wear, damage, or deterioration. Check for loose fasteners, damaged plastic sheeting, and compromised seals. Address any issues promptly to prevent further damage and maintain the structural integrity of the greenhouse. Inspect the frame, door, and ventilation components to ensure they are functioning as intended.
Monitoring Climate Conditions
Regularly monitor the internal climate conditions within the greenhouse, including temperature, humidity, and airflow. Use thermometers, hygrometers, and airflow meters to track these parameters and make adjustments as needed. Be attentive to fluctuations in climate, especially during extreme weather events, and take proactive measures to safeguard your plants from adverse effects.
Pest and Disease Management
Implement a proactive pest and disease management strategy to prevent infestations and outbreaks. Inspect plants regularly for signs of pests, such as aphids, mites, and whiteflies, and promptly address any infestations using organic pest control methods. Additionally, practice good sanitation by removing fallen leaves and plant debris to minimize the risk of disease spread.
Seasonal Maintenance
Adjust the greenhouse environment to accommodate seasonal changes and the specific needs of your plants. During colder months, consider insulating the greenhouse and providing supplemental heating to protect your plants from frost. In warmer seasons, optimize ventilation and shading to prevent overheating and excessive humidity. Regularly clean and maintain heating and cooling equipment to ensure their efficient operation.
Watering and Fertilization
Establish a consistent watering and fertilization routine to provide your plants with essential nutrients and hydration. Monitor soil moisture levels and adjust watering frequency based on plant requirements and environmental conditions. Use organic fertilizers to promote healthy growth and avoid over-fertilization, which can lead to nutrient imbalances.
Repairs and Upgrades
Address any necessary repairs or upgrades to the greenhouse structure and components. Replace worn-out plastic sheeting, repair damaged frames, and upgrade ventilation systems as needed. Consider incorporating energy-efficient technologies and sustainable materials to enhance the functionality and eco-friendliness of your greenhouse.
By prioritizing these maintenance practices, you can create a thriving and sustainable environment within your small greenhouse, ensuring the well-being of your plants and the long-term success of your gardening endeavors. Regular care and attention to the greenhouse will contribute to a rewarding and fulfilling gardening experience.
Conclusion
Building your own small greenhouse is a fulfilling and rewarding endeavor that provides a nurturing space for your plants and extends your gardening capabilities. By carefully selecting the location, gathering the necessary materials and tools, constructing the frame, adding the covering and door, installing shelves and benches, setting up the ventilation system, and maintaining the greenhouse, you have embarked on a journey of creating a sustainable and productive environment for your plants.
The small greenhouse you have built offers a controlled climate that protects your plants from adverse weather conditions, extends the growing season, and provides a space for cultivating a wide variety of plants. The attention to detail in the construction and maintenance of the greenhouse ensures that your plants receive the optimal conditions for growth and development.
As you continue to tend to your greenhouse and watch your plants thrive, you are not only fostering a deeper connection with nature but also reaping the rewards of your DIY efforts. The small greenhouse becomes a sanctuary for your gardening passion, allowing you to experiment with different plant species, propagate new varieties, and enjoy the beauty of a flourishing garden throughout the year.
With the knowledge and skills gained from building and maintaining your small greenhouse, you are well-equipped to continue expanding your gardening pursuits and exploring the endless possibilities that this nurturing space offers. Whether you are a seasoned gardener or a novice enthusiast, the small greenhouse stands as a testament to your dedication to creating a sustainable and bountiful environment for your beloved plants.