
Home>Create & Decorate>DIY & Crafts>DIY Storage Bed Frame
DIY & Crafts
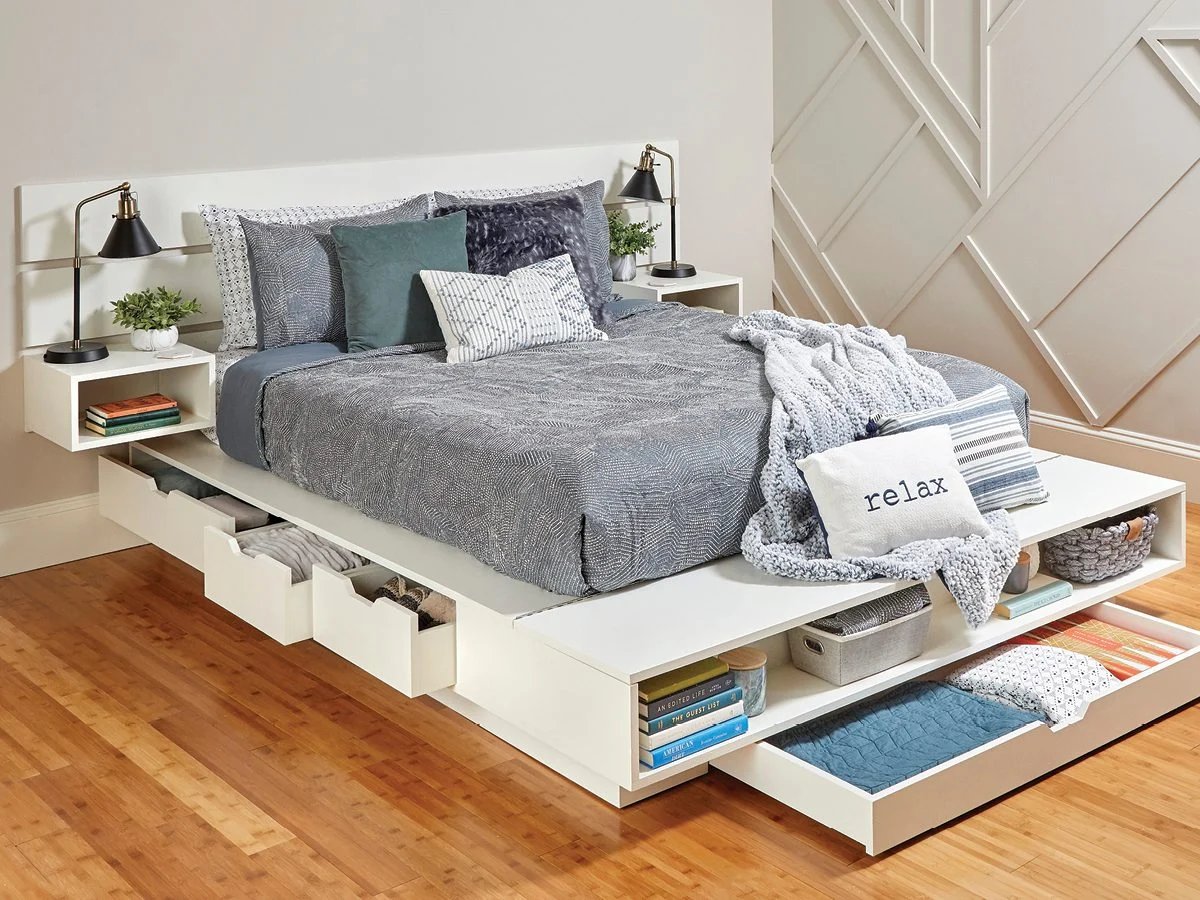
DIY Storage Bed Frame
Modified: May 30, 2024

Content Creator specializing in woodworking and interior transformations. Caegan's guides motivate readers to undertake their own projects, while his custom furniture adds a personal touch.
Discover how to build your own DIY storage bed frame with our step-by-step guide. Perfect for those who love DIY & Crafts projects.
(Many of the links in this article redirect to a specific reviewed product. Your purchase of these products through affiliate links helps to generate commission for Twigandthistle.com, at no extra cost. Learn more)
Introduction
Are you tired of clutter in your bedroom? Do you need more storage space but don't want to sacrifice style? A DIY storage bed frame might just be the solution you're looking for. Not only does it provide a comfortable place to sleep, but it also offers ample space to store extra bedding, clothes, or any other items you want to keep out of sight. In this guide, we'll walk you through the steps to create your own storage bed frame, allowing you to maximize space and add a touch of personal flair to your bedroom. Let's get started!
Materials Needed
To build your own DIY storage bed frame, you will need the following materials:
- Plywood: You'll need this to create the base and the partitions for the storage compartments.
- Lumber: This will be used to construct the frame of the bed and provide support for the mattress.
- Screws and Nails: Essential for securing the various components together.
- Wood Glue: This will provide extra strength and stability to the joints.
- Hinges: Necessary for the storage compartments to open and close smoothly.
- Drawer Slides: If you plan to include drawers in your storage compartments.
- Power Drill: To make pilot holes and drive screws.
- Saw: To cut the plywood and lumber to the required dimensions.
- Measuring Tape: Essential for ensuring accurate cuts and assembly.
- Sandpaper: To smooth out any rough edges and surfaces.
- Paint or Stain: To add a finishing touch and protect the wood.
Gathering these materials will set you up for a successful DIY storage bed frame project.
Step 1: Building the Base
-
Measure and Cut the Plywood: Begin by measuring and cutting the plywood to the dimensions of your mattress. You will need two pieces for the top and bottom of the base.
-
Assemble the Base: Place the two pieces of plywood parallel to each other and connect them using lumber pieces cut to the same length as the plywood. This will create a sturdy base for the mattress to rest on.
-
Reinforce the Corners: To ensure the base is strong and durable, reinforce the corners with additional lumber pieces. This will provide extra support and stability.
-
Add Support Beams: Install support beams across the base to prevent the plywood from sagging in the middle. These beams should be evenly spaced to evenly distribute the weight of the mattress and the sleeper.
-
Sand and Finish: Once the base is assembled, sand down any rough edges and apply a finish of your choice to protect the wood and give it a polished look.
By following these steps, you will have a solid and reliable base for your DIY storage bed frame.
Step 2: Adding the Storage Compartments
-
Measure and Divide: Begin by measuring and dividing the remaining plywood into sections that will serve as the partitions for the storage compartments. The number and size of the compartments will depend on your specific storage needs and the dimensions of your bed frame.
-
Attach the Partitions: Once the plywood is cut to the appropriate sizes, attach the partitions to the base using screws and wood glue. Ensure that they are securely fastened and evenly spaced to create uniform storage compartments.
-
Install Hinges and Drawer Slides: If your design includes hinged doors or drawers, install the hinges and drawer slides according to the manufacturer's instructions. This will allow for smooth opening and closing of the storage compartments, providing easy access to the items stored within.
-
Add Handles or Knobs: To enhance the functionality and aesthetics of the storage compartments, consider adding handles or knobs to the doors or drawers. This not only makes it easier to open and close the compartments but also adds a decorative touch to the bed frame.
-
Test the Functionality: Before proceeding to the next step, test the functionality of the storage compartments to ensure that they open and close smoothly and that the storage space meets your needs. Make any necessary adjustments at this stage.
By following these steps, you will successfully integrate functional and practical storage compartments into your DIY bed frame, providing a convenient solution for organizing and storing your belongings.
Step 3: Assembling the Frame
-
Position the Base: Place the assembled base in the desired location in your bedroom, ensuring that it is positioned correctly and aligned with the surrounding furniture and walls.
-
Attach the Frame Sides: Using lumber pieces, construct the frame sides by connecting the headboard and footboard to the base. Secure them in place using screws and wood glue, ensuring that the frame is stable and well-supported.
-
Add Center Support: For additional stability, consider adding a center support beam running from the headboard to the footboard. This will prevent the frame from sagging and provide extra reinforcement.
-
Install the Slats: If your mattress requires slats for support, install them across the base, ensuring they are evenly spaced and securely attached. This step is crucial for maintaining the integrity of your mattress.
-
Check for Stability: Once the frame is assembled, check for any wobbling or instability. Make any necessary adjustments to ensure that the frame is solid and secure.
-
Test the Mattress Fit: Place your mattress on the assembled frame to ensure that it fits properly and rests evenly on the base and slats. This step is essential for the comfort and longevity of your mattress.
By following these steps, you will successfully assemble the frame of your DIY storage bed, providing a sturdy and reliable structure for your mattress and storage compartments.
Step 4: Finishing Touches
-
Apply Paint or Stain: Once the frame is assembled, consider applying a coat of paint or stain to enhance the appearance of the bed frame. Choose a color or finish that complements the overall aesthetic of your bedroom. This step not only adds a decorative touch but also protects the wood from wear and tear.
-
Add Decorative Molding: To give your DIY storage bed frame a polished look, consider adding decorative molding to the frame sides or headboard. This can create a more refined and elegant appearance, elevating the overall design of the bed frame.
-
Attach Bed Legs: Depending on your design preference, you may choose to attach bed legs to the frame to elevate it from the floor. This not only adds a stylish element but also makes it easier to clean underneath the bed.
-
Install Underbed Lighting: For a modern and functional touch, consider installing underbed lighting. This can create a cozy ambiance in the bedroom and also provide practical illumination for the storage compartments.
-
Add Upholstered Headboard: If you desire a more luxurious and comfortable look, consider adding an upholstered headboard to the bed frame. This can add a touch of softness and sophistication to the overall design.
-
Accessorize with Bedding: Once the bed frame is complete, add your favorite bedding, pillows, and throws to complement the overall look. Choose colors and textures that tie the room together and create a cozy and inviting space.
By incorporating these finishing touches, you can personalize your DIY storage bed frame to align with your style preferences and create a functional and aesthetically pleasing piece of furniture for your bedroom.
Conclusion
In conclusion, building your own DIY storage bed frame is a rewarding and practical project that can enhance the functionality and aesthetics of your bedroom. By following the steps outlined in this guide and utilizing the right materials, you can create a customized bed frame that not only provides a comfortable place to sleep but also offers valuable storage space. From constructing the base and adding storage compartments to assembling the frame and adding finishing touches, each step contributes to the overall success of the project. With careful planning and attention to detail, you can achieve a well-crafted storage bed frame that meets your specific needs and reflects your personal style. Embrace the opportunity to unleash your creativity and woodworking skills, and enjoy the satisfaction of a DIY project that brings both practicality and beauty to your living space.