
Home>Create & Decorate>DIY & Crafts>DIY Dog Ramp For Bed
DIY & Crafts
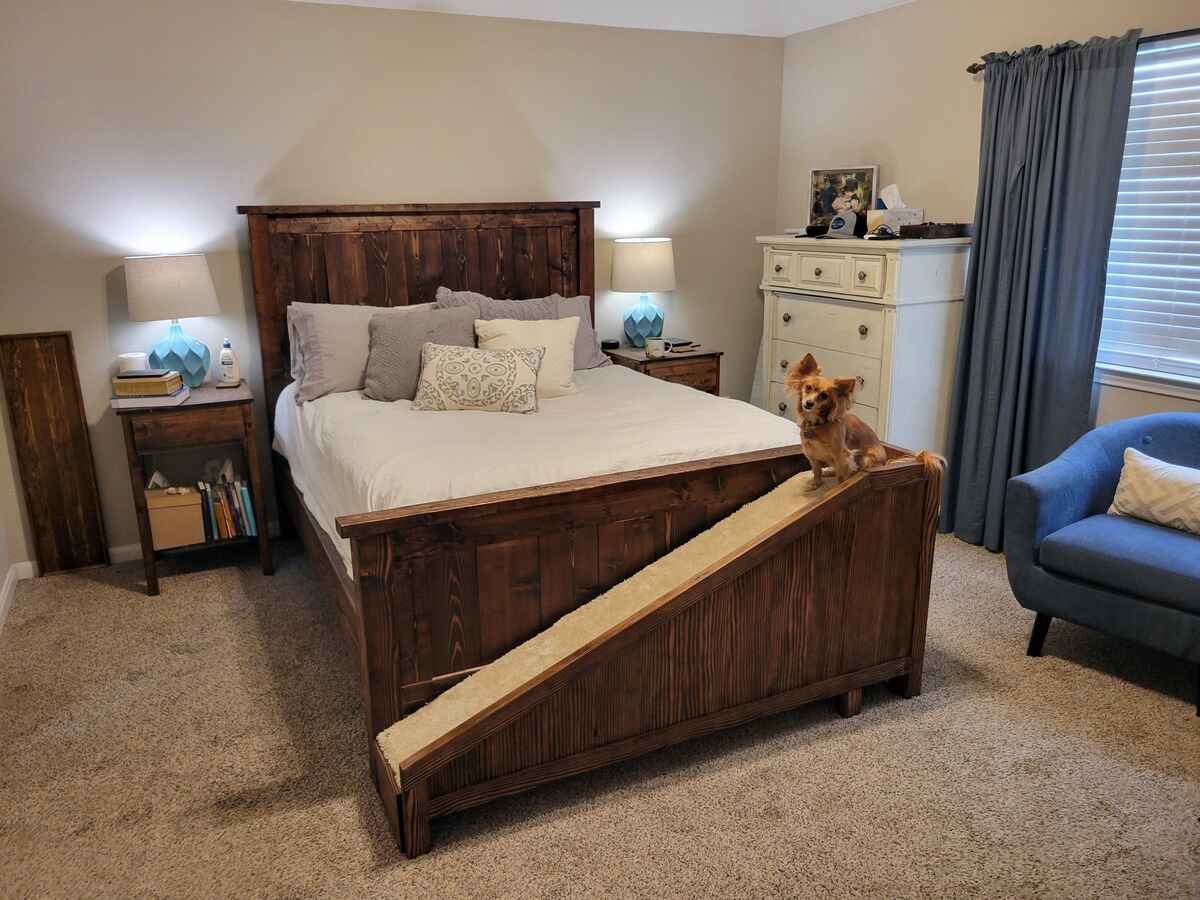
DIY Dog Ramp For Bed
Published: June 6, 2024

Content Creator specializing in woodworking and interior transformations. Caegan's guides motivate readers to undertake their own projects, while his custom furniture adds a personal touch.
Looking for a DIY project? Learn how to create a practical and stylish dog ramp for your bed with our easy-to-follow guide. Perfect for pet owners who love crafts!
(Many of the links in this article redirect to a specific reviewed product. Your purchase of these products through affiliate links helps to generate commission for Twigandthistle.com, at no extra cost. Learn more)
Introduction
Are you tired of your furry friend struggling to jump onto the bed? Building a DIY dog ramp for bed can be a great solution to help your pet access their favorite spot with ease. Not only is it a practical addition to your home, but it can also be a fun project to work on. In this guide, we will walk you through the steps to create a sturdy and safe ramp for your beloved canine companion. Let's get started on this pawsome project!
Materials Needed
To get started on this DIY dog ramp project, you will need the following materials:
- Plywood: This will serve as the main surface of the ramp.
- Wood Screws: These will be used to secure the ramp's components together.
- Wood Glue: To reinforce the joints and add extra stability.
- Saw: For cutting the plywood to the desired size.
- Measuring Tape: Essential for accurately measuring the dimensions of the ramp.
- Sandpaper: To smooth out any rough edges and surfaces.
- Paint or Stain: Optional for adding a decorative touch to the ramp.
- Carpet or Rubber Mat: For providing traction on the ramp surface.
- Drill: To create holes for the screws and for assembly.
- Paintbrush or Roller: If you choose to paint or stain the ramp.
Gather these materials before you begin, and you'll be all set to create a comfortable and secure ramp for your furry friend.
Step 1: Measuring and Cutting
-
Measure the Dimensions: Begin by measuring the height of your bed and the distance from the floor to the top of the mattress. This will help you determine the optimal angle and length for the ramp. Additionally, measure the width of the space where the ramp will be placed to ensure a proper fit.
-
Mark and Cut the Plywood: Using the measurements obtained, mark the plywood accordingly. A gradual incline with a gentle slope is ideal for the ramp. Carefully cut the plywood to the desired size using a saw, ensuring smooth and straight edges.
-
Cut Support Pieces: Depending on the length of the ramp, you may need to cut support pieces to reinforce the structure. These pieces will provide additional stability and strength to the ramp, especially for larger dogs. Measure and cut the support pieces from the remaining plywood, ensuring they are of equal length and width.
-
Sand the Edges: After cutting the plywood and support pieces, use sandpaper to smooth out any rough edges and surfaces. This will help prevent splinters and ensure a safe and comfortable surface for your dog to walk on.
By carefully measuring and cutting the materials, you'll be one step closer to assembling a custom dog ramp that perfectly suits your pet's needs.
Step 2: Assembling the Ramp
-
Position the Ramp Components: Lay the main piece of plywood on a flat surface, ensuring it is positioned at the desired angle and height relative to your bed. Place the support pieces evenly underneath the ramp, ensuring they are securely aligned to provide stability.
-
Secure the Support Pieces: Using wood glue and screws, attach the support pieces to the underside of the ramp. Apply a generous amount of wood glue along the edges where the support pieces will be placed, then carefully secure them with screws. This will create a strong bond and reinforce the structure of the ramp.
-
Attach the Sides: If you prefer to have sides on the ramp to prevent your dog from slipping off, cut additional pieces of plywood to serve as the sides. Secure these pieces to the edges of the ramp using wood glue and screws, ensuring they are firmly attached and provide a safe enclosure for your pet.
-
Add Stability: To further enhance the stability of the ramp, consider adding additional support beams underneath. These beams can be attached perpendicular to the support pieces, providing extra reinforcement and ensuring the ramp can support the weight of your dog without wobbling.
-
Finishing Touches: Once the ramp is assembled, inspect all the connections to ensure they are secure. Sand down any rough edges and surfaces, and consider applying a coat of paint or stain to enhance the appearance of the ramp and protect the wood.
By following these steps, you can assemble a sturdy and reliable dog ramp that will provide your pet with a safe and comfortable means of accessing the bed.
Step 3: Adding Traction
-
Cutting the Traction Material: Measure the surface area of the ramp and cut the carpet or rubber mat to fit. Ensure that it covers the entire walking surface of the ramp, providing ample traction for your dog.
-
Securing the Traction Material: Once the carpet or rubber mat is cut to size, use adhesive or a staple gun to secure it to the ramp's surface. Make sure it is taut and free from any wrinkles or bumps that could cause tripping.
-
Testing the Traction: After securing the traction material, test the ramp to ensure that it provides sufficient grip for your dog's paws. Your furry friend should be able to walk up and down the ramp without slipping or struggling.
-
Additional Traction Options: If the carpet or rubber mat alone does not provide enough traction, consider adding adhesive grip tape or rubberized treads to enhance the surface's grip. These additional traction options can further improve the safety and usability of the ramp for your dog.
-
Regular Maintenance: Periodically check the traction material for wear and tear, and replace it as needed to maintain optimal grip. Keeping the traction surface in good condition is essential for ensuring your dog's safety and confidence when using the ramp.
By adding the right traction material and ensuring its secure placement, you can create a dog ramp that offers a safe and slip-resistant surface for your pet to use with ease.
Step 4: Testing the Ramp
After completing the construction and adding traction to the dog ramp, it's crucial to conduct thorough testing to ensure its safety and functionality for your furry companion.
-
Weight Testing: Before allowing your dog to use the ramp, test its weight-bearing capacity. Apply pressure to different areas of the ramp to ensure it remains stable and does not wobble or flex excessively. This step is essential for verifying that the ramp can support your dog's weight without any structural issues.
-
Encouraging Exploration: Introduce your dog to the ramp in a calm and positive manner. Use treats or toys to entice them to explore and walk on the ramp. Encouraging your dog to become familiar with the ramp gradually can help alleviate any apprehension they may have about using it.
-
Observing Behavior: Observe your dog's behavior as they interact with the ramp. Pay attention to their body language and movements to determine if they feel comfortable and confident while using the ramp. If your dog appears hesitant or anxious, provide reassurance and gentle encouragement.
-
Assessing Stability: As your dog walks on the ramp, observe its stability and any potential slipping or shifting. The ramp should remain firmly in place without sliding or tilting, ensuring a secure and reliable surface for your pet to walk on.
-
Adjustments and Reassurance: If necessary, make any adjustments to the ramp's positioning or stability based on your dog's interaction with it. Providing positive reinforcement and reassurance during the testing phase can help your dog feel at ease and build trust in using the ramp.
By thoroughly testing the dog ramp and addressing any concerns that arise, you can ensure that it provides a safe and comfortable means for your dog to access the bed or other elevated surfaces with ease.
Conclusion
In conclusion, building a DIY dog ramp for the bed can be a rewarding and practical project for pet owners. By following the steps outlined in this guide and using the recommended materials, you can create a customized ramp that provides your furry friend with a safe and comfortable way to access elevated surfaces. The careful measurement and cutting of the ramp, along with the secure assembly and addition of traction, are essential for ensuring the ramp's stability and usability. Thorough testing of the ramp's weight-bearing capacity and your dog's comfort and confidence in using it is crucial for its success. With the right approach and attention to detail, you can construct a dog ramp that enhances your pet's mobility and overall well-being, while also adding a functional and personalized element to your home.