
Home>Create & Decorate>DIY & Crafts>How To Build A Ramp For A Shed
DIY & Crafts
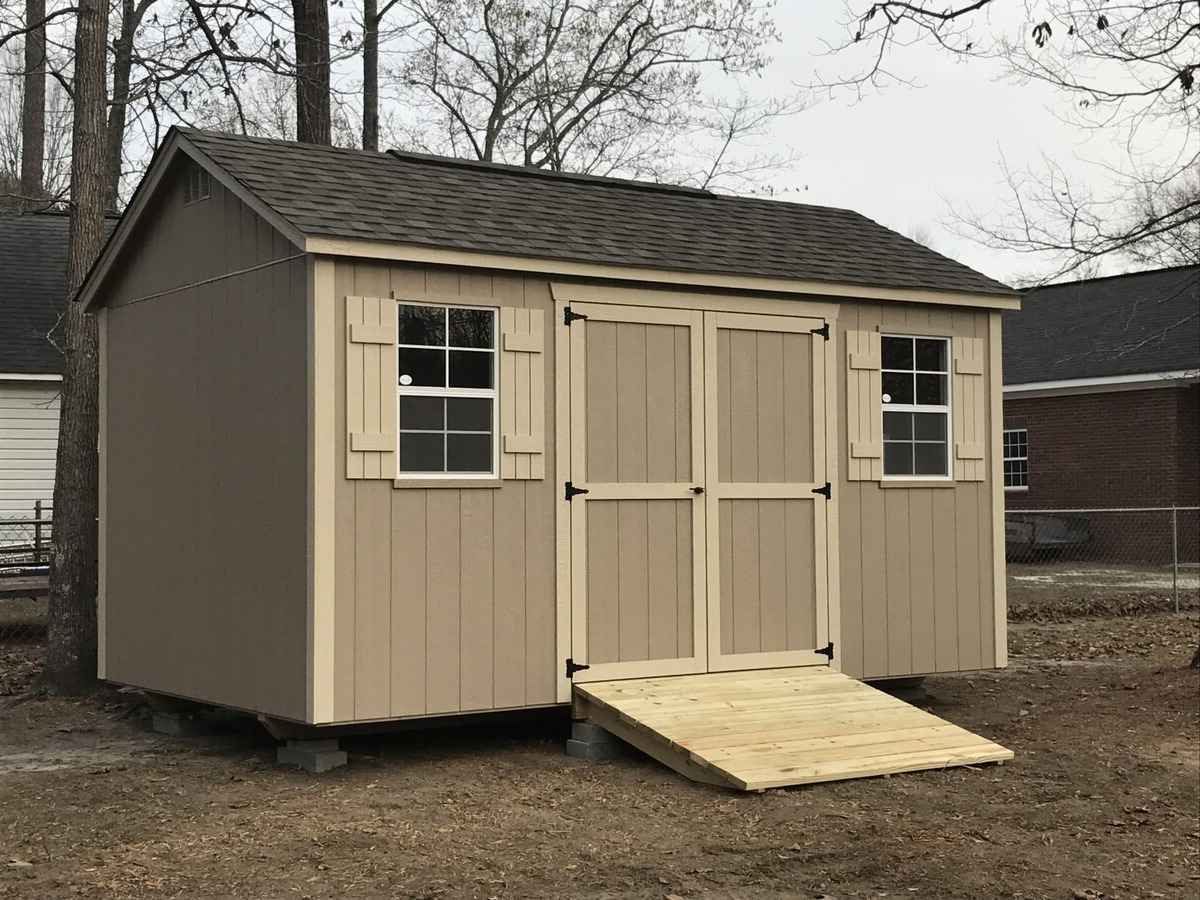
How To Build A Ramp For A Shed
Published: February 23, 2024

Content Creator specializing in woodworking and interior transformations. Caegan's guides motivate readers to undertake their own projects, while his custom furniture adds a personal touch.
Learn how to build a sturdy and functional ramp for your shed with this DIY guide. Perfect for DIY & Crafts enthusiasts.
(Many of the links in this article redirect to a specific reviewed product. Your purchase of these products through affiliate links helps to generate commission for Twigandthistle.com, at no extra cost. Learn more)
Introduction
Building a ramp for a shed is a practical and rewarding DIY project that can greatly enhance the accessibility and functionality of your outdoor storage space. Whether you use your shed for gardening tools, lawn equipment, or as a workshop, a well-constructed ramp provides a smooth transition for wheeling heavy items in and out with ease. By following this comprehensive guide, you'll learn how to create a sturdy and reliable ramp tailored to your shed's specific dimensions and your individual needs.
A well-constructed ramp not only facilitates the movement of heavy items but also ensures safety and convenience for anyone using the shed. It eliminates the need to lift or drag heavy objects over the threshold, reducing the risk of injury and making the entire process more efficient. Additionally, a thoughtfully designed ramp can enhance the overall aesthetic appeal of your shed, seamlessly blending functionality with visual appeal.
In this guide, we'll walk you through the step-by-step process of building a ramp for your shed, from gathering the necessary materials and tools to the final installation. You'll gain valuable insights into measuring and planning, constructing the frame, adding support beams, and installing the decking. By the end of this tutorial, you'll be equipped with the knowledge and confidence to create a durable and well-designed ramp that perfectly complements your shed.
So, roll up your sleeves, gather your tools, and let's embark on this DIY journey to create a practical and visually appealing ramp for your shed. Whether you're a seasoned DIY enthusiast or a novice looking to expand your skills, this guide will empower you to tackle this project with enthusiasm and achieve impressive results. Let's get started!
Step 1: Gather Materials and Tools
Before diving into the construction of your shed ramp, it's crucial to gather all the necessary materials and tools. This step sets the foundation for a smooth and efficient building process, ensuring that you have everything at your disposal to complete the project without unnecessary interruptions. Here's a comprehensive list of materials and tools you'll need:
Materials:
- Pressure-treated lumber: This will serve as the primary material for constructing the ramp, providing durability and resistance to outdoor elements.
- Galvanized screws or nails: These fasteners will secure the various components of the ramp, ensuring structural integrity.
- Gravel or crushed stone: This will be used as a base for the ramp, providing stability and drainage.
- Concrete blocks or deck blocks: These will support the ramp's frame, elevating it slightly above the ground to prevent moisture damage.
- Joist hangers: These metal brackets will reinforce the connections between the ramp's frame and support beams.
- Plywood or composite decking: This will form the surface of the ramp, offering a smooth and sturdy pathway for wheeled equipment.
Tools:
- Measuring tape: Essential for accurately determining the dimensions of the ramp and ensuring precise cuts.
- Circular saw or miter saw: These tools will be used to cut the lumber to the required lengths and angles.
- Drill/driver: Necessary for driving screws or nails into the lumber, securing the various components together.
- Shovel: To level the ground and create a stable foundation for the ramp.
- Level: This tool will help ensure that the ramp is constructed on a flat and even surface, preventing any potential instability.
- Safety gear: Including gloves, safety glasses, and hearing protection to safeguard yourself during the construction process.
By gathering these materials and tools, you'll be well-prepared to embark on the construction of your shed ramp. This proactive approach will streamline the building process and minimize the likelihood of delays or setbacks, allowing you to focus on creating a high-quality and functional addition to your outdoor space.
Step 2: Measure and Plan
Before diving into the physical construction of the shed ramp, it's crucial to start with meticulous measurements and a well-thought-out plan. This preparatory phase sets the stage for a successful and seamless building process, ensuring that the ramp fits the specific dimensions of your shed and aligns with your functional requirements.
Measuring the Space
Begin by measuring the available space around your shed to determine the ideal location and size for the ramp. Use a measuring tape to record the width of the shed's entrance and the distance from the ground to the threshold. These measurements will dictate the dimensions of the ramp, ensuring a precise fit and seamless integration with the shed.
Determining the Ramp Dimensions
Based on the measurements, calculate the optimal length and slope for the ramp. The slope, often referred to as the "rise over run," determines the angle at which the ramp will ascend from the ground to the shed's entrance. For accessibility and ease of use, a gentle slope is recommended, typically with a ratio of 1:12. This means that for every 1 inch of vertical rise, there should be 12 inches of horizontal run.
Sketching the Design
With the measurements in hand, sketch a rough design of the ramp, incorporating the calculated dimensions and slope. Consider the placement of support beams and the overall aesthetic of the ramp. This visual representation will serve as a guide during the construction phase, ensuring that each component is positioned accurately and harmonizes with the shed's architecture.
Planning for Support
Evaluate the ground where the ramp will be installed. Ensure that it is level and stable, free from any obstructions or uneven terrain. If necessary, use a shovel to level the ground and create a solid foundation for the ramp. Additionally, consider the use of concrete blocks or deck blocks to elevate the ramp slightly above the ground, preventing moisture damage and ensuring long-term stability.
Anticipating Accessibility Needs
Take into account the specific needs of individuals who will be using the shed. If the ramp is intended for the movement of heavy equipment or machinery, prioritize durability and weight-bearing capacity. Conversely, if the shed will be accessed by individuals with mobility challenges, ensure that the ramp complies with accessibility guidelines and provides a safe and gradual incline.
By meticulously measuring the space, calculating the ramp dimensions, sketching the design, planning for support, and anticipating accessibility needs, you'll lay a solid foundation for the construction of a well-designed and functional shed ramp. This thoughtful approach sets the stage for a seamless transition to the next phase of the building process, ensuring that the ramp aligns with your specific requirements and enhances the overall usability of your outdoor storage space.
Step 3: Build the Frame
With the measurements and plan in place, it's time to embark on the construction of the ramp's frame. The frame serves as the foundational structure, providing stability and support for the ramp's decking and ensuring its long-term durability. Here's a detailed walkthrough of the frame-building process:
1. Cutting the Lumber
Begin by cutting the pressure-treated lumber to the required lengths, following the dimensions outlined in your plan. Use a circular saw or miter saw to make precise cuts, ensuring that the components fit together seamlessly to form the frame.
2. Assembling the Sides
Lay out the cut lumber to form the two parallel sides of the frame. Position the boards according to your design, ensuring that they are aligned and evenly spaced. Use galvanized screws or nails to secure the boards at the joints, creating sturdy and stable side structures.
3. Adding Cross Braces
To reinforce the frame and prevent any potential warping or shifting, add cross braces between the two sides. These braces provide additional structural support, enhancing the overall stability of the frame. Secure the cross braces in place using appropriate fasteners, ensuring a snug and secure fit.
4. Installing Support Beams
Position the support beams perpendicular to the sides of the frame, spacing them according to your design and the anticipated load requirements. These support beams will bear the weight of the decking and any items being wheeled up the ramp. Secure the support beams to the frame using joist hangers, ensuring a strong and reliable connection.
5. Checking for Level and Square
Once the frame is assembled, use a level to ensure that it is perfectly horizontal and free from any unevenness. Additionally, check the corners of the frame to ensure that they form right angles, confirming that the frame is square and structurally sound.
6. Elevating the Frame
If necessary, use concrete blocks or deck blocks to elevate the frame slightly above the ground. This elevation helps prevent moisture damage and ensures that the ramp remains stable and secure over time.
By meticulously following these steps, you'll successfully construct a robust and well-engineered frame for your shed ramp. This foundational structure forms the backbone of the ramp's construction, setting the stage for the subsequent installation of the decking and the seamless integration of the ramp with your shed. With the frame in place, you're ready to proceed to the next phase of the building process, bringing you one step closer to completing your functional and visually appealing shed ramp.
Step 4: Add Support Beams
Adding support beams to the ramp's frame is a critical step that reinforces the structure, enhances load-bearing capacity, and ensures the overall stability of the ramp. These horizontal beams play a pivotal role in distributing the weight of the decking and any items being transported up the ramp, effectively minimizing stress on the frame and promoting long-term durability. Here's a detailed walkthrough of the process of adding support beams to the ramp:
-
Determining Beam Placement: Begin by carefully determining the placement of the support beams within the frame. The spacing and quantity of support beams will depend on the dimensions of the ramp, the anticipated load requirements, and the specific design considerations. Typically, support beams are positioned perpendicular to the sides of the frame, evenly spaced to provide comprehensive structural reinforcement.
-
Selecting and Preparing the Lumber: Choose pressure-treated lumber of appropriate dimensions for the support beams. Ensure that the lumber is cut to the precise lengths required for the specific layout of the ramp. Use a circular saw or miter saw to make accurate cuts, creating beams that seamlessly integrate with the frame and align with the predetermined design.
-
Attaching the Support Beams: Position the cut support beams within the frame, ensuring that they are aligned with the predetermined layout and spacing. Secure the support beams to the frame using joist hangers, which provide a strong and reliable connection. Joist hangers are essential for maintaining the integrity of the structure, preventing lateral movement of the support beams, and ensuring that they effectively bear the weight of the decking and any transported items.
-
Ensuring Level Alignment: Once the support beams are attached, use a level to verify that they are perfectly horizontal and aligned with the frame. This step is crucial for ensuring that the ramp's surface, when installed, will be even and stable, providing a smooth pathway for wheeled equipment and ensuring user safety.
-
Reinforcing the Connections: To further enhance the stability and load-bearing capacity of the support beams, consider adding additional fasteners at the points where the beams intersect with the frame. This reinforcement minimizes any potential movement or shifting, ensuring that the support beams remain securely integrated with the frame.
By meticulously following these steps, you'll effectively add support beams to the ramp's frame, creating a robust and reliable structure that forms the foundation for the subsequent installation of the decking. The strategic placement and secure attachment of support beams ensure that the ramp is equipped to handle the intended usage, providing a safe and durable access point to your shed. With the support beams in place, you're ready to progress to the next phase of the construction process, bringing you closer to the completion of your functional and visually appealing shed ramp.
Step 5: Install the Decking
With the frame and support beams securely in place, the next crucial step in building your shed ramp is the installation of the decking. The decking serves as the surface of the ramp, providing a smooth and sturdy pathway for wheeled equipment and ensuring safe and convenient access to your shed. Here's a detailed guide on how to effectively install the decking:
1. Selecting the Decking Material
Choose the appropriate material for the decking, considering factors such as durability, weather resistance, and visual appeal. Pressure-treated plywood or composite decking are popular choices, offering resilience against outdoor elements and minimal maintenance requirements. Ensure that the selected material aligns with your design preferences and complements the overall aesthetic of your shed.
2. Cutting and Fitting the Decking
Measure the dimensions of the ramp's frame to determine the precise size of the decking panels. Use a circular saw to make accurate cuts, ensuring that the panels fit seamlessly within the frame. Position the decking panels on the frame, ensuring even alignment and a snug fit. If using multiple panels, ensure that they are joined securely to create a continuous and uniform surface.
3. Securing the Decking
Once the decking panels are positioned correctly, use galvanized screws or nails to secure them to the frame and support beams. Place the fasteners at regular intervals along the edges and across the surface of the decking, ensuring a secure and stable attachment. This step is crucial for preventing any potential movement or shifting of the decking during use, maintaining a safe and reliable pathway to your shed.
4. Adding Finishing Touches
Consider applying a weather-resistant sealant or protective coating to the decking to enhance its longevity and resistance to outdoor elements. This additional layer of protection safeguards the decking against moisture, UV exposure, and general wear and tear, ensuring that it remains in optimal condition for years to come. Additionally, consider adding edge trim or non-slip strips to the decking to further enhance safety and usability.
By meticulously following these steps, you'll successfully install the decking, transforming the frame and support beams into a functional and visually appealing ramp for your shed. The carefully selected and securely installed decking provides a reliable pathway for accessing your shed, accommodating the movement of heavy equipment and ensuring a seamless transition from the outdoor space to the interior of the shed. With the decking in place, you're one step closer to completing your shed ramp, ready to proceed to the final phase of the construction process.
Step 6: Attach the Ramp to the Shed
Attaching the ramp to the shed is the final crucial step in completing your shed ramp construction project. This phase involves seamlessly integrating the ramp with the shed, ensuring a secure and stable connection that facilitates easy access and enhances the overall functionality of the outdoor storage space. Here's a detailed guide on how to effectively attach the ramp to the shed:
-
Positioning the Ramp: Carefully maneuver the completed ramp into position, aligning it with the entrance of the shed. Ensure that the ramp is centered and positioned at the optimal angle to provide a smooth transition from the ground to the shed's threshold. Take into account any specific design considerations or architectural features of the shed to achieve a seamless integration.
-
Securing the Ramp: Once the ramp is positioned correctly, use galvanized screws or nails to secure it to the shed's structure. Drive the fasteners through the frame of the ramp and into the exterior walls of the shed, creating a strong and reliable attachment. Ensure that the fasteners penetrate the shed's framing or siding, providing a secure connection that withstands the anticipated usage and environmental conditions.
-
Reinforcing the Connection: To further enhance the stability and durability of the attachment, consider adding additional support brackets or braces at key points where the ramp meets the shed. These reinforcements provide added security, minimizing any potential movement or shifting of the ramp and ensuring a long-lasting connection that can withstand regular use and varying weather conditions.
-
Sealing the Junction: Apply a weather-resistant sealant or caulking along the junction between the ramp and the shed. This additional step helps prevent water infiltration and moisture damage, safeguarding the attachment point and preserving the structural integrity of both the ramp and the shed. Proper sealing also contributes to the overall longevity of the ramp and ensures that it remains a reliable and functional addition to your outdoor space.
By meticulously following these steps, you'll effectively attach the ramp to the shed, completing the construction of a durable, visually appealing, and highly functional access point to your outdoor storage space. The seamless integration of the ramp with the shed enhances accessibility, facilitates the movement of heavy items, and elevates the overall usability of the shed. With the ramp securely attached to the shed, you've successfully brought your shed ramp construction project to fruition, ready to enjoy the convenience and practicality it brings to your outdoor environment.
Conclusion
Congratulations on successfully completing the construction of a sturdy and well-designed ramp for your shed! By following this comprehensive guide, you've gained valuable insights into every aspect of the building process, from gathering materials and tools to seamlessly integrating the ramp with your shed. As you stand back and admire your handiwork, it's evident that the newly constructed ramp not only enhances the accessibility of your shed but also adds a touch of practical elegance to your outdoor space.
The completion of this DIY project marks a significant achievement, showcasing your ability to tackle complex construction tasks with precision and creativity. The ramp you've built is not just a functional addition but a testament to your craftsmanship and dedication to enhancing your living environment through practical ingenuity.
As you reflect on the journey from planning and measuring to cutting and securing, each step has contributed to the creation of a reliable and visually appealing ramp tailored to your shed's specific dimensions and your individual needs. The careful consideration given to the slope, support beams, and decking material has resulted in a structure that seamlessly integrates with the shed, providing a smooth transition for wheeling heavy items in and out with ease.
Beyond the practical benefits, the completion of this project signifies the empowerment that comes with DIY endeavors. You've honed your skills, expanded your knowledge of construction techniques, and demonstrated the ability to transform raw materials into a functional and aesthetically pleasing addition to your property. This accomplishment not only enhances the usability of your outdoor space but also instills a sense of pride and satisfaction in your ability to create tangible solutions through hands-on craftsmanship.
As you admire the newly constructed ramp, envision the countless tasks it will simplify and the convenience it will bring to your daily activities. Whether it's effortlessly rolling out your lawnmower for yard maintenance or smoothly transporting heavy tools for a weekend project, the ramp stands ready to serve as a reliable and indispensable asset to your shed.
In conclusion, the successful completion of this project exemplifies your commitment to enhancing your living space through practical innovation and hands-on construction. The ramp you've built is not just a functional structure but a testament to your creativity, resourcefulness, and determination to create a more accessible and efficient environment. As you enjoy the fruits of your labor, take pride in the tangible impact of your DIY skills and the lasting value they bring to your home.