
Home>Create & Decorate>DIY & Crafts>DIY Shed Entrance Ramp: Easy Steps To Build A Sturdy Access Ramp For Your Shed
DIY & Crafts
DIY Shed Entrance Ramp: Easy Steps To Build A Sturdy Access Ramp For Your Shed
Published: February 22, 2024

Senior Editor in Create & Decorate, Kathryn combines traditional craftsmanship with contemporary trends. Her background in textile design and commitment to sustainable crafts inspire both content and community.
Learn how to build a sturdy DIY shed entrance ramp with easy steps and expert tips. Perfect for your shed access needs. Enhance your DIY & Crafts skills today!
(Many of the links in this article redirect to a specific reviewed product. Your purchase of these products through affiliate links helps to generate commission for Twigandthistle.com, at no extra cost. Learn more)
Introduction
Building a sturdy access ramp for your shed can greatly enhance its functionality and accessibility. Whether you use your shed for storage, as a workshop, or for other purposes, having a well-constructed ramp makes it easier to move heavy equipment, tools, and supplies in and out of the space. Additionally, a well-designed ramp can provide a smooth transition for wheeled items such as lawnmowers, wheelbarrows, and hand trucks, ensuring that you can effortlessly navigate the entrance without any hassle.
In this comprehensive guide, we will walk you through the step-by-step process of constructing a durable and reliable entrance ramp for your shed. By following these easy instructions, you can create a practical solution that not only improves the functionality of your shed but also adds a professional and polished touch to its overall appearance.
Whether you're a seasoned DIY enthusiast or a novice looking to tackle your first project, building a shed entrance ramp is a rewarding endeavor that can be completed with basic carpentry skills and a few essential tools. With careful planning and attention to detail, you can customize the ramp to suit your specific needs and the design of your shed, ensuring that it seamlessly integrates with the existing structure while providing a safe and convenient access point.
By the end of this guide, you'll have the knowledge and confidence to embark on this project, and you'll be well-equipped to create a functional and visually appealing ramp that enhances the usability of your shed. So, roll up your sleeves, gather your materials, and let's get started on this exciting DIY journey to build a practical and durable entrance ramp for your shed.
Step 1: Gather Materials and Tools
Before diving into the construction of your shed entrance ramp, it's crucial to gather all the necessary materials and tools. By ensuring that you have everything at your disposal, you can streamline the building process and minimize interruptions. Here's a comprehensive list of the items you'll need to get started:
Materials:
- Pressure-treated lumber: Opt for high-quality, durable lumber that can withstand outdoor elements and heavy use. The dimensions will depend on the size of your ramp, but 2×6 or 2×8 boards are commonly used for framing and decking.
- Exterior-grade plywood: This will be used for the ramp's surface, providing a smooth and sturdy platform for walking and rolling equipment.
- Galvanized screws and nails: Choose corrosion-resistant fasteners to ensure the longevity and stability of your ramp.
- Concrete blocks or gravel: These will serve as a foundation for the ramp, providing stability and preventing ground contact to mitigate moisture-related issues.
- Construction adhesive: Opt for a weather-resistant adhesive to reinforce the connections between the ramp components.
- Ramp surfacing material (optional): Depending on your preferences, you may consider adding a non-slip surface to enhance traction and safety, such as rubber matting or anti-slip tape.
Tools:
- Measuring tape and carpenter's square: Accurate measurements and precise angles are essential for constructing a functional and aesthetically pleasing ramp.
- Circular saw or miter saw: These tools will be used to cut lumber to the required dimensions, ensuring clean and precise edges.
- Power drill and screwdriver bits: A reliable drill is indispensable for driving screws and creating pilot holes, while a selection of bits will accommodate various fastener sizes.
- Level: Maintaining a level surface throughout the construction process is crucial for the ramp's stability and usability.
- Shovel and rake: If you're opting for a gravel foundation, these tools will aid in preparing the ground and achieving a level surface.
- Safety gear: Prioritize safety by wearing protective eyewear, gloves, and hearing protection, especially when operating power tools and handling construction materials.
By assembling these materials and tools, you'll be well-prepared to embark on the next steps of building your shed entrance ramp. With everything in place, you can proceed with confidence, knowing that you have the essential resources to bring your project to fruition.
Step 2: Measure and Plan
Accurate measurements and meticulous planning are the cornerstones of a successful shed entrance ramp construction. Before picking up any tools, take the time to carefully measure the area where the ramp will be installed. Begin by determining the desired width and length of the ramp, considering factors such as the shed's entrance width, the slope of the surrounding terrain, and the anticipated usage of the ramp.
Using a measuring tape and carpenter's square, mark out the dimensions on the ground, ensuring that the ramp will align seamlessly with the shed's entrance. It's essential to maintain uniformity and precision during this phase to avoid any potential issues during the construction process.
Next, consider the slope or incline of the ramp. Ideally, the ramp should have a gentle slope to facilitate easy access while ensuring safety for users and equipment. Determine the desired angle of incline, keeping in mind any local building codes or accessibility guidelines that may apply in your area.
With the measurements in hand, create a detailed plan for the ramp's construction. Sketch out the design, indicating the placement of support posts, the layout of the frame, and the positioning of the decking materials. This plan will serve as a valuable reference throughout the building process, guiding you through each step and helping to visualize the final product.
Additionally, consider the foundation for the ramp. Depending on your preference and the local climate, you may opt for a concrete block or gravel foundation. If using concrete blocks, plan the placement to ensure stability and even weight distribution. For a gravel foundation, prepare the ground by leveling and compacting the area to provide a solid base for the ramp.
During the planning phase, take into account any additional features you may want to incorporate, such as handrails or non-slip surfacing. By carefully measuring and planning every aspect of the ramp's construction, you'll set the stage for a smooth and efficient building process, ultimately leading to a well-crafted and functional entrance ramp for your shed.
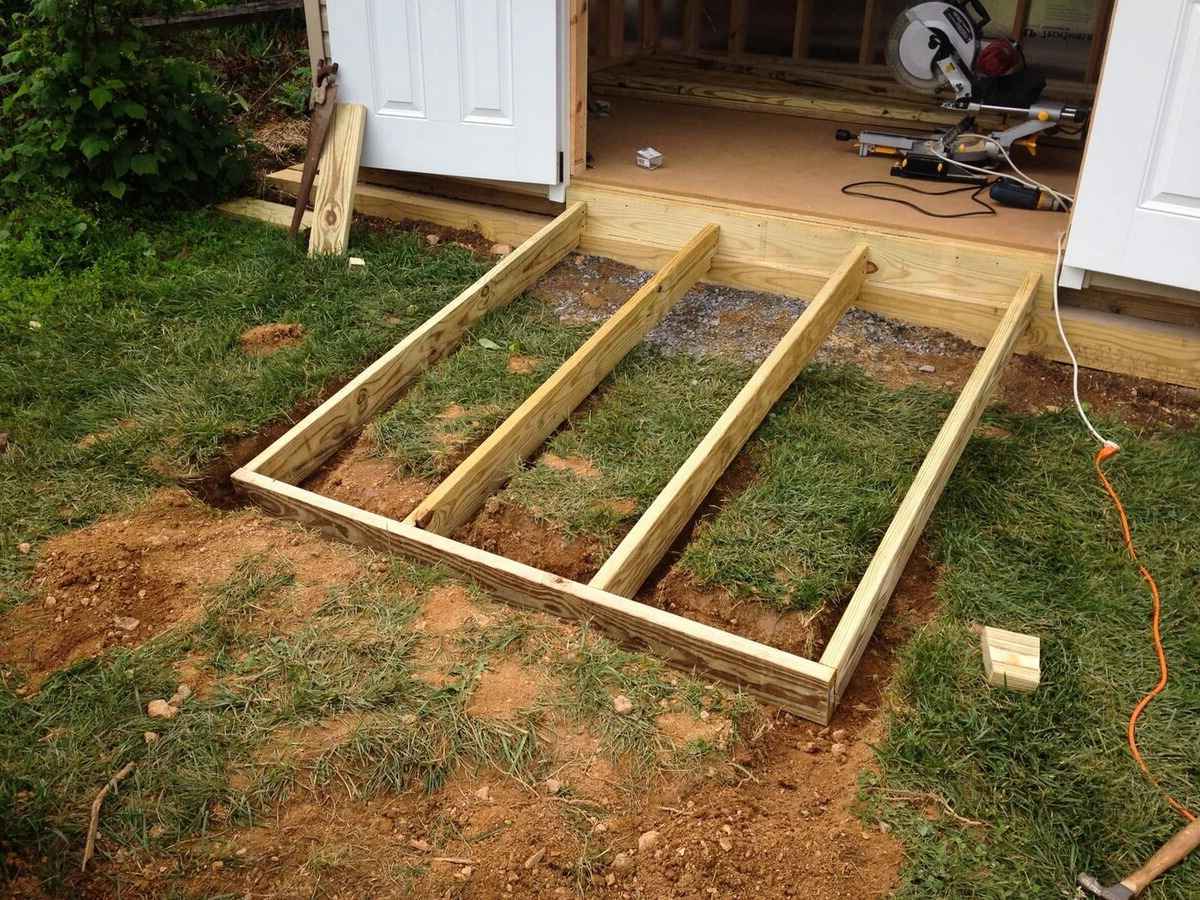
Step 3: Build the Frame
With the measurements and plan in place, it's time to commence the construction of the frame for your shed entrance ramp. The frame serves as the structural backbone of the ramp, providing support and stability for the decking and ensuring the overall integrity of the structure.
Frame Design and Layout
Begin by laying out the pressure-treated lumber according to your plan, marking the locations for cuts, joints, and fasteners. Use a carpenter's square to ensure precise angles and straight lines, as accuracy at this stage is crucial for the frame's stability and alignment.
Cut the lumber to the required dimensions using a circular saw or miter saw, taking care to achieve clean and accurate cuts. Assemble the frame components on a flat and level surface, double-checking the measurements and ensuring that the pieces fit together seamlessly.
Assembly and Reinforcement
Once the frame components are cut and laid out, it's time to assemble them into the desired configuration. Utilize galvanized screws and construction adhesive to secure the joints, creating a robust and durable frame that can withstand the weight and traffic it will encounter.
Pay close attention to the connections between the frame members, ensuring that they are securely fastened and reinforced to prevent any shifting or instability. Use a level to confirm that the frame is even and well-balanced, making any necessary adjustments to achieve a uniform surface.
Support Posts and Bracing
Depending on the length and slope of the ramp, you may need to incorporate support posts and bracing to bolster the frame's strength and stability. Position the support posts at strategic intervals along the length of the ramp, anchoring them securely to the ground or foundation.
Bracing elements, such as diagonal supports, can be added to enhance the rigidity of the frame, particularly if the ramp spans a significant distance. These reinforcements contribute to the overall resilience of the ramp, ensuring that it can accommodate heavy loads and sustained use without compromising its structural integrity.
Final Checks and Adjustments
Before proceeding to the next phase of construction, thoroughly inspect the frame to confirm that it meets the specified dimensions, angles, and alignment. Make any final adjustments as needed, fine-tuning the frame to achieve a solid and level foundation for the decking and surfacing materials.
By meticulously building the frame according to the established plan and design, you'll lay the groundwork for a robust and dependable shed entrance ramp. The careful attention to detail during this phase sets the stage for the successful completion of the project, bringing you one step closer to realizing a functional and well-crafted addition to your shed.
Step 4: Attach the Decking
With the frame of the shed entrance ramp securely in place, the next crucial step is to attach the decking, which forms the surface that provides traction and support for foot traffic and wheeled equipment. The decking material, typically exterior-grade plywood, plays a pivotal role in ensuring the functionality and durability of the ramp.
Decking Installation
Begin by measuring and cutting the plywood to fit the dimensions of the ramp, allowing for a slight overhang if desired. Use a circular saw to achieve clean and precise cuts, ensuring that the decking pieces align seamlessly with the frame and provide a uniform surface.
Once the plywood pieces are cut to size, position them onto the frame, ensuring that they are flush with the edges and corners. Secure the plywood to the frame using galvanized screws, driving them at regular intervals to create a secure and stable attachment. Be mindful of the spacing between the screws, aiming for consistent placement to prevent warping or shifting of the decking material.
As you progress with attaching the plywood decking, periodically check for levelness and uniformity, making any necessary adjustments to maintain a smooth and even surface. It's essential to achieve a seamless connection between the decking pieces, creating a cohesive platform that can withstand heavy loads and frequent use.
Optional Surfacing Enhancements
Depending on your preferences and the intended use of the ramp, you may consider incorporating additional surfacing enhancements to improve traction and safety. Non-slip surfacing materials, such as rubber matting or anti-slip tape, can be applied to the plywood decking to provide added grip, especially in wet or slippery conditions.
These surfacing enhancements not only contribute to the safety of the ramp but also enhance its usability, ensuring that users can navigate the entrance with confidence and stability. When applying non-slip materials, follow the manufacturer's guidelines for installation to achieve optimal effectiveness and longevity.
Final Checks and Finishing Touches
Once the decking is securely attached and any optional surfacing enhancements are in place, conduct a thorough inspection of the ramp to confirm that the plywood is firmly secured and free from any protruding screws or rough edges. Make any final adjustments to ensure that the decking is level, smooth, and well-integrated with the frame.
At this stage, you have successfully completed the installation of the decking, bringing the shed entrance ramp one step closer to its final form. The securely attached plywood provides a solid and reliable surface, setting the stage for the subsequent phase of installing the ramp and adding finishing touches to complete the project.
Step 5: Install the Ramp
With the frame and decking in place, the installation of the ramp itself marks a significant stride towards the completion of your shed entrance ramp. The ramp, typically constructed from pressure-treated lumber, serves as the inclined pathway that facilitates smooth and effortless access to the shed. This pivotal phase involves the assembly and attachment of the ramp, culminating in the realization of a functional and well-integrated structure.
Ramp Construction and Assembly
Begin by measuring and cutting the pressure-treated lumber to the specified dimensions, taking into account the desired length and angle of incline for the ramp. Carefully align the ramp components with the frame, ensuring a seamless connection and uniform transition from the horizontal decking to the inclined surface of the ramp. Secure the ramp to the frame using galvanized screws, driving them at regular intervals to create a sturdy and reliable attachment.
As you assemble the ramp, pay close attention to the alignment and angle of incline, aiming to achieve a smooth and gradual transition that facilitates easy navigation for foot traffic and wheeled equipment. Utilize a level to confirm that the ramp maintains a consistent slope, making any necessary adjustments to ensure uniformity and stability.
Reinforcement and Stability
To bolster the strength and stability of the ramp, consider incorporating additional support elements such as cross-bracing or reinforcement beams. These reinforcements contribute to the overall resilience of the ramp, ensuring that it can accommodate heavy loads and sustained use without compromising its structural integrity. Securely fasten these support elements to the ramp and frame, creating a cohesive and robust structure that can withstand the rigors of daily use.
Final Checks and Adjustments
Upon completing the installation of the ramp, conduct a comprehensive inspection to verify that it aligns seamlessly with the decking, frame, and shed entrance. Confirm that the ramp is securely attached and free from any protruding fasteners or potential hazards. Test the ramp's stability and weight-bearing capacity, ensuring that it can accommodate the intended usage without any compromise to safety or functionality.
By meticulously installing the ramp and reinforcing its connection to the frame, you bring the shed entrance ramp one step closer to its final form. The securely attached ramp provides a smooth and reliable transition, setting the stage for the subsequent phase of adding finishing touches to complete the project.
Step 6: Finishing Touches
With the structural elements of the shed entrance ramp in place, the final phase involves adding finishing touches to enhance both the functionality and aesthetics of the completed project. These details not only contribute to the overall visual appeal of the ramp but also serve practical purposes, ensuring that the ramp is well-equipped to meet the diverse needs of its users.
Surface Treatment
Consider applying a protective surface treatment to the ramp to safeguard it against the effects of weather and regular use. A weather-resistant sealant or outdoor-grade paint can help prevent moisture damage and prolong the lifespan of the ramp. Additionally, a coat of paint can add a touch of color and personality to the ramp, seamlessly integrating it with the surrounding environment.
Handrails and Guardrails
For added safety and accessibility, installing handrails and guardrails can provide essential support for individuals navigating the ramp. Whether for elderly individuals, individuals with mobility challenges, or simply as a precautionary measure, sturdy handrails and guardrails contribute to the overall safety and usability of the ramp. Ensure that these elements are securely anchored and meet any relevant safety standards or building codes.
Lighting
Incorporating lighting along the ramp can significantly enhance its usability, especially during evening hours or in low-light conditions. Solar-powered or low-voltage LED lights can be strategically positioned to illuminate the pathway, ensuring safe and convenient access at all times. Properly placed lighting not only adds a decorative touch but also contributes to the overall safety and security of the ramp.
Landscaping and Integration
To seamlessly integrate the ramp with its surroundings, consider incorporating landscaping elements around the entrance. Whether through the addition of potted plants, shrubs, or decorative stones, thoughtful landscaping can soften the transition between the ramp and the surrounding area, creating a visually appealing and harmonious entryway to the shed.
Accessibility Considerations
If the ramp is intended to accommodate individuals with disabilities, ensure that it complies with accessibility guidelines and standards. This may include specific slope requirements, tactile warning strips at the top and bottom of the ramp, and other features to ensure compliance with accessibility regulations.
By attending to these finishing touches, you elevate the shed entrance ramp from a functional structure to a well-integrated and aesthetically pleasing addition to your property. These details not only enhance the usability and safety of the ramp but also contribute to its seamless integration with the surrounding environment, resulting in a truly polished and professional final product.
Conclusion
In conclusion, the construction of a shed entrance ramp is a rewarding and practical DIY project that significantly enhances the accessibility and functionality of your outdoor storage space. By following the step-by-step guide outlined in this comprehensive tutorial, you've gained the knowledge and confidence to create a sturdy and reliable ramp that seamlessly integrates with your shed while providing a safe and convenient access point.
Throughout the process, you've learned the importance of meticulous planning, precise measurements, and careful execution to ensure the successful construction of the ramp. From gathering the necessary materials and tools to building the frame, attaching the decking, installing the ramp, and adding finishing touches, each step has contributed to the creation of a well-crafted and functional entrance ramp.
By incorporating optional enhancements such as non-slip surfacing, handrails, lighting, and landscaping, you've not only prioritized safety and accessibility but also added a personalized touch to the ramp, making it a seamless and visually appealing addition to your property.
As you reflect on the journey of building the shed entrance ramp, you've not only honed your carpentry skills but also demonstrated your ability to transform a basic structure into a valuable asset that enhances the usability and aesthetic appeal of your outdoor space.
Whether you use your shed for storage, as a workshop, or for other purposes, the newly constructed ramp will undoubtedly streamline the process of moving tools, equipment, and supplies in and out of the space. Additionally, it provides a smooth transition for wheeled items, ensuring that you can effortlessly navigate the entrance without any hassle.
As you admire the completed ramp, take pride in the fact that you've successfully tackled a practical and rewarding project that adds both functionality and visual appeal to your property. The ramp stands as a testament to your DIY prowess and your commitment to creating a space that is not only efficient but also thoughtfully designed.
With the shed entrance ramp now in place, you can look forward to enjoying the convenience and ease of access it provides, knowing that you've crafted a durable and reliable solution that complements your shed and enhances the overall usability of your outdoor space.