
Home>Create & Decorate>DIY & Crafts>How To Build A Shed Ramp With Pavers
DIY & Crafts
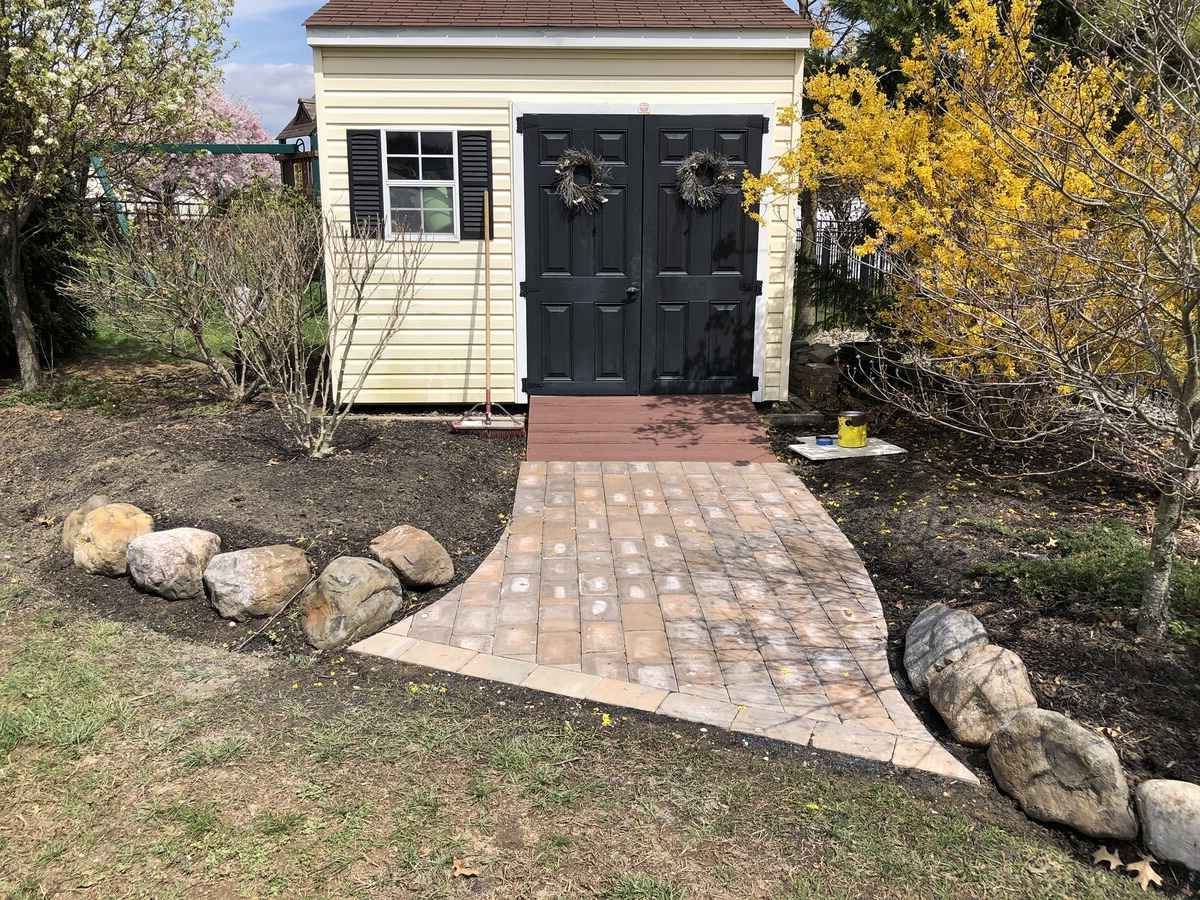
How To Build A Shed Ramp With Pavers
Published: February 27, 2024

Senior Editor in Create & Decorate, Kathryn combines traditional craftsmanship with contemporary trends. Her background in textile design and commitment to sustainable crafts inspire both content and community.
Learn how to create a sturdy shed ramp using pavers with this easy DIY guide. Enhance your outdoor space with this practical and stylish addition. Ideal for DIY & Crafts enthusiasts.
(Many of the links in this article redirect to a specific reviewed product. Your purchase of these products through affiliate links helps to generate commission for Twigandthistle.com, at no extra cost. Learn more)
Introduction
Building a shed ramp with pavers is a practical and visually appealing way to improve accessibility to your shed. Whether you use your shed for storage, as a workshop, or for other purposes, a well-constructed ramp can make it easier to move heavy equipment, tools, and supplies in and out of the space. Additionally, a paver ramp can enhance the overall aesthetic of your property, adding a touch of elegance to the functional aspect of the shed.
In this comprehensive guide, we will walk you through the step-by-step process of creating a sturdy and durable shed ramp using pavers. From gathering the necessary materials and tools to laying the foundation and adding the finishing touches, you will gain valuable insights into the craftsmanship involved in this DIY project. By following these instructions, you can elevate the functionality and visual appeal of your shed while also gaining the satisfaction of completing a hands-on construction endeavor.
So, roll up your sleeves, gather your tools, and let's embark on this rewarding journey of building a shed ramp with pavers. Whether you're a seasoned DIY enthusiast or a novice looking to expand your skills, this project offers a fulfilling opportunity to enhance your property and create a practical solution for accessing your shed with ease. Let's dive into the details and get started on this exciting and rewarding construction project.
Step 1: Gather Materials and Tools
Before diving into the construction of your shed ramp with pavers, it's crucial to gather all the necessary materials and tools. By ensuring that you have everything at your disposal, you can streamline the building process and minimize interruptions. Here's a comprehensive list of what you'll need:
Materials:
- Pavers: Select durable, weather-resistant pavers that can withstand the weight of heavy equipment and foot traffic. Consider the aesthetic appeal of the pavers to complement the overall look of your property.
- Gravel: This will serve as the base for the ramp, providing stability and drainage.
- Sand: Used for leveling and setting the pavers in place.
- Landscape Fabric: Helps prevent weed growth and maintains the integrity of the ramp over time.
- Edging Material: Choose sturdy edging material to contain the pavers and create a defined border for the ramp.
- Pressure-Treated Lumber: Required for constructing the frame and support structure of the ramp.
- Nails and Screws: Ensure you have an adequate supply of fasteners for securing the lumber and edging.
- Crushed Stone: Provides a solid foundation for the ramp and aids in drainage.
- Concrete Mix: If you plan to create a concrete base for the ramp, you'll need concrete mix for this purpose.
Tools:
- Measuring Tape: Essential for taking accurate measurements of the ramp area and materials.
- Shovel: Used for excavating the ramp area and moving gravel and crushed stone.
- Level: Ensures that the ramp surface is even and sloped correctly for efficient drainage.
- Wheelbarrow: Facilitates the transportation of gravel, sand, and other materials to the construction site.
- Tamper: Used to compact the gravel and crushed stone for a stable base.
- Saw: Required for cutting lumber to the appropriate dimensions for the ramp frame.
- Work Gloves: Protect your hands during the construction process.
- Safety Glasses: Essential for eye protection when cutting materials or working with pavers and fasteners.
- Broom: Used for sweeping sand into the joints between the pavers and for general cleanup.
By gathering these materials and tools, you'll be well-prepared to commence the construction of your shed ramp with pavers. With everything in place, you can proceed to the next step with confidence, knowing that you have the necessary resources to bring your project to fruition.
Step 2: Measure and Plan
Before breaking ground on your shed ramp project, meticulous measurement and thoughtful planning are essential. This phase sets the foundation for a well-executed construction process and ensures that the ramp will seamlessly integrate with the existing landscape. Here's a detailed breakdown of the crucial steps involved in measuring and planning for your paver shed ramp:
-
Assess the Slope: Begin by evaluating the slope of the ground where the ramp will be installed. Measure the rise and run of the area to determine the necessary length and incline for the ramp. This assessment will guide the design and construction of the ramp to ensure optimal functionality and accessibility.
-
Determine Ramp Dimensions: Based on the slope assessment, calculate the dimensions of the ramp, including the length, width, and angle of the incline. Consider the intended use of the shed and the types of equipment or items that will be transported via the ramp. These factors will influence the size and load-bearing capacity of the ramp.
-
Sketch the Layout: Create a rough sketch or diagram of the planned ramp, indicating the placement of pavers, support structure, and any additional features such as handrails or landings. This visual representation will serve as a guide during the construction phase and help you visualize the final outcome.
-
Consider Drainage: Factor in proper drainage during the planning phase to prevent water accumulation on the ramp surface. Ensure that the slope and positioning of the ramp allow for efficient water runoff, minimizing the risk of water damage and enhancing safety during inclement weather.
-
Account for Landscaping Features: Take into account any existing landscaping features, such as flower beds, trees, or pathways, that may impact the placement and design of the ramp. Adapting the ramp layout to harmonize with the surrounding landscape will result in a more cohesive and visually appealing integration.
-
Review Local Building Codes: Check local building codes and regulations pertaining to ramp construction to ensure compliance with safety and structural standards. Understanding any specific requirements or permits needed for the project is crucial before proceeding with the construction phase.
By meticulously measuring the site, considering various design elements, and adhering to regulatory guidelines, you can lay the groundwork for a successful shed ramp construction project. This careful planning stage sets the stage for seamless execution and ensures that the finished ramp meets both functional and aesthetic expectations.
Step 3: Prepare the Area
Preparing the area for the construction of a shed ramp with pavers is a critical phase that sets the stage for a sturdy and long-lasting structure. This step involves clearing the designated space, excavating the ground, and creating a solid foundation for the ramp. Here's a detailed breakdown of the essential tasks involved in preparing the area for your paver shed ramp:
-
Clear the Site: Begin by clearing the designated area where the ramp will be installed. Remove any debris, rocks, or vegetation that may impede the construction process. Clearing the site provides a clean canvas for the subsequent excavation and construction activities.
-
Mark the Layout: Use stakes and string to outline the dimensions and shape of the ramp on the ground. This visual guide will help ensure that the excavation and foundation construction align with the intended design and dimensions of the ramp.
-
Excavate the Ground: With the layout marked, proceed to excavate the ground to the required depth for the ramp foundation. Use a shovel to remove the topsoil and create a level surface for the subsequent construction layers. The depth of the excavation will depend on the desired slope and the thickness of the base materials.
-
Compact the Soil: After excavating the ground, use a tamper to compact the soil thoroughly. Compaction is crucial for creating a stable base that can support the weight of the ramp and withstand the forces of foot traffic and equipment movement.
-
Install Landscape Fabric: Once the soil is compacted, lay down a layer of landscape fabric over the excavated area. The landscape fabric acts as a barrier that prevents weed growth and helps maintain the integrity of the ramp structure over time.
-
Add Base Materials: Following the installation of the landscape fabric, add a layer of gravel to the excavated area. The gravel serves as a base material that provides stability, aids in drainage, and forms the foundation for the pavers. Ensure that the gravel layer is evenly distributed and compacted to create a solid base for the ramp.
By meticulously preparing the area for the shed ramp construction, you establish a solid foundation for the subsequent stages of the project. This meticulous groundwork ensures that the ramp will be structurally sound, durable, and capable of withstanding the rigors of regular use.
Step 4: Lay the Foundation
With the site meticulously prepared, the next crucial step in constructing a shed ramp with pavers is laying the foundation. This phase involves creating a stable and level base that will support the pavers and ensure the structural integrity of the ramp. Here's a detailed breakdown of the essential tasks involved in laying the foundation for your paver shed ramp:
-
Leveling and Compacting: Begin by ensuring that the gravel base laid during the site preparation phase is thoroughly leveled and compacted. Use a tamper to compact the gravel, creating a firm and stable surface for the pavers. Proper compaction is essential for preventing uneven settling and maintaining the longevity of the ramp.
-
Adding Crushed Stone: Following the compaction of the gravel base, add a layer of crushed stone to further enhance the stability and load-bearing capacity of the foundation. The crushed stone acts as a secondary base material, providing additional support and aiding in drainage. Spread the crushed stone evenly and compact it to create a solid sub-base for the pavers.
-
Installing Edging Material: To contain the pavers and create a defined border for the ramp, install sturdy edging material along the sides of the designated ramp area. The edging material helps maintain the structural integrity of the ramp, prevents the pavers from shifting, and adds a polished finish to the overall design.
-
Leveling and Aligning: Before laying the pavers, use a level to ensure that the foundation surface is even and sloped correctly for efficient drainage. Take the time to align the edging material and verify that the entire foundation is uniform and ready to receive the pavers. This meticulous attention to detail at this stage will contribute to the overall stability and aesthetics of the ramp.
-
Applying Sand Bedding: Once the foundation is leveled and aligned, spread a layer of sand over the compacted base. The sand serves as a bedding material for the pavers, allowing for minor adjustments in their placement and ensuring a snug fit. Use a screed board or a straight edge to evenly distribute the sand across the foundation surface.
By meticulously laying the foundation for your shed ramp with pavers, you establish a solid base that forms the backbone of the entire structure. This foundational phase sets the stage for the precise placement of the pavers and ensures that the ramp will be structurally sound, visually appealing, and capable of withstanding the demands of regular use.
Step 5: Install the Pavers
With the foundation meticulously prepared, it's time to embark on the transformative phase of installing the pavers for your shed ramp. This step requires precision, attention to detail, and a keen eye for creating a visually striking and structurally robust surface. Here's a detailed breakdown of the essential tasks involved in installing the pavers for your paver shed ramp:
-
Begin at the Bottom: Start laying the pavers at the bottom of the ramp, working your way upward. This approach ensures that you can maintain a consistent slope and alignment as you progress, resulting in a seamless and visually appealing surface.
-
Pattern and Design: Consider the pattern and design layout for the pavers. Whether you opt for a traditional running bond pattern or a more intricate herringbone design, visualize the aesthetic impact of the pavers and how they will complement the overall look of your property.
-
Cutting Pavers: If necessary, use a saw to cut pavers to fit the edges and corners of the ramp. Precise cuts ensure a snug fit and a polished finish, enhancing the overall visual appeal of the ramp surface.
-
Interlocking Placement: As you lay the pavers, ensure that they interlock securely, creating a stable and cohesive surface. Pay attention to the alignment and spacing between the pavers, maintaining uniformity and structural integrity throughout the installation process.
-
Use a Rubber Mallet: Tap the pavers gently with a rubber mallet to ensure they are level and securely set in place. This step helps to eliminate any unevenness and ensures that the pavers are firmly seated in the sand bedding.
-
Check for Consistency: Periodically use a level to verify the evenness of the pavers as you progress. This meticulous attention to consistency ensures that the ramp surface will provide a smooth and stable pathway for accessing the shed.
-
Fill the Joints: Once all the pavers are in place, fill the joints with additional sand. Use a broom to sweep the sand into the gaps between the pavers, securing them in position and enhancing the overall stability of the ramp surface.
By meticulously installing the pavers for your shed ramp, you elevate the functionality and visual appeal of the structure. This phase marks the culmination of your efforts, resulting in a beautifully crafted ramp that enhances accessibility to your shed while adding a touch of elegance to your property.
Step 6: Finishing Touches
As you near the completion of your shed ramp construction with pavers, the finishing touches play a pivotal role in enhancing the functionality, durability, and visual appeal of the structure. This phase involves attention to detail and the implementation of final elements that elevate the overall quality of the ramp. Here's a detailed breakdown of the essential tasks involved in adding the finishing touches to your paver shed ramp:
-
Seal the Pavers: Consider applying a sealant to the pavers to enhance their longevity and resistance to stains, moisture, and weathering. A quality sealant not only protects the pavers but also enriches their color, adding a vibrant and polished look to the ramp surface.
-
Add Handrails: If desired, install handrails along the sides of the ramp to provide additional support and safety. Handrails can be constructed from durable materials such as pressure-treated wood or metal, offering stability and peace of mind when navigating the ramp.
-
Incorporate Landscaping: Surround the ramp with landscaping elements such as flower beds, shrubs, or decorative stones to integrate the structure seamlessly into the overall aesthetic of your property. Thoughtfully chosen landscaping enhances the visual appeal of the ramp and creates a harmonious transition between the ramp and the surrounding environment.
-
Ensure Proper Drainage: Verify that the ramp's slope and surface facilitate efficient drainage. Address any potential water pooling or runoff issues by adjusting the grading or incorporating additional drainage solutions. Proper drainage not only preserves the integrity of the ramp but also minimizes safety hazards during inclement weather.
-
Perform a Final Inspection: Thoroughly inspect the entire ramp, checking for any loose pavers, uneven surfaces, or potential tripping hazards. Address any discrepancies and make necessary adjustments to ensure that the ramp is structurally sound and safe for regular use.
-
Cleanup and Maintenance: Once the finishing touches are in place, conduct a comprehensive cleanup of the construction site, removing any debris, excess materials, and tools. Consider implementing a maintenance plan for the ramp, including regular cleaning, weed prevention, and periodic inspections to uphold its functionality and visual appeal over time.
By meticulously attending to the finishing touches, you elevate the shed ramp with pavers to a level of craftsmanship that reflects your dedication to quality and attention to detail. These final elements not only enhance the practicality and durability of the ramp but also contribute to the overall aesthetic charm of your property, creating a seamless blend of functionality and visual appeal.
Conclusion
In conclusion, the construction of a shed ramp with pavers is a gratifying endeavor that combines practical functionality with aesthetic appeal. By following the step-by-step process outlined in this guide, you have gained valuable insights into the meticulous craftsmanship involved in creating a sturdy and visually striking ramp for accessing your shed. From the initial planning and preparation stages to the precise installation of pavers and the addition of finishing touches, each phase of the project has contributed to the transformation of a basic access point into a well-crafted and seamlessly integrated structure.
The careful selection of materials, including durable pavers, gravel, sand, and edging, has laid the foundation for a ramp that can withstand the demands of heavy equipment and foot traffic while adding a touch of elegance to your property. The thoughtful planning and measurement phase has ensured that the ramp aligns with the natural slope of the landscape, integrates harmoniously with existing features, and complies with local building codes and regulations.
As the pavers are meticulously laid and secured, the ramp takes shape as a functional pathway that enhances accessibility to your shed while contributing to the overall visual appeal of your property. The addition of finishing touches, such as sealants, handrails, and landscaping elements, further elevates the ramp, creating a polished and inviting access point that seamlessly blends with the surrounding environment.
It's important to recognize that the completion of the shed ramp construction is not just the culmination of a hands-on project but also the beginning of a practical and visually appealing addition to your property. The ramp you have constructed will serve as a testament to your dedication to quality craftsmanship and your ability to transform a basic necessity into a well-crafted and aesthetically pleasing feature.
As you take pride in the completion of your shed ramp with pavers, it's essential to implement a maintenance plan to preserve its functionality and visual appeal over time. Regular upkeep, including cleaning, weed prevention, and periodic inspections, will ensure that the ramp continues to serve its purpose effectively while enhancing the overall charm of your property.
In essence, the construction of a shed ramp with pavers is not just a practical solution; it's a testament to your ability to merge functionality with craftsmanship, creating a lasting and visually appealing addition to your property. Whether you use your shed for storage, as a workshop, or for other purposes, the ramp you have constructed will stand as a testament to your dedication to quality and your passion for hands-on construction projects.