
Home>Create & Decorate>DIY & Crafts>How To Build A Dog Ramp
DIY & Crafts
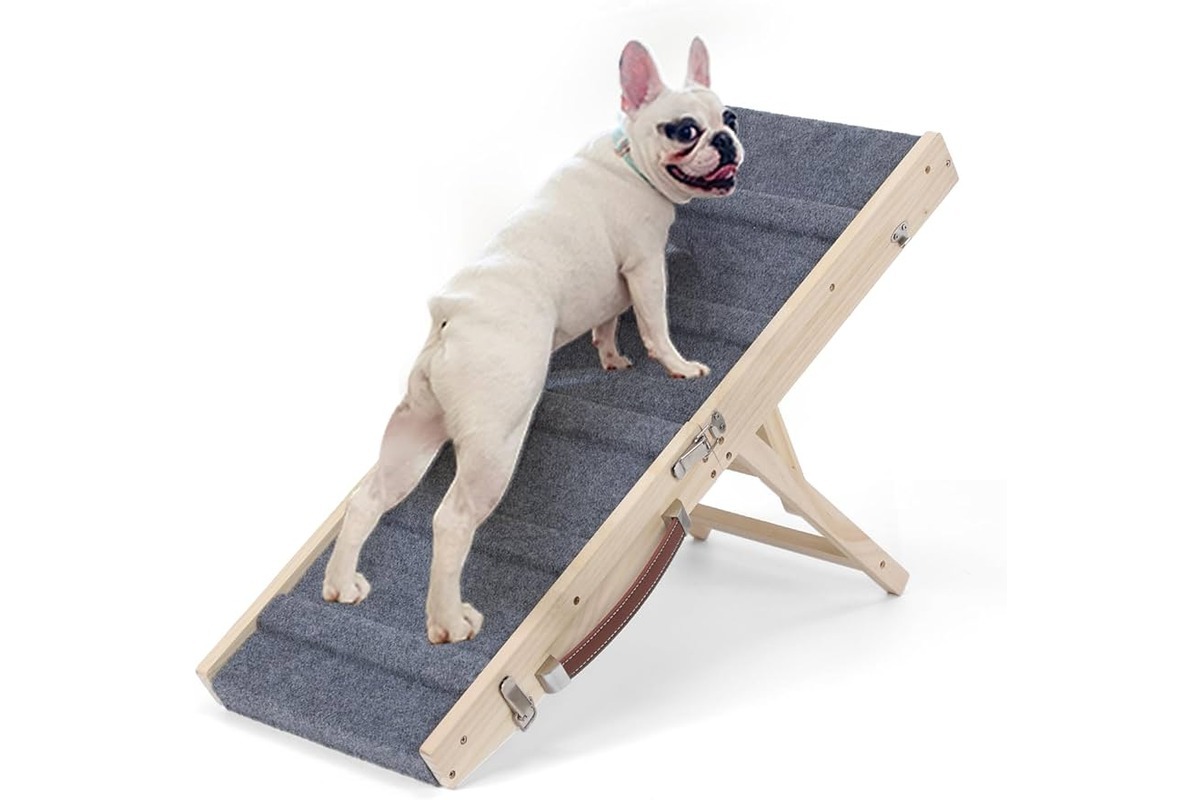
How To Build A Dog Ramp
Published: February 29, 2024

Senior Editor in Create & Decorate, Kathryn combines traditional craftsmanship with contemporary trends. Her background in textile design and commitment to sustainable crafts inspire both content and community.
Learn how to build a DIY dog ramp with our step-by-step guide. Perfect for pet owners who love to craft and create!
(Many of the links in this article redirect to a specific reviewed product. Your purchase of these products through affiliate links helps to generate commission for Twigandthistle.com, at no extra cost. Learn more)
Introduction
Building a dog ramp is a rewarding DIY project that can greatly benefit your furry friend. Whether your dog is aging, recovering from an injury, or simply needs assistance getting onto higher surfaces, a well-constructed ramp can provide the necessary support and safety. By creating a custom ramp tailored to your dog's specific needs, you can ensure a comfortable and secure means of access to elevated areas, such as vehicles, beds, or furniture.
A dog ramp offers numerous advantages, including minimizing the risk of joint strain and injury, especially for smaller breeds or those with mobility issues. Additionally, it can alleviate the need for lifting and carrying your dog, reducing the potential for back strain and other physical discomforts for both you and your pet. Furthermore, a thoughtfully designed ramp can promote independence and confidence in your dog, allowing them to navigate their surroundings with ease.
In this comprehensive guide, we will walk through the step-by-step process of constructing a sturdy and functional dog ramp. From gathering the necessary materials to assembling and testing the ramp, you will gain valuable insights and practical tips to ensure a successful DIY project. Whether you are a seasoned craftsman or a novice DIY enthusiast, this guide will equip you with the knowledge and confidence to create a customized dog ramp that meets your pet's unique needs.
By embarking on this DIY endeavor, you not only demonstrate your love and care for your canine companion but also have the opportunity to unleash your creativity and craftsmanship. So, roll up your sleeves, gather your tools, and let's embark on this fulfilling journey of building a dog ramp that will undoubtedly enhance the quality of life for your beloved pet.
Materials Needed
To embark on the construction of a durable and functional dog ramp, you will need a selection of materials and tools that are essential for the project. By ensuring that you have all the necessary items at your disposal, you can streamline the building process and achieve a professional-quality result. Here's a comprehensive list of the materials and tools required for this DIY endeavor:
Materials:
- Wood: Select high-quality plywood or lumber that is sturdy and capable of supporting your dog's weight. The dimensions will depend on the size of the ramp you intend to build.
- Screws and Nails: Choose appropriate screws and nails to securely fasten the ramp components together. Ensure that they are of sufficient length and strength to provide structural integrity.
- Hinges: Opt for durable hinges that will facilitate the folding functionality of the ramp, if desired.
- Non-Slip Surface: Acquire a non-slip material, such as rubber matting or adhesive grip tape, to cover the ramp's surface and ensure your dog's stability during use.
- Wood Glue: Invest in high-quality wood glue to reinforce the joints and enhance the overall stability of the ramp.
- Paint or Sealant: Consider using pet-safe paint or sealant to protect the wood from outdoor elements and prolong the ramp's lifespan.
Tools:
- Measuring Tape: A reliable measuring tape is essential for accurately determining the dimensions of the ramp components.
- Circular Saw or Hand Saw: Depending on your preference and the availability of tools, a circular saw or hand saw will be indispensable for cutting the wood to the required sizes and angles.
- Drill and Bits: A power drill with appropriate drill bits is necessary for creating pilot holes and securing screws during assembly.
- Screwdriver: Both a manual and electric screwdriver will be useful for driving screws into the wood.
- Sandpaper: Smooth out rough edges and surfaces of the wood using sandpaper to prevent splinters and ensure a safe ramp for your dog.
- Paintbrushes or Rollers: If you plan to paint or seal the ramp, having the right application tools will facilitate the finishing touches.
By gathering these materials and tools, you will be well-prepared to commence the construction of a dog ramp that is not only functional and safe but also visually appealing. With careful planning and attention to detail, you can ensure that your canine companion will have a reliable and customized access ramp that meets their specific needs.
Step 1: Measure and Cut the Wood
The initial step in building a dog ramp involves precise measurements and accurate cutting of the wood components. This critical phase sets the foundation for the ramp's structural integrity and functionality, ensuring that each piece fits together seamlessly to create a secure and reliable access platform for your canine companion.
Begin by carefully measuring the designated area where the ramp will be utilized, taking into account the height and length required to accommodate your dog's needs. Use a measuring tape to determine the exact dimensions, considering the incline and overall slope of the ramp to ensure a gentle and manageable ascent for your pet. It's essential to prioritize safety and comfort during this phase, as the correct measurements will directly impact the usability and effectiveness of the ramp.
Once the measurements are determined, transfer the dimensions to the selected wood material, whether it's plywood or lumber. Utilize a pencil and straight edge to mark the precise cutting lines, ensuring accuracy and consistency across the various components of the ramp, including the ramp surface, side rails, and support beams. If the ramp is designed to be foldable, take into account the necessary joints and angles for the folding mechanism during the cutting process.
With the measurements clearly marked, proceed to cut the wood according to the specified dimensions. Depending on the complexity of the design, a circular saw or hand saw may be employed to achieve clean and precise cuts. Take caution to follow the marked lines accurately, maintaining straight edges and smooth angles to facilitate seamless assembly and structural stability.
After the wood components are cut to size, it's advisable to use sandpaper to smooth any rough edges and surfaces, minimizing the risk of splinters and ensuring a safe environment for your dog. This meticulous attention to detail during the cutting and sanding process will contribute to the overall quality and safety of the dog ramp, providing a polished and professional finish.
By meticulously measuring and cutting the wood components with precision and care, you lay the groundwork for a well-constructed dog ramp that prioritizes safety, functionality, and durability. This foundational step sets the stage for the subsequent assembly and customization of the ramp, bringing you closer to the fulfillment of providing your beloved pet with a tailored and reliable access solution.
Step 2: Assemble the Ramp Frame
With the wood components accurately measured and cut, the next pivotal phase in constructing a dog ramp involves the assembly of the ramp frame. This step is crucial in bringing together the individual elements to form a cohesive and robust structure that will provide the necessary support and stability for your canine companion.
Commence the assembly process by arranging the cut wood pieces according to the predetermined design and layout. If the ramp is designed to be foldable, ensure that the hinge placements and folding mechanism are taken into consideration during this phase. By visualizing the final configuration and ensuring that all components align seamlessly, you can streamline the assembly process and minimize potential errors.
Utilize screws, nails, and wood glue to securely fasten the ramp components together, reinforcing the joints and connections to enhance the overall strength and durability of the frame. It's essential to prioritize structural integrity and stability, especially in areas where weight-bearing and pressure points are concentrated, such as the junctions between the ramp surface, side rails, and support beams.
If the ramp is intended for outdoor use, consider the application of weather-resistant sealant or paint to protect the wood from environmental elements and prolong its lifespan. This additional step not only enhances the aesthetic appeal of the ramp but also safeguards it against moisture, UV exposure, and general wear and tear, ensuring a long-lasting and resilient structure.
Throughout the assembly process, periodically assess the alignment and stability of the frame, making any necessary adjustments to ensure that all components are securely fastened and the overall structure is level and balanced. Attention to detail during this phase is paramount, as it directly influences the functionality and safety of the completed dog ramp.
By methodically assembling the ramp frame with precision and care, you establish a solid foundation for the subsequent steps in the construction process. This phase marks a significant milestone in transforming individual wood components into a cohesive and reliable access ramp that is tailored to meet your dog's specific needs, bringing you one step closer to providing your beloved pet with a customized and supportive mobility solution.
Step 3: Attach the Ramp Surface
Attaching the ramp surface is a pivotal phase in the construction of a dog ramp, as it directly influences the functionality, safety, and overall usability of the completed structure. The ramp surface serves as the primary point of contact for your dog, providing traction and stability during ascent and descent. By meticulously securing the ramp surface to the frame, you ensure a reliable and supportive platform that caters to your canine companion's mobility needs.
Begin by positioning the pre-cut ramp surface onto the assembled frame, aligning it meticulously to achieve a seamless fit. Whether the ramp surface is made of plywood or another sturdy material, it's essential to ensure that it rests securely on the frame, with no overhanging edges or misalignments that could compromise its stability.
Once the ramp surface is positioned correctly, utilize screws and a power drill to fasten it securely to the frame, ensuring that the attachment points are strategically distributed to uphold the surface's integrity. It's advisable to create pilot holes prior to driving the screws, as this minimizes the risk of splitting the wood and facilitates a more secure and precise fastening process.
Incorporate wood glue along the edges and underside of the ramp surface before affixing it to the frame, enhancing the bond and reinforcing the connection for added stability. This additional step contributes to the overall structural integrity of the ramp, minimizing the potential for shifting or loosening of the surface over time.
If the ramp is designed to be foldable, ensure that the attachment method accommodates the folding functionality, allowing for smooth and secure folding and unfolding without compromising the stability of the ramp surface.
After the ramp surface is securely attached, conduct a thorough inspection to verify the stability and alignment of the entire structure. Test the ramp surface by applying pressure and ensuring that it can support the anticipated weight of your dog without flexing or shifting.
By meticulously attaching the ramp surface with precision and care, you establish a fundamental component of the dog ramp that prioritizes safety, functionality, and durability. This critical phase brings you closer to the realization of a customized and reliable access solution for your beloved pet, setting the stage for the final steps in completing the construction of the dog ramp.
Step 4: Add Non-Slip Surface
Incorporating a non-slip surface onto the ramp is a pivotal step that significantly enhances the safety and usability of the dog ramp. The non-slip surface serves as a crucial element in providing traction and stability for your canine companion, ensuring confident and secure mobility during ascent and descent. By integrating a reliable non-slip material, such as rubber matting or adhesive grip tape, you can effectively mitigate the risk of slips and falls, especially in instances where your dog may encounter smooth or slippery surfaces.
Begin by selecting a high-quality non-slip material that is suitable for the specific dimensions and design of the ramp. Opt for a material that offers superior traction and durability, capable of withstanding regular use and providing a secure foothold for your dog. Consider the dimensions of the ramp surface and ensure that the chosen non-slip material can be seamlessly integrated to cover the entire surface area, leaving no exposed areas that could compromise safety.
Carefully position the non-slip material onto the ramp surface, ensuring a precise fit that aligns with the edges and contours of the ramp. If necessary, trim the material to achieve a perfect match with the ramp surface, prioritizing a seamless and uniform coverage that minimizes potential tripping hazards and ensures consistent traction along the entire length of the ramp.
Once the non-slip material is positioned correctly, firmly adhere it to the ramp surface, utilizing a suitable adhesive that is compatible with both the material and the wood. Pay meticulous attention to the edges and corners, ensuring that the non-slip material is securely affixed without any protruding edges or loose sections that could pose a hazard to your dog.
After the non-slip surface is applied, conduct a thorough inspection to verify the integrity and effectiveness of the traction enhancement. Test the non-slip surface by simulating your dog's movement on the ramp, ensuring that it provides a stable and secure grip without any slippage or displacement. Prioritize the comfort and safety of your dog by guaranteeing that the non-slip surface offers reliable traction under various conditions and usage scenarios.
By integrating a dependable non-slip surface onto the ramp, you fortify the safety and functionality of the access solution, providing your beloved pet with a secure and confidence-inspiring platform for navigating elevated surfaces. This essential step underscores your commitment to crafting a dog ramp that prioritizes the well-being and comfort of your canine companion, culminating in a customized and reliable mobility solution that enriches their daily experiences.
Step 5: Test the Ramp
Testing the completed dog ramp is a crucial phase that validates its functionality, safety, and overall effectiveness in providing reliable access for your canine companion. This pivotal step serves as the ultimate assessment of the ramp's construction, ensuring that it meets the intended objectives and caters to your dog's specific mobility needs.
Commence the testing process by inviting your dog to interact with the ramp in a controlled and supportive environment. Encourage your pet to approach the ramp and observe their initial response, noting any signs of hesitation or reluctance. By creating a positive and reassuring atmosphere, you can instill confidence in your dog and facilitate their exploration of the ramp.
Observe your dog as they ascend and descend the ramp, paying close attention to their body language and movements. Assess their comfort level and stability during the transition, noting any indications of unease or discomfort. By closely monitoring your dog's interaction with the ramp, you can gain valuable insights into its usability and identify any potential adjustments or refinements that may be necessary.
Encourage your dog to repeat the ramp traversal multiple times, allowing them to acclimate to the structure and become familiar with its presence. Observe their adaptability and confidence, noting any improvements in their approach and demeanor as they engage with the ramp. By providing a supportive and encouraging environment, you can facilitate a positive and constructive testing experience for your dog.
Assess the structural integrity of the ramp during the testing phase, verifying that all components remain securely fastened and stable under the weight and movement of your dog. Pay meticulous attention to the attachment points, joints, and overall stability of the ramp, ensuring that it upholds its structural integrity and functionality throughout the testing process.
Evaluate the non-slip surface's effectiveness by observing your dog's traction and stability while traversing the ramp. Verify that the non-slip material provides reliable grip and support, minimizing the risk of slips or falls and instilling confidence in your dog's movements. Prioritize the safety and comfort of your pet by ensuring that the non-slip surface delivers the intended traction enhancement.
By meticulously testing the completed dog ramp with your canine companion, you gain valuable insights into its functionality, safety, and overall suitability for providing reliable access to elevated surfaces. This comprehensive evaluation serves as the final validation of the ramp's construction, ensuring that it aligns with your dog's specific needs and enhances their mobility with a tailored and dependable access solution.