
Home>Create & Decorate>DIY & Crafts>How To Build A Ramp
DIY & Crafts
How To Build A Ramp
Published: February 28, 2024

Senior Editor in Create & Decorate, Kathryn combines traditional craftsmanship with contemporary trends. Her background in textile design and commitment to sustainable crafts inspire both content and community.
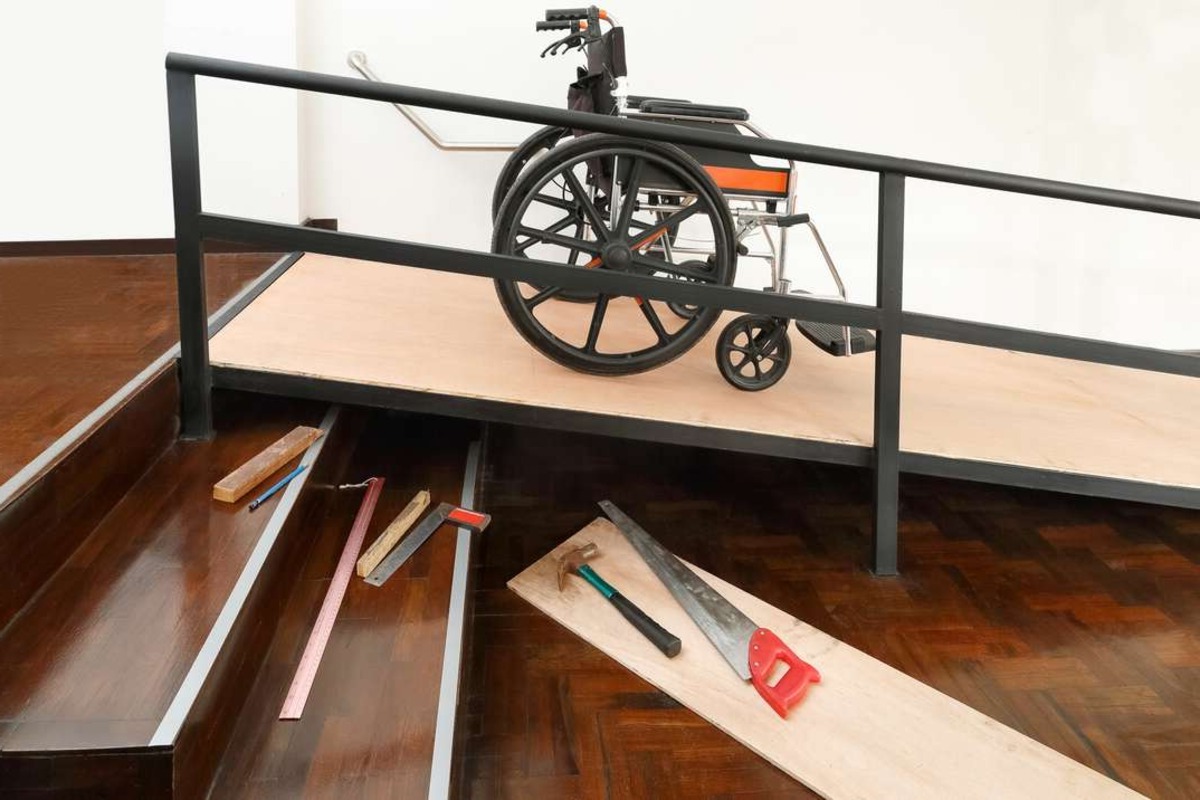
Learn how to build a ramp with our easy DIY & Crafts guide. Get step-by-step instructions and tips for creating a sturdy and functional ramp. Start your project today!
(Many of the links in this article redirect to a specific reviewed product. Your purchase of these products through affiliate links helps to generate commission for Twigandthistle.com, at no extra cost. Learn more)
Introduction
Creating a ramp can significantly improve accessibility and convenience for individuals with mobility challenges. Whether it's for a wheelchair, a scooter, or simply to make it easier to navigate steps, a well-built ramp can make a world of difference. In this comprehensive guide, we will walk you through the step-by-step process of building a sturdy and safe ramp for your home or community space.
By following these instructions, you'll not only enhance the functionality of your property but also contribute to creating a more inclusive environment for everyone. From gathering the necessary materials and tools to adding essential safety features, this guide will equip you with the knowledge and confidence to tackle this rewarding DIY project.
So, roll up your sleeves, gather your tools, and let's get started on constructing a ramp that will make life easier for those who need it most.
Step 1: Gather Materials and Tools
Before diving into the construction process, it's crucial to gather all the necessary materials and tools. Ensuring that you have everything at hand will streamline the building process and minimize interruptions. Here's a comprehensive list of what you'll need:
Materials:
- Pressure-Treated Lumber: This will serve as the primary material for the ramp's frame and decking. Opting for pressure-treated lumber is essential to protect the ramp from weathering and decay.
- Plywood or Composite Decking: Choose a durable and non-slip surface material for the ramp's decking. Plywood or composite decking are popular choices for their resilience and traction.
- Concrete Footings: These will provide a stable foundation for the ramp, ensuring it remains secure and level.
- Galvanized Screws and Nails: Invest in high-quality, weather-resistant screws and nails to secure the ramp's components firmly in place.
- Handrail Materials: If your design includes handrails, gather the necessary materials such as metal or PVC piping, as well as the associated connectors and fasteners.
- Safety Features: Consider adding safety features such as non-slip treads, edge guards, and reflective tape to enhance visibility and user safety.
Tools:
- Measuring Tape and Level: Accurate measurements and a level surface are crucial for a well-constructed and safe ramp.
- Circular Saw and Drill: These power tools will be essential for cutting lumber and creating pilot holes for screws.
- Shovel and Wheelbarrow: If the site requires excavation or moving of materials, a shovel and wheelbarrow will be indispensable.
- Screwdriver and Hammer: These basic hand tools will aid in the assembly of the ramp's components.
- Safety Gear: Prioritize safety by wearing protective gear such as gloves, safety goggles, and a dust mask during construction.
By ensuring that you have all the required materials and tools on hand, you'll be well-prepared to move on to the next step: designing the ramp. With everything in place, you can approach the construction process with confidence, knowing that you have everything needed to create a functional and safe ramp.
Step 2: Design the Ramp
Designing the ramp is a critical phase that sets the foundation for a well-constructed and functional structure. The design process involves careful consideration of the ramp's dimensions, slope, and layout to ensure optimal usability and safety. Here's a detailed walkthrough of the key aspects to focus on when designing your ramp:
Consider the User's Needs
First and foremost, it's essential to consider the specific needs of the individuals who will be using the ramp. If the ramp is intended for wheelchair users, it's crucial to adhere to the guidelines for slope and width outlined in the Americans with Disabilities Act (ADA). This ensures that the ramp is accessible and user-friendly for individuals with mobility challenges.
Determine the Ramp Length and Slope
The length and slope of the ramp are pivotal factors in its design. Calculating the required length involves considering the vertical rise that the ramp needs to overcome. The slope, expressed as a ratio (e.g., 1:12), determines the incline of the ramp and directly impacts its usability. For instance, a 1:12 slope means that for every 1 inch of vertical rise, the ramp should extend 12 inches horizontally. Adhering to ADA guidelines for slope ensures that the ramp is safe and easy to navigate for all users.
Plan the Ramp Layout
Carefully plan the layout of the ramp to integrate seamlessly with the existing architecture and landscape. Consider the entry and exit points, as well as any existing pathways or structures that the ramp needs to connect to. Additionally, factor in the space required for landings at the top and bottom of the ramp, ensuring there is ample room for maneuvering and safety.
Incorporate Safety Features
Integrating safety features into the ramp's design is paramount. This includes adding handrails on both sides of the ramp, ensuring they are at the appropriate height and graspable. Non-slip surfacing materials should also be selected to provide traction and prevent slips or falls, especially in wet or icy conditions.
Seek Professional Guidance if Needed
If you are unsure about any aspect of the ramp's design, consider consulting with a professional contractor or accessibility expert. They can provide valuable insights and ensure that the design meets all necessary safety and accessibility standards.
By meticulously designing the ramp with the users' needs and safety in mind, you set the stage for a successful construction phase. With the design finalized, you can confidently move forward to the next step: preparing the site for the ramp's installation.
Step 3: Prepare the Site
Preparing the site for the construction of the ramp is a crucial step that sets the groundwork for a sturdy and stable structure. This phase involves assessing the location, clearing the area, and creating a level foundation to ensure the ramp's long-term stability and usability.
Assess the Location
Begin by carefully assessing the chosen location for the ramp. Ensure that it meets the necessary criteria for accessibility, safety, and convenience. Take into account factors such as proximity to the entry point, available space for the ramp's layout, and the terrain of the surrounding area. It's essential to choose a location that provides a clear and direct path, minimizing any obstacles or obstructions for users.
Clear the Area
Once the location is confirmed, clear the designated area of any debris, vegetation, or obstacles that could impede the construction process. This may involve removing rocks, roots, or any other obstructions from the ground. Additionally, ensure that the area is free from any underground utilities or cables by contacting the relevant authorities for verification.
Create a Level Foundation
Establishing a level foundation is paramount for the stability and safety of the ramp. If the ground is uneven or sloped, excavation may be necessary to create a level surface. Use a shovel and a level to carefully remove any excess soil and ensure that the ground is uniformly flat. In some cases, it may be necessary to pour a concrete footing to provide a solid and level base for the ramp's support posts.
Consider Drainage
Proper drainage is essential to prevent water accumulation and potential damage to the ramp over time. Assess the site to determine the natural flow of water and make any necessary adjustments to ensure that water is directed away from the ramp. This may involve creating a gentle slope away from the ramp or installing drainage channels to manage water runoff effectively.
Secure Permits and Approvals
Before proceeding with the construction, it's important to secure any required permits or approvals from local authorities. Depending on the location and the scope of the project, there may be specific regulations or building codes that need to be adhered to. Obtaining the necessary permits ensures that the ramp is constructed in compliance with local guidelines and standards.
By meticulously preparing the site, you lay the groundwork for a successful and durable ramp construction. With the site cleared, leveled, and ready for construction, you can confidently move on to the next phase of building the frame of the ramp.
Step 4: Build the Frame
Building the frame forms the structural backbone of the ramp, providing stability and support for the decking and ensuring the overall integrity of the structure. This phase involves assembling the primary framework of the ramp, including the support posts, beams, and joists. Here's a detailed walkthrough of the key steps involved in constructing the frame:
Measure and Mark the Layout
Begin by carefully measuring and marking the layout of the ramp on the prepared site. Use a measuring tape, level, and marking tools to outline the precise locations for the support posts and the overall dimensions of the frame. Accurate measurements are crucial to ensure that the frame aligns with the designated design and layout.
Install the Support Posts
Once the layout is marked, proceed to install the support posts at the designated locations. These posts serve as the vertical supports for the ramp, bearing the weight and providing stability. Use a post hole digger to create holes at the marked locations, ensuring that the depth and diameter of the holes comply with local building codes. Insert the support posts into the holes and secure them in place with concrete, ensuring they are plumb and aligned.
Construct the Beams and Joists
With the support posts in place, it's time to construct the horizontal framework of the ramp. Begin by installing the beams, which will run perpendicular to the support posts and provide additional support for the decking. Secure the beams to the support posts using appropriate fasteners, ensuring they are level and evenly spaced.
Next, install the joists, which will run parallel to the support posts and provide the foundational structure for the decking. Space the joists according to the design specifications, ensuring they are securely attached to the beams and support posts. Proper spacing and attachment of the joists are essential to ensure the stability and load-bearing capacity of the ramp.
Add Cross Bracing for Stability
To further enhance the stability of the frame, consider adding cross bracing between the support posts. Cross bracing helps distribute the load evenly across the frame, minimizing any potential sway or movement. Install the cross braces diagonally between the support posts, securing them in place with appropriate fasteners.
Inspect and Reinforce
Once the frame is assembled, thoroughly inspect the entire structure to ensure that all components are securely fastened and aligned. Reinforce any connections or joints as needed to enhance the overall stability and durability of the frame.
By meticulously constructing the frame, you establish a solid foundation for the ramp, setting the stage for the next phase of installing the decking. With the frame in place, the ramp begins to take shape, bringing you one step closer to completing this impactful and rewarding DIY project.
Step 5: Install the Decking
With the frame of the ramp securely in place, the next crucial step is to install the decking, which forms the surface that users will traverse. The decking not only contributes to the functionality of the ramp but also plays a significant role in ensuring safety and ease of use. Here's a detailed guide on how to effectively install the decking for your ramp:
Select the Decking Material
Begin by selecting the appropriate decking material based on your specific requirements and preferences. Plywood and composite decking are popular choices due to their durability and non-slip properties. Ensure that the chosen material is suitable for outdoor use and can withstand varying weather conditions without compromising on traction.
Cut and Position the Decking
Carefully measure and cut the decking material to fit the dimensions of the ramp. Use a circular saw to achieve precise cuts, ensuring that the decking pieces align seamlessly with the frame. Position the decking onto the frame, starting from the top and working your way down. Secure the decking in place using galvanized screws, ensuring that they are evenly spaced and firmly fastened to the frame.
Ensure Proper Drainage
When installing the decking, pay attention to the slope and ensure that it allows for proper drainage. The decking should be slightly angled to facilitate the runoff of water, preventing any accumulation that could compromise safety and longevity. Incorporating a subtle slope ensures that water drains away from the surface, reducing the risk of slips and maintaining the integrity of the ramp.
Apply Non-Slip Surface Treatment
To enhance traction and safety, consider applying a non-slip surface treatment to the decking material. This can include specialized coatings or non-slip strips that provide additional grip, especially in wet or slippery conditions. Prioritizing non-slip surfacing contributes to the overall safety and usability of the ramp, particularly for individuals with mobility challenges.
Inspect and Test the Decking
Once the decking is installed, thoroughly inspect the surface to ensure that it is securely fastened and free from any protrusions or hazards. Test the decking by walking across it to verify its stability and traction. Address any potential issues or adjustments to guarantee that the decking provides a smooth and secure surface for users to navigate.
By meticulously installing the decking, you bring the ramp one step closer to completion, transforming it into a functional and safe accessibility feature. With the decking in place, the ramp begins to fulfill its purpose, offering a seamless pathway for individuals with mobility needs.
Step 6: Add Handrails and Safety Features
The addition of handrails and safety features is a pivotal phase in the construction of a ramp, significantly enhancing its usability, accessibility, and overall safety. Handrails serve as crucial aids for individuals navigating the ramp, providing support and stability, while safety features contribute to mitigating potential hazards and ensuring a secure environment for users. Here's a detailed exploration of the essential elements to consider when adding handrails and safety features to your ramp:
Install Sturdy Handrails
The installation of sturdy handrails is paramount to the safety and accessibility of the ramp. Handrails provide crucial support for individuals with mobility challenges, offering a firm grip and guidance as they traverse the incline. When installing handrails, ensure that they are positioned at the appropriate height, typically between 34 to 38 inches, in accordance with accessibility guidelines. Additionally, the handrails should extend beyond the top and bottom of the ramp, providing continuous support for users as they approach and depart from the ramp.
Incorporate Non-Slip Treads
Integrating non-slip treads on the ramp's surface enhances traction and minimizes the risk of slips and falls, especially in adverse weather conditions. Non-slip treads, typically made of durable materials such as rubber or specialized non-slip coatings, provide a textured surface that offers secure footing for users. By strategically placing non-slip treads along the ramp, you create a safer pathway that promotes confidence and stability for individuals using mobility aids.
Add Edge Guards and Reflective Tape
To further bolster safety, consider adding edge guards to the sides of the ramp. Edge guards serve as protective barriers, preventing wheels or feet from inadvertently rolling off the edge of the ramp. Additionally, incorporating reflective tape along the edges and handrails enhances visibility, especially in low-light conditions, and ensures that the ramp remains clearly delineated for users. The reflective properties of the tape contribute to improved safety and accessibility, particularly during evening hours or in dimly lit environments.
Ensure Compliance with Accessibility Standards
Throughout the installation of handrails and safety features, it's essential to adhere to accessibility standards and regulations, such as those outlined in the Americans with Disabilities Act (ADA). By ensuring compliance with these standards, you guarantee that the ramp is inclusive and user-friendly for individuals with diverse mobility needs. Prioritizing accessibility standards underscores the commitment to creating a safe and welcoming environment for all users.
By thoughtfully incorporating handrails and safety features, you elevate the functionality and safety of the ramp, creating a well-rounded accessibility solution that prioritizes the needs of individuals with mobility challenges. With these essential elements in place, the ramp becomes a reliable and secure pathway, fostering independence and inclusivity for all who rely on its accessibility.
Step 7: Test the Ramp
Once the construction of the ramp is complete, it is crucial to thoroughly test its functionality, safety, and usability. Testing the ramp ensures that it meets the intended purpose of providing accessible and secure passage for individuals with mobility challenges. Here's a detailed overview of the essential steps involved in testing the ramp:
Conduct Accessibility Assessment
Begin by conducting a comprehensive accessibility assessment of the ramp. This involves evaluating the slope, width, and overall design to ensure compliance with accessibility standards, such as those outlined in the ADA. Verify that the slope adheres to the recommended guidelines, providing a manageable incline for individuals using wheelchairs or other mobility aids. Additionally, assess the width of the ramp to confirm that it allows for unobstructed passage and maneuverability.
Perform Safety Checks
Conduct thorough safety checks to identify and address any potential hazards or deficiencies. Inspect the handrails to ensure they are securely fastened and at the appropriate height for optimal support. Verify that non-slip treads are effectively providing traction and that the surface is free from any protrusions or uneven areas. Additionally, test the edge guards and reflective tape to ensure they contribute to user safety and visibility.
Test User Experience
Invite individuals, including those who will regularly use the ramp, to test its usability and comfort. Observe how individuals navigate the ramp, noting any challenges or areas for improvement. Encourage feedback regarding the ease of access, the stability of the surface, and the overall user experience. This firsthand input is invaluable in identifying any necessary adjustments to enhance the ramp's functionality and user-friendliness.
Evaluate Drainage and Weather Resistance
Assess the ramp's drainage capabilities, particularly during or after rainfall. Verify that water effectively drains away from the surface, preventing pooling or slippery conditions. Additionally, consider the ramp's resilience to varying weather conditions, ensuring that the materials used are durable and weather-resistant. This evaluation is essential to guarantee the ramp's long-term reliability and safety.
Address Any Identified Issues
Based on the findings from the accessibility assessment, safety checks, user feedback, and weather resistance evaluation, address any identified issues or areas for improvement. This may involve making adjustments to the slope, enhancing traction on the surface, or reinforcing certain components for added stability. By promptly addressing any issues, you ensure that the ramp meets the highest standards of accessibility and safety.
By diligently testing the ramp and addressing any identified concerns, you affirm its readiness to serve as a reliable and secure accessibility solution. This rigorous testing process underscores the commitment to creating an inclusive and accommodating environment for individuals with mobility needs. With the ramp successfully tested and validated, it stands as a testament to the dedication to accessibility and the empowerment of all individuals to navigate their surroundings with confidence and independence.