
Home>Create & Decorate>DIY & Crafts>DIY Banquette Seating: Create Your Own Cozy Corner
DIY & Crafts
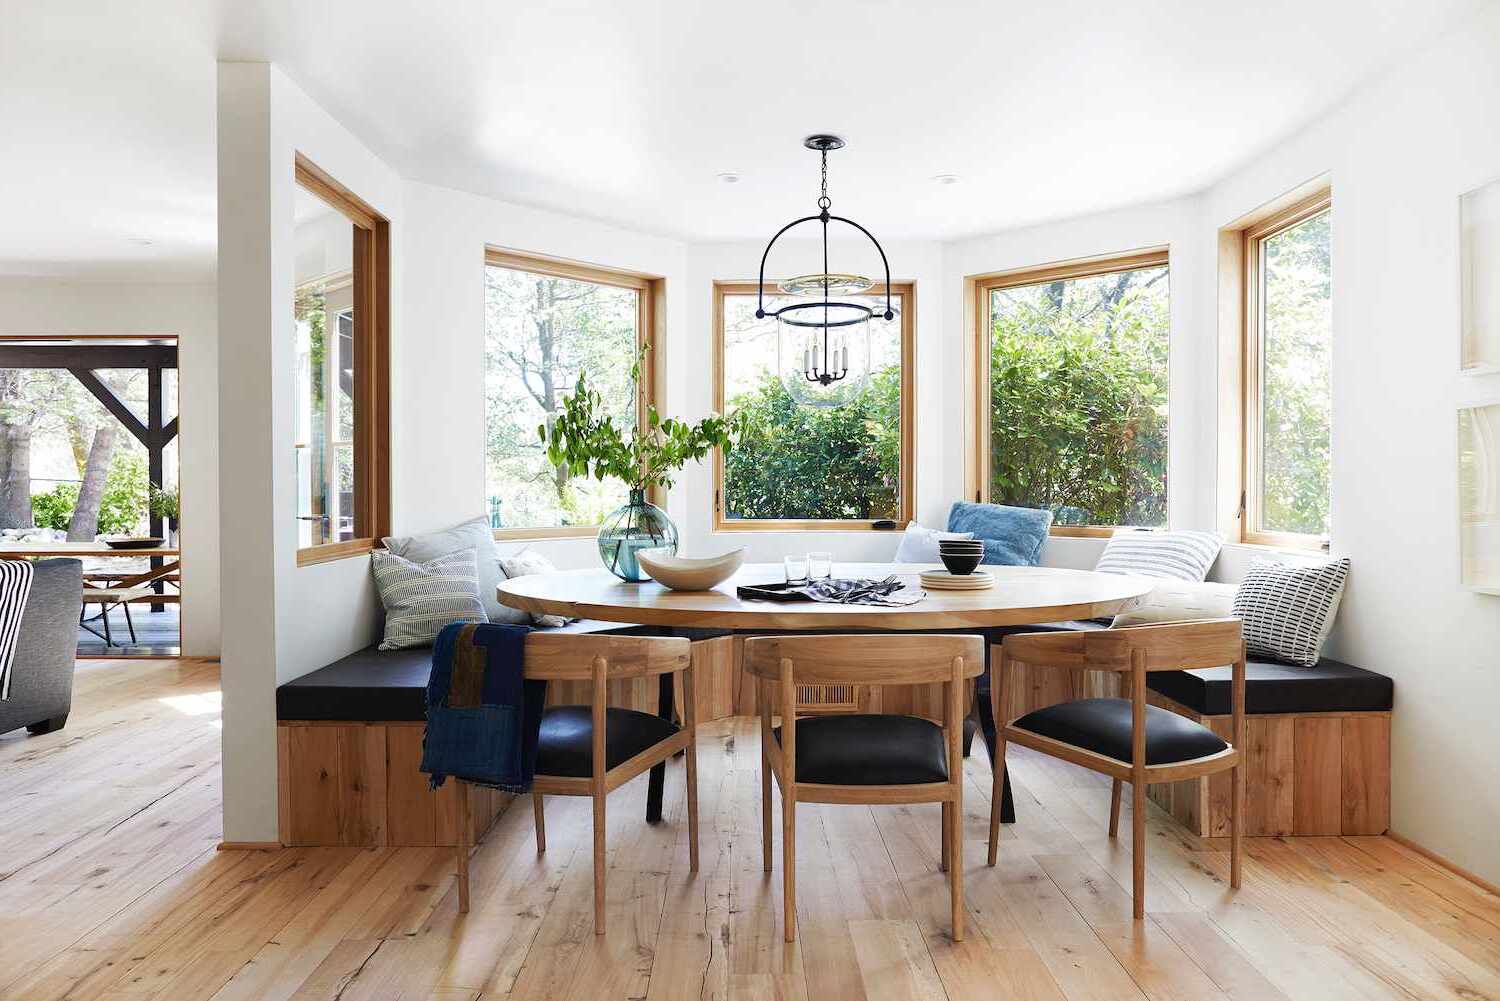
DIY Banquette Seating: Create Your Own Cozy Corner
Published: February 29, 2024

Content Creator specializing in woodworking and interior transformations. Caegan's guides motivate readers to undertake their own projects, while his custom furniture adds a personal touch.
Discover how to build your own DIY banquette seating to transform any corner into a cozy and stylish space with our easy-to-follow crafting guide. Perfect for DIY & Crafts enthusiasts!
(Many of the links in this article redirect to a specific reviewed product. Your purchase of these products through affiliate links helps to generate commission for Twigandthistle.com, at no extra cost. Learn more)
Introduction
Creating a cozy and inviting space in your home can be a rewarding and enjoyable DIY project. Banquette seating, with its comfortable cushions and versatile design, offers a perfect solution for adding both style and functionality to any room. Whether you're looking to maximize seating in a small dining area, create a relaxing reading nook, or simply enhance the overall ambiance of your home, DIY banquette seating can be a fantastic addition to your living space.
In this comprehensive guide, we will walk you through the step-by-step process of building your own banquette seating. From planning and measuring to adding the finishing touches, you'll learn everything you need to know to create a custom, cozy corner that perfectly suits your space and style. With a bit of creativity, some basic carpentry skills, and a handful of materials, you can transform an underutilized area into a comfortable and visually appealing seating nook that will be enjoyed for years to come.
Whether you're a seasoned DIY enthusiast or a novice looking to embark on your first major home project, this guide is designed to provide you with the knowledge and confidence to tackle the construction of banquette seating. By following the detailed instructions and tips provided, you'll be able to customize the dimensions, upholstery, and design elements to align with your personal preferences and the existing decor of your home.
So, roll up your sleeves, gather your tools, and get ready to embark on a fulfilling DIY journey. With a little creativity and a lot of passion, you'll soon be enjoying the comfort and charm of your very own DIY banquette seating. Let's dive into the planning and measuring phase to get started on this exciting project!
Step 1: Planning and Measuring
Before diving into the construction of your DIY banquette seating, it's crucial to start with a well-thought-out plan and precise measurements. This initial step sets the foundation for a successful and customized seating area that seamlessly integrates with your space.
Assessing the Space
Begin by identifying the location where you intend to install the banquette seating. Whether it's a cozy corner in the kitchen, a sunny alcove in the living room, or a versatile spot in the dining area, understanding the available space is essential. Take into account the dimensions of the area, including the length, width, and height, as well as any architectural features or obstacles that may impact the design.
Determining Dimensions
Once you've pinpointed the space, consider the seating capacity and the intended use of the banquette. Will it primarily serve as a dining area, a lounging nook, or a multifunctional space? Based on these considerations, determine the ideal dimensions for the seating area, ensuring that it provides ample comfort and functionality. Take precise measurements to establish the length, depth, and height of the banquette, keeping in mind the placement of tables or additional furniture.
Design Considerations
With the dimensions in mind, explore various design options to complement the existing decor and architectural style of your home. Consider the shape of the seating area, whether it's a straight bench, an L-shaped configuration, or a curved design. Additionally, contemplate the style of the backrest, the incorporation of storage compartments, and the overall aesthetic, ensuring that it harmonizes with the ambiance of the room.
Material Selection
As you plan and measure, contemplate the materials that will bring your vision to life. From sturdy lumber for the frame to high-quality foam and fabric for the upholstery, selecting the right materials is crucial for both durability and visual appeal. Consider the color palette and texture that will seamlessly integrate with the surrounding elements, such as walls, flooring, and other furnishings.
By meticulously planning and measuring the space, you'll lay the groundwork for a well-crafted and personalized banquette seating area. With these essential details in place, you're ready to move on to the next phase: gathering the materials and tools needed to bring your vision to fruition.
Step 2: Gathering Materials and Tools
With the meticulous planning and precise measurements in place, the next crucial step in creating your DIY banquette seating is gathering the necessary materials and tools. This phase sets the stage for the construction process and ensures that you have everything at your disposal to bring your vision to life.
Lumber and Supplies
Begin by procuring high-quality lumber for constructing the frame of the banquette seating. Opt for sturdy and durable wood, such as pine or plywood, that can withstand the weight and provide structural integrity. Consider the dimensions and design of your seating area to determine the quantity of lumber required. Additionally, gather essential supplies such as wood screws, wood glue, and corner braces to reinforce the frame and ensure its stability.
Upholstery Materials
For the comfortable and inviting aspect of the banquette seating, select premium upholstery materials. This includes high-density foam for the seat and back cushions, as well as fabric that complements your home's aesthetic. Measure the dimensions of the seating area to calculate the necessary yardage of fabric, ensuring ample coverage for the cushions and any desired decorative elements.
Essential Tools
Equipping yourself with the right tools is essential for a smooth construction process. Ensure you have a reliable power drill with assorted drill bits for securing the frame and attaching the upholstery. A sturdy staple gun is indispensable for securing the fabric to the frame, while a saw will be necessary for cutting the lumber to the required dimensions. Additionally, have a tape measure, level, and carpenter's square on hand to maintain precision throughout the construction.
Safety Gear
Prioritize safety by gathering the appropriate gear, including protective eyewear, gloves, and a dust mask. These items are essential for safeguarding yourself during the cutting, drilling, and assembly stages of the project.
Additional Decorative Elements
Consider any additional decorative elements or accessories that will enhance the visual appeal of your banquette seating. This may include decorative trim, upholstery piping, or buttons for tufting, depending on the design and style you envision.
By diligently gathering the necessary materials and tools, you'll set the stage for a seamless and efficient construction process. With everything at your fingertips, you're now prepared to move on to the exciting phase of building the frame for your DIY banquette seating.
Step 3: Building the Frame
With the meticulous planning, precise measurements, and the essential materials and tools at your disposal, you're now ready to embark on the pivotal phase of constructing the frame for your DIY banquette seating. This foundational element provides the structural support and framework for the seating area, laying the groundwork for the comfortable and visually appealing space you envision.
Constructing the Base
Begin by assembling the base of the banquette seating, which typically consists of a sturdy platform that supports the seat cushions and provides stability. Using the previously determined dimensions, cut the lumber to size, ensuring precision in the length, width, and height of the base. Secure the pieces together using wood screws, wood glue, and corner braces, reinforcing the joints to create a robust foundation.
Building the Backrest
Next, focus on constructing the backrest of the banquette seating, which contributes to both comfort and aesthetics. Depending on your design preference, you may opt for a straight vertical backrest or a more angled and ergonomic design. Cut the lumber to the specified dimensions, ensuring that the backrest aligns seamlessly with the base. Secure the backrest to the base using appropriate fasteners, ensuring a secure and stable connection.
Adding Support and Stability
To enhance the durability and longevity of the banquette seating, incorporate additional support and stability features as needed. This may involve installing support beams or braces within the frame to distribute weight evenly and prevent sagging over time. Attention to detail in this phase is crucial, as it ensures that the frame can withstand regular use and maintain its structural integrity.
Customizing Design Elements
As you construct the frame, consider customizing design elements to elevate the visual appeal of the banquette seating. This may involve incorporating decorative trim, molding, or other embellishments that align with your home's aesthetic. Additionally, if your design includes storage compartments within the frame, ensure that they are seamlessly integrated and structurally sound.
Ensuring Precision and Alignment
Throughout the construction of the frame, prioritize precision and alignment to guarantee a seamless and professional finish. Use a level and carpenter's square to ensure that the frame is perfectly squared and aligned, minimizing any potential issues during the upholstery phase. Attention to detail at this stage sets the stage for a successful and visually appealing end result.
By meticulously constructing the frame with attention to detail and precision, you're laying the groundwork for a well-crafted and durable banquette seating area. With the frame in place, you're now prepared to move on to the exciting phase of adding upholstery, bringing comfort and style to your DIY creation.
Step 4: Adding Upholstery
With the sturdy frame of your DIY banquette seating in place, it's time to infuse comfort and style by adding the upholstery. This transformative phase brings the seating area to life, creating a cozy and inviting space that perfectly complements your home's aesthetic. Whether you opt for vibrant patterns, luxurious textures, or timeless neutrals, the upholstery plays a pivotal role in enhancing both the visual appeal and comfort of the banquette seating.
Securing the Foam and Fabric
Begin by measuring and cutting high-density foam to fit the dimensions of the seat and backrest. Ensure that the foam provides ample cushioning and support, enhancing the overall comfort of the seating area. Next, carefully wrap the foam with the selected upholstery fabric, ensuring a snug and smooth fit. Use a staple gun to secure the fabric to the underside of the seat and the back of the backrest, pulling it taut to create a seamless and polished appearance.
Creating Decorative Details
Depending on your design preference, consider incorporating decorative details to elevate the upholstery. This may involve adding upholstery piping along the seams for a tailored and refined look, or incorporating tufting for a classic and sophisticated aesthetic. These decorative elements not only enhance the visual appeal of the banquette seating but also add a touch of personalized charm to the overall design.
Ensuring Quality Craftsmanship
Throughout the upholstery process, prioritize quality craftsmanship to ensure durability and longevity. Secure the fabric and foam with precision, paying attention to detail in the corners and edges to create a professional and polished finish. Additionally, reinforce the attachment of the upholstery to the frame, ensuring that it withstands regular use and maintains its visual appeal over time.
Harmonizing with the Space
As you add the upholstery, consider how the fabric and design elements harmonize with the surrounding space. Whether you opt for a cohesive blend with existing decor or a contrasting statement piece, the upholstery should seamlessly integrate with the ambiance of the room. Pay attention to color palettes, textures, and patterns to create a cohesive and inviting seating area that enhances the overall aesthetic of your home.
By meticulously adding the upholstery to your DIY banquette seating, you're infusing comfort, style, and personality into the space. With the upholstery in place, the banquette seating is poised to become a beloved and functional addition to your home, offering a cozy and inviting corner for relaxation, dining, and cherished moments with family and friends.
Step 5: Finishing Touches
With the frame constructed and the upholstery in place, the final phase of completing your DIY banquette seating involves adding the finishing touches that elevate the overall aesthetic and functionality of the space. These subtle yet impactful details contribute to the polished and personalized nature of the seating area, ensuring that it seamlessly integrates with your home's ambiance and serves as a versatile and inviting corner for various activities.
Embracing Decorative Accents
Incorporate decorative accents that enhance the visual appeal of the banquette seating. This may involve adding throw pillows in coordinating colors and patterns, introducing a cozy throw blanket for added comfort, or integrating decorative cushions that provide a touch of personality. These accents not only contribute to the overall coziness of the space but also allow for easy customization to suit different seasons and occasions.
Lighting Considerations
Evaluate the lighting in the vicinity of the banquette seating to create an inviting and functional ambiance. Whether it's natural light streaming through nearby windows or strategically placed lamps or sconces, ensuring adequate illumination enhances the usability of the space. Consider incorporating dimmable lighting options to create a versatile atmosphere that accommodates both intimate gatherings and everyday use.
Personalized Art and Decor
Infuse the surrounding walls with personalized art and decor that complements the banquette seating. Whether it's a gallery wall featuring cherished family photos, a statement piece of artwork, or decorative mirrors that reflect light and space, these elements contribute to the overall charm and character of the seating area. Select pieces that resonate with your personal style and contribute to the cohesive ambiance of the room.
Functional Additions
Integrate functional additions that enhance the usability of the banquette seating. This may involve incorporating a small side table for placing drinks or books, installing discreet storage compartments within the frame for stowing away essentials, or adding hooks or hangers for hanging bags, hats, or accessories. These thoughtful additions ensure that the seating area serves as a practical and versatile space for various activities.
Reflecting Personal Style
Ultimately, the finishing touches should reflect your personal style and preferences, creating a space that feels uniquely yours. Whether it's through the selection of decor, the arrangement of accessories, or the integration of meaningful elements, infusing the banquette seating with your personal touch ensures that it becomes a cherished and integral part of your home.
By attending to these finishing touches, you're not only enhancing the visual appeal and functionality of the banquette seating but also creating a welcoming and versatile space that enriches your daily life. With these details in place, your DIY banquette seating is ready to serve as a cozy and inviting corner for relaxation, dining, and cherished moments with loved ones.
Conclusion
In conclusion, the journey of creating your own DIY banquette seating has been a fulfilling and rewarding endeavor. From the initial stages of planning and measuring to the meticulous construction of the frame, the addition of upholstery, and the thoughtful finishing touches, every step has contributed to the transformation of an underutilized space into a cozy and inviting corner within your home.
By embracing the DIY spirit and investing your creativity and effort into this project, you've not only crafted a functional seating area but also personalized a space that reflects your unique style and preferences. The careful consideration of dimensions, design elements, and materials has resulted in a custom banquette seating that seamlessly integrates with the existing decor and architectural features of your home.
The process of gathering materials and tools, from selecting high-quality lumber to choosing premium upholstery materials, has equipped you with the essentials to bring your vision to life. The construction of the frame, with its sturdy base and carefully crafted backrest, has laid the foundation for a durable and long-lasting seating area that will be enjoyed for years to come.
The addition of upholstery, with its comfortable foam and carefully selected fabric, has infused the seating area with both comfort and style. The finishing touches, including decorative accents, personalized art, and functional additions, have elevated the overall ambiance and usability of the space, creating a versatile and inviting corner for various activities.
As you take a moment to admire the completed DIY banquette seating, you can take pride in the craftsmanship and attention to detail that have gone into every aspect of the project. Whether it's a cozy breakfast nook, a relaxed reading corner, or a multifunctional dining area, the banquette seating stands as a testament to your dedication and creativity in enhancing your living space.
Ultimately, the DIY banquette seating serves as more than just a piece of furniture; it's a reflection of your passion for creating a home that is both functional and aesthetically pleasing. It's a space where cherished memories will be made, where conversations will flow, and where moments of relaxation and togetherness will be savored.
So, as you settle into the inviting comfort of your DIY banquette seating, surrounded by the warmth and charm of your home, take a moment to appreciate the transformation that has taken place. Your dedication and craftsmanship have turned a vision into reality, and the result is a cozy and personalized corner that enriches the daily experience of your home.