
Home>Create & Decorate>DIY & Crafts>DIY Dog Ramp For Stairs: Step-by-Step Guide
DIY & Crafts
DIY Dog Ramp For Stairs: Step-by-Step Guide
Modified: November 28, 2024

Senior Editor in Create & Decorate, Kathryn combines traditional craftsmanship with contemporary trends. Her background in textile design and commitment to sustainable crafts inspire both content and community.
Learn how to build a DIY dog ramp for stairs with our step-by-step guide. Perfect for pet owners who love DIY & crafts. Keep your furry friend safe and happy!
(Many of the links in this article redirect to a specific reviewed product. Your purchase of these products through affiliate links helps to generate commission for Twigandthistle.com, at no extra cost. Learn more)
Introduction
Are you tired of seeing your furry friend struggle to climb up and down the stairs? Building a DIY dog ramp for stairs can be a game-changer for both you and your pet. Not only does it provide a safe and convenient way for your dog to navigate the stairs, but it also gives you peace of mind knowing that your pet is less likely to injure themselves. In this step-by-step guide, we'll walk you through the process of creating a custom dog ramp that fits perfectly with your staircase, ensuring that your four-legged friend can move around the house with ease. Let's get started!
Materials Needed
To get started on your DIY dog ramp for stairs, you'll need the following materials:
- Measuring tape: This will help you accurately measure the dimensions of your staircase and determine the appropriate size for your dog ramp.
- Plywood: Choose a sturdy plywood that can support your dog's weight. The size will depend on the dimensions of your staircase and the desired length of the ramp.
- Wood screws: These will be used to secure the frame and the ramp surface.
- Wood glue: Opt for a strong wood glue to reinforce the joints and ensure the stability of the ramp.
- Carpenter's square: This tool will help you ensure that your cuts and angles are precise, resulting in a well-constructed ramp.
- Circular saw or jigsaw: You'll need this to cut the plywood to the appropriate size and shape.
- Sandpaper: Smooth out any rough edges and surfaces to prevent splinters and ensure the safety of your dog.
- Paint or stain (optional): If you want to add a decorative touch to the ramp or protect the wood from wear and tear, consider using paint or stain.
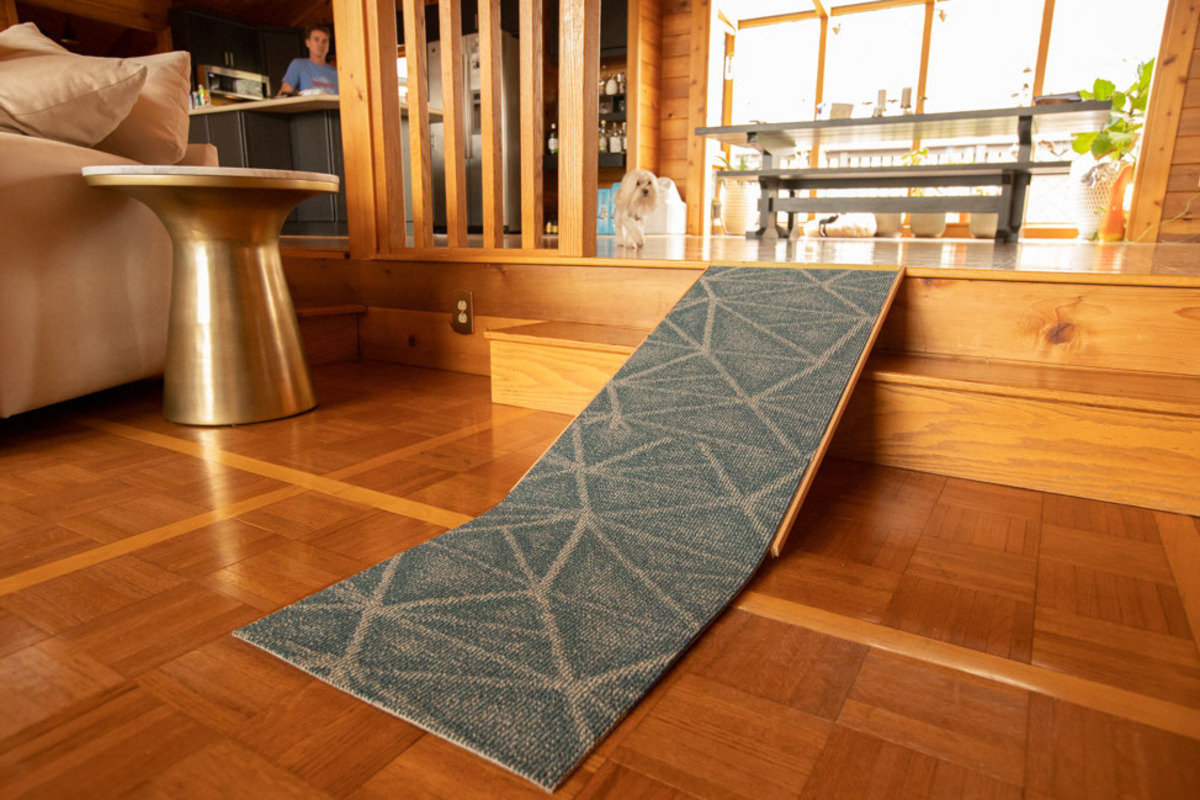
- Rug or carpet: Adding a non-slip surface to the ramp will provide traction for your dog as they ascend and descend the stairs.
Gathering these materials will set you up for a successful construction process and ensure that your DIY dog ramp is both functional and visually appealing.
Planning and Measuring
Before diving into the construction of your DIY dog ramp for stairs, it's crucial to start with thorough planning and precise measurements. Here's how to get started:
-
Assess Your Staircase: Take a close look at your staircase and determine where the dog ramp will be positioned. Consider factors such as the height of the stairs, the available space for the ramp, and any obstructions that may affect the design.
-
Measure the Dimensions: Use a measuring tape to carefully measure the length, width, and height of the area where the ramp will be installed. Take note of any irregularities or slopes that need to be accounted for in the design.
-
Consider the Angle: Decide on the angle of the ramp based on the steepness of your stairs and the mobility of your dog. A gradual incline is generally more comfortable for dogs to navigate.
-
Sketch the Design: Create a rough sketch or diagram of the dog ramp, incorporating the measurements and dimensions you've taken. This will serve as a visual guide as you move forward with the construction process.
-
Account for Safety: Ensure that the ramp will be stable and secure for your dog to use. Consider adding railings or side barriers to prevent falls, especially if your dog is older or has mobility issues.
By carefully planning and taking accurate measurements, you'll set the foundation for a dog ramp that fits seamlessly with your staircase and provides a safe and accessible solution for your furry companion.
Building the Ramp Frame
Once you have completed the planning and measuring phase, it's time to move on to constructing the frame of your DIY dog ramp for stairs. Follow these steps to build a sturdy and reliable ramp frame:
-
Cut the Plywood: Using a circular saw or jigsaw, carefully cut the plywood to the dimensions determined during the planning phase. You will need to create two identical pieces for the sides of the ramp and additional pieces for the support braces.
-
Assemble the Sides: Position the two side pieces of plywood parallel to each other, forming the outer edges of the ramp. Use wood glue and wood screws to secure the sides together, creating a stable framework for the ramp.
-
Add Support Braces: Measure and cut additional pieces of plywood to serve as support braces for the ramp. These braces will reinforce the structure and provide added stability. Position them horizontally between the two side pieces and attach them securely with wood glue and screws.
-
Reinforce the Joints: To ensure the strength of the frame, reinforce the joints with additional wood screws and apply wood glue along the seams. This will prevent the frame from wobbling or shifting when in use.
-
Smooth the Edges: Use sandpaper to smooth out any rough edges or surfaces on the frame. This step is essential for preventing splinters and ensuring the safety of your dog as they use the ramp.
By following these steps, you'll be able to construct a durable and well-supported frame for your dog ramp, setting the stage for the next phase of adding the ramp surface.
Adding the Ramp Surface
With the frame of the dog ramp in place, the next crucial step is to add the ramp surface, providing a secure and comfortable pathway for your dog to navigate the stairs. Follow these steps to complete this phase of the construction process:
-
Cut the Plywood: Measure and cut a piece of plywood to fit the dimensions of the ramp frame. Ensure that the plywood is sturdy enough to support your dog's weight and provides ample surface area for them to walk on.
-
Attach the Surface: Position the cut plywood onto the frame, ensuring that it aligns with the edges and sits securely on the support braces. Use wood glue and wood screws to fasten the ramp surface to the frame, creating a stable and reliable walking surface.
-
Consider Traction: To enhance traction and prevent slipping, consider adding a non-slip surface to the ramp. This can be achieved by attaching a piece of rug or carpet to the plywood surface, providing your dog with a secure grip as they ascend and descend the stairs.
-
Smooth and Secure: Once the ramp surface is attached, use sandpaper to smooth out any rough areas and ensure that the edges are safe for your dog's paws. Additionally, reinforce the attachment points with extra screws to secure the ramp surface firmly in place.
-
Test for Stability: Before proceeding, test the ramp to ensure that the surface is stable and can support the weight of your dog. Apply pressure to different areas of the ramp to check for any signs of weakness or instability.
By following these steps, you'll be able to complete the construction of the ramp surface, providing your dog with a safe and reliable pathway to navigate the stairs with ease.
Attaching the Ramp to the Stairs
Once the frame and ramp surface are securely constructed, the next crucial step is to attach the dog ramp to the stairs, ensuring that it is stable and seamlessly integrated into your home environment. Follow these steps to complete this phase of the installation process:
-
Positioning the Ramp: Carefully place the assembled dog ramp in the desired location against the stairs. Ensure that it is aligned with the edge of the stairs and sits flush against the bottom and top landing.
-
Securing the Ramp: Use wood screws to anchor the bottom of the ramp to the floor, providing additional stability and preventing any movement or shifting when in use. Ensure that the screws are driven into a secure and stable surface to support the weight of the ramp and your dog.
-
Attaching to the Top Landing: If the top of the ramp reaches a higher landing or platform, secure it in place using brackets or L-shaped supports. This will prevent the ramp from slipping or tipping when your dog uses it to access the upper level.
-
Testing for Stability: Once the ramp is attached, test its stability by applying pressure and encouraging your dog to walk on it. Check for any signs of wobbling or movement, and make any necessary adjustments to ensure that the ramp is securely fastened to the stairs.
-
Consider Additional Support: Depending on the design of your staircase and the length of the ramp, you may need to add additional support legs or braces to reinforce the stability of the ramp. This is especially important for longer ramps or those supporting larger dogs.
By following these steps, you can effectively attach the dog ramp to the stairs, providing your pet with a safe and reliable means of navigating between different levels of your home. This integration ensures that the ramp becomes a seamless and functional addition to your living space, benefiting both you and your furry companion.
Finishing Touches and Safety Considerations
As you near the completion of your DIY dog ramp for stairs, it's essential to add the finishing touches that enhance both the functionality and safety of the ramp. Additionally, considering safety measures will ensure that your furry friend can use the ramp with confidence and ease. Here's how to add the final details and address safety considerations:
-
Smooth Out Any Rough Surfaces: Run a thorough check of the entire ramp, including the frame and the ramp surface, to ensure that there are no rough or sharp edges that could pose a risk to your dog. Sand down any rough spots and edges to prevent splinters and injuries.
-
Apply a Protective Finish: Consider applying a protective finish, such as paint or stain, to the ramp to safeguard the wood from wear and tear. This not only adds a decorative touch but also prolongs the lifespan of the ramp, making it a long-term investment for your pet's well-being.
-
Add Non-Slip Treads: To further enhance the traction and safety of the ramp, consider adding non-slip treads or strips to the surface. These can be easily attached to provide your dog with added grip and stability as they use the ramp.
-
Install Safety Railings: Depending on the size and design of the ramp, installing safety railings along the sides can provide extra security, especially for dogs with limited mobility. The railings prevent accidental falls and give your pet a sense of security as they navigate the ramp.
-
Regular Maintenance: Incorporate regular maintenance into your routine to ensure that the ramp remains in optimal condition. Check for loose screws, worn-out surfaces, or any signs of damage, and address them promptly to maintain the safety and functionality of the ramp.
-
Consider Your Dog's Needs: Tailor the finishing touches and safety features to suit your dog's specific needs. For example, if your dog has visual impairments, consider adding contrasting colors or textures to the ramp to aid their navigation.
By incorporating these finishing touches and safety considerations, you'll not only enhance the usability and longevity of the dog ramp but also prioritize the safety and well-being of your beloved pet. This attention to detail ensures that the ramp provides a reliable and secure means for your dog to access different areas of your home, promoting their independence and comfort.
Conclusion
In conclusion, building a DIY dog ramp for stairs is a rewarding project that benefits both you and your furry companion. By following the step-by-step guide outlined in this article, you can create a custom dog ramp that provides a safe and convenient way for your dog to navigate the stairs. From the initial planning and measuring to the final finishing touches, each phase of the construction process contributes to the overall functionality and safety of the ramp. By considering your dog's specific needs and incorporating safety measures, you can ensure that the ramp becomes an integral part of your home, promoting your pet's independence and well-being. With the completion of the dog ramp, you can look forward to seeing your dog move around the house with ease and confidence, knowing that you've provided them with a practical and reliable solution for accessing different levels of your home.