Home>Create & Decorate>DIY & Crafts>How To Build A Mini Golf Course

DIY & Crafts
How To Build A Mini Golf Course
Published: February 27, 2024

Senior Editor in Create & Decorate, Kathryn combines traditional craftsmanship with contemporary trends. Her background in textile design and commitment to sustainable crafts inspire both content and community.
Learn how to create your own DIY mini golf course with our step-by-step guide. Get creative with these fun and engaging DIY & Crafts projects. Start building today!
(Many of the links in this article redirect to a specific reviewed product. Your purchase of these products through affiliate links helps to generate commission for Twigandthistle.com, at no extra cost. Learn more)
Introduction
Welcome to the exciting world of DIY mini-golf course construction! Whether you're a passionate golfer looking to practice your putting skills or a crafty individual seeking a fun and engaging project, building a mini-golf course can be a rewarding and entertaining endeavor. This comprehensive guide will walk you through the step-by-step process of creating your very own mini-golf course, from selecting the perfect location to adding the finishing touches.
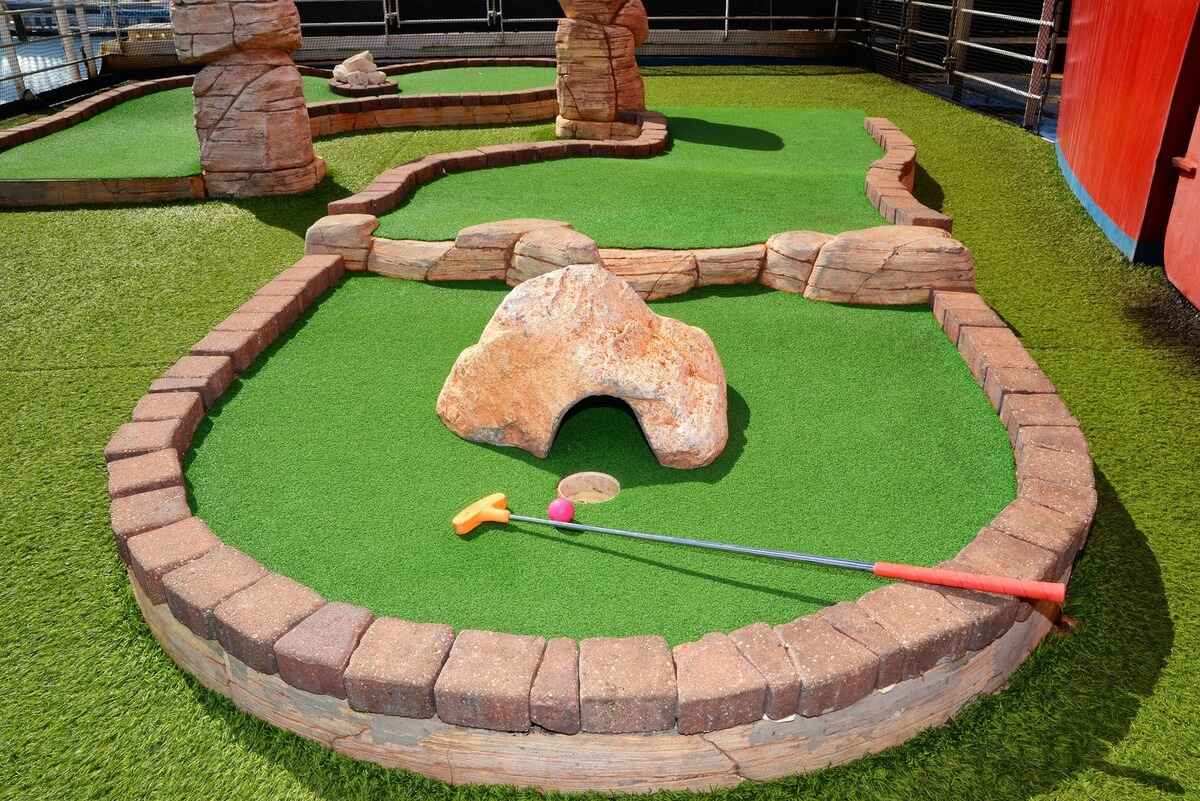
Mini-golf, also known as putt-putt, is a beloved pastime that combines the precision of golf with the whimsy of creative course design. Constructing your own mini-golf course provides an opportunity to unleash your imagination and design a unique and challenging experience for players of all ages. Whether you plan to build the course in your backyard, community center, or recreational facility, the possibilities for customization and creativity are endless.
By following the steps outlined in this guide, you'll gain the knowledge and confidence to transform a blank canvas into a captivating mini-golf destination. From designing the layout and selecting materials to adding obstacles and installing putting greens, each stage of the construction process offers a chance to infuse your personality and style into the course. Whether you envision a tropical-themed paradise with cascading water features or a rugged terrain dotted with thrilling obstacles, the choice is yours.
Building a mini-golf course is not only a fulfilling creative project but also a fantastic way to bring people together for hours of lighthearted fun. As you embark on this journey, prepare to unleash your creativity, problem-solving skills, and passion for DIY projects. Get ready to dive into the world of mini-golf course construction and embark on an adventure that will leave a lasting impression on all who have the pleasure of playing on your custom-built course.
Read more: DIY Golf Simulator for Your Garage
Step 1: Choose the Location
Selecting the ideal location for your mini-golf course is a crucial first step in the construction process. The chosen site will significantly influence the overall layout, design, and accessibility of the course. Here's a detailed exploration of the factors to consider when choosing the perfect location for your mini-golf masterpiece.
-
Space and Terrain: Begin by assessing the available space for your mini-golf course. Whether it's a backyard, community park, or indoor facility, the area should provide enough room for multiple holes, putting greens, and pathways. Additionally, consider the terrain of the location. Flat, open spaces are ideal for traditional mini-golf courses, while sloped or irregular terrains can add an extra layer of challenge and creativity to the design.
-
Accessibility: The location should be easily accessible to your target audience. If you're building the course in a public space, ensure that it complies with accessibility standards to accommodate individuals with disabilities. Convenient parking, clear pathways, and proximity to amenities can enhance the overall experience for players and visitors.
-
Environmental Considerations: Take into account the environmental factors that may impact the course, such as sunlight exposure, drainage, and existing landscaping. Consider how natural elements like trees, rocks, or water features can be incorporated into the course design to create a harmonious and visually appealing environment.
-
Regulations and Permits: Before finalizing the location, research local regulations and zoning requirements that may affect the construction and operation of a mini-golf course. Obtain any necessary permits or approvals to ensure compliance with legal and safety standards.
-
Target Audience: Tailor the location to suit the preferences and needs of your target audience. If the course is intended for family-friendly entertainment, choose a location that offers a welcoming and inclusive atmosphere. For a more competitive or adult-oriented experience, consider a setting that allows for creative and challenging hole designs.
-
Scenic Appeal: Aesthetics play a significant role in the success of a mini-golf course. Look for a location with scenic potential, such as picturesque views, natural features, or architectural elements that can enhance the overall ambiance of the course.
By carefully considering these factors, you can choose a location that sets the stage for an exceptional mini-golf experience. Once the perfect location is secured, you can move on to the next exciting phase of designing the layout and bringing your mini-golf vision to life.
Step 2: Design the Layout
Designing the layout of your mini-golf course is where your creativity truly takes center stage. This step is all about envisioning the overall flow of the course, planning the placement of each hole, and incorporating unique features that will make your mini-golf experience memorable and enjoyable for players. Here's a detailed exploration of the key considerations and steps involved in designing the layout of your mini-golf course.
-
Conceptualization: Begin by conceptualizing the theme and style of your mini-golf course. Will it be a whimsical wonderland with vibrant colors and playful obstacles, or a more traditional course with natural elements and challenging terrain? Let your imagination run wild as you visualize the overall ambiance and character of the course.
-
Hole Placement: Determine the number of holes your course will feature and strategically plan their placement. Consider the variety of hole designs, including straight putts, bank shots, and loop-de-loops, to offer a diverse and engaging experience for players. Pay attention to the flow of the course, ensuring that each hole transitions seamlessly to the next.
-
Pathways and Landscaping: Map out the pathways that will guide players through the course, taking into account the natural flow of movement and potential areas for landscaping and decorative elements. Incorporate landscaping features such as shrubs, flowers, and rocks to enhance the visual appeal and create a cohesive theme throughout the course.
-
Obstacle Integration: Integrate creative and challenging obstacles into the layout to add excitement and complexity to the gameplay. From windmills and water features to tunnels and ramps, the possibilities for obstacles are endless. Each obstacle should be strategically placed to provide a mix of fun and skill-testing elements for players to navigate.
-
Theming and Decor: Infuse the course with thematic elements and decorative touches that bring your vision to life. Whether it's a pirate-themed adventure complete with treasure chests and shipwrecks or a futuristic landscape with neon lights and space-age props, the theming and decor will set the tone for the entire experience.
-
Accessibility and Safety: Ensure that the layout prioritizes accessibility and safety for all players. Smooth pathways, clear signage, and well-maintained surfaces are essential for a positive and inclusive experience. Additionally, consider safety measures such as handrails, non-slip surfaces, and adequate lighting for evening play.
By meticulously designing the layout of your mini-golf course, you'll create an immersive and captivating environment that captivates players and leaves a lasting impression. With the layout finalized, you're ready to move on to the next phase of gathering materials and equipment to bring your mini-golf vision to life.
Step 3: Gather Materials and Equipment
Gathering the necessary materials and equipment is a pivotal step in bringing your mini-golf course vision to life. This phase involves sourcing a diverse range of items, from construction materials to decorative elements, to ensure that your course meets both functional and aesthetic requirements. Here's a comprehensive overview of the essential materials and equipment needed for building a captivating and durable mini-golf course.
Construction Materials
- Lumber and Plywood: Acquire high-quality lumber and plywood for constructing the framework of the course, including pathways, ramps, and support structures for obstacles.
- Fasteners and Hardware: Stock up on screws, nails, bolts, and other fasteners, as well as essential hardware such as hinges and brackets for assembling and securing course components.
- Artificial Turf or Putting Green Material: Select artificial turf or specialized putting green material to create smooth and consistent surfaces for the putting greens and fairways.
- Concrete or Pavers: If incorporating permanent pathways or retaining walls, concrete or pavers will provide stability and durability.
Read more: How To Build A Golf Green
Equipment
- Power Tools: Ensure access to a variety of power tools, including drills, saws, and sanders, to facilitate the cutting, shaping, and assembly of materials.
- Leveling and Measuring Tools: Equip yourself with levels, measuring tapes, and marking tools to maintain precision and accuracy during construction.
- Lawn Mower or Trimmer: If the course includes natural grass areas, a reliable lawn mower or trimmer will be essential for maintenance and grooming.
Decorative Elements
- Themed Decor and Props: Depending on the theme of your course, gather decorative elements such as themed props, signage, and landscaping features to enhance the visual appeal and storytelling aspects of the course.
- Obstacle Components: Acquire specific components for obstacles, such as windmill blades, water pump systems, or custom-designed features that align with the overall course design.
Safety and Maintenance Supplies
- Safety Signage and Barriers: Prioritize safety by obtaining signage for hazard warnings, directional cues, and barriers to guide players and prevent accidents.
- Maintenance Tools: Stock up on maintenance tools such as brooms, rakes, and brushes to keep the course clean and well-maintained.
By assembling a comprehensive array of materials and equipment, you'll be well-prepared to embark on the construction phase of your mini-golf course project. With these essential resources at your disposal, you can proceed with confidence, knowing that you have everything needed to bring your mini-golf masterpiece to fruition.
Step 4: Build the Holes
Building the holes is a pivotal stage in the construction of your mini-golf course, as it sets the foundation for the gameplay experience. Each hole presents an opportunity to challenge players' putting skills while adding a unique and visually captivating element to the course. Here's a detailed exploration of the essential steps and considerations involved in building the holes for your mini-golf masterpiece.
Read more: How To Build A Golf Cart
Hole Design and Layout
Begin by conceptualizing the design and layout of each hole, considering factors such as length, angles, and potential obstacles. Visualize the trajectory of the ball and the strategic placement of the hole cup to create a diverse range of challenges for players. Whether it's a straightforward putt or a winding path with unexpected twists and turns, each hole should offer a distinct and engaging experience.
Construction Process
Once the hole design is finalized, proceed with the construction process by assembling the necessary materials and equipment. Utilize lumber, plywood, and artificial turf to create the framework and surface of each hole, ensuring precision and attention to detail. Incorporate supportive structures and shaping elements to guide the ball toward the hole, maintaining a balance between creativity and functionality.
Obstacle Integration
Enhance the complexity and excitement of each hole by integrating creative obstacles and features. From elevated platforms and tunnels to interactive elements such as spinning wheels or moving barriers, the obstacles should challenge players while adding an element of surprise and delight to the gameplay. Carefully consider the placement and design of obstacles to ensure they align with the overall theme and flow of the course.
Theming and Aesthetics
Infuse each hole with thematic elements and decorative touches that contribute to the cohesive visual narrative of the course. Whether it's a tropical paradise with cascading water features or a mystical landscape with themed props and lighting effects, the theming and aesthetics should transport players into a captivating and immersive world. Pay attention to details such as signage, landscaping, and thematic props to enhance the storytelling aspect of each hole.
Read more: How to Build a Green Roof Guide
Testing and Refinement
After the construction of each hole is complete, conduct thorough testing to ensure that the gameplay experience meets your expectations. Invite friends, family, or fellow enthusiasts to playtest the course, gathering feedback on the level of challenge, fun factor, and overall satisfaction. Use this feedback to refine and fine-tune the design and functionality of each hole, ensuring that they offer an enjoyable and memorable experience for players of all skill levels.
By meticulously building and refining the holes for your mini-golf course, you'll create a dynamic and captivating gameplay experience that captivates players and immerses them in a world of imaginative challenges and visual delights. With the holes in place, you're ready to proceed to the next phase of adding obstacles and decorations to elevate the course to new heights of creativity and excitement.
Step 5: Add Obstacles and Decorations
With the foundational elements of your mini-golf course in place, it's time to elevate the gameplay experience by adding creative obstacles and captivating decorations. This phase of the construction process is where your imagination can truly shine, as you infuse each hole with dynamic challenges and thematic embellishments that transport players into a world of excitement and visual splendor.
Obstacle Integration
Integrating a diverse range of obstacles into the course is essential for creating engaging and challenging gameplay. From classic windmills and rotating obstacles to custom-designed features that align with the overall theme of the course, each obstacle should test players' skills while adding an element of surprise and delight. Carefully consider the placement and design of obstacles to ensure they enhance the flow of gameplay and contribute to the overall narrative of the course.
Interactive Elements
Incorporate interactive elements that add an extra layer of excitement to the gameplay experience. Whether it's a water feature that introduces unpredictable ball movement, a tunnel that leads to a hidden surprise, or a themed prop that triggers a visual or auditory effect, interactive elements can captivate players and immerse them in the immersive world of your mini-golf course.
Thematic Decor
Infuse each hole with thematic decor and props that contribute to the cohesive visual narrative of the course. Whether you're aiming for a tropical paradise with cascading water features and vibrant flora, a mystical landscape with themed props and atmospheric lighting, or a whimsical wonderland with playful characters and vibrant colors, the thematic decor should transport players into a captivating and immersive world. Pay attention to details such as signage, landscaping, and thematic props to enhance the storytelling aspect of each hole.
Visual Appeal
Enhance the visual appeal of the course by incorporating decorative elements that elevate the aesthetic experience for players. From vibrant landscaping and eye-catching signage to artistic flourishes and thematic lighting, the visual appeal of the course should captivate players from the moment they step onto the first tee. Consider how each decorative element contributes to the overall ambiance and theme of the course, creating a visually stunning and immersive environment for players to enjoy.
By thoughtfully adding obstacles and decorations to your mini-golf course, you'll create a dynamic and visually captivating experience that captivates players and immerses them in a world of imaginative challenges and visual delights. With these elements in place, your mini-golf course will be ready to delight and entertain players of all ages, offering a one-of-a-kind experience that leaves a lasting impression.
Step 6: Install Putting Greens
Installing putting greens is a pivotal phase in the construction of your mini-golf course, as it sets the stage for the precision and skill-testing aspect of the gameplay experience. The putting greens serve as the focal points of each hole, providing players with a smooth and consistent surface to showcase their putting abilities. Here's a detailed exploration of the essential steps and considerations involved in installing putting greens for your mini-golf masterpiece.
Surface Preparation
Begin by preparing the designated areas for the putting greens, ensuring that the underlying surface is level, smooth, and free of any debris or obstacles. Whether you're working with natural grass, artificial turf, or specialized putting green material, the surface preparation is crucial for achieving an optimal playing experience. Clear the area of any obstructions and ensure proper drainage to maintain the integrity of the putting greens.
Read more: DIY Garage Golf Net Setup Guide
Artificial Turf Installation
If you've opted for artificial turf for the putting greens, carefully measure and cut the turf to fit the dimensions of each green. Secure the turf in place, ensuring a seamless and uniform surface that mimics the texture and performance of natural grass. Pay attention to details such as seam placement, infill material, and proper anchoring to create a realistic and consistent putting surface.
Natural Grass Maintenance
For those incorporating natural grass putting greens, meticulous maintenance is essential to ensure a lush and resilient playing surface. Regular mowing, watering, and fertilization are crucial for promoting healthy turf growth and maintaining an even and consistent putting experience. Additionally, consider factors such as sunlight exposure and soil composition to optimize the quality of the natural grass putting greens.
Putting Green Design
Infuse each putting green with strategic contours, slopes, and breaks to challenge players and add an element of complexity to the putting experience. Carefully consider the placement of the hole cup within each green, taking into account the trajectory of the ball and the potential for skill-testing putts. The design of the putting greens should complement the overall layout and theme of the course, offering a diverse range of putting challenges for players to navigate.
Quality Assurance
After the installation of each putting green, conduct thorough testing to ensure that the surface meets the desired standards for playability and consistency. Invite players of varying skill levels to test the greens, gathering feedback on the smoothness, speed, and overall performance of the putting surfaces. Use this feedback to make any necessary adjustments and refinements to optimize the putting greens for an exceptional gameplay experience.
By meticulously installing putting greens that offer a blend of challenge and precision, you'll create a dynamic and engaging putting experience that captivates players and adds an extra layer of excitement to your mini-golf course. With the putting greens in place, your course will be primed to deliver a memorable and enjoyable experience for players of all ages and skill levels.
Step 7: Create Scorecards and Rules
Creating scorecards and establishing clear rules are essential components of ensuring a structured and enjoyable mini-golf experience for players. By developing comprehensive scorecards and establishing fair and engaging rules, you can enhance the competitive aspect of the game while promoting sportsmanship and camaraderie among participants.
Scorecard Design
Designing a well-structured scorecard is crucial for tracking players' performance and maintaining a competitive yet lighthearted atmosphere. The scorecard should feature designated spaces for recording scores on each hole, as well as sections for player names, dates, and any additional notes. Consider incorporating thematic elements and vibrant visuals to align with the overall theme of the course, adding a touch of creativity to the scorekeeping process.
Scoring System
Establishing a clear and fair scoring system is fundamental for maintaining consistency and transparency throughout the game. Whether using a traditional stroke play format or implementing a modified scoring method, ensure that players understand how to record their scores accurately. Additionally, consider incorporating bonus challenges or special achievements that can add an extra layer of excitement and friendly competition to the game.
Rules and Etiquette
Defining specific rules and etiquette guidelines helps create a respectful and inclusive environment for players of all skill levels. Clearly outline rules regarding ball retrieval, out-of-bounds areas, and player conduct to ensure a smooth and enjoyable gameplay experience. Emphasize the importance of sportsmanship, patience, and respect for fellow players to foster a positive and welcoming atmosphere on the course.
Player Briefing
Before commencing the game, provide players with a comprehensive briefing that covers the rules, scoring system, and any specific course-related guidelines. This briefing ensures that all participants are well-informed and prepared to engage in a fair and enjoyable mini-golf experience. Encourage questions and clarifications to address any uncertainties and promote a sense of confidence and understanding among players.
Interactive Elements
Consider incorporating interactive elements into the scorecards, such as trivia questions, fun facts about the course, or space for players to jot down memorable moments from their gameplay. These interactive features can add a touch of entertainment and personalization to the scorekeeping process, further engaging players and enhancing their overall experience on the course.
By creating thoughtfully designed scorecards and establishing clear rules, you can elevate the mini-golf experience, fostering a sense of friendly competition, camaraderie, and sportsmanship among players. With these foundational elements in place, players can fully immerse themselves in the game, enjoying a memorable and engaging mini-golf adventure from start to finish.
Conclusion
As you reach the conclusion of your mini-golf course construction journey, take a moment to reflect on the incredible creativity, dedication, and passion that have gone into bringing your vision to life. From the initial selection of the perfect location to the meticulous design of each hole, the gathering of materials, and the installation of putting greens, you've embarked on a remarkable adventure that has resulted in the creation of a captivating and immersive mini-golf experience.
The completion of your mini-golf course marks the beginning of a new chapter filled with endless opportunities for enjoyment, laughter, and friendly competition. Whether you've built the course for personal enjoyment, as a community attraction, or as a unique addition to a recreational facility, the impact of your creation is bound to be felt by all who have the pleasure of playing on it.
Your mini-golf course is more than just a collection of holes and obstacles; it's a testament to your ingenuity and ability to transform a blank canvas into a dynamic and engaging recreational space. Each element, from the thematic decor and challenging obstacles to the meticulously crafted putting greens, reflects your dedication to providing an exceptional experience for players of all ages and skill levels.
As players step onto the first tee and embark on their mini-golf adventure, they'll be transported into a world of excitement, creativity, and skill-testing challenges. The course you've built is not just a place for putting; it's a stage for creating lasting memories, fostering friendly rivalries, and celebrating the joy of play.
With the scorecards and rules in place, players will engage in spirited competition, test their putting prowess, and revel in the camaraderie that comes with sharing a memorable experience on your custom-built course. The laughter, cheers, and moments of triumph that echo through the course will serve as a testament to the impact of your creation on the community and beyond.
As you look ahead to the future of your mini-golf course, envision the countless hours of enjoyment, the bonds formed between players, and the sense of pride that comes with knowing that your creation has brought happiness to others. Whether it's a sunny afternoon of family fun, a team-building outing, or a lighthearted date night, your mini-golf course stands ready to provide an unforgettable experience for all who cross its threshold.
So, as you stand back and admire the fruits of your labor, take pride in knowing that your mini-golf course is more than just a recreational attraction; it's a testament to the power of creativity, community, and the joy of play. Your journey from conception to completion has left an indelible mark on the landscape, and the memories created on your course will continue to inspire laughter, friendly competition, and cherished moments for years to come.

