Home>Create & Decorate>DIY & Crafts>How To Build A Clubhouse

DIY & Crafts
How To Build A Clubhouse
Published: June 12, 2024

Content Creator specializing in woodworking and interior transformations. Caegan's guides motivate readers to undertake their own projects, while his custom furniture adds a personal touch.
Discover step-by-step DIY instructions for building a clubhouse with our easy-to-follow crafts guide. Create a fun and engaging space for kids to enjoy!
(Many of the links in this article redirect to a specific reviewed product. Your purchase of these products through affiliate links helps to generate commission for Twigandthistle.com, at no extra cost. Learn more)
Introduction
So, you've decided to take on the exciting project of building a clubhouse in your backyard. Whether it's for your kids, grandkids, or just a fun DIY project for yourself, creating a clubhouse can be a rewarding and enjoyable experience. Not only does it provide a space for creativity and play, but it also adds a unique touch to your outdoor living area. In this guide, we'll walk you through the step-by-step process of building a clubhouse that will be the envy of the neighborhood. Let's roll up our sleeves and get started!
Read more: How To Build A Trailer
Choosing the Right Location
When it comes to building a clubhouse, the first step is to carefully select the perfect location in your backyard. Here are some key factors to consider when choosing the right spot:
-
Space: Ensure that the chosen area has enough space to accommodate the size of the clubhouse you intend to build. It should also allow for some extra room around the clubhouse for easy access and future expansion.
-
Accessibility: Consider the accessibility of the location. It should be easily reachable from your home and other areas of your yard. Additionally, think about how the clubhouse will fit into the overall flow of your outdoor space.
-
Safety: Prioritize safety by selecting a location that is away from potential hazards such as steep slopes, large trees with overhanging branches, or areas prone to flooding. It's essential to create a secure and stable environment for the clubhouse.
-
Sunlight: Take into account the amount of sunlight the area receives throughout the day. A balance of shade and sunlight can make the clubhouse a comfortable place to spend time in, especially during hot summer days.
-
Privacy: If the clubhouse is intended for children, consider choosing a location that offers a degree of privacy. This can enhance the feeling of having a secret hideaway and make the clubhouse even more appealing.
By carefully considering these factors, you can select a location that sets the stage for a successful and enjoyable clubhouse-building project.
Designing the Layout
Designing the layout of your clubhouse is a crucial step that sets the foundation for the entire project. It involves creating a plan that outlines the size, shape, and features of the clubhouse. Here's how to approach this phase:
-
Brainstorm Ideas: Gather everyone involved in the project and brainstorm ideas for the clubhouse's layout. Consider the purpose of the clubhouse – whether it's for play, relaxation, or a combination of both. Encourage creativity and let everyone contribute their thoughts.
-
Sketch the Design: Once you have a clear vision, sketch the layout on paper. This doesn't have to be a professional architectural drawing; a simple rough sketch will do. Include the dimensions, the placement of windows and doors, and any additional features you want to incorporate.
-
Consider Functionality: Think about how the space will be used. If it's for kids, you might want to include a play area or a small table for activities. If it's for relaxation, consider adding comfortable seating and perhaps a small bookshelf.
-
Factor in Aesthetics: While functionality is important, don't overlook the aesthetics. Consider the overall look and feel you want to achieve. This could be influenced by the architectural style of your home, a theme that resonates with your family, or simply a design that stands out.
-
Seek Inspiration: Look for inspiration in magazines, online resources, or even by visiting local home improvement stores. You might come across design elements or features that you hadn't considered but would be perfect for your clubhouse.
-
Get Feedback: Once you have a preliminary design, seek feedback from family members or friends. They might offer valuable insights or suggestions that can enhance the layout.
By carefully designing the layout, you'll create a clubhouse that not only meets your practical needs but also reflects your unique style and vision.
Gathering Materials and Tools
Gathering the right materials and tools is a crucial step in the process of building a clubhouse. Having everything you need on hand will streamline the construction process and ensure that you can work efficiently. Here's a comprehensive list of materials and tools you'll likely need for the project:
Materials
-
Lumber: Purchase high-quality lumber in the appropriate dimensions for framing, walls, and flooring. Pressure-treated wood is an excellent choice for outdoor structures as it offers durability and resistance to decay.
-
Fasteners: Stock up on nails, screws, and bolts of various sizes. Make sure to choose fasteners that are suitable for outdoor use to prevent rust and corrosion.
-
Plywood: Invest in sturdy plywood for sheathing the walls and roof. Consider using exterior-grade plywood to withstand the elements.
-
Roofing Materials: Depending on your design, you may need shingles, metal roofing panels, or other roofing materials to provide weather protection.
-
Insulation: If you plan to use the clubhouse year-round, insulation will help regulate the temperature. Opt for insulation designed for outdoor applications.
-
Exterior Finish: Choose a suitable exterior finish such as paint, stain, or sealant to protect the wood from moisture and UV exposure.
-
Windows and Doors: Select windows and doors that fit the dimensions of your clubhouse. Ensure they are designed for outdoor use and provide proper sealing.
-
Hardware: Don't forget to gather hinges, latches, handles, and other necessary hardware for doors and windows.
-
Foundation Materials: Depending on your chosen foundation type, you may need concrete, gravel, or deck blocks to provide a stable base for the clubhouse.
Read more: How To Build A Pantry
Tools
-
Measuring Tools: A tape measure, level, and square are essential for ensuring accurate and precise cuts and assembly.
-
Cutting Tools: Circular saw, jigsaw, and handsaw for cutting lumber and plywood to the required dimensions.
-
Fastening Tools: Hammer, screwdriver, drill, and impact driver for driving nails, screws, and bolts.
-
Safety Gear: Safety glasses, work gloves, and hearing protection to ensure safety during construction.
-
Ladder: A sturdy ladder will be necessary for working at heights during the construction of the walls and roof.
-
Painting Supplies: If you plan to paint the clubhouse, gather brushes, rollers, and other painting supplies.
-
Miscellaneous Tools: Depending on your specific design and construction methods, you may need additional tools such as a framing nailer, air compressor, or a post hole digger.
By ensuring you have all the necessary materials and tools at the outset, you can avoid delays and interruptions during the construction process, allowing you to focus on bringing your clubhouse vision to life.
Constructing the Frame
Constructing the frame is a pivotal phase in building a sturdy and durable clubhouse. The frame provides the structural skeleton on which the walls, roof, and other components will be attached. Here's a detailed guide on how to construct the frame for your clubhouse:
1. Prepare the Site
Before beginning the frame construction, ensure that the chosen location is clear of any debris or obstacles. Use a tape measure and layout tools to mark the exact dimensions of the clubhouse on the ground. This will serve as a guide for positioning the frame components.
2. Cut the Lumber
Using the measurements from your clubhouse design, carefully cut the lumber to the required lengths. A circular saw or a miter saw can be used to make precise cuts. It's essential to double-check the dimensions to ensure accuracy before cutting the lumber.
Read more: How To Build A Dock
3. Assemble the Base
Start by constructing the base of the frame, which will typically consist of pressure-treated 2×4 or 2×6 lumber. Lay out the pieces according to the dimensions of the clubhouse floor and secure them together using galvanized screws or nails. Use a level to ensure that the base is perfectly horizontal.
4. Build the Wall Frames
Next, assemble the wall frames using 2×4 or 2×6 lumber. Lay out the lumber according to the wall dimensions and nail or screw them together to form the frame. Ensure that the corners are square by measuring diagonally from corner to corner. Diagonal measurements that are equal indicate a square frame.
5. Install Support Beams
For larger clubhouses or structures with a loft, support beams may be necessary to provide additional structural integrity. These beams are typically attached to the top of the wall frames and run horizontally to support the roof.
6. Raise the Frame
With the base and wall frames constructed, it's time to raise the frame into position. Enlist the help of others to carefully lift and position the wall frames onto the base. Secure the frames to the base using galvanized screws or nails, ensuring a strong connection.
Read more: How To Build A Trebuchet
7. Brace the Frame
To prevent the frame from shifting or becoming misaligned, use temporary bracing on the walls. This can be achieved by attaching diagonal braces from the top of the walls to the base. Once the frame is fully secured and the walls are plumb, the bracing can be removed.
8. Check for Level and Plumb
Using a level, check that the walls are perfectly vertical (plumb) and that the frame is level in all directions. Making any necessary adjustments at this stage will ensure that the subsequent construction phases proceed smoothly.
By following these steps, you'll successfully construct a solid and stable frame for your clubhouse, setting the stage for the next phases of the construction process.
Adding Walls and Roof
After constructing the frame, the next crucial step in building a clubhouse is adding the walls and roof. This phase transforms the frame into a fully enclosed structure, providing shelter and defining the interior space. Here's a detailed guide on how to add walls and a roof to your clubhouse:
1. Sheath the Walls
Begin by sheathing the exterior walls with plywood or oriented strand board (OSB). Cut the sheathing panels to fit the dimensions of the wall frames and secure them using galvanized nails or screws. Ensure that the sheathing is installed with even spacing and properly aligned to create a smooth and uniform surface.
Read more: How To Build A Cupola
2. Install Wall Siding
Once the sheathing is in place, it's time to install the exterior siding. Choose a siding material that suits your design preferences and provides weather protection. Common options include wood siding, vinyl siding, or fiber cement siding. Follow the manufacturer's instructions for proper installation, ensuring that the siding is securely attached and properly sealed to prevent water infiltration.
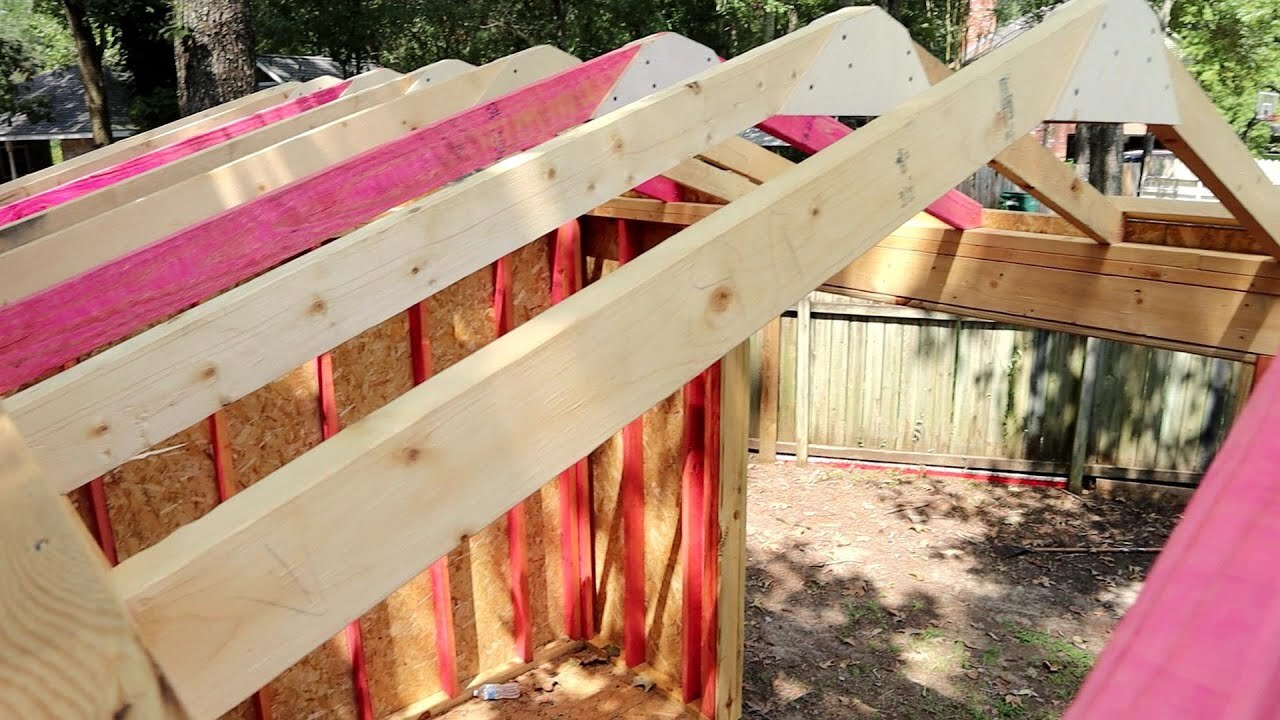
3. Frame the Roof
With the walls enclosed, move on to framing the roof structure. Depending on your design, this may involve constructing rafters, trusses, or a combination of both. Carefully calculate the required dimensions and angles for the roof framing members to ensure a precise fit. Use a level and framing square to ensure that the roof framing is accurately assembled.
4. Add Roof Sheathing
Once the roof framing is in place, add the roof sheathing to provide a solid base for the roofing material. Similar to the wall sheathing, cut the panels to size and secure them to the roof framing using nails or screws. Pay attention to proper panel orientation and staggering to enhance structural integrity.
5. Choose Roofing Material
Select a roofing material that suits your climate and aesthetic preferences. Common options include asphalt shingles, metal roofing panels, or cedar shakes. Ensure that the chosen material is suitable for the pitch of your roof and provides adequate protection against rain, snow, and UV exposure.
Read more: How To Build A Sauna
6. Install Roofing
Carefully follow the manufacturer's guidelines to install the chosen roofing material. Pay attention to proper fastening methods, flashing installation, and ridge cap details to ensure a watertight and durable roof. Properly installed roofing not only enhances the appearance of the clubhouse but also provides essential weatherproofing.
7. Add Windows and Doors
As the walls and roof take shape, it's essential to install windows and doors to provide ventilation, natural light, and access to the interior space. Choose windows and doors that complement the design of the clubhouse and ensure proper sealing to prevent air and water infiltration.
8. Weatherproofing
Once the walls, roof, windows, and doors are in place, apply weatherproofing measures to ensure the clubhouse is protected from the elements. This may include caulking around windows and doors, applying exterior paint or stain, and installing appropriate flashing to direct water away from vulnerable areas.
By following these steps, you'll successfully add walls and a roof to your clubhouse, bringing it one step closer to becoming a functional and inviting space for play and relaxation.
Installing Windows and Doors
Installing windows and doors is a crucial step in the construction of a clubhouse, as it provides ventilation, natural light, and access to the interior space. Here's a detailed guide on how to install windows and doors for your clubhouse:
-
Select Appropriate Windows and Doors: Before installation, carefully select windows and doors that are suitable for outdoor use and complement the design of your clubhouse. Consider factors such as size, style, and functionality. For example, if the clubhouse is intended for children, consider using windows that can be opened for ventilation and doors with easy-to-operate handles.
-
Prepare Openings: Measure and mark the locations for the windows and doors on the sheathed walls. Use a saw to carefully cut out the openings, ensuring that the dimensions match the specifications of the windows and doors. It's essential to follow the manufacturer's guidelines for rough opening sizes to ensure a proper fit.
-
Install Window and Door Frames: Begin by installing the window and door frames within the prepared openings. Use shims to ensure that the frames are level, plumb, and square. Secure the frames in place using screws or nails, making sure they are firmly anchored to the surrounding structure.
-
Apply Weatherproofing: Prior to installing the windows and doors, apply a layer of weatherproofing membrane or flashing tape around the perimeter of the openings. This helps to create a barrier against moisture infiltration and ensures a tight seal between the frames and the sheathing.
-
Set Windows and Doors in Place: Carefully set the windows and doors into their respective openings, ensuring a snug fit against the frames. Use shims as needed to adjust the positioning and ensure that the windows and doors operate smoothly. Secure them in place by driving screws through the frames into the surrounding structure.
-
Check for Proper Operation: Once the windows and doors are installed, test their operation to ensure they open, close, and lock correctly. Adjust the shimming as necessary to achieve proper alignment and functionality. Additionally, check for any gaps around the frames and use expanding foam or caulk to seal any air leaks.
-
Install Trim and Hardware: Complete the installation by adding exterior trim around the windows and doors. This not only enhances the appearance but also provides additional weather protection. Install the necessary hardware, including handles, locks, and hinges, following the manufacturer's instructions for proper installation.
-
Apply Exterior Sealant: To further enhance weather resistance, apply a bead of exterior-grade sealant around the perimeter of the installed windows and doors. This helps to seal any gaps and prevent water infiltration, ensuring the longevity of the clubhouse structure.
By following these steps, you'll successfully install windows and doors, providing the clubhouse with natural light, ventilation, and functional access while ensuring proper weatherproofing and durability.
Read more: How To Build A Hearth
Finishing Touches
After completing the major construction phases of the clubhouse, it's time to focus on the finishing touches that will enhance its functionality, aesthetics, and overall appeal. Here's a detailed guide on the essential finishing touches to consider for your clubhouse:
-
Interior Finishing: Once the structural elements are in place, turn your attention to the interior of the clubhouse. Consider adding insulation to regulate temperature, drywall or paneling for the walls, and a durable flooring material such as laminate, vinyl, or outdoor carpet. These elements not only improve comfort but also contribute to the overall look and feel of the space.
-
Paint or Stain: Apply a fresh coat of paint or stain to the exterior of the clubhouse to protect the wood from weathering and enhance its visual appeal. Choose a color that complements your outdoor space and reflects your personal style. Consider adding decorative details or accents to make the clubhouse stand out.
-
Decor and Furnishings: Personalize the interior of the clubhouse with decor and furnishings that suit its intended use. This could include comfortable seating, storage solutions, a small table for activities, and decorative elements such as curtains, rugs, and wall art. Let your creativity shine through in the design of the interior space.
-
Electrical and Lighting: If you plan to use the clubhouse in the evenings or for extended periods, consider adding electrical wiring for lighting, outlets, and possibly small appliances. Install weatherproof light fixtures both inside and outside the clubhouse to ensure visibility and safety.
-
Exterior Landscaping: Enhance the surroundings of the clubhouse by adding landscaping elements such as flower beds, potted plants, or a small garden. Create a welcoming pathway leading to the clubhouse and consider adding a seating area or a play area nearby.
-
Functional Additions: Depending on your needs, consider adding functional elements such as a small workbench, storage shelves, or a chalkboard or whiteboard for creative play. These additions can make the clubhouse a versatile and practical space for various activities.
-
Safety Measures: Prioritize safety by adding features such as a fire extinguisher, smoke detector, and first aid kit within the clubhouse. Ensure that all windows and doors are equipped with proper locking mechanisms for security.
-
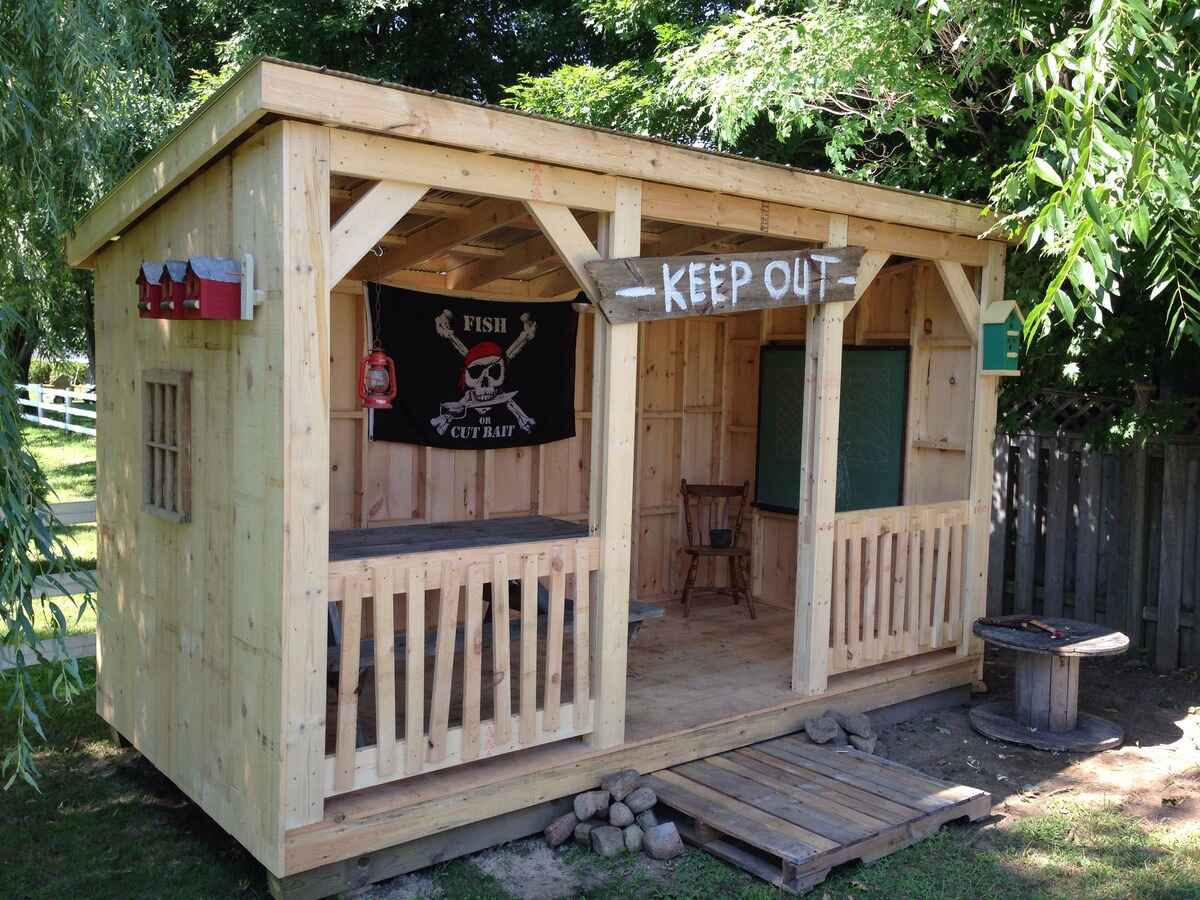
Personal Touches: Finally, add personal touches that make the clubhouse feel like a special and unique space. This could include custom signage, a nameplate, or a flag, as well as any other elements that reflect the personality and interests of those who will be using the clubhouse.
By attending to these finishing touches, you'll transform your clubhouse into a functional, inviting, and personalized space that adds value to your outdoor living area. These details not only enhance the overall experience of using the clubhouse but also contribute to the sense of pride and accomplishment in creating a truly special space.
Conclusion
In conclusion, building a clubhouse in your backyard is a rewarding and fulfilling project that adds a unique and personalized touch to your outdoor space. By carefully choosing the location, designing the layout, gathering the necessary materials and tools, constructing the frame, adding walls and a roof, installing windows and doors, and attending to the finishing touches, you can create a clubhouse that becomes a cherished and functional part of your home. Whether it's a play space for children, a relaxation retreat, or a versatile multi-purpose area, the clubhouse represents a labor of love and creativity. Embrace the opportunity to customize the clubhouse to suit your family's needs and preferences, and enjoy the process of bringing your vision to life. With proper planning, attention to detail, and a dash of creativity, your backyard clubhouse will undoubtedly become a beloved and cherished addition to your home.

