
Home>Create & Decorate>DIY & Crafts>Electromagnet Building Guide: How To Build An Electromagnet
DIY & Crafts
Electromagnet Building Guide: How To Build An Electromagnet
Published: May 24, 2024

Content Creator specializing in woodworking and interior transformations. Caegan's guides motivate readers to undertake their own projects, while his custom furniture adds a personal touch.
Discover step-by-step instructions for building your own electromagnet with our DIY & Crafts guide. Learn the essentials of creating a powerful electromagnet. Start your project today!
(Many of the links in this article redirect to a specific reviewed product. Your purchase of these products through affiliate links helps to generate commission for Twigandthistle.com, at no extra cost. Learn more)
Introduction
So, you want to learn how to build an electromagnet, huh? Well, you've come to the right place! Building your own electromagnet can be a fun and educational DIY project that will not only teach you about the principles of magnetism but also provide you with a cool gadget to show off to your friends. In this guide, we will walk you through the step-by-step process of creating your very own electromagnet. Whether you're a science enthusiast, a hobbyist, or just someone looking for a hands-on project, building an electromagnet is an exciting endeavor that anyone can tackle with the right guidance. Let's dive in and get started on this electrifying journey!
Understanding Electromagnets
An electromagnet is a type of magnet that is created by passing an electric current through a coil of wire. When the electric current flows through the wire, it generates a magnetic field around the coil, turning it into a magnet. Unlike permanent magnets, which have a constant magnetic field, electromagnets can be turned on and off by controlling the flow of electricity. This unique characteristic makes electromagnets incredibly versatile and useful in a wide range of applications, from industrial machinery to everyday household devices.
The strength of an electromagnet's magnetic field depends on several factors, including the number of turns in the wire coil, the amount of current flowing through the wire, and the material used as the core of the electromagnet. By manipulating these variables, it is possible to create electromagnets with varying degrees of magnetic strength, making them suitable for different purposes.
One of the key principles behind electromagnets is electromagnetic induction, which was discovered by Michael Faraday in the 19th century. Faraday's experiments with electromagnetism led to the development of the first electric generator, laying the foundation for modern electrical power systems. Today, electromagnets are integral components in a wide array of devices, including electric motors, speakers, MRI machines, and magnetic levitation trains.
In summary, electromagnets are a fascinating fusion of electricity and magnetism, offering a dynamic and controllable magnetic force that has revolutionized numerous technological advancements. Understanding the basic principles of electromagnets is crucial before embarking on the journey of building your own. Now that we've covered the fundamentals, let's move on to the materials you'll need for this electrifying DIY project!
Materials Needed
Before you embark on your electromagnet-building adventure, it's essential to gather all the necessary materials. Here's what you'll need to get started:
-
Iron Core: The core of your electromagnet is crucial for enhancing its magnetic properties. A solid iron core, such as a nail or bolt, serves as an ideal foundation for your electromagnet.
-
Insulated Copper Wire: You'll require a sufficient length of insulated copper wire to form the coil around the iron core. The wire's insulation prevents electrical short circuits and ensures the efficient flow of current.
-
Power Source: A reliable power source, such as a battery or a power supply, is essential for energizing your electromagnet. Ensure that the power source can deliver the necessary current to create a strong magnetic field.
-
Switch (Optional): While not mandatory, incorporating a switch into your setup allows you to control the flow of electricity to the electromagnet, enabling you to turn it on and off at will.
-
Wire Strippers: These tools are handy for removing the insulation from the ends of the copper wire, allowing for proper electrical connections.
-
Electrical Tape: To secure the wire and insulate connections, electrical tape is indispensable for ensuring safety and maintaining the integrity of the circuit.
-
Safety Gear: It's always wise to prioritize safety. Wear protective gear, such as gloves and safety goggles, to shield yourself from potential hazards while working with electrical components.
Now that you've got your materials lined up, it's time to roll up your sleeves and dive into the exciting process of constructing your very own electromagnet. Let's move on to the first step: creating the core.
Step 1: Creating the Core
The first step in building your electromagnet is to create the core, which will serve as the foundation for the magnetic field. An ideal core material is iron, as it possesses magnetic properties that can be easily magnetized. Here's how to create the core:
-
Selecting the Core Material: Choose a solid iron object, such as a nail, bolt, or iron rod, as the core of your electromagnet. The length and thickness of the core can influence the strength of the resulting magnetic field, so consider these factors based on your desired outcome.
-
Preparing the Core: Ensure that the surface of the iron core is clean and free from any debris or rust. A smooth and unblemished surface allows for better contact between the wire coil and the core, optimizing the efficiency of the electromagnet.
-
Positioning the Core: Place the iron core in a vertical position, as this orientation facilitates the uniform distribution of the magnetic field when the wire coil is wrapped around it. Secure the core in place to prevent any movement during the subsequent steps.
By carefully selecting and preparing the iron core, you are laying the groundwork for a robust and effective electromagnet. With the core in place, you're ready to move on to the next step: wrapping the wire around the core.
Step 2: Wrapping the Wire
Once you have the core in place, the next crucial step is to wrap the insulated copper wire around the iron core to create the coil. This coil will be responsible for generating the magnetic field when an electric current passes through it. Here's a detailed guide on how to effectively wrap the wire:
-
Determining the Number of Turns: Before you start wrapping the wire, decide on the number of turns you want for the coil. The more turns you have, the stronger the magnetic field will be. However, keep in mind that a higher number of turns also increases the resistance in the circuit, which can affect the flow of current.
-
Securing the Starting End: Begin by securing the starting end of the wire to the core using electrical tape or by looping it around the core and twisting it to hold it in place. This ensures that the wire stays in position as you wrap it around the core.
-
Wrapping the Wire: Carefully and evenly wrap the insulated copper wire around the length of the iron core, ensuring that each turn of the wire lies adjacent to the previous one without overlapping. Maintain a consistent tension as you wrap the wire to create a neat and uniform coil.
-
Determining the Direction: The direction in which you wrap the wire around the core influences the polarity of the electromagnet. To determine the direction, use the right-hand rule: if you wrap the wire in a clockwise direction when viewed from one end, the resulting magnetic pole will be north. Conversely, wrapping the wire counterclockwise will produce a south pole.
-
Completing the Coil: Once you have achieved the desired number of turns, secure the end of the wire to the core using electrical tape or by twisting it around the core. Ensure that the ends of the wire are left exposed for the next step of connecting it to a power source.
By following these steps, you will have successfully created the coil for your electromagnet. The next step involves connecting the wire to a power source to energize the electromagnet and bring it to life.
Step 3: Connecting the Wire to a Power Source
With the coil wrapped around the iron core, the next critical step is to connect the wire to a power source to initiate the flow of electricity and activate the electromagnet. Here's a detailed guide on how to effectively connect the wire to a power source:
-
Preparing the Wire Ends: Before making the electrical connections, ensure that the ends of the insulated copper wire are stripped to expose the bare copper conductors. Use wire strippers to carefully remove the insulation, exposing a sufficient length of the copper wire for secure connections.
-
Selecting the Power Source: Choose a suitable power source for energizing the electromagnet. This can be a battery, a power supply, or any other source capable of delivering the required current to generate a magnetic field. Ensure that the voltage and current rating of the power source align with the specifications of your electromagnet.
-
Making the Connections: Once the wire ends are prepared and the power source is selected, it's time to make the electrical connections. If you're using a battery, connect one end of the wire to the positive terminal of the battery and the other end to the negative terminal. If a power supply is being used, connect the wire to the positive and negative terminals based on the polarity required for the electromagnet.
-
Securing the Connections: After making the connections, ensure that the wire is securely attached to the power source. Use electrical tape or connectors to fasten the wire to the terminals, preventing any loose connections that could disrupt the flow of current.
-
Incorporating a Switch (Optional): If you want the ability to control the activation of the electromagnet, consider incorporating a switch into the circuit. This allows you to turn the electromagnet on and off as desired, adding a level of convenience and functionality to your creation.
By following these steps, you will have successfully connected the wire to a power source, setting the stage for the final step: testing the electromagnet to witness its magnetic prowess in action. Now, let's move on to the exciting phase of testing the electromagnet to see the magnetic magic unfold!
Step 4: Testing the Electromagnet
After completing the crucial steps of creating the core, wrapping the wire, and connecting it to a power source, it's time to put your electromagnet to the test. Testing the electromagnet allows you to observe its magnetic properties and verify that it functions as intended. Here's a detailed guide on how to effectively test your electromagnet:
-
Powering Up the Circuit: Before testing the electromagnet, ensure that the wire is securely connected to the power source. If you've incorporated a switch, make sure it is in the "on" position to allow the flow of current through the wire coil.
-
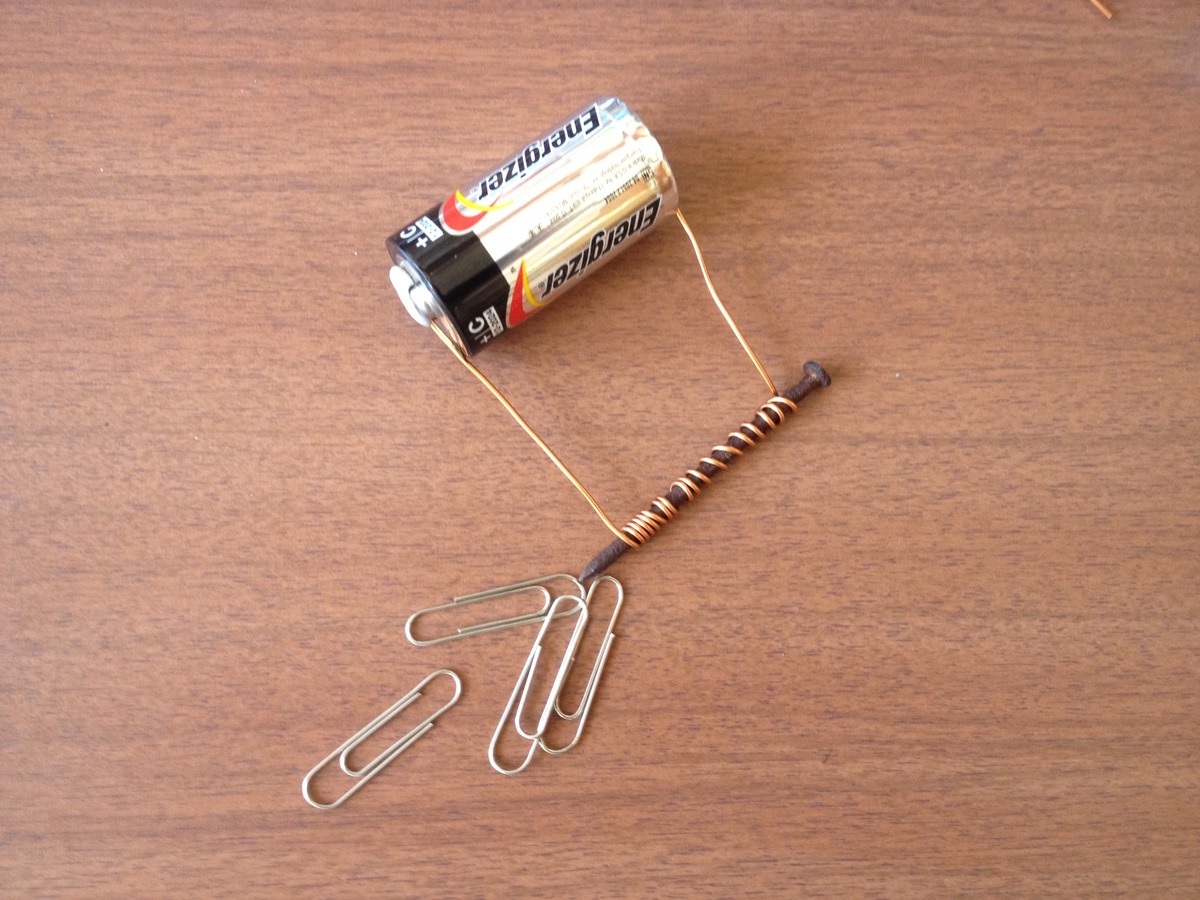
Observing the Magnetic Attraction: Once the circuit is powered up, bring a small ferromagnetic object, such as a paperclip or a small nail, close to the end of the electromagnet. Observe whether the object is attracted to the electromagnet. If the electromagnet is functioning correctly, the ferromagnetic object should be drawn towards the core, demonstrating the magnetic force generated by the electromagnet.
-
Assessing the Holding Strength: Test the holding strength of the electromagnet by gradually increasing the size and weight of the ferromagnetic objects you use. Start with lightweight objects and gradually progress to heavier ones. This allows you to gauge the maximum weight that the electromagnet can effectively hold against the force of gravity.
-
Verifying Polarity: To verify the polarity of the electromagnet, use a small compass. Place the compass near the electromagnet and observe the direction in which the needle points. Based on the direction of the needle, you can determine the polarity of the electromagnet, identifying whether it exhibits a north or south magnetic pole.
-
Fine-Tuning the Performance: If the electromagnet does not exhibit the expected magnetic properties, you may need to make adjustments to the number of wire turns, the current flow, or the core material. Experiment with these variables to optimize the performance of your electromagnet and achieve the desired magnetic strength.
By following these steps, you can effectively test the electromagnet and validate its magnetic functionality. Once you've confirmed that the electromagnet operates as intended, you can proudly showcase your DIY creation and explore its applications in various experiments and projects. Testing the electromagnet not only validates your construction skills but also provides valuable insights into the fascinating realm of magnetism and electricity. Now that you've successfully tested your electromagnet, you're ready to embark on new adventures in the realm of DIY and home improvement!
Conclusion
Congratulations! You've successfully ventured into the captivating world of electromagnetism and emerged with a fully functional electromagnet. By understanding the fundamental principles of electromagnets, gathering the necessary materials, and meticulously following the step-by-step construction process, you've unlocked the power of magnetism through your own creation. Building an electromagnet not only provides a hands-on learning experience but also opens the door to exploring the intersection of science, engineering, and DIY ingenuity.
As you reflect on your journey, remember that the knowledge and skills gained from this project extend beyond the realm of electromagnets. The problem-solving, attention to detail, and creativity exercised in this endeavor are valuable assets that can be applied to a myriad of future DIY and home improvement projects. Whether you're delving into electronics, experimenting with magnetic levitation, or simply seeking to understand the forces that shape our world, the electromagnet you've built serves as a testament to your ability to bring theoretical concepts to life through practical craftsmanship.
As you continue to explore the realms of DIY and home improvement, let the electrifying experience of building an electromagnet serve as a springboard for future endeavors. Embrace the spirit of curiosity, innovation, and hands-on exploration, and let your electromagnet be a symbol of the endless possibilities that await as you embark on new DIY adventures. With each project, you're not just building tangible creations – you're also nurturing a mindset of creativity, resilience, and a deep appreciation for the wonders of the world around you. So, go forth and let the magnetic allure of DIY and home improvement continue to spark your imagination and fuel your passion for crafting, creating, and innovating.