
Home>Create & Decorate>DIY & Crafts>Brick Shed Building: A DIY Guide
DIY & Crafts
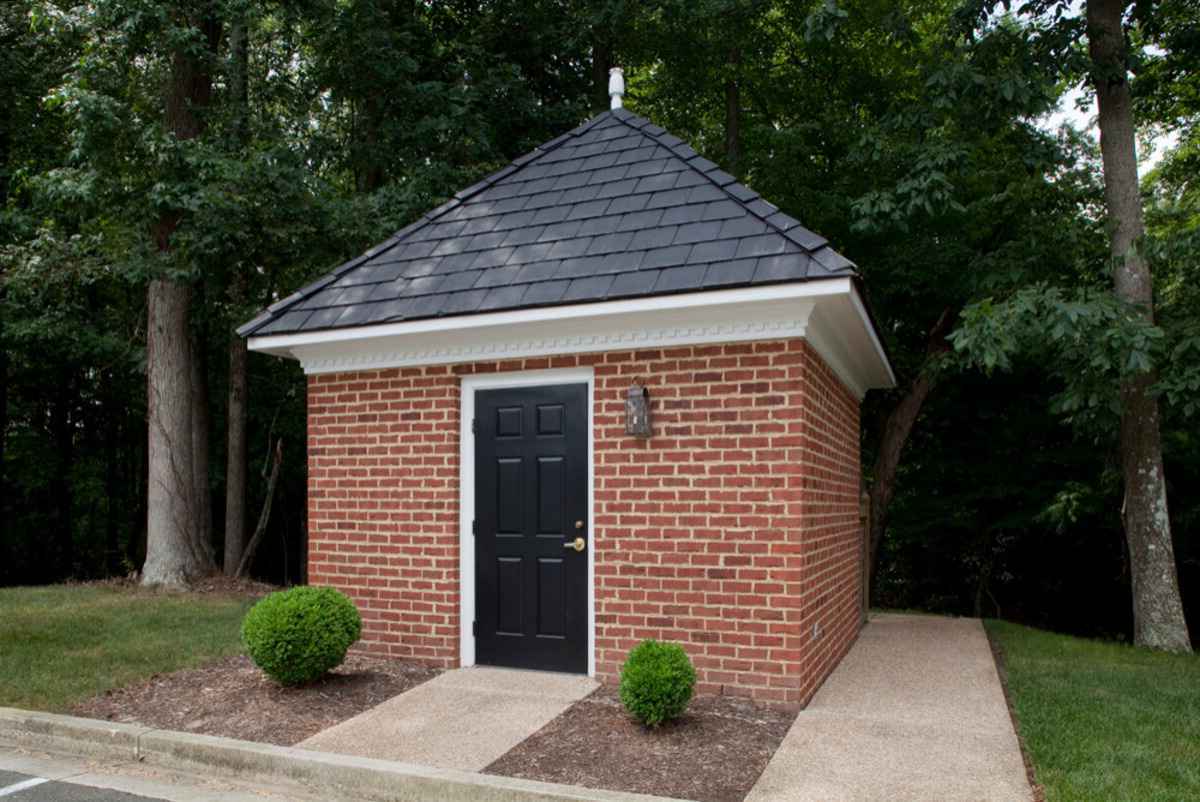
Brick Shed Building: A DIY Guide
Published: February 23, 2024

Content Creator specializing in woodworking and interior transformations. Caegan's guides motivate readers to undertake their own projects, while his custom furniture adds a personal touch.
Learn how to build a brick shed with our comprehensive DIY guide. Get expert tips and step-by-step instructions for your DIY & Crafts project.
(Many of the links in this article redirect to a specific reviewed product. Your purchase of these products through affiliate links helps to generate commission for Twigandthistle.com, at no extra cost. Learn more)
Introduction
Embarking on a DIY brick shed building project is an exciting endeavor that allows you to unleash your creativity while adding practical value to your property. Whether you're a seasoned DIY enthusiast or a novice looking to dive into the world of construction, building a brick shed can be a rewarding and fulfilling experience.
Constructing a brick shed from the ground up offers a sense of accomplishment and provides a functional space for storage, hobbies, or even a cozy retreat. The process involves meticulous planning, precise execution, and a touch of ingenuity to bring your vision to life.
Throughout this comprehensive guide, we will delve into the essential steps and considerations involved in building a brick shed. From selecting the ideal location to adding the finishing touches, each stage of the process plays a crucial role in the overall success of your project.
As we navigate through the intricacies of brick shed construction, you'll gain valuable insights into the planning, preparation, and execution required to create a sturdy and visually appealing structure. Whether you're aiming to store gardening tools, create a workshop space, or simply enhance your property's aesthetics, this guide will equip you with the knowledge and confidence to tackle the project with enthusiasm.
So, roll up your sleeves, gather your tools, and let's embark on this DIY brick shed building journey together. With careful attention to detail and a willingness to embrace the challenges along the way, you'll soon find yourself marveling at the impressive structure you've brought to life. Let's dive in and lay the foundation for your brick shed building adventure!
Planning and Preparation
Before diving into the physical construction of your brick shed, meticulous planning and thorough preparation are essential to ensure a smooth and successful building process. This phase sets the stage for the entire project, laying the groundwork for a well-executed and structurally sound structure. Here's a detailed breakdown of the crucial steps involved in the planning and preparation stage:
-
Design Considerations: Begin by envisioning the purpose of your brick shed. Will it serve as a storage space for gardening tools, a workshop for DIY projects, or a multifunctional retreat? Understanding the intended use of the shed will influence its design, size, and layout. Consider factors such as the shed's dimensions, door and window placements, and interior organization to align with your specific needs.
-
Regulatory Compliance: Check with local authorities or homeowner associations to understand any zoning regulations, building codes, or permit requirements for constructing a brick shed on your property. Adhering to these regulations is crucial to avoid potential legal issues and ensure the structural integrity of your shed.
-
Budgeting and Material Selection: Determine a realistic budget for your project, factoring in expenses for materials, tools, and any professional assistance if needed. Research and select high-quality bricks, mortar, and other construction materials that align with your budget and project requirements.
-
Site Preparation: Evaluate potential locations for your brick shed, considering aspects such as accessibility, drainage, and proximity to existing structures. Clear the chosen site of any debris, vegetation, or obstacles to create a level and stable foundation for the construction process.
-
Tool Acquisition and Organization: Compile a comprehensive list of tools required for the construction, including but not limited to a spirit level, trowel, masonry saw, and safety gear. Ensure that your tools are in good condition and organize them for easy access during the building phase.
-
Timeline and Scheduling: Establish a realistic timeline for the project, considering factors such as weather conditions, availability of assistance, and your personal schedule. Breaking down the construction process into manageable tasks and setting achievable milestones will help you stay on track and maintain momentum throughout the project.
By meticulously addressing these planning and preparation considerations, you'll set a solid foundation for the subsequent stages of building your brick shed. This proactive approach will streamline the construction process, minimize potential setbacks, and ultimately lead to the successful realization of your DIY project.
Choosing the Right Location
Selecting the optimal location for your brick shed is a pivotal decision that significantly impacts its functionality, visual appeal, and long-term durability. Several key factors should be carefully considered when determining the placement of your shed:
-
Accessibility: Choose a location that offers convenient access to the shed. Consider its proximity to your home, garden, or other areas where you may frequently need to retrieve or store items. Ensuring easy access will enhance the shed's practicality and usability.
-
Sunlight and Shade: Assess the sun's path throughout the day to identify areas with adequate sunlight exposure. Depending on your shed's purpose, such as a greenhouse or workshop, ample natural light may be essential. Conversely, if the shed will primarily serve as storage, consider incorporating shaded areas to prevent items from being exposed to prolonged sunlight.
-
Drainage: Evaluate the site's drainage capabilities to prevent water accumulation around the shed. Select a location with proper drainage to minimize the risk of water damage and ensure the shed's structural integrity over time.
-
Aesthetic Integration: Consider how the shed will visually complement its surroundings. Aim to integrate the structure harmoniously with your property's landscape and existing structures. This may involve aligning the shed's design and color scheme with the overall aesthetic of your property.
-
Property Boundaries and Regulations: Verify property boundaries and any relevant regulations that dictate the placement of structures. Ensure that the chosen location complies with setback requirements and any other zoning regulations to avoid potential legal issues in the future.
-
Foundation Stability: Assess the ground's stability and levelness at potential locations. A solid, level foundation is crucial for the structural integrity of the shed. Avoid areas prone to soil erosion or significant ground movement, as these can compromise the shed's stability over time.
By carefully evaluating these factors, you can make an informed decision when choosing the right location for your brick shed. This thoughtful approach will contribute to the shed's functionality, longevity, and seamless integration into your property's landscape.
Gathering Materials and Tools
Gathering the necessary materials and tools is a critical precursor to commencing the construction of your brick shed. This phase requires careful consideration and planning to ensure that you have all the essential components and equipment at your disposal. Here's a comprehensive breakdown of the materials and tools required for building a sturdy and visually appealing brick shed:
Materials:
-
Bricks: Select high-quality bricks that are suitable for structural use. Consider factors such as durability, color, and texture to align with your design preferences.
-
Mortar: Acquire a sufficient quantity of mortar to bind the bricks together securely. Opt for a mortar mix that is compatible with the type of bricks you've chosen.
-
Foundation Materials: Depending on your chosen foundation type, gather materials such as concrete, gravel, or paving slabs to establish a stable base for the shed.
-
Roofing Materials: If you're opting for a traditional pitched roof, gather roofing materials such as timber trusses, roofing sheets, and appropriate fasteners. For a flat roof design, consider materials such as EPDM rubber roofing or roofing membranes.
-
Doors and Windows: If your shed design incorporates doors and windows, ensure that you have these components ready for installation. Select durable and weather-resistant options to enhance the shed's functionality and aesthetics.
-
Insulation and Finishing Materials: If you intend to insulate the shed for year-round use, gather insulation materials such as fiberglass or foam board. Additionally, consider finishing materials such as paint, sealant, and trim to add a polished look to the shed's interior and exterior.
Tools:
-
Masonry Tools: Essential masonry tools include a spirit level, trowel, brick jointer, and masonry saw. These tools are crucial for accurately laying and aligning the bricks during the construction process.
-
Foundation Tools: Depending on the foundation type, you may need tools such as a shovel, wheelbarrow, and compactor for preparing and leveling the foundation materials.
-
Roofing Tools: If you're handling the roofing installation yourself, gather tools such as a handsaw, hammer, roofing nail gun, and a chalk line for precise and efficient roof assembly.
-
Safety Gear: Prioritize safety by acquiring personal protective equipment, including gloves, safety goggles, and a dust mask. These items are essential for safeguarding yourself during various stages of the construction process.
-
General Construction Tools: Additional tools such as a tape measure, hammer, screwdriver, and a power drill will be indispensable for various tasks throughout the construction process.
By diligently procuring the required materials and organizing the essential tools, you'll set the stage for a streamlined and efficient construction process. This proactive approach will minimize interruptions and ensure that you have everything you need to bring your brick shed vision to fruition.
Building the Foundation
The foundation serves as the backbone of your brick shed, providing stability and structural integrity. Building a solid foundation is crucial for ensuring the longevity and durability of the entire structure. Here's a detailed overview of the essential steps involved in constructing a robust foundation for your brick shed:
-
Site Preparation: Begin by clearing the chosen site of any debris, vegetation, or obstructions. Use a shovel and a level to ensure that the ground is level and free from any unevenness. This step is vital for establishing a stable base for the foundation.
-
Foundation Type Selection: Depending on your specific requirements and the shed's size, you can opt for a concrete slab, concrete blocks, or treated timber skids as the foundation. Each type offers distinct advantages, so consider factors such as cost, soil type, and shed usage when making your selection.
-
Marking and Layout: Use string lines and stakes to mark the perimeter of the foundation, outlining the exact dimensions of the shed. This step is crucial for ensuring that the foundation aligns precisely with the shed's design and size.
-
Excavation: Once the layout is marked, proceed with excavating the marked area to the required depth for your chosen foundation type. Use a shovel or a mini excavator to remove soil and create a level trench for the foundation.
-
Compaction and Gravel Bed: After excavation, compact the soil using a hand tamper or a plate compactor to create a stable base. Then, add a layer of gravel to the excavated area and compact it thoroughly. The gravel bed enhances drainage and provides additional stability for the foundation.
-
Formwork Construction (for Concrete Foundations): If you're opting for a concrete foundation, construct formwork using timber or plywood to contain the concrete. Ensure that the formwork is securely braced and aligned with the marked layout.
-
Concrete Pouring and Leveling: With the formwork in place, pour the concrete into the prepared area. Use a screed board and a float to level the concrete, ensuring a smooth and even surface. Pay attention to achieving the correct thickness and slope, especially if the shed will be housing heavy equipment or machinery.
-
Curing and Drying: Allow the poured concrete to cure and dry according to the manufacturer's recommendations. This process is crucial for the concrete to achieve its full strength and stability.
By meticulously following these steps, you'll establish a sturdy and reliable foundation for your brick shed. A well-constructed foundation sets the stage for the subsequent phases of the construction process, bringing you closer to the realization of your DIY brick shed building project.
Constructing the Walls
Constructing the walls of your brick shed marks a significant milestone in the building process, shaping the structure and bringing your vision to life. This phase requires precision, patience, and a meticulous approach to ensure that the walls are sturdy, level, and visually appealing. Here's a detailed overview of the essential steps involved in constructing the walls of your brick shed:
-
Laying the First Course: Begin by applying a generous layer of mortar along the foundation where the first course of bricks will be laid. Carefully position the bricks, ensuring they are level and aligned with the layout plan. Use a spirit level to verify the horizontal and vertical alignment of the bricks, maintaining consistent mortar joints between each brick.
-
Building Upward: As you progress to subsequent courses, apply mortar to the top surface of the previously laid course before positioning the next layer of bricks. Stagger the vertical joints between bricks to enhance the structural integrity of the walls. Periodically check for plumb and level as you build upward, making any necessary adjustments to maintain the desired alignment.
-
Window and Door Openings: If your shed design includes windows and doors, carefully plan and construct the openings within the wall structure. Use lintels or reinforced concrete above the openings to provide structural support and distribute the load effectively. Ensure that the dimensions and positioning of the openings align with the shed's design and functionality.
-
Corner Construction: Pay special attention to the corners of the walls, ensuring that they are precisely aligned and reinforced for stability. Corner bricks may require careful cutting and fitting to achieve a seamless and structurally sound junction. Utilize corner blocks or specially shaped bricks to facilitate the construction of sturdy corners.
-
Wall Ties and Reinforcement: Integrate wall ties and reinforcement as necessary to enhance the structural strength of the walls. These components help secure the bricks in place and prevent potential shifting or displacement over time. Follow best practices for wall tie placement and spacing to optimize the walls' resilience.
-
Finishing Touches: As the walls reach the desired height, ensure that the top course of bricks is neatly aligned and finished. Use a jointer to create clean and uniform mortar joints, enhancing the overall aesthetic appeal of the walls. Pay attention to any remaining openings or penetrations, sealing them effectively to prevent water infiltration.
By meticulously executing these steps, you'll achieve the construction of robust and visually striking walls for your brick shed. Each carefully laid brick contributes to the structural integrity and enduring charm of the shed, bringing you closer to the realization of your DIY building project.
Installing the Roof
Installing the roof is a pivotal phase in the construction of your brick shed, as it provides crucial protection against the elements and contributes to the overall structural integrity and aesthetic appeal of the structure. Whether you opt for a traditional pitched roof or a modern flat roof design, meticulous attention to detail and precise execution are essential for a successful roof installation.
Roofing Material Preparation
Before commencing the roof installation, gather all the necessary roofing materials, including timber trusses, roofing sheets, fasteners, and any additional components specific to your chosen roof design. Ensure that the roofing materials are of high quality and suitable for the local climate conditions to guarantee long-term durability and weather resistance.
Truss Assembly and Installation
If your shed design incorporates timber trusses, begin by assembling the trusses according to the engineered specifications. Carefully position and secure the trusses onto the top of the shed walls, ensuring that they are evenly spaced and aligned with precision. Utilize temporary bracing to maintain the trusses' stability during the installation process.
Roof Sheathing and Underlayment
Once the trusses are in place, proceed with installing the roof sheathing, which provides a solid base for the roofing material. Secure the sheathing to the trusses using appropriate fasteners, ensuring a uniform and secure attachment. Following the sheathing installation, apply a weather-resistant underlayment to create a protective barrier against moisture infiltration.
Roofing Material Application
With the sheathing and underlayment in position, it's time to apply the selected roofing material, whether it's asphalt shingles, metal roofing panels, or EPDM rubber membrane for a flat roof. Adhere to the manufacturer's guidelines and best practices for the installation of the chosen roofing material, ensuring proper overlap, fastening, and sealing to achieve optimal weatherproofing and longevity.
Flashing and Edge Detailing
Incorporate flashing components around roof penetrations, such as vents and chimneys, to prevent water intrusion at vulnerable points. Additionally, pay close attention to the edge detailing, ensuring that the roof's perimeter is properly finished and sealed to safeguard against wind uplift and water ingress.
Finishing Touches and Trim
Complete the roof installation by adding finishing touches and trim elements to enhance the overall appearance and functionality of the roof. Consider adding ridge caps, fascia boards, and soffits to create a polished and cohesive look while providing essential ventilation and weather protection.
By meticulously following these steps and adhering to industry best practices, you'll successfully install a robust and visually appealing roof for your brick shed. The completed roof not only safeguards the shed's interior but also adds a striking architectural element to your DIY construction project, bringing you closer to the fulfillment of your vision.
Adding Doors and Windows
Incorporating doors and windows into your brick shed is a pivotal step that enhances both its functionality and aesthetic appeal. Careful planning and precise installation are essential to ensure that these openings provide seamless access, ample natural light, and ventilation while complementing the overall design of the shed.
Door Installation
When selecting a door for your brick shed, consider factors such as durability, security, and weather resistance. Whether opting for a pre-hung door or constructing a custom door, ensure that it aligns with the shed's dimensions and design. Begin by framing the door opening, ensuring it is plumb and level. Install the door frame securely, using shims to achieve proper alignment and smooth operation. Once the frame is in place, hang the door carefully, adjusting it to ensure a snug fit and smooth operation. Pay attention to weather sealing and hardware installation to enhance security and weather resistance.
Window Placement and Installation
Windows play a crucial role in illuminating the shed's interior and providing ventilation. When determining the placement of windows, consider factors such as natural light exposure, privacy, and visual balance. Frame the window openings meticulously, ensuring they align with the shed's design and are structurally sound. Install the windows securely, incorporating weatherproofing measures to prevent water infiltration. Consider adding window trim to enhance the aesthetic appeal and weather resistance while providing a polished finish to the openings.
Considerations for Security and Weatherproofing
Incorporate robust locking mechanisms for the doors to enhance security, especially if the shed will store valuable equipment or tools. Additionally, install weather-stripping around the doors and windows to create a tight seal, preventing drafts and moisture ingress. Utilize quality hardware and consider adding window screens to facilitate ventilation while keeping insects at bay.
Enhancing Aesthetics and Functionality
Select doors and windows that complement the overall design of the shed, whether aiming for a rustic charm or a modern aesthetic. Consider the functionality of each opening, ensuring that they provide convenient access and adequate ventilation. Utilize window treatments and decorative hardware to add a personalized touch and enhance the shed's visual appeal.
By meticulously addressing the installation of doors and windows, you'll elevate the functionality, comfort, and visual allure of your brick shed. These carefully integrated openings not only enhance the shed's usability but also contribute to its overall charm and character, bringing your DIY construction project closer to its completion.
Finishing Touches
As the construction of your brick shed nears completion, the phase of finishing touches becomes a pivotal focus, adding the final elements that elevate the functionality, aesthetics, and overall appeal of the structure. This stage encompasses a range of meticulous details and enhancements that contribute to the polished and cohesive presentation of your DIY project.
Exterior and Interior Finishes
The exterior of the shed presents an opportunity to infuse your personal style and enhance the visual impact of the structure. Consider applying a durable and weather-resistant paint or stain to the exterior walls, selecting colors that harmonize with your property's landscape and architectural theme. Additionally, add trim elements, such as fascia boards and corner moldings, to create a refined and cohesive exterior appearance.
Inside the shed, attention to interior finishes plays a crucial role in creating a welcoming and functional space. Consider painting or sealing the interior walls to protect the brickwork and create a clean, finished look. If the shed will serve as a workspace or hobby area, installing shelving, workbenches, or storage solutions can optimize the interior layout and enhance its practicality.
Ventilation and Insulation
Prioritize the comfort and usability of the shed by addressing ventilation and insulation. Install vents or louvers to facilitate air circulation, preventing moisture buildup and maintaining a comfortable environment. If the shed will be used year-round, consider adding insulation to regulate temperature and enhance energy efficiency. Insulation materials such as fiberglass or foam board can be applied within the walls and roof to create a comfortable and climate-controlled interior space.
Lighting and Electrical Considerations
Incorporate lighting fixtures to illuminate the shed's interior, enhancing usability and safety. Consider installing energy-efficient LED lights or solar-powered options to minimize energy consumption. If electrical outlets or fixtures are required for specific activities, enlist the assistance of a qualified electrician to ensure safe and compliant installation, adhering to local building codes and regulations.
Landscaping and Exterior Accents
Complement the shed's presence within your property by integrating landscaping elements and exterior accents. Consider adding pathways, plantings, or decorative features around the shed to create a harmonious connection with the surrounding environment. Utilize exterior lighting to highlight the shed's architectural features and create an inviting ambiance during evening hours.
Personalization and Customization
Infuse your personal touch by incorporating custom signage, decorative elements, or personalized touches that reflect your individual style and interests. Consider adding a nameplate, decorative hardware, or artistic embellishments to make the shed uniquely yours, infusing it with character and charm.
By meticulously attending to these finishing touches, you'll elevate the overall appeal and functionality of your brick shed, culminating in a space that seamlessly integrates with your property while serving as a practical and visually captivating addition. Each detail contributes to the cohesive and refined presentation of your DIY construction project, bringing your vision to life with a touch of individuality and flair.
Conclusion
As we conclude this comprehensive guide to DIY brick shed building, it's essential to reflect on the journey we've embarked upon and the remarkable accomplishment that awaits at the end of this fulfilling endeavor. Building a brick shed from the ground up is not merely a construction project; it's a testament to creativity, perseverance, and the joy of bringing a vision to life.
Throughout the planning, preparation, and construction phases, we've delved into the intricacies of creating a sturdy and visually appealing structure that serves a multitude of purposes, from storage to a tranquil retreat. The meticulous attention to detail, from selecting the ideal location to adding the finishing touches, has been instrumental in shaping the shed into a functional and aesthetically pleasing asset to your property.
The process of building a brick shed is a testament to the rewards of hands-on craftsmanship and the satisfaction of creating a tangible and enduring structure. It's a journey that fosters a deep sense of pride and accomplishment, as each brick laid and each detail perfected contributes to the realization of a personal sanctuary or a practical storage space.
As you stand back and admire the completed brick shed, you'll witness not just a physical structure but a reflection of your dedication, ingenuity, and unwavering commitment to seeing a project through from inception to fruition. The shed stands as a testament to your ability to transform raw materials into a functional and visually captivating space, a testament to your resourcefulness and determination.
Moreover, the skills and knowledge gained throughout this DIY endeavor extend far beyond the construction site. The problem-solving, attention to detail, and the ability to adapt and innovate are invaluable traits that will continue to serve you in future projects and endeavors.
So, as you take a moment to appreciate the brick shed standing proudly on your property, remember the journey that brought it to life. Embrace the sense of accomplishment and the memories woven into every brick and every finishing touch. Whether it's the satisfaction of organizing tools within its walls or the tranquility of a quiet retreat, the brick shed stands as a testament to your creativity, determination, and the joy of hands-on construction.
In the end, the completion of the brick shed marks not just the end of a construction project, but the beginning of a new chapter filled with possibilities, creativity, and the enduring pride of a DIY project brought to fruition.