
Home>Create & Decorate>DIY & Crafts>How To Build A Wooden Walkway
DIY & Crafts
How To Build A Wooden Walkway
Published: May 23, 2024

Senior Editor in Create & Decorate, Kathryn combines traditional craftsmanship with contemporary trends. Her background in textile design and commitment to sustainable crafts inspire both content and community.
Learn how to create a beautiful wooden walkway with our DIY & Crafts guide. Enhance your outdoor space with this simple and practical project.
(Many of the links in this article redirect to a specific reviewed product. Your purchase of these products through affiliate links helps to generate commission for Twigandthistle.com, at no extra cost. Learn more)
Introduction
So, you've been dreaming of adding a charming wooden walkway to your garden or backyard, but you're not quite sure where to start. Well, you've come to the right place! Building a wooden walkway can be a rewarding and relatively simple DIY project that can enhance the aesthetics and functionality of your outdoor space. Whether you want to create a path from your patio to your garden, or you simply want to add a decorative element to your yard, a wooden walkway can be a fantastic addition to your home. In this guide, we'll walk you through the step-by-step process of building your very own wooden walkway, from planning and designing to the finishing touches. Let's get started!
Planning and Designing Your Wooden Walkway
When it comes to building a wooden walkway, the first step is to carefully plan and design the layout. Here are some key points to consider:
-
Determine the Purpose: Think about the purpose of your walkway. Is it purely functional, providing a path from one point to another, or is it also meant to add visual appeal to your outdoor space?
-
Choose the Location: Consider where you want your walkway to be located. Take into account the natural flow of foot traffic and any landscaping features you want to highlight.
-
Measure the Area: Take precise measurements of the area where the walkway will be installed. This will help you determine the amount of materials you'll need.
-
Select the Wood: Choose the type of wood you want to use for your walkway. Cedar and redwood are popular choices due to their durability and resistance to rot and insects.
-
Design the Layout: Sketch out the layout of your walkway, considering any curves or turns you want to incorporate. This will help you visualize the final look and make adjustments as needed.
-
Consider Drainage: If your walkway will be installed in an area prone to moisture, such as near a garden or lawn, think about incorporating proper drainage to prevent water buildup.
By carefully planning and designing your wooden walkway, you'll set the stage for a successful and visually appealing addition to your outdoor space.
Gathering Materials and Tools
Before you can start building your wooden walkway, you'll need to gather the necessary materials and tools. Here's a list of what you'll need:
Materials:
- Wooden planks: Choose high-quality, weather-resistant wood such as cedar or redwood. Calculate the amount needed based on your measurements.
- Gravel or crushed stone: This will be used for the foundation of the walkway.
- Landscaping fabric: To prevent weed growth under the walkway.
- Wood preservative or sealant: To protect the wood from moisture and prolong its lifespan.
- Gravel or sand: For leveling and stabilizing the foundation.
Tools:
- Measuring tape: For taking accurate measurements of the walkway area.
- Shovel: To excavate the area and create a base for the walkway.
- Level: To ensure the walkway is even and flat.
- Saw: For cutting the wooden planks to the desired length.
- Drill and screws: To secure the wooden planks in place.
- Work gloves and safety goggles: For personal protection during construction.
- Wheelbarrow: For transporting materials such as gravel and crushed stone.
By gathering these materials and tools in advance, you'll be well-prepared to tackle the construction of your wooden walkway.
Preparing the Site
-
Clear the Area: Begin by clearing the area where the walkway will be installed. Remove any existing vegetation, rocks, or debris to create a clean and level surface for the walkway.
-
Mark the Layout: Use stakes and string to mark the exact layout of the walkway. This will serve as a guide for excavation and ensure that the walkway is installed in the desired location.
-
Excavate the Path: Using a shovel, excavate the marked path to a depth of about 4-6 inches. This will allow space for the foundation materials and the wooden planks.
-
Lay Landscaping Fabric: Once the path is excavated, lay landscaping fabric over the entire area. This will help prevent weed growth and maintain the integrity of the walkway over time.
-
Add Gravel or Crushed Stone: Pour a layer of gravel or crushed stone onto the fabric-covered path. This will serve as the foundation for the walkway, providing stability and drainage.
-
Level and Compact: Use a rake and a hand tamper to level and compact the gravel or crushed stone. It's important to ensure that the foundation is even and firmly packed to support the weight of the wooden planks.
-
Check for Slope: Verify that the path has a slight slope to allow for proper drainage. A gentle slope away from any structures or towards a designated drainage area will help prevent water from pooling on the walkway.
By thoroughly preparing the site for your wooden walkway, you'll create a solid foundation for the construction phase and ensure the long-term durability of your project.
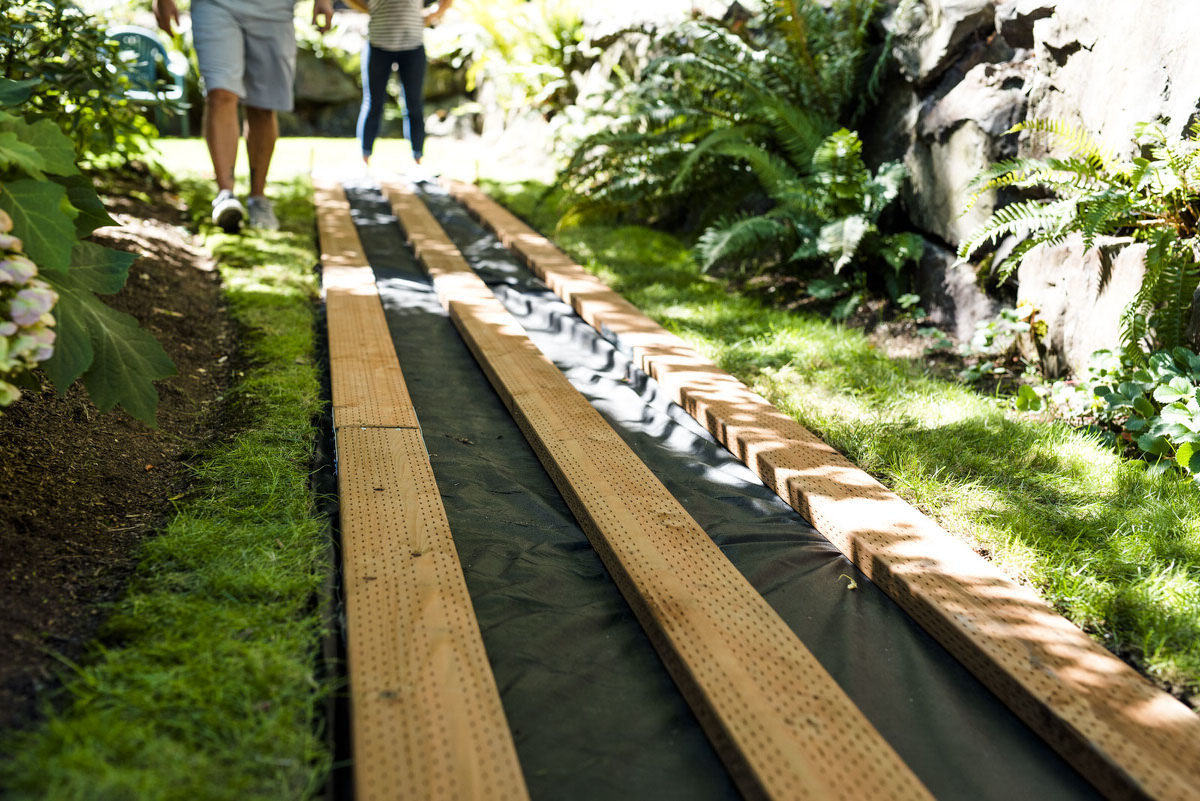
Building the Foundation
-
Lay the Wooden Planks: Once the foundation is prepared, it's time to lay the wooden planks to form the actual walkway. Start by placing the first plank at one end of the path, ensuring that it is aligned with the layout you designed. Use a level to make sure the plank is flat and even.
-
Secure the Planks: After positioning the first plank, use a drill and screws to secure it to the foundation. Place screws at regular intervals along the length of the plank, ensuring that it is firmly attached to the underlying gravel or crushed stone.
-
Create Spacing: To allow for proper drainage and prevent water from accumulating on the walkway, place spacers between the wooden planks. These spacers can be small wooden blocks or plastic tabs specifically designed for this purpose.
-
Continue the Process: Continue laying and securing the wooden planks, using the spacers to maintain consistent spacing between each plank. As you progress, periodically check that the planks are level and adjust as needed.
-
Cutting and Trimming: Depending on the layout of your walkway, you may need to cut and trim the wooden planks to fit around curves or obstacles. Use a saw to carefully cut the planks to the required size, ensuring precise and clean edges.
-
Apply Wood Preservative: Once all the planks are in place, apply a wood preservative or sealant to protect the wood from moisture, UV rays, and general wear and tear. This step is crucial for extending the lifespan of your wooden walkway.
-
Add Finishing Touches: To enhance the visual appeal of your walkway, consider adding decorative elements such as solar-powered lights, gravel, or plants along the edges. These finishing touches can elevate the overall look of your wooden walkway and integrate it seamlessly into your outdoor space.
By following these steps and paying attention to detail during the foundation-building phase, you'll create a sturdy and visually appealing wooden walkway that will enhance the charm and functionality of your outdoor area.
Installing the Wooden Planks
Once the foundation is prepared, it's time to lay the wooden planks to form the actual walkway. Here's a detailed guide on how to install the wooden planks for your wooden walkway:
-
Start at One End: Begin by placing the first plank at one end of the path, ensuring that it is aligned with the layout you designed during the planning phase. This initial placement is crucial, as it will serve as a reference point for the rest of the planks.
-
Check for Level: Use a level to ensure that the first plank is flat and even. This step is essential for creating a walkway that is not only visually appealing but also safe and comfortable to walk on.
-
Secure the Plank: After positioning the first plank, use a drill and screws to secure it to the foundation. Place screws at regular intervals along the length of the plank, ensuring that it is firmly attached to the underlying gravel or crushed stone. This will provide stability and prevent the planks from shifting over time.
-
Maintain Consistent Spacing: To allow for proper drainage and prevent water from accumulating on the walkway, place spacers between the wooden planks. These spacers can be small wooden blocks or plastic tabs specifically designed for this purpose. Maintaining consistent spacing between the planks is essential for the functionality and longevity of the walkway.
-
Continue the Process: Continue laying and securing the wooden planks, using the spacers to maintain consistent spacing between each plank. As you progress, periodically check that the planks are level and adjust as needed. This attention to detail will ensure a professional-looking and structurally sound walkway.
-
Cutting and Trimming: Depending on the layout of your walkway, you may need to cut and trim the wooden planks to fit around curves or obstacles. Use a saw to carefully cut the planks to the required size, ensuring precise and clean edges. This step may require patience and precision, but it is essential for achieving a seamless and polished look for your walkway.
-
Apply Wood Preservative: Once all the planks are in place, apply a wood preservative or sealant to protect the wood from moisture, UV rays, and general wear and tear. This step is crucial for extending the lifespan of your wooden walkway and maintaining its appearance over time.
-
Add Finishing Touches: To enhance the visual appeal of your walkway, consider adding decorative elements such as solar-powered lights, gravel, or plants along the edges. These finishing touches can elevate the overall look of your wooden walkway and integrate it seamlessly into your outdoor space.
By following these detailed steps for installing the wooden planks, you'll be well on your way to creating a beautiful and functional wooden walkway that enhances the charm and usability of your outdoor area.
Finishing Touches and Maintenance
Once the wooden walkway is constructed, adding finishing touches can elevate its overall appearance and functionality. Additionally, regular maintenance is essential to ensure the longevity and durability of the walkway. Here's a detailed guide on finishing touches and maintenance for your wooden walkway:
-
Decorative Elements: Consider adding decorative elements to enhance the visual appeal of the walkway. Solar-powered lights can illuminate the path at night, creating a charming ambiance. Incorporating gravel or small pebbles along the edges of the walkway can provide a polished and cohesive look. You can also plant low-maintenance ground cover or ornamental grass along the sides to soften the edges and integrate the walkway with the surrounding landscape.
-
Regular Cleaning: To maintain the walkway's appearance, regularly sweep away debris such as leaves, dirt, and twigs. Use a gentle detergent and water to clean the wooden planks, removing any stains or buildup. Avoid using harsh chemicals that can damage the wood.
-
Inspect for Damage: Periodically inspect the walkway for any signs of damage, such as loose planks, cracks, or rot. Address any issues promptly to prevent further deterioration. Tighten any loose screws and replace any damaged or rotted planks as needed.
-
Reapply Sealant: Over time, the wood may require reapplication of a wood preservative or sealant to maintain its resistance to moisture and UV rays. Follow the manufacturer's recommendations for the frequency of reapplication based on the specific product used.
-
Address Drainage: Ensure that the walkway maintains proper drainage to prevent water from pooling or causing damage to the wood. Clear any debris that may obstruct drainage channels and make adjustments as necessary to maintain effective water runoff.
-
Seasonal Care: In regions with significant seasonal changes, consider additional care during extreme weather conditions. In winter, use caution when applying de-icing products to prevent damage to the wood. In autumn, regularly remove fallen leaves to prevent moisture buildup and potential staining.
By incorporating these finishing touches and following a regular maintenance routine, you can preserve the beauty and functionality of your wooden walkway for years to come. Regular care and attention will ensure that your walkway continues to enhance your outdoor space and provide a charming pathway for years to come.