
Home>Create & Decorate>DIY & Crafts>How To Build A Wooden Crate
DIY & Crafts
How To Build A Wooden Crate
Published: May 22, 2024

Senior Editor in Create & Decorate, Kathryn combines traditional craftsmanship with contemporary trends. Her background in textile design and commitment to sustainable crafts inspire both content and community.
Learn how to build a wooden crate with our step-by-step DIY guide. Perfect for DIY & Crafts enthusiasts looking for a fun and practical project.
(Many of the links in this article redirect to a specific reviewed product. Your purchase of these products through affiliate links helps to generate commission for Twigandthistle.com, at no extra cost. Learn more)
Introduction
So, you want to learn how to build a wooden crate, huh? Well, you've come to the right place! Whether you need a sturdy container for storing items, transporting goods, or adding a touch of rustic charm to your home decor, building a wooden crate can be a fun and rewarding DIY project. In this guide, we'll walk you through the step-by-step process of creating your very own wooden crate from scratch. From selecting the right wood to adding the finishing touches, you'll soon be on your way to becoming a crate-building pro! Let's roll up our sleeves and get started.
Choosing the Right Wood
When it comes to choosing the right wood for your wooden crate, there are a few factors to consider. First and foremost, you'll want to select a sturdy and durable type of wood that can withstand the weight of the items you plan to store or transport in the crate. Hardwoods such as oak, maple, or birch are excellent choices for building a strong and long-lasting crate. If you're aiming for a more rustic look, you might opt for reclaimed or pallet wood, which can add character and charm to your finished crate. Additionally, consider the dimensions of the crate and the overall aesthetic you're aiming for when selecting the wood. Keep in mind that the wood should be free from any defects or damage that could compromise the structural integrity of the crate. With the right wood in hand, you'll be well on your way to crafting a high-quality wooden crate.
Now, let's move on to the next step in the process: Measuring and Cutting the Wood.
Measuring and Cutting the Wood
Before you start sawing away, it's crucial to take precise measurements of the wood pieces needed for your wooden crate. Grab your measuring tape and determine the dimensions for the sides, bottom, and any additional components of the crate. Accurate measurements are key to ensuring that the pieces fit together snugly, resulting in a sturdy and well-constructed crate.
Once you have your measurements, it's time to break out the saw and start cutting the wood to size. Whether you're using a hand saw, circular saw, or table saw, be sure to follow your measurements closely and use a straight edge or miter box to achieve clean and precise cuts. Remember, measure twice, cut once! It's always a good idea to double-check your measurements before making any cuts to avoid any costly mistakes.
As you cut the wood pieces, take care to maintain straight and even cuts to ensure that the crate comes together seamlessly. If you're incorporating any intricate designs or joinery techniques, such as finger joints or dovetails, precision is even more critical. With the wood pieces cut to perfection, you're ready to move on to the next exciting phase of the crate-building process: Assembling the Crate.
Assembling the Crate
With all the wood pieces cut to size, it's time to bring your wooden crate to life by assembling the components. Begin by laying out the pieces in the designated order, ensuring that everything fits together as planned. If you're using nails or screws to join the wood, pre-drill any necessary holes to prevent splitting and make the assembly process smoother.
Next, apply a bead of wood glue along the edges where the pieces will connect. This will provide added strength and stability to the joints. As you join the pieces together, use clamps to hold them firmly in place while the glue sets. Whether you're constructing a simple butt-jointed crate or incorporating more advanced joinery techniques, such as rabbet or dado joints, take your time to ensure that each connection is secure and aligned.
Once the glue has dried and the joints are secure, reinforce the connections by driving in nails or screws as needed. Be mindful of the wood's natural grain and avoid placing fasteners too close to the edges to prevent splitting. If you're aiming for a seamless look, consider using wood filler to conceal any visible fastener heads or imperfections in the wood.
As the pieces come together, step back and admire the structure taking shape. Whether you're building a small decorative crate or a large functional container, the satisfaction of seeing your creation come together is truly rewarding. With the main structure assembled, it's time to add the finishing touches that will elevate your wooden crate to the next level.
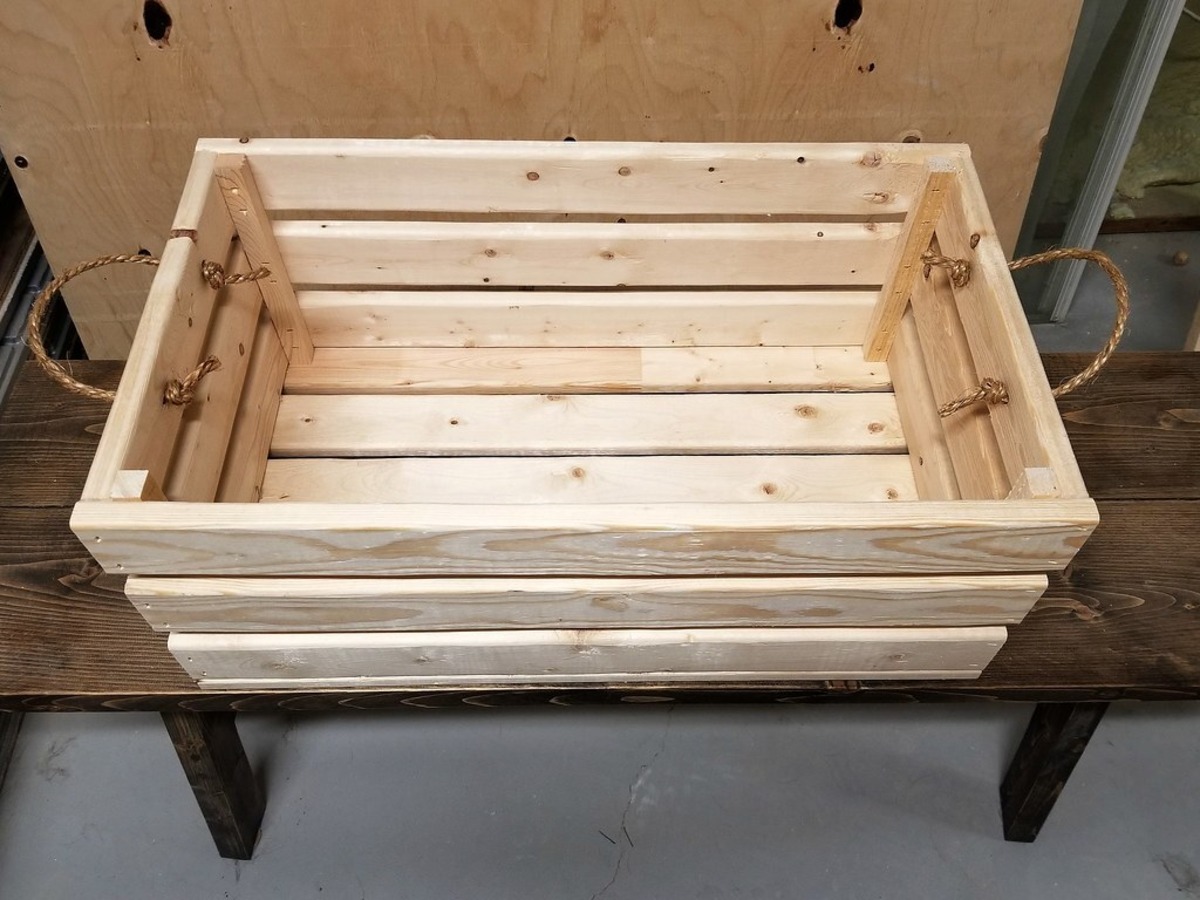
Adding Handles and Hardware
Now that the main structure of your wooden crate is assembled, it's time to add the finishing touches that will enhance both its functionality and aesthetic appeal. One essential addition to consider is the inclusion of handles. Whether you plan to use the crate for storage, transportation, or simply as a decorative piece, adding handles will make it easier to lift and move around. You can opt for traditional metal handles for a classic look, or get creative with rope handles for a more rustic vibe. Position the handles evenly on opposite sides of the crate, ensuring that they are securely attached to bear the weight of the crate and its contents.
In addition to handles, selecting the right hardware can further elevate the look and functionality of your wooden crate. If you're aiming for a more industrial or vintage look, consider adding decorative corner brackets or metal accents to the crate. These small details can add a touch of character and charm to the overall design. When choosing hardware, be mindful of the size and weight of the crate, selecting pieces that are proportionate and complement the wood. Whether you opt for sleek and modern hardware or vintage-inspired accents, the right choices can truly make your wooden crate stand out.
As you add handles and hardware, take the time to ensure that everything is securely fastened and aligned. Whether you're using screws, nails, or other fasteners, pre-drill any necessary holes to prevent splitting and ensure a snug fit. Once the handles and hardware are in place, give them a gentle tug to test their sturdiness. You want to be confident that they can withstand the rigors of everyday use without compromising the integrity of the crate.
With the handles and hardware in place, step back and admire how these small additions have transformed your wooden crate into a functional and visually appealing piece. The thoughtful details you've incorporated will not only enhance its practicality but also showcase your craftsmanship. Now, with the finishing touches complete, your wooden crate is ready to be sanded and finished to perfection.
Sanding and Finishing
After the main structure of the wooden crate is assembled and the handles and hardware are in place, it's time to focus on the crucial step of sanding and finishing. This step not only enhances the visual appeal of the crate but also ensures a smooth and splinter-free surface for safe handling and storage of items.
Begin by using a medium-grit sandpaper to smooth out any rough edges and uneven surfaces on the crate. Pay special attention to the corners and edges, as these areas are prone to splintering. Once the rough spots are smoothed out, switch to a fine-grit sandpaper to achieve a silky-smooth finish. Sand in the direction of the wood grain to avoid leaving visible scratches, and be sure to sand all surfaces, including the interior and exterior of the crate.
As you sand, periodically run your hands over the wood to check for any remaining rough patches. The goal is to achieve a uniform and velvety texture that is pleasant to the touch. Once the sanding is complete, use a clean, damp cloth to wipe away any dust and debris from the surface of the crate.
Now comes the exciting part – applying the finish. Whether you prefer a natural, rustic look or a glossy, polished appearance, there are various finishing options to consider. For a more natural look, you might opt for a clear varnish or wood oil that enhances the wood's natural grain and color. If you're aiming for a more dramatic effect, consider using a wood stain to add depth and richness to the wood.
Using a brush or a clean cloth, apply the chosen finish evenly to the entire surface of the crate, working with the wood grain to ensure uniform coverage. Allow the first coat to dry completely, then lightly sand the surface with a fine-grit sandpaper to smooth out any raised grain. Apply a second coat of finish for added protection and a more lustrous appearance.
Once the final coat of finish has dried, step back and admire the transformation of the wooden crate. The smooth and lustrous surface not only enhances the visual appeal but also provides added protection against moisture and wear. With the sanding and finishing complete, your wooden crate is now ready to be put to use, whether as a stylish storage solution, a unique gift container, or a charming addition to your home decor.
Conclusion
In conclusion, building a wooden crate is a gratifying DIY project that allows you to unleash your creativity and craftsmanship. From selecting the right wood to adding the finishing touches, each step in the process contributes to the creation of a sturdy, functional, and visually appealing crate. Whether you're a seasoned woodworker or a novice DIY enthusiast, the satisfaction of crafting a wooden crate with your own hands is truly unmatched. As you embark on your crate-building journey, remember to take your time, pay attention to detail, and enjoy the process. With the knowledge and skills gained from this guide, you're well-equipped to tackle your next wooden crate project with confidence and flair. So, roll up your sleeves, grab your tools, and let your imagination run wild as you bring your wooden crate visions to life!