Home>Create & Decorate>DIY & Crafts>How To Build Wooden Steps

DIY & Crafts
How To Build Wooden Steps
Published: February 29, 2024

Content Creator specializing in woodworking and interior transformations. Caegan's guides motivate readers to undertake their own projects, while his custom furniture adds a personal touch.
Learn how to build wooden steps with our easy DIY & Crafts guide. Create a beautiful and functional addition to your home with our step-by-step instructions.
(Many of the links in this article redirect to a specific reviewed product. Your purchase of these products through affiliate links helps to generate commission for Twigandthistle.com, at no extra cost. Learn more)
Introduction
Building wooden steps is a rewarding and practical DIY project that can enhance the functionality and aesthetics of your outdoor space. Whether you're aiming to create a welcoming entrance to your home, connect different levels of a deck or patio, or provide easy access to a garden or yard, constructing wooden steps can be a fulfilling endeavor. By following a systematic approach and utilizing the right tools and materials, you can craft sturdy and visually appealing steps that seamlessly blend with their surroundings.
In this comprehensive guide, we will walk you through the step-by-step process of building wooden steps, from gathering the necessary materials and tools to installing the treads and optional handrail. Whether you're a seasoned DIY enthusiast or a novice looking to embark on your first woodworking project, this guide will equip you with the knowledge and confidence to tackle this undertaking with precision and skill.
By the end of this tutorial, you will have the expertise to design and build wooden steps that not only serve a functional purpose but also add a touch of charm and character to your outdoor environment. So, roll up your sleeves, gather your tools, and let's dive into the gratifying journey of creating custom wooden steps that will elevate the accessibility and visual appeal of your outdoor space.
Read more: How To Build A Wooden Gate
Step 1: Gather Materials and Tools
Before embarking on the construction of wooden steps, it's essential to gather all the necessary materials and tools to ensure a smooth and efficient building process. Here's a comprehensive list of items you'll need:
Materials:
- Pressure-treated lumber: This will serve as the primary material for constructing the steps, providing durability and resistance to outdoor elements.
- Gravel and compactible gravel base: These materials will form the foundation for the steps, ensuring stability and proper drainage.
- Concrete mix: Used to secure the support posts and provide additional stability to the steps.
- Galvanized or stainless-steel screws and nails: These corrosion-resistant fasteners will ensure the longevity of the steps.
- Concrete anchors (if attaching the steps to a concrete surface): Necessary for securely anchoring the steps to a concrete base.
Tools:
- Measuring tape: Essential for taking accurate measurements of the construction site and materials.
- Carpenter's square: Used to ensure precise angles and straight lines during the cutting and assembly process.
- Circular saw or miter saw: Ideal for cutting the lumber to the required dimensions with precision.
- Level: Critical for ensuring that the steps are even and properly aligned during installation.
- Drill/driver: Needed for driving screws and drilling pilot holes for fasteners.
- Shovel: Used for excavating the area where the steps will be installed and for preparing the base.
- Safety gear: Including gloves, safety glasses, and hearing protection to ensure personal safety during the construction process.
By gathering these materials and tools, you'll be well-equipped to commence the construction of your wooden steps. Ensuring that you have everything on hand before starting the project will help prevent unnecessary delays and ensure a seamless building experience. With the materials and tools in place, you're ready to move on to the next step: measuring and planning the layout of the steps.
Step 2: Measure and Plan
Accurate measurements and meticulous planning are crucial prerequisites for the successful construction of wooden steps. Before cutting any lumber or commencing the assembly process, it's essential to carefully measure the designated area and develop a comprehensive plan for the layout and design of the steps.
Read more: How To Build A Wooden Crate
Measuring the Area
Begin by measuring the total rise and total run of the area where the steps will be installed. The total rise refers to the vertical distance from the ground to the top of the landing or deck where the steps will terminate. On the other hand, the total run represents the horizontal distance from the front of the landing to where the steps will touch the ground. These measurements will determine the number of steps needed and their individual dimensions.
Determining the Number of Steps
To calculate the number of steps required, divide the total rise by the ideal height of each riser. Standard building codes often recommend a riser height between 6 and 8 inches for optimal safety and comfort. By dividing the total rise by the chosen riser height, you can ascertain the exact number of steps needed for the staircase.
Planning the Tread and Riser Dimensions
Once the number of steps is determined, plan the dimensions of the treads and risers. The tread depth should be sufficient to provide a comfortable and secure surface for walking. Typically, a tread depth of 10 to 11 inches is recommended for outdoor wooden steps. Additionally, ensure that the riser height is consistent across all steps to promote uniformity and safety.
Sketching the Layout
With the measurements and dimensions in hand, sketch a detailed layout of the steps, including the dimensions of each tread and riser. This visual representation will serve as a valuable reference during the construction process, guiding the cutting and assembly of the lumber with precision.
Read more: How To Build A Wooden Walkway
Considering the Aesthetic and Functional Elements
In addition to the technical aspects of measurement and planning, consider the aesthetic and functional elements that align with your outdoor space. Choose a design that complements the existing architecture and landscape while ensuring that the steps provide safe and convenient access to the intended area.
By meticulously measuring the area, calculating the number of steps, planning the dimensions of the treads and risers, sketching the layout, and considering the aesthetic and functional elements, you'll lay a solid foundation for the subsequent stages of constructing wooden steps. With the measurements and plan in place, you're ready to move on to the next step: cutting the stringers.
Step 3: Cut the Stringers
The stringers form the structural backbone of the wooden steps, providing support and stability to the treads and risers. Cutting the stringers accurately is essential to ensure that the steps are level, secure, and visually appealing. Here's a detailed walkthrough of the process:
1. Selecting the Lumber
Begin by selecting high-quality pressure-treated lumber for the stringers. Opt for lumber that is straight, free of knots, and resistant to decay and insect damage. The chosen lumber should be capable of withstanding outdoor conditions and supporting the weight of individuals using the steps.
2. Determining the Stringer Dimensions
Calculate the dimensions of the stringers based on the total rise and total run of the steps, as well as the planned tread and riser dimensions. The stringers will be notched to accommodate the treads and risers, and their overall length and angle will be determined by the specific layout of the steps.
Read more: How To Build Free Standing Wooden Steps
3. Marking and Cutting the Stringers
Using the calculated dimensions, mark the notches and cuts on the selected lumber. A carpenter's square and measuring tape will be indispensable for ensuring precision during this process. Employ a circular saw or miter saw to make the necessary cuts, taking care to follow the marked lines accurately.
4. Notching the Stringers
After cutting the stringers to the required dimensions, notch them to accommodate the treads and risers. These notches will provide a secure and flush fit for the steps, ensuring stability and uniformity. A handsaw, chisel, and wood rasp can be used to carefully notch the stringers according to the planned layout.
5. Ensuring Consistency
It's crucial to maintain consistency across all the stringers to guarantee that the steps are level and uniform. Double-check the dimensions, angles, and notches of each stringer to eliminate any discrepancies that could compromise the structural integrity of the steps.
By meticulously executing these steps, you'll successfully cut the stringers with precision and accuracy, laying the groundwork for the subsequent stages of constructing the wooden steps. With the stringers prepared, you're ready to move on to the next step: attaching the stringers to the designated area.
Step 4: Attach the Stringers
Attaching the stringers is a critical phase in the construction of wooden steps, as it establishes the foundational support for the entire staircase. The secure attachment of the stringers ensures the stability and durability of the steps, providing a safe and reliable means of access to elevated areas. Here's a detailed walkthrough of the process:
-
Positioning the Stringers: Begin by positioning the stringers in alignment with the layout and design plan developed in the previous steps. Ensure that the stringers are evenly spaced and oriented correctly to accommodate the treads and risers. The use of a level is essential at this stage to verify that the stringers are plumb and level, guaranteeing the overall stability and uniformity of the steps.
-
Securing the Stringers: Once the stringers are positioned accurately, secure them in place using appropriate fasteners. Predrill pilot holes to prevent splitting of the wood and then attach the stringers to the supporting structure using galvanized or stainless-steel screws. It's crucial to fasten the stringers securely to the landing or foundation, as this connection will bear the weight and impact of individuals using the steps.
-
Utilizing Brackets for Added Support: Depending on the design and layout of the steps, utilizing metal brackets to reinforce the connection between the stringers and the supporting structure can provide additional support and stability. These brackets can be strategically positioned and fastened to enhance the overall strength of the staircase, particularly in high-traffic areas or locations with specific structural requirements.
-
Verifying Alignment and Stability: After attaching the stringers, carefully verify the alignment and stability of the entire structure. Use the level to confirm that the stringers are still plumb and level, making any necessary adjustments to ensure uniformity and safety. This meticulous attention to detail at the attachment stage will contribute to the overall integrity and longevity of the wooden steps.
By methodically following these steps, you'll effectively attach the stringers, laying the groundwork for the subsequent phases of constructing the wooden steps. With the stringers securely in place, you're ready to progress to the next step: installing the treads, which will transform the stringers into functional and visually appealing steps.
Read more: How To Make A Wooden Box
Step 5: Install the Treads
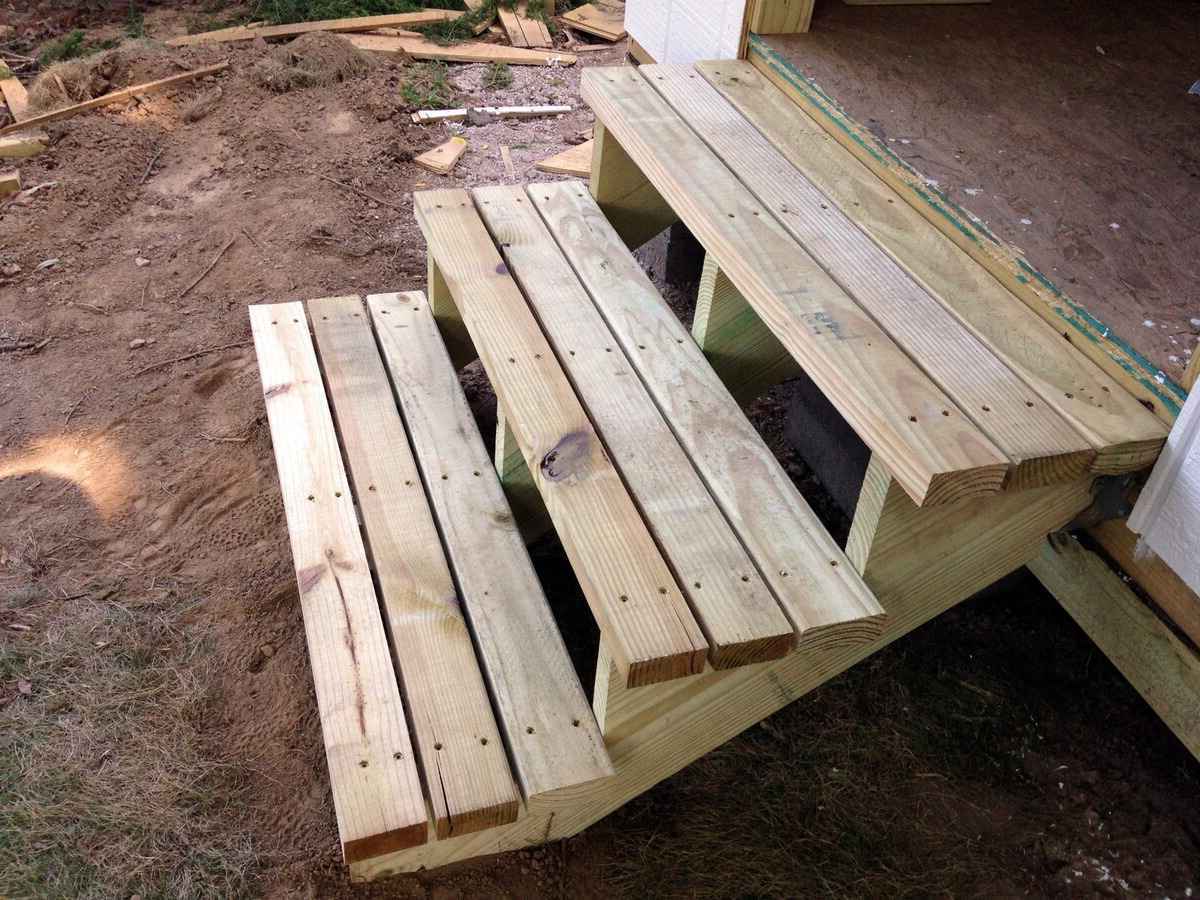
Installing the treads is a pivotal stage in the construction of wooden steps, as it transforms the stringers into functional and visually appealing stair treads. The treads not only provide a secure surface for walking but also contribute to the overall aesthetic of the staircase. Here's a detailed walkthrough of the process:
-
Selecting High-Quality Lumber: Begin by selecting pressure-treated lumber for the treads, ensuring that the wood is durable, resistant to decay, and capable of withstanding outdoor conditions. Opt for lumber that is free of knots and imperfections, as this will contribute to the longevity and visual appeal of the steps.
-
Cutting the Treads to Size: Using the measurements and dimensions outlined in the initial planning phase, carefully cut the lumber to the required dimensions for the treads. A circular saw or miter saw can be employed to achieve precise and uniform cuts, ensuring that the treads fit securely and seamlessly onto the notched stringers.
-
Securing the Treads: Position the cut treads onto the notched stringers, ensuring a snug and flush fit. Predrill pilot holes to prevent splitting, and then fasten the treads to the stringers using galvanized or stainless-steel screws. It's essential to secure the treads firmly to the stringers, as they will bear the weight and impact of individuals using the steps.
-
Maintaining Consistency and Alignment: As each tread is installed, verify that it is level and aligned with the adjacent treads. Consistency in the placement and alignment of the treads is crucial for ensuring the safety and comfort of individuals using the steps. Use a level to confirm that each tread is even and stable, making any necessary adjustments as required.
-
Applying a Finish (Optional): Depending on personal preference and the desired aesthetic, applying a finish to the treads can enhance their visual appeal and provide additional protection against outdoor elements. A weather-resistant wood stain or sealant can be applied to the treads to accentuate the natural beauty of the wood and prolong its lifespan.
By meticulously following these steps, you'll effectively install the treads, elevating the stringers into fully functional and visually appealing steps. With the treads securely in place, the wooden steps will begin to take shape, providing a safe and inviting means of access to elevated areas. This marks a significant milestone in the construction process, setting the stage for the optional addition of a handrail to further enhance the functionality and safety of the steps.
Step 6: Add the Handrail (Optional)
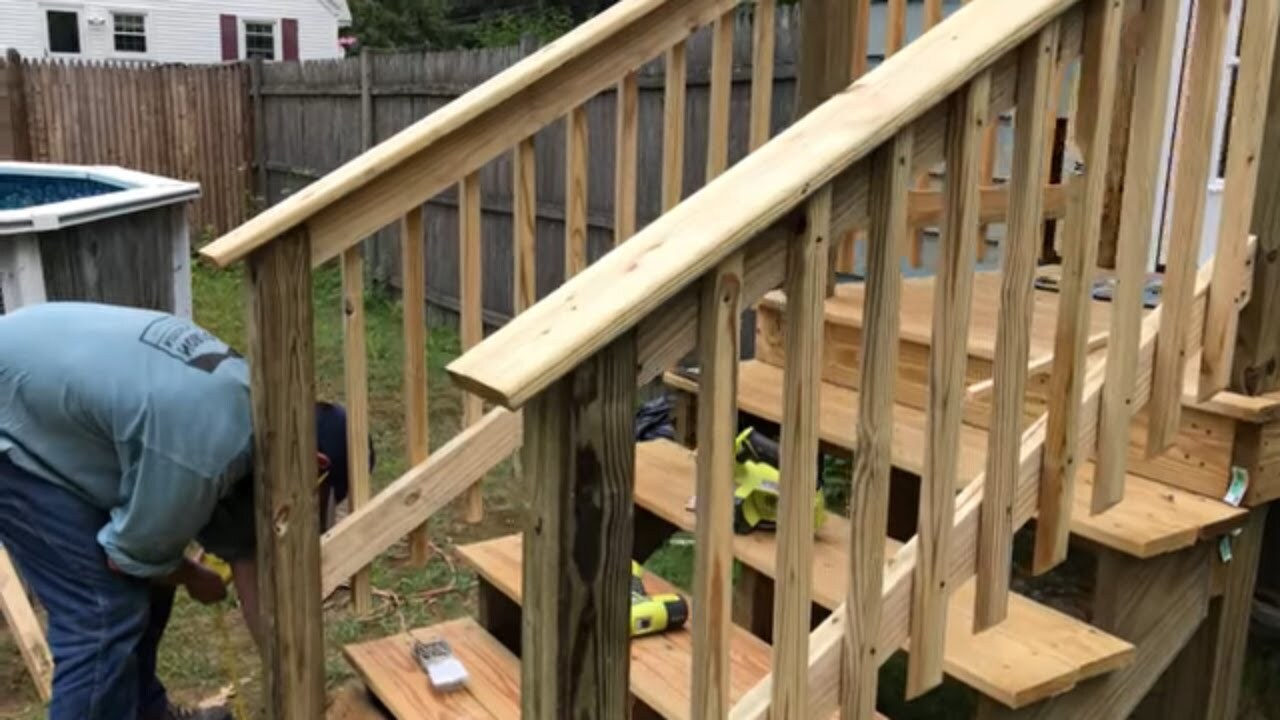
Incorporating a handrail into the design of wooden steps can significantly enhance safety, accessibility, and overall visual appeal. While it is optional, a well-constructed handrail provides essential support and stability, especially for individuals with mobility challenges or when navigating steps in adverse weather conditions. Here's a detailed guide on adding a handrail to your wooden steps:
1. Selecting the Handrail Material
Begin by selecting a suitable material for the handrail. Pressure-treated lumber, metal, or composite materials are popular choices for outdoor handrails due to their durability and resistance to the elements. Consider the aesthetic compatibility with the surrounding environment and the overall design of the steps when choosing the material.
2. Planning the Handrail Design
Develop a comprehensive plan for the design and layout of the handrail. Consider the height, length, and placement of the handrail to ensure optimal functionality and compliance with safety standards. The handrail should provide a comfortable grip and extend along the entire length of the steps, offering continuous support from the top landing to the bottom.
Read more: How To Build A Wooden Crate For Shipping
3. Installing the Handrail Posts
If the handrail will include posts, position them at appropriate intervals along the length of the steps. Secure the posts to the stringers or supporting structure using galvanized or stainless-steel hardware, ensuring that they are plumb and securely anchored. The posts serve as the foundational support for the handrail, contributing to its stability and strength.
4. Attaching the Handrail
Once the posts are in place, attach the handrail to the posts using suitable fasteners. Predrill pilot holes to prevent splitting of the wood or material, and then secure the handrail firmly to the posts. Ensure that the handrail is level and securely attached, providing a reliable and supportive grip for individuals using the steps.
5. Verifying Compliance and Safety
After installing the handrail, verify that it complies with local building codes and safety regulations. Check the height, clearance, and structural integrity of the handrail to ensure that it provides adequate support and meets established standards. A well-constructed handrail enhances the safety and accessibility of the steps, contributing to a welcoming and inclusive environment.
By following these steps, you can seamlessly integrate a handrail into the design of your wooden steps, elevating their functionality and safety. Whether for a residential entrance, deck, or garden access, a thoughtfully designed handrail adds a touch of refinement while prioritizing the well-being of those utilizing the steps.
Conclusion
In conclusion, the process of building wooden steps encompasses a series of meticulous steps, from gathering materials and tools to integrating optional features such as handrails. By following this comprehensive guide, you have gained the knowledge and confidence to embark on this rewarding DIY project, enhancing the accessibility and visual appeal of your outdoor space.
Throughout the journey of constructing wooden steps, attention to detail and precision are paramount. From measuring and planning the layout to cutting and attaching the stringers, each phase contributes to the structural integrity and aesthetic allure of the steps. The installation of treads and the optional addition of a handrail further elevate the functionality and safety of the staircase, catering to the diverse needs of individuals utilizing the steps.
As you embark on this endeavor, remember that safety should always be a top priority. Adhering to local building codes and regulations, utilizing high-quality materials, and ensuring secure attachments are essential practices that contribute to the longevity and reliability of the wooden steps. Additionally, incorporating a handrail, though optional, can significantly enhance the inclusivity and accessibility of the steps, accommodating individuals of varying mobility levels.
Beyond the practical aspects, the construction of wooden steps offers an opportunity for creative expression and personalization. Whether aligning the design with the existing architectural style or infusing unique elements, each step of the process allows for the manifestation of individual preferences and creativity.
Ultimately, the completion of wooden steps signifies more than just a functional addition to your outdoor space. It represents a tangible accomplishment, a testament to your craftsmanship and dedication to enhancing your surroundings. The steps you have built will serve as a welcoming pathway, connecting different levels of your outdoor environment and inviting individuals to traverse with ease and confidence.
As you admire the finished wooden steps, take pride in the craftsmanship and attention to detail that have gone into their creation. Whether leading to a front entrance, a garden, or a patio, the steps stand as a testament to your ability to transform raw materials into a functional and visually appealing structure. Embrace the sense of fulfillment that comes with this achievement, and revel in the knowledge that you have added both practical and aesthetic value to your outdoor space.


