
Home>Create & Decorate>DIY & Crafts>Wood Shed Base: DIY Guide For Building A Sturdy Foundation
DIY & Crafts
Wood Shed Base: DIY Guide For Building A Sturdy Foundation
Published: February 29, 2024

Senior Editor in Create & Decorate, Kathryn combines traditional craftsmanship with contemporary trends. Her background in textile design and commitment to sustainable crafts inspire both content and community.
Learn how to build a sturdy foundation for your wood shed with our comprehensive DIY guide. Perfect for DIY & Crafts enthusiasts.
(Many of the links in this article redirect to a specific reviewed product. Your purchase of these products through affiliate links helps to generate commission for Twigandthistle.com, at no extra cost. Learn more)
Introduction
Building a wood shed base is a crucial first step in creating a sturdy and durable foundation for your outdoor storage space. Whether you're a seasoned DIY enthusiast or a novice looking to embark on a new project, constructing a solid base is essential for ensuring the longevity and stability of your wood shed. By following this comprehensive guide, you'll gain valuable insights into the planning, preparation, and execution required to build a reliable foundation that can withstand the test of time.
A well-constructed wood shed base serves as the cornerstone of your outdoor storage structure, providing the necessary support to keep your shed level and secure. It not only safeguards your belongings from moisture and ground moisture but also contributes to the overall structural integrity of the shed. With careful attention to detail and the right materials, you can create a base that not only meets your functional needs but also enhances the aesthetic appeal of your outdoor space.
In this guide, we'll delve into the essential steps and considerations involved in building a wood shed base. From selecting the ideal location to gathering the necessary materials and tools, each stage of the process plays a pivotal role in ensuring the success of your project. By the end of this guide, you'll be equipped with the knowledge and confidence to embark on this rewarding DIY endeavor, knowing that you've laid a solid foundation for your wood shed.
Embarking on the journey of building a wood shed base is an opportunity to unleash your creativity and craftsmanship while adding value to your property. Whether you envision a quaint storage space for gardening tools or a functional workshop for your DIY projects, the foundation sets the stage for the functionality and longevity of your outdoor structure. So, roll up your sleeves, gather your tools, and let's dive into the exciting world of constructing a wood shed base that will stand the test of time.
Planning and Preparation
Before diving into the physical construction of a wood shed base, thorough planning and preparation are essential to ensure a smooth and successful building process. This phase sets the stage for the entire project, laying the groundwork for a sturdy and reliable foundation. Here's a detailed breakdown of the crucial steps involved in the planning and preparation stage:
-
Assessing Shed Size and Requirements: Begin by determining the size and weight-bearing capacity required for your wood shed. Consider the dimensions of the shed and the intended use of the space. This assessment will help you calculate the necessary dimensions and load-bearing capacity for the base.
-
Researching Local Building Codes: Check with your local building authorities to understand any regulations or permits required for constructing a wood shed base. Familiarize yourself with any zoning restrictions or building codes that may impact the location and design of your base.
-
Selecting Suitable Foundation Type: Evaluate the available foundation options, such as concrete slabs, gravel pads, or pressure-treated wood frames. Consider factors such as cost, soil type, and drainage requirements to determine the most suitable foundation type for your specific needs.
-
Gathering Essential Tools and Materials: Create a comprehensive list of tools and materials needed for the construction process. This may include lumber, gravel, concrete, leveling tools, and protective gear. Ensuring that you have all the necessary supplies on hand will streamline the building process.
-
Evaluating Site Accessibility: Assess the accessibility of the chosen location for constructing the wood shed base. Consider factors such as terrain, proximity to utilities, and ease of transporting materials to the site. Accessibility plays a crucial role in the efficiency of the construction process.
-
Budgeting and Cost Estimation: Develop a realistic budget for the project, factoring in the cost of materials, tools, and any professional assistance required. Consider potential unforeseen expenses and allocate a contingency fund to accommodate unexpected costs.
-
Creating a Project Timeline: Establish a timeline for the construction process, taking into account factors such as weather conditions and personal commitments. Setting a realistic timeline will help you manage the project efficiently and ensure that the construction proceeds smoothly.
By meticulously planning and preparing for the construction of a wood shed base, you set the stage for a successful and rewarding DIY endeavor. This phase allows you to anticipate potential challenges, mitigate risks, and approach the project with confidence and clarity. With careful consideration of these essential steps, you'll be well-equipped to move on to the next phase of building a sturdy foundation for your wood shed.
Choosing the Right Location
Selecting the optimal location for your wood shed base is a critical decision that significantly impacts the functionality and longevity of your outdoor structure. The right location not only ensures stability and durability but also enhances the overall aesthetic appeal of your property. Here's a detailed exploration of the key considerations involved in choosing the right location for your wood shed base:
Factors to Consider:
-
Ground Stability: Assess the stability of the ground where you intend to build the base. Look for a level area with firm, compact soil to provide a solid foundation for the shed. Avoid areas prone to erosion or water accumulation, as these can compromise the stability of the base over time.
-
Drainage: Consider the natural drainage patterns of the site. Choose a location that allows for proper water runoff to prevent moisture buildup around the shed. Adequate drainage helps protect the base from water damage and prolongs its lifespan.
-
Sunlight Exposure: Evaluate the sunlight exposure in different areas of your property. Select a location that receives sufficient sunlight throughout the day, as this promotes air circulation and helps prevent moisture-related issues within the shed.
-
Accessibility: Ensure that the chosen location is easily accessible for both construction and future use. A convenient location facilitates the transportation of materials and equipment during the building process and allows for easy access to the shed once it's completed.
-
Proximity to Utilities: Consider the proximity of utilities such as electricity, water, and drainage systems. If you plan to incorporate utilities into the shed, choosing a location close to existing connections can streamline the installation process.
-
Aesthetic Integration: Take into account the visual impact of the shed on your property. Choose a location that complements the overall landscape and architectural elements of your home. A well-integrated shed enhances the visual harmony of your outdoor space.
Site Assessment:
Before finalizing the location, conduct a thorough site assessment to ensure that it meets the aforementioned criteria. Use a level and measuring tools to check the evenness of the ground and verify that it aligns with the dimensions of your shed. Additionally, consider the surrounding vegetation and landscaping, as these elements can influence the overall suitability of the location.
By carefully evaluating these factors and conducting a comprehensive site assessment, you can confidently select the right location for your wood shed base. This thoughtful approach sets the stage for a successful construction process and ensures that your shed will stand on a solid and reliable foundation for years to come.
Gathering Materials and Tools
Gathering the necessary materials and tools is a crucial step in preparing for the construction of a wood shed base. By ensuring that you have all the essential components at your disposal, you can streamline the building process and minimize potential delays. Here's a comprehensive breakdown of the materials and tools required to embark on this rewarding DIY endeavor:
Materials:
-
Pressure-Treated Lumber: Select high-quality pressure-treated lumber that is resistant to decay and insect damage. The dimensions of the lumber will depend on the size of the shed base, so calculate the required quantity based on the planned dimensions.
-
Gravel or Crushed Stone: Use gravel or crushed stone to create a stable and well-draining foundation for the shed base. The amount of gravel needed will depend on the size of the base and the desired depth of the foundation.
-
Concrete Mix (Optional): If you opt for a concrete base or footings, ensure that you have an adequate quantity of concrete mix. This may include ready-mix concrete or the components for mixing concrete on-site.
-
Anchor Brackets or Ties: Depending on the design of your shed base, you may need anchor brackets or ties to secure the base to the ground and prevent shifting or movement.
-
Landscape Fabric: Consider using landscape fabric to prevent weed growth and promote drainage beneath the shed base. This helps maintain the stability and integrity of the foundation over time.
-
Fasteners and Hardware: Stock up on appropriate fasteners, such as screws, nails, and bolts, as well as any necessary hardware for connecting and securing the structural components of the base.
-
Protective Gear: Prioritize safety by ensuring that you have the necessary protective gear, including gloves, safety goggles, and dust masks, to safeguard yourself during the construction process.
Tools:
-
Measuring and Marking Tools: Equip yourself with measuring tape, a carpenter's square, and marking tools to accurately lay out the dimensions of the shed base and ensure precise cuts and placements.
-
Leveling Tools: A reliable level, such as a spirit level or laser level, is essential for ensuring that the shed base is perfectly level and plumb during construction.
-
Cutting Tools: Depending on the materials used, you may need a circular saw, handsaw, or miter saw to cut lumber and other components to the required dimensions.
-
Digging and Excavation Tools: Shovels, a wheelbarrow, and a tamper are indispensable for excavating the site, moving gravel, and compacting the foundation materials.
-
Mixing and Pouring Equipment (If Using Concrete): If you're incorporating concrete into the base, you'll need mixing tools such as a concrete mixer or mixing trough, as well as equipment for pouring and leveling the concrete.
-
Personal Protective Equipment (PPE): Prioritize safety by ensuring that you have the necessary protective gear, including gloves, safety goggles, and dust masks, to safeguard yourself during the construction process.
By gathering these materials and tools in advance, you'll be well-prepared to commence the construction of a sturdy and reliable wood shed base. This proactive approach sets the stage for a smooth and efficient building process, allowing you to focus on bringing your vision to life and creating a durable foundation for your outdoor storage space.
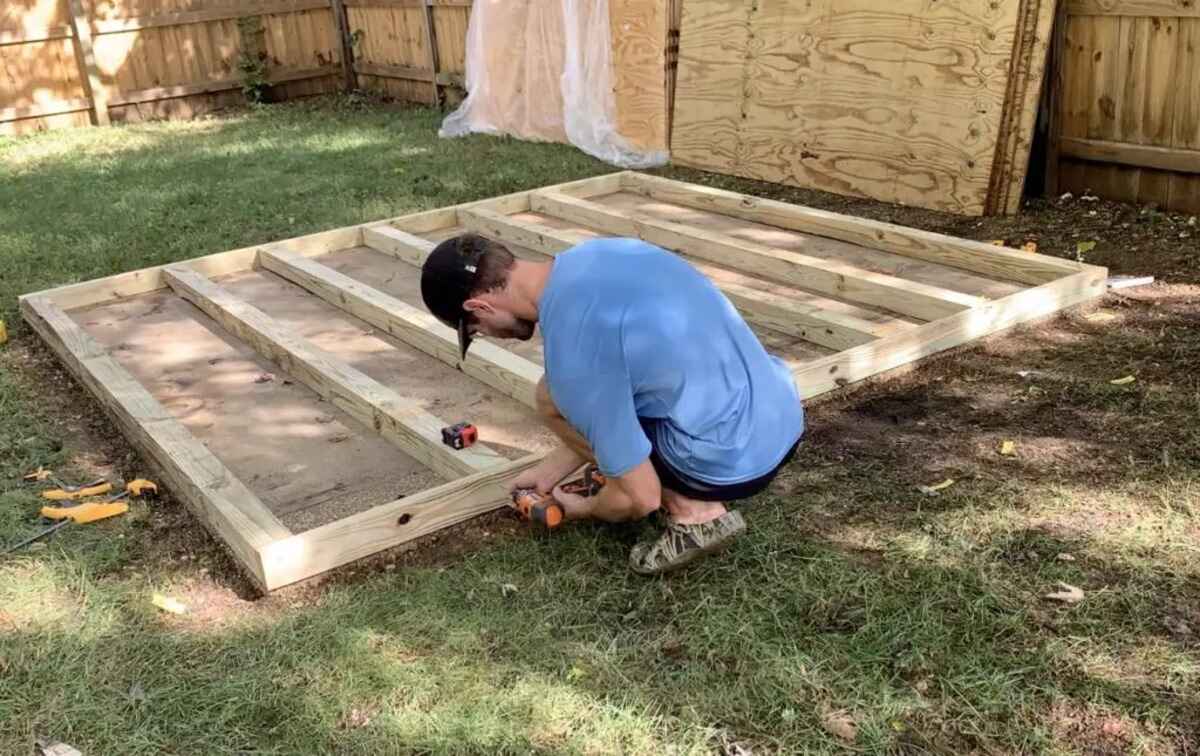
Building the Base
With the planning and preparation phase complete and all necessary materials and tools at the ready, it's time to embark on the exciting phase of building the wood shed base. This pivotal stage lays the groundwork for the structural integrity and stability of the entire shed, making it essential to approach the construction process with precision and care. Here's a detailed walkthrough of the steps involved in building a robust and reliable base for your wood shed:
1. Laying the Groundwork
Begin by clearing and leveling the selected site for the shed base. Remove any vegetation, rocks, or debris, and use a shovel and rake to ensure the ground is even and free from obstructions. This preparatory step sets the stage for a solid foundation and facilitates accurate measurements for the base dimensions.
2. Assembling the Frame
If opting for a wood frame base, assemble the pressure-treated lumber according to the predetermined dimensions of the shed base. Use a carpenter's square to ensure precise right angles and secure the frame with appropriate fasteners. This frame serves as the structural skeleton of the base, providing essential support for the shed.
3. Adding Support and Bracing
To enhance the stability and load-bearing capacity of the base, consider adding diagonal bracing within the frame. This additional reinforcement helps distribute the weight of the shed evenly and minimizes the risk of structural shifting or instability over time. Secure the bracing firmly to the frame using appropriate hardware.
4. Incorporating Drainage Elements
If utilizing gravel or crushed stone for the base, consider incorporating a layer of landscape fabric to prevent weed growth and promote efficient drainage. This step helps maintain the integrity of the foundation by preventing soil erosion and moisture buildup beneath the shed.
5. Implementing Concrete Footings (Optional)
For those opting for a concrete base, prepare the site for pouring the concrete footings. Use wooden forms to contain the concrete and ensure that the footings are level and properly aligned with the dimensions of the shed base. Allow the concrete to cure according to the manufacturer's recommendations before proceeding.
6. Ensuring Levelness and Alignment
Once the frame or footings are in place, utilize leveling tools such as a spirit level to ensure that the base is perfectly level and aligned. This meticulous step is crucial for guaranteeing the stability and structural integrity of the shed, preventing issues such as sagging or uneven weight distribution.
By meticulously following these steps and paying close attention to detail, you can construct a robust and reliable base for your wood shed. This foundational element sets the stage for the successful assembly of the shed structure, ensuring that it stands securely and withstands the test of time. With the base in place, you're one step closer to bringing your vision of a functional and durable wood shed to fruition.
Leveling the Base
Ensuring that the wood shed base is perfectly level is a critical step that directly impacts the stability and structural integrity of the entire shed. A level base not only provides a solid foundation for the shed but also prevents issues such as uneven weight distribution, structural stress, and potential damage to the shed over time. Here's a detailed exploration of the essential steps involved in leveling the base to guarantee a sturdy and reliable foundation for your wood shed.
1. Assessing the Initial Level
Before proceeding with the leveling process, use a reliable leveling tool, such as a spirit level or laser level, to assess the initial levelness of the base. This initial assessment provides valuable insight into any existing unevenness or discrepancies that need to be addressed. By identifying high and low points, you can develop a targeted approach to achieve a uniformly level base.
2. Adjusting the Base
Using shims, adjustable post bases, or additional layers of gravel or compacted soil, make the necessary adjustments to address any uneven areas identified during the initial assessment. Focus on gradually building up low points and supporting high points to achieve a consistent level surface across the entire base. Take a meticulous approach to ensure that the adjustments result in a uniformly level base that provides a stable platform for the shed.
3. Verifying Levelness
After making the initial adjustments, reevaluate the levelness of the base using the leveling tool. Verify that the entire surface of the base aligns with the desired level, with no noticeable deviations or sloping. This iterative process of adjustment and verification is essential for achieving precise levelness and laying the groundwork for the successful installation of the wood shed.
4. Fine-Tuning and Rechecking
Fine-tune the leveling adjustments as needed, paying close attention to detail to eliminate any remaining discrepancies. Repeatedly recheck the levelness of the base, ensuring that each adjustment brings the base closer to the desired level. This meticulous approach is crucial for achieving a uniformly level base that meets the structural requirements of the shed and ensures long-term stability.
5. Final Verification
Once the base is uniformly level, perform a final verification to confirm that all adjustments have resulted in a stable and even surface. Take the time to inspect the entire base, verifying that it meets the necessary levelness criteria for the successful installation of the wood shed. This final verification provides assurance that the base is ready to support the shed structure without compromising its stability.
By meticulously following these steps and prioritizing precision and attention to detail, you can achieve a perfectly level base that forms the cornerstone of a sturdy and reliable wood shed. The level base sets the stage for the seamless installation of the shed structure, ensuring that it stands securely and withstands the test of time. With the base leveled to perfection, you're one step closer to bringing your vision of a functional and durable wood shed to fruition.
Adding Support and Bracing
Adding support and bracing to the wood shed base is a crucial step that significantly enhances the stability and load-bearing capacity of the structure. By incorporating strategic reinforcement elements within the base, you can effectively distribute the weight of the shed and minimize the risk of structural shifting or instability over time. Here's a detailed exploration of the essential considerations and techniques involved in adding support and bracing to ensure the long-term durability and reliability of the wood shed base.
Assessing Structural Integrity
Before proceeding with the addition of support and bracing, it's essential to assess the structural integrity of the base frame or footings. Verify that the foundational elements are securely in place and free from any signs of instability or movement. This initial assessment provides valuable insight into the areas that may require additional reinforcement to ensure the overall stability of the base.
Selecting Bracing Materials
When selecting materials for bracing, prioritize durability and resistance to environmental elements. Pressure-treated lumber or metal braces are commonly used for reinforcing the base, offering robust support and longevity. Consider the dimensions and load-bearing requirements of the shed base to determine the appropriate size and quantity of bracing materials needed to effectively distribute the weight and stress across the structure.
Strategic Placement and Attachment
Strategically position the bracing elements within the base to maximize their impact on reinforcing the overall structure. Diagonal bracing, in particular, is effective in providing lateral support and preventing the base from shifting or twisting under the weight of the shed. Secure the bracing firmly to the frame or footings using appropriate fasteners, ensuring a tight and stable connection that withstands the forces exerted on the base.
Distributing Weight and Stress
The addition of support and bracing serves to distribute the weight and stress exerted on the base more evenly, reducing the risk of localized pressure points and potential structural weaknesses. By strategically reinforcing key areas of the base, you can enhance its overall load-bearing capacity and minimize the risk of long-term damage or deterioration, ensuring that the shed remains securely anchored to the foundation.
Ensuring Alignment and Symmetry
Maintain a keen focus on ensuring that the bracing elements contribute to the alignment and symmetry of the base structure. Properly positioned and securely attached bracing elements play a pivotal role in maintaining the overall stability and balance of the base, contributing to its ability to support the shed structure without compromising its integrity.
By meticulously incorporating support and bracing into the wood shed base, you can fortify the foundation and create a reliable platform for the shed structure. This strategic reinforcement not only enhances the structural integrity and stability of the base but also contributes to the long-term durability and functionality of the entire wood shed. With the support and bracing in place, you can proceed with confidence, knowing that the foundation is fortified to withstand the demands of the shed structure over time.
Finishing Touches
Once the wood shed base is constructed and all structural elements are in place, attention turns to the finishing touches that enhance the functionality, aesthetics, and longevity of the foundation. These final steps add a layer of refinement and protection, ensuring that the base is well-prepared to support the shed and withstand environmental factors. Here's a detailed exploration of the essential finishing touches that elevate the wood shed base to a state of readiness for the shed installation.
1. Surface Treatment
Consider applying a protective surface treatment to the wood components of the base to safeguard them against moisture, decay, and insect damage. This may involve the application of a wood preservative, sealant, or exterior-grade paint to create a barrier against the elements. By treating the surface of the base, you can prolong the lifespan of the wood and maintain its structural integrity over time.
2. Edge Sealing
Seal the edges of the base frame or footings to prevent moisture infiltration and protect against potential rot or deterioration. Utilize an appropriate sealant or waterproofing product to create a barrier along the exposed edges, ensuring that the entire base is shielded from water damage and environmental wear.
3. Weed Prevention
Incorporate additional measures to prevent weed growth beneath the shed base. This may involve the installation of a weed barrier fabric or the application of a weed-suppressing material to inhibit the emergence of unwanted vegetation. By addressing weed prevention, you can maintain the stability and cleanliness of the base while minimizing maintenance requirements.
4. Anchor Installation
If the shed base is designed to accommodate anchoring points for the shed structure, ensure that the anchor locations are prepared and reinforced. This may involve installing anchor brackets, ties, or embedded anchor points within the base to facilitate the secure attachment of the shed. By addressing anchor installation during the finishing touches, you set the stage for a seamless and stable connection between the shed and the base.
5. Final Inspection
Conduct a comprehensive final inspection of the completed base, verifying that all finishing touches have been applied with precision and attention to detail. Check for any remaining areas that may require additional treatment or reinforcement, ensuring that the base is fully prepared to support the shed without compromise.
By attending to these finishing touches, you elevate the wood shed base to a state of readiness for the installation of the shed structure. These meticulous steps not only enhance the durability and protection of the base but also contribute to the overall functionality and longevity of the entire outdoor storage space. With the finishing touches in place, the wood shed base stands as a testament to meticulous craftsmanship and thoughtful preparation, ready to fulfill its role as the solid foundation for the shed.
Conclusion
In conclusion, the construction of a wood shed base is a foundational endeavor that sets the stage for the successful installation and long-term functionality of the shed. By embarking on this DIY journey with meticulous planning, precise execution, and attention to detail, you've laid the groundwork for a sturdy and reliable foundation that will stand the test of time.
Throughout the planning and preparation phase, you meticulously assessed the shed size and requirements, researched local building codes, and selected the optimal foundation type. This thoughtful approach ensured that the construction process adhered to regulations and best practices while meeting the specific needs of your outdoor storage space.
The careful selection of the right location for the wood shed base further underscored your commitment to creating a stable and visually harmonious foundation. By considering factors such as ground stability, drainage, sunlight exposure, accessibility, proximity to utilities, and aesthetic integration, you ensured that the chosen location provides the ideal setting for the shed base to thrive.
Gathering the necessary materials and tools in advance demonstrated your proactive approach to the construction process, streamlining the building phase and minimizing potential delays. The comprehensive list of materials, including pressure-treated lumber, gravel, concrete mix, anchor brackets, and protective gear, equipped you to commence the construction with confidence and efficiency.
As you progressed to building the base, the meticulous steps of laying the groundwork, assembling the frame, adding support and bracing, and ensuring levelness and alignment underscored your dedication to creating a robust and reliable foundation. The strategic incorporation of support and bracing elements further fortified the base, ensuring that it can effectively withstand the demands of the shed structure.
The final touches, including surface treatment, edge sealing, weed prevention, and anchor installation, added a layer of refinement and protection to the base, ensuring that it is well-prepared to support the shed and withstand environmental factors. These meticulous finishing touches underscored your commitment to the long-term durability and functionality of the wood shed base.
With the completion of the wood shed base, you've not only created a solid foundation for your outdoor storage space but also embarked on a rewarding journey of craftsmanship and creativity. The knowledge and skills gained from this endeavor will serve as valuable assets as you move forward with the installation and utilization of the wood shed, knowing that its foundation is a testament to your dedication and meticulous attention to detail.